Site sections
Editor's Choice:
- Mark of Ephesus. Sayings from Holy Scripture, Acts of Councils and St. fathers, that the Holy Spirit comes only from the Father, but not from the Son. Interpretations in In
- Our Lady does not pray for those who swear
- • How does the Old Believer cross differ from the Orthodox cross?
- Print the Russian alphabet in capital and printed on one sheet
- Order of Military Merit
- Capture of Perekop by the Red Army
- The meaning of Boretsk marfa in a brief biographical encyclopedia
- Chairman of the Board of Belarusbank Viktor Anich discussed issues of further cooperation with the management of Belaruskali Board of the JSB Belarusbank
- What does it mean if you have a dream in a dream?
- Drought, tsunami, Atlantic - mod for water disasters Water xml file for gta 5
Advertising
| We make the stairs to the second floor at home ourselves. Wooden staircase to the second floor - step-by-step instructions for calculation and production |
|
Modern cottages and private houses require the presence of 2 or more floors, and the topmost of them can be either residential or non-residential premises. In any case, a ladder is required. Make your own reliable interfloor or attic staircase made of concrete or metal structures is quite heavy, which cannot be said about wood. Even a novice master can assemble it. From this article you will learn what types of wooden stairs there are, what are their differences, what material is used to make the spans. In addition, each of you will be able to make a wooden staircase to the second floor yourself - in the article we will provide approximate calculations and photos. Types and types of structuresThere are several species wooden staircase designs:
Types of structures wooden stairs are the following:
What kind of wood can a staircase be made from?Material selection for depends on the preferences of the owner of the house or apartment, the characteristics of the tree and the cost of it. Various breeds have their advantages and disadvantages:
Pros and cons of wooden stairs
Positive aspects:
Disadvantages of wood:
Materials for making stairs
Staircase calculationsIf you decide to make a wooden staircase with your own hands, think over the nuances of the design: determine its dimensions, calculate the number of steps and supports. It is important to initially imagine what function the staircase will perform: connecting the floors or leading to the top of the attic. (You can read information about insulating the attic yourself). Draw diagram It’s also easy to do it yourself. Most often they make straight staircase. It connects the first floor with the second, and reaches a height of several meters. For convenience, the angle of inclination of the structure should be equal to the value in 30-40 degrees.
Pay attention! Wooden houses experience significant shrinkage in the first two years after construction, so the angle of inclination may change. So, for your convenience, we will provide basic calculations elements of the staircase (using the example of a wooden one) standard designs:
Necessary calculations
The value is rounded up. Total we get 17 steps.
The value is rounded to 30 cm. - this is the width of the step.
230400 + 81225 = 311625
Advice! If it is difficult to make geometric calculations, you can draw a staircase on paper on an appropriate scale and measure the angle and length of the base. Assembling the stairsBefore you begin assembling the stairs to the second floor, you need to decide place for installing stringers(supporting structure of a flight of stairs). Installation stairs (in our case, a marching structure) includes several stages:
Cost of a finished staircase
For example, the most common design of a flight of stairs with a turn 90 degrees pine will cost 60-80000 rub.., from birch – 100,000 rub..,made of oak – 150,000 rub.. You can order a wooden staircase in a specialized store or on company websites. Manufacturing On average it takes up stairs 5-10 working days. It’s up to you to make a wooden staircase yourself or order it from specialists. Self-installation It's not a quick process, but it has its advantages. First of all, this saving cash and visual quality assessment building materials. This is how to make a wooden staircase with your own hands video. The construction of a two- or three-story cottage requires the presence of stairs. Without it, access to the basement, underground garage, or attic space will be problematic. Private households are characterized by the use of two main types of staircases: flight and spiral. Marching - with one or several spans separated by intermediate platforms. Screw ones are considered the most effective, but also the most expensive. It is recommended to involve specialists with relevant experience in their construction and calculation of the number and width of steps. In this article we will look in more detail at all popular types of stairs, their advantages and disadvantages. But you need to start with choosing wood:
How to make a wooden spiral staircase to the second floor with your own handsIf, in accordance with the house plan, a minimum space is allocated for the placement of interfloor passages, a screw modification will be indispensable. It can be mounted either in the center of a room, hall or corridor, or against a wall. Types of spiral staircasesThere are four main types depending on the method of fastening the steps:
Advantages of a spiral staircaseThe first thing to mention is its elegant appearance. The number of design and finishing options is endless: from Gothic and wrought iron railings to high-tech and postmodernism. There is no feeling of “heaviness”; the light “transparent” design does not distract attention, while at the same time visually “increasing” the height of the ceilings. Don't forget about saving space. Not everyone has the opportunity to allocate half of the floor for staircase placement. A modern technologies and materials make it possible not to spend half a fortune on organizing transitions from floor to floor.
Important points during constructionA spiral staircase is built subject to the following criteria:
You can build a spiral staircase yourself. But calculating the number of treads, their height and rotation requires special knowledge. To avoid mistakes and subsequent rework, it is better to contact specialists, at least at the design stage. If you decide to go through all the stages yourself, listen to the following tips:
Straight wooden staircase to the second floorA one-flight flight is the simplest option for organizing movement around the house. It has both advantages and disadvantages. The advantages include:
There is also a drawback to be noted. IN ideal the slope ranges from 26-450, and the stairs take up a lot of space. You will have to decide where to place it and what to do with the space under the stairs. Design parametersThe design stage should not be neglected even if we're talking about about 2-3 steps. The project helps to decide on appearance, and with total length and other technical characteristics. Regardless of the owner’s wishes regarding the design, the SNiP requirements remain the same for all modifications of staircases:
Why do you need a layout?Construction work begins with a plywood model. Don't give it up if you lack experience. Better to spend a few additional days, but avoid fatal mistakes. Exact copies of stringers, risers and treads are cut out of plywood. They are assembled and “fitted on” at the installation site. The dimensions, ease of use, and placement of balusters under the railings are specified. It is quite possible that you will have to add/reduce the number of steps, or adjust the height of the lowest one. The layout is ready, let's move on to working on the originalIf you are completely satisfied with the plywood copy, move on to working with the boards. You should not immediately install stringers or bowstrings in a permanent location. Assembly is carried out on the floor. First, the risers are installed, then the treads. The heads of fasteners (nails or wood screws) should not protrude above the surface. For fastening to the floor and stairwell, special mounting loops or parts are used that are installed in the ceilings during the construction of the main building. Upon completion of work on the steps, proceed to installing railings: made of wood, metal, profile pipe. A specific option is selected taking into account the general style, wall material, and floor. Experts recommend placing one baluster on each tread. The presence of crossbars is individual. It is advisable to install them if there are small children in the house, or the railings are made of metal. On wooden structure crossbars are unnecessary.
Stairs with a 90 degree turnIf the space for placing a flight of stairs is limited or the structure has more than 10-12 steps, experts recommend making an intermediate platform with a rotation of 90 or 180 degrees, mounted into the walls of the house on two or three sides. Calculations of the number and width of treads are carried out in the same way as for a standard single-flight span with a few exceptions. Does the turntable consist of winder steps? They are designed like a spiral staircase. In the very bottleneck depth - at least 10 cm, at the widest - 40 cm. To facilitate calculations, graph paper is used. On it, in compliance with scale, the upper and lower spans, the transition platform are drawn, and the winder steps are laid out. Along the midline, their depth is at least 20 cm. Otherwise, going up/down will be problematic. Do you critically evaluate your own drawing abilities? Refer to special calculation programs distributed free of charge. If the turntable does not provide for the use of winder steps, a frame corresponding to the width of the flights is prepared. To fasten the platform frame the following are used:
For reliability, it is recommended to make a rough version from plywood or scrap planks. A turning staircase is a complex design. It is almost impossible to correct errors. On a plywood model it is easier to adjust the number of steps or the angle of rotation if there are inaccuracies in the calculations. Installation of stairs with a 90 degree turn
DIY wooden staircase to the second floor with a 180 turnIn a private house, there are often situations when there is no space for placing a straight staircase, and it is undesirable to build a spiral staircase. For example, elderly people live in the building. In this case, you should pay attention to modifications with a rotation of 1800, made using one of two technologies:
Project developmentprojections of the stairs are drawn vertically and horizontally on a sheet of graph paper, observing the scale;
Installation of stairs with a 180 degree rotationPreparing stringers with grooves for treads: two shorter ones and four longer ones. The short ones reach the support pillar, the long ones reach the wall behind the transition area. The lower span stringers are secured with anchor bolts to the first floor floor support beam. In the upper part - either to a pillar or to a wall. The stringers of the upper span are attached to the ceiling, pillar and wall;
Outdoor wooden staircase to the second floorThe construction of a wooden staircase outdoors is practically no different in technology from the process indoors. The type of structure is selected, the number of steps and the parameters of the transition platform are calculated. There are also nuances:
How to paint a wooden staircaseThe staircase is ready, railings are installed, steps are lined, mounted decorative panels and strips masking stringers and fasteners. It's time to move on to painting or varnishing. Industry offers different options paint solutions. Each of them deserves separate consideration. Alkyd paints
Acrylic paints
Oil paints
Enamel paints
Lucky
stain
Experts say that the best option Alkyd paints are used for painting indoor stairs. For greater effect, the top is coated with varnish. Painting optionsThe stairs are painted in one of two ways:
If it is possible not to use the second floor yet, or an additional descent is provided, painting is carried out without skipping. This option is preferable, since there will be no different shades. Regardless of the chosen dyeing method, you must add at least 5 hours to the time specified by the manufacturer. The direction of the strokes is along the grain of the wood. Subtleties of painting pine stairsPine boards require special handling. Resin is actively released on their surface. If it is not eliminated before painting, the paint will lie unevenly, will not penetrate deep into the structure, and will darken in places over time. Removing resin is a mandatory stage of work. For degumming, a 25% acetone solution is used. It is applied to all surfaces, followed by wiping with a damp cloth. Apply paint or varnish after complete drying. If there is too much resin in certain areas, it is recommended to cut them out and putty the surface to level it. General technology for painting wooden stairs
When choosing a color, you need to focus on your own preferences, the style of the room, and the design solution of the house. If steps or balusters of several colors are planned, it is better to paint them before the assembly process. Building a staircase to the second floor with your own hands is a difficult task, but not hopeless. With a little effort, everything is done in a few days.
A staircase is a rather complex and very important design, but every home craftsman with at least minimal experience working with wood can make it. The main thing is to first familiarize yourself with the basic rules, requirements and nuances of its manufacture, which will be discussed further. Design, or how to make a staircase comfortable and safeIt is necessary to decide on the design of the future staircase. It can be of the following types:
Next, we’ll look at how wooden flight stairs are made, and we’ll start with calculations and design. To make the structure comfortable and safe, when performing calculations, it is necessary to take into account the following rules and requirements for it:
We begin the design calculation by measuring the height between the floor of the first and the floor of the second floor. Then you must measure the width and length of the site. For example, the ceiling height is 2500 mm. Let's take the average - 170 mm. To count the number of steps in a flight, you need to divide the total height by the height of the steps. The result will be 2500/170=14.7. So the number of steps should be an integer, let’s adjust their height – 2500/15=166 mm. Please note that in fact the march will have not 15, but 14 steps, since the function of the last step will be performed by the ceiling of the second floor. Now you need to decide on the width of the treads. To do this, we will use the following formula: step height, tread width = 430–450 mm. As a result, we get 450-166 = 284 mm, round it up and get 280 mm.
If you do not have space for a staircase more than four meters long, it can be divided into two flights. They should be separated by a landing. The depth of the latter is always equal to the width of the span. You can save even more space by using turning steps instead of a landing. But in this case, the ladder becomes less convenient to use. As for the flights, they can be located L-shaped if the staircase is angular, or at an angle of 380 degrees, i.e. parallel to each other. Finally, you need to calculate the length of the beams. Knowing the height of the stairs and the length, this can be done using the Pythagorean theorem a 2 b 2 =c 2. Our legs are the length of the staircase (the projection of the flight onto the floor) and the height of the staircase. Accordingly, we need to calculate the length of the hypotenuse. Now you need to decide on its main design points. The fact is that there are several types of flights of stairs:
Then you need to decide on the method of installing the beams. If the staircase has one flight, then it will not need supports: the flight rests on the floor and ceiling of the second floor. Double-flight stairs require the installation of support pillars on which the upper part of the lower flight, the landing and the lower part of the upper flight rest. Each bowstring or stringer requires its own support. The exception is beams located near the wall - they can be fixed to the wall without supports. When you have decided on all the main points of the staircase, draw the design on paper, maybe even schematically, and indicate the dimensions of all the elements of the staircase in millimeters. We manufacture staircase parts - calculation details
Start by cutting the boards to the length of the stringers. Then you need to mark the stringer - this is the most difficult and responsible operation. We begin marking by marking the points from which the cuts for the steps will be made. You can determine the distance between the cutouts on the stringer using the same Pythagorean theorem. Since the legs are the width of the tread and the height of the step, the distance between the edges of the steps in our case is 280 2 166 2 = 105956. We take the square root and get 325 mm. Thus, dots should be applied to the edge of the future stringer in increments of 325 mm. Then you need to use a square and draw tread and riser lines through the resulting points, which form a right angle. The result should be rectangles, the hypotenuse of which is the edge of the stringer, and their vertices, respectively, are points located on the edge with a pitch of 325 mm.
Now you need to make cutouts for the steps according to the resulting markings. To do this, you can use a jigsaw or a regular hacksaw. The edges of the stringer must be cut at an angle to ensure maximum support area on the floor and beam of the landing or ceiling. Use the resulting stringer as a template for marking the counter beam. Then make the cutouts in the same way. Using this principle, make stringers for all flights of stairs.
Then prepare racks for supports from 70x70 or even 100x100 mm timber. Their height should correspond to the height of the lower flight. To calculate it, multiply the number of steps of the first flight by their height. If the staircase is L-shaped, then you will need four racks for the landing. In this case, the landing itself will turn out to be square, as mentioned above, its width is equal to the width of the flight, most often it is 1000x1000 mm. If the marches are parallel to each other, 8 racks will be needed. In this case, the depth of the platform should be equal to the width of the march, i.e. 1000 mm, and length 1000 1000 distance between marches. You also need to make beams for tying the racks. You can use the same timber from which the racks themselves are made. The length of the beams is equal to the distance between the racks of the landing. To complete the work, you need to make steps and risers. To make them, use 30x300 mm boards. The length of the treads should correspond to the width of the march or be a couple of centimeters longer so that the tread hangs slightly from the stringers. The risers are made of the same length, but their width should be less than the height of the step by the thickness of the riser, i.e. in our case – 166-30 = 136 mm.
Assembling a staircase from ready-made partsNow we begin the installation of the stairs. First of all, you need to apply markings to the floor and walls adjacent to the stairs. This operation requires accuracy and attention, since the quality of assembly of the entire staircase depends on this. Then, according to the markings, you need to install the supports of the staircase opening. If the floor is concrete, you can use special glasses for these purposes that correspond to the cross-section of the racks.
The glasses are attached to the floor using dowels. Then the racks are inserted into the glasses and fixed with self-tapping screws. When installing the racks, be sure to ensure that they do not deviate from the vertical. Tie the installed racks with horizontal beams. If you have a router, you can make a tongue and groove connection; to do this, you need to mill grooves in the racks, and make tenons in the beams for these grooves. If such a tool is not at hand, the connection can be made using steel angles and self-tapping screws. To give the structure rigidity, coat the joints of all parts with wood glue. Now we install the stringers. If the march is adjacent to the wall, fasten the beam to it according to the markings. In a wooden house, you can use screws to attach the beam to the walls, but if the wall is brick or concrete, secure the stringer with anchors. Use fasteners in pairs, installing them 10 cm apart vertically. Make the pitch of each pair of fasteners 20–25 centimeters. The counter stringer usually rests only on the landing post. It is advisable to secure it to the rack using the tongue and groove method and self-tapping screws. If this is not possible, use self-tapping screws and also fasten another horizontal beam under the stringer, on which it will also rest. According to this principle, stringers are installed for all flights of stairs. When installing joists, be sure to use a level to ensure that the tread cutouts are aligned opposite each other in the same horizontal plane.
Then we install the treads and risers. The treads are laid on the cutouts in the stringers and fixed with self-tapping screws. To subsequently hide the heads of the screws, drill out the holes to a depth of several millimeters. In order not to fasten the risers with self-tapping screws, you can mill a groove in the steps above and below them. The width of the groove should correspond to the thickness of the riser. As a result, the risers will be fixed only by treads. If it is not possible to make grooves, secure the risers with self-tapping screws. When installing treads and risers, also use wood glue. So that the space under the stairs does not go to waste, you can make a cabinet under it. To do this, you just need to install walls between the stringers and the floor, and also install doors. Installing stair railingNow you need to install the fence (railing). It can be anything - forged, chrome-plated, stainless steel or even glass. But as an example, let’s look at how a wooden fence is installed. The design of a wooden railing consists of figured posts (balusters) and a handrail. Subject to availability lathe You can make curly columns yourself. If such equipment is not available, balusters can be purchased ready-made - the cost of a solid pine post starts at an average of 150 rubles per piece.
Keep in mind that you will need two types of balusters - intermediate and extreme. The latter differ in size - they are larger. In addition, you will need dowels for fastening, which can be purchased at a furniture store. Step-by-step instructions for installing the fence are as follows:
Finishing is the final touchNow that the staircase is assembled, you need to finish it. First of all, the surface should be thoroughly sanded. Doing this work with your own hands is quite difficult and time-consuming, so use an angle grinder. Then you need to fill all the cracks, cracks and screw heads. If you plan to later varnish the staircase, choose a putty that matches the color of the wood. After the putty has dried, be sure to sand it with fine sandpaper. Now you can cover the stairs with paint and varnish material. It is best to use water-based varnish - it has good abrasion resistance, dries quickly and is odorless. The only thing is that after applying the first layer of varnish, the stairs need to be sanded again, since under the influence of moisture, the wood fibers rise, as a result of which the surface becomes rough. After this, you need to apply another 1-2 layers of varnish.
At this point ours is ready. As you can see, in general there is really nothing super complicated in its manufacture. A staircase is an important functional element not only for multi-story buildings, but also for houses with attics and basements. In order for the structure to be comfortable and reliable, its dimensions must correspond to SNiPs, and the material and shape must correspond to the type of structure. How to assemble the structure with your own hands and what nuances should be taken into account - read below. Metal stairs are considered the most durable and durable. But, firstly, in order to collect them you need to have experience working with welding machine. And, secondly, the metal frame does not always fit into the interior of the room (“bare” metal stairs would be appropriate in loft, hi-tech, minimalist interiors).
The easiest way to make a structure on a metal frame with your own hands is to purchase a modular device with fasteners included, which is assembled like a construction set. The convenience and durability of this design is evidenced by numerous positive reviews on the Internet. In private wooden houses and cottages you can often find wooden stairs, which are distinguished by their spectacular appearance, reliability and lightness (which is important for wooden house). In addition, wood should also be chosen for stairs in new buildings made of timber (due to shrinkage of the material).
Simple staircase shapeThe shape of both metal and wooden stairs can be any: from straight structures to spiral ones. Standard straight single-flight stairs are considered the easiest to assemble with your own hands. The disadvantages of the structures include the fact that due to the angle of inclination (if the staircase is designed taking into account all SNiP) they take up quite a lot of space on the lower floors.
Therefore, in a room of limited size, two-flight structures should be placed. The advantage of such stairs is that they can be used to save space in a small space: for example, the intermediate platform can be used as a “box” for storing household equipment and tools, and under the flight itself you can place a closet or a sanitary unit. A simple staircase in the house: basic requirementsRegardless of the material of manufacture and shape (straight or rotary), the simplest stairs are divided into the following types: with one or two stringers; open (without risers) and closed. The most comfortable and reliable designs are those with two bowstrings and risers.
In addition, for maximum safety and convenience, the design must:
In addition, a comfortable staircase should be well lit, have upper and lower frieze steps, and a passage height of at least two meters.
Dimensions of a simple staircaseThe dimensions of the staircase determine the level of its convenience and safety. According to fire safety rules, structures with a march width of 1.25-1.50 m are considered the safest (for garden house this value can be reduced to 800 cm provided that a simple structure is located along the wall). The height of the stairs is calculated based on the finished floors of the upper and lower floors. The number of steps in a flight is calculated by dividing the height of the stairs by the optimal riser height.
There are two ways to calculate the length of the stairs:
Using the second method, you should remember that the last treads and steps in front of the winder are not taken into account. DIY simple metal staircase to the second floorAn ordinary staircase on a metal frame is a strong and durable design that allows you to quickly and safely climb to the second floor.
Assembling a staircase on a metal frame with your own hands involves the following procedure:
Balusters can be installed on the base by welding or to the end of the step using bolts. Do-it-yourself wooden ordinary staircaseIt is easier to assemble a staircase made of wood: lumber can be cut to order at a hardware store, and to install the elements, most often, a regular screwdriver is used.
A wooden staircase is assembled from the installation of a winder platform (if the staircase has two flights): a frame is made from timber, reinforced in the middle with stiffening ribs, on which a wooden rectangular flooring is mounted. Simply put, the assembled platform should resemble a stool in appearance. Next comes the assembly of the flight of stairs (first the bottom one - up to the landing): steps and risers are installed on the stringers using nails and self-tapping screws. There is another installation method - the steps cut into the bowstrings. Anchors or studs are used to install balusters and fence posts. Afterwards, handrails are installed.
Upon completion of assembly, the structure is sanded and puttied, painted in the desired color and covered with several layers of varnish. Construction of a simple staircase (video)A staircase is an important architectural component of any building, which allows you to move freely between the tiers of the building. The simplest design can be made on either a wooden or metal frame. Which option to choose depends on the wishes and skills of the master. The main thing is that the stairs are assembled taking into account building codes and rules. Then the device will be as convenient and safe as possible! Multi-storey private construction requires the presence of a building in the house. This architectural detail of the room today is represented by a fairly wide range, both in terms of design and in terms of the materials from which it is made. In today's review, we will look at how to make diagrams of stairs to the second floor in a private house with your own hands and what parameters require mandatory calculation. Read in the article What kind of stairs are there?Let's start with design features stairs, because this criterion is the main one in choosing this architectural element. Marching stairsThis is the most common staircase model used in private homes due to its simple design. They can be straight, that is, connecting the first and second floors with one flight. They can be rotary with a change of direction by 90° or 180°. It should be noted that direct stairs from the second floor are the simplest option. Their assembly is quite simple, the main thing is to correctly calculate the number of steps taking into account the angle of inclination of the structure. Because safe movement along it depends on these two parameters.
The standards indicate that an ideal flight of stairs should consist of 10 steps, no more. If the quantity exceeds this figure, then you need to think about using a rotary model.
In addition to the direction of location of stair structures, flight stairs differ in the load-bearing element of the structure. There are two positions here:
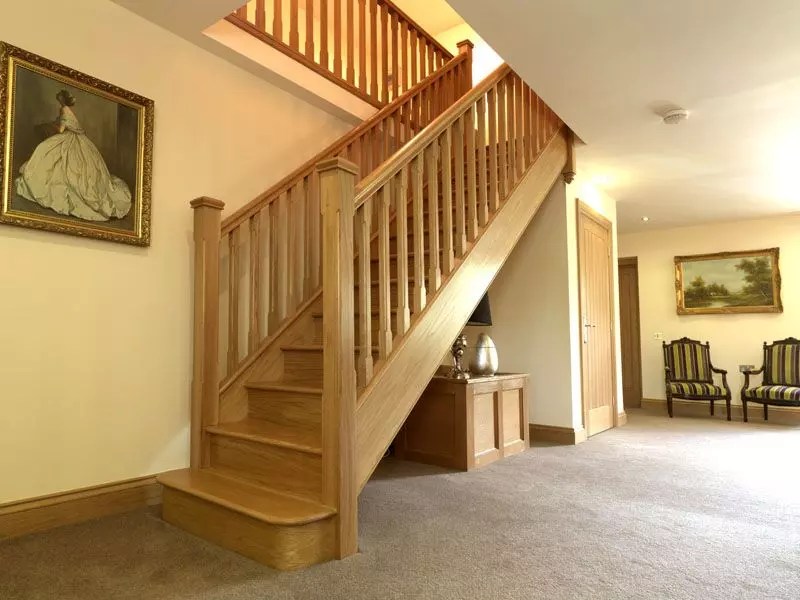
Stringers are a beam (one or two) on which steps are installed on top. If you look at such a staircase from the side, the entire structure will be visible. Bowstrings are also beams (there must be two of them), only the steps are attached to them from the side to the back. They find themselves inside the structure, and if you look at the latter from the side, the steps will not be visible. They are closed with bowstrings. The photo above shows the staircase to the second floor on stringers, in the bottom photo on bowstrings.
Spiral staircases to the second floorThe unusual nature of spiral staircases has made them popular. Today, many owners are trying to give the interior of their rooms a certain charm, so screw models are increasingly found in country houses. But, firstly, such structures are not appropriate everywhere, secondly, in terms of assembly technology they are the most complex, thirdly, it is inconvenient to move around them, especially for older people, fourthly, it is simply impossible to move around them. But in some situations you cannot do without them. For example, if the staircase is installed in cramped conditions, where it is not possible to build an inclined model. Because for her, an area of 1.5x1.5 m is a real option for location and placement. Stairs on railsFirst of all, let’s define what Bolts is. This is a special fastener that is inserted into the wall, and a step is installed on it. This can be a regular pin, it can be a metal corner that is attached to the wall or with metal dowels. That is, the main purpose of this element is the load-bearing basis for the step.  Purely structurally, staircases on rails do not have load-bearing beams, because the wall of the house acts as a support for the steps. As for the opposite side of the steps from the wall, they are usually installed on top of each other using special supplies. The latter can be made of metal or. But this design is not always used. The photo below shows a staircase on rails, the design of which has no additional elements. This structure looks light and elegant.  Combined designsThis category includes designs that use two different types: marching and screw. It must be said honestly that such models are rarely used in private homes. They are difficult to assemble; precise calculations are required here, especially with regard to the dimensions of the interface between the flight and the screw part, where the winder steps will be used. As practice shows, combined stairs to the second floor are purchased in finished form or made to order. It is difficult to make them with your own hands due to the complexity of the design itself. It’s easy to assemble the finished version according to the instructions. But we must take into account the possibility of installing the structure in the space allocated for it. That is why experts recommend not installing such stairs yourself. They will require adjustment, which is associated with changes in the size of the structure or room.  Materials for making stairsWhen the conversation turns to building an interfloor staircase for a private house with your own hands, you must assume that the construction should not be difficult. Therefore, you should not choose non-traditional materials for staircase structures, which are used today in finished products. The best option– tree or . Wooden stairsHow to make a metal staircase to the second floor with your own handsFirst of all, you need to select the supporting elements. Typically, channel No. 16-20 or profile pipe 100×100 or 150×150 mm. They, as in the case of wooden stringers, are selected according to their length, taking into account the angle of inclination and height of the ceilings. Two profiles are laid between the floor of the first and second floors and secured to them by any means and means. Most often they use or metal dowels. Although it can also be used if the floors contain embedded parts in the form of corners or plates. The difficulty begins at this stage, because it is necessary to form supports for the steps. Essentially, you need to create two combs from two profiles. There is no need to cut anything here, because this will weaken the load-bearing elements. We will build up the beams. To do this, you will have to make several supports in the form of corner structures from a 35×35 or 40-40 mm corner. Their number is twice the number of steps. Because under each you will have to lay two supports. The dimensions of the corners determine the height of the riser and the depth of the step. After which these elements are welded to the beams at the location of the steps. The photo below shows the distribution diagram of the corner supports. 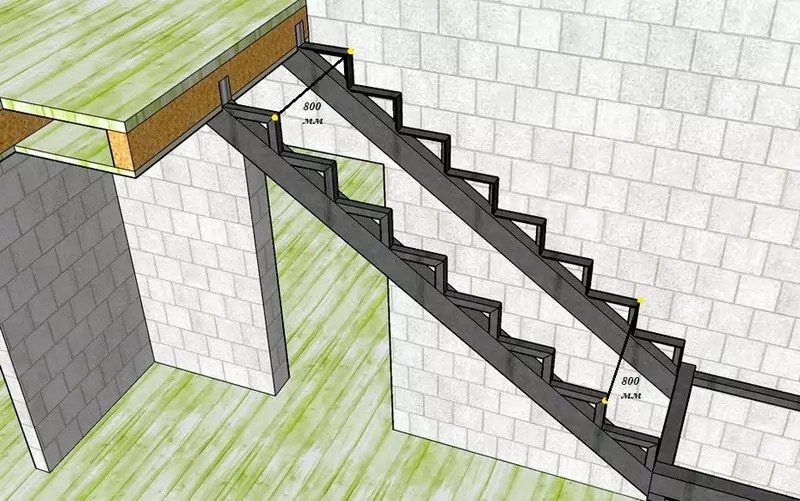
Now, regarding the fastening of the steps. The simplest option is with bolts. To do this on upper plane corner supports, two holes are made with a drill and a drill bit. The step (usually wooden) is installed in place and marks are made from below through the holes on it with a marker. Through the latter, through holes are made. On the front side (top), the hole must be widened to fit the size of the bolt heads. This is done to ensure that the heads are flush with the surface of the steps. Now you need to install the steps on the supports, insert four bolts into them with the head on top, and tighten them from below with a nut with a wide washer inserted.  The risers, if any are used in the stairs, can be attached to the vertical parts of the supports in exactly the same way, or to the steps with self-tapping screws from the bottom to the end. Compact staircase to the second floorWhat does a compact staircase mean? Most likely, this term means the construction small sizes, which can fit in a small area. In any case, it should not take up much space and not interfere. Such structures can be erected from both screw and marching types. And in this regard, screw ones are preferable, although if you make the staircase steep, they will take up little space. Usually these are built from or on. So, let's look at how you can install a compact staircase in a house to the second floor. How to make a compact staircase with your own handsLet's consider the screw version. The design is based on a support pillar on which the degrees will be attached. For a pole, it is better to choose a pipe with a diameter of 80-100 mm. That is, we will assemble a metal structure using .
So, first of all, 12 steps are made according to the obtained dimensions. They can be made of angle or sheet iron with a thickness of at least 6 mm. Then the support pole is installed and secured. After that, steps are welded to it evenly along the length. The main requirement for them is horizontal location. 
The following drawings of spiral staircases.
And the latest drawings of straight flight stairs.
Prices for finished stairs to the second floor and installation services
As for staircase installation services, they vary by region. For example, the manufacturer of the Spiral Color 160 model produces installation for 25,000 rubles. At the same time, separately 1500 rubles. will take measurements. If tinting is ordered, then another 11,000 rubles are added. It is difficult to understand the huge variety of staircases offered for private houses. And if you have difficulty choosing, our editors are ready to help. Leave your questions in the comments and we will definitely answer them. |
 Wooden stairs have their advantages and disadvantages. Let's take a closer look at them.
 For installation of stairs to the second floor You will need:
 Those who decided to buy ready wooden staircase or make it order, should be aware that the cost will depend on the complexity of the design and the type of wood.


Popular:

New
- Our Lady does not pray for those who swear
- • How does the Old Believer cross differ from the Orthodox cross?
- Print the Russian alphabet in capital and printed on one sheet
- Order of Military Merit
- Capture of Perekop by the Red Army
- The meaning of Boretsk marfa in a brief biographical encyclopedia
- Chairman of the Board of Belarusbank Viktor Anich discussed issues of further cooperation with the management of Belaruskali Board of the JSB Belarusbank
- What does it mean if you have a dream in a dream?
- Drought, tsunami, Atlantic - mod for water disasters Water xml file for gta 5
- Grand theft auto iv: friends and girlfriends - game tactics and tips from masters Where is Michelle in GTA San Andreas


