Sections of the site
Editor's Choice:
- Semiconductor diodes and transistors, their areas of application
- How to choose the right flux
- What are quasars and what are their functions in the Universe?
- English words that cannot be translated
- Abbreviations in English: common and informal
- Conditional sentences in English
- Zinaida Reich and Sergei Yesenin Women sung throughout the centuries
- Pavilion in the Tsar's village of Kvarengi
- Grand Duke's Palace on the English Embankment Alexandrovka Estate
- Russian Seven Publishing house Russian Seven
Advertising
| Working with tables in Word is reduced. Introduction to the specialty |
|
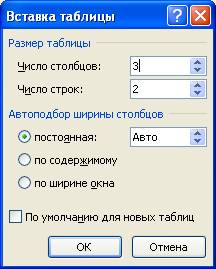
Working with tables The table cells contain numbers. In a table, you can add, merge or delete rows and columns, sort text, etc. Let's look at the basic operations in more detail. Creating a table. There are two ways to create a table. Usually useInsert →Table →Add Table, and a window will appear on the screen where you need to specify Number of Columns and Number of Rows , which will be in the table, after which you can enter text or numerical information into the cells.
In this example, we specified 3 columns and 2 rows, as in the table above. After creating the table, you can enter text into it. To do this, place the cursor in the desired cell and left-click, then enter text from the keyboard. The table borders can be moved by moving the mouse cursor over the border of the line and it will turn into an icon with vertical or horizontal lines with arrows (). After this, click on the left mouse button and, without releasing it, move the border to a new location by moving the mouse, and the width of the adjacent columns on the left and right will change. If you drag the border while holding down the key Shift, the width of the columns to the left of the border and the entire table will change. You can also use the icons on the ruler to the left and top of the table (). To do this, by placing the cursor on the () icon, you can move the table boundaries. You can enter text in a cell. To do this, click on the cell with the left mouse button and when a flashing vertical line appears in it, you can enter text using the keyboard. The text in each cell is formatted in the same way as regular text. If you need to format a cell, then you need to select it and apply formatting operations; if there are several, then select several cells. Since the key Tab is used to move to the next cell, then to set the tab character you need to press Ctrl+Tab. When you press a key Tab a new row will be added in the last cell of the table. You can create a table in another way. To do this, the text that should be in the table is selected and the mode is used Insert →Table →Convert →Convert to Table.A window will appear on the screen as shown below. In chapter Delimiter click on the circle to the right of the name another and a green dot will appear in the circle. This says that of the four switches (paragraph mark, semicolon, tab, other) another will be involved. The remaining switches will not be activated, since if the switches have a circle to the right of them, then you need to select one of them. These are so-called mutually exclusive switches.
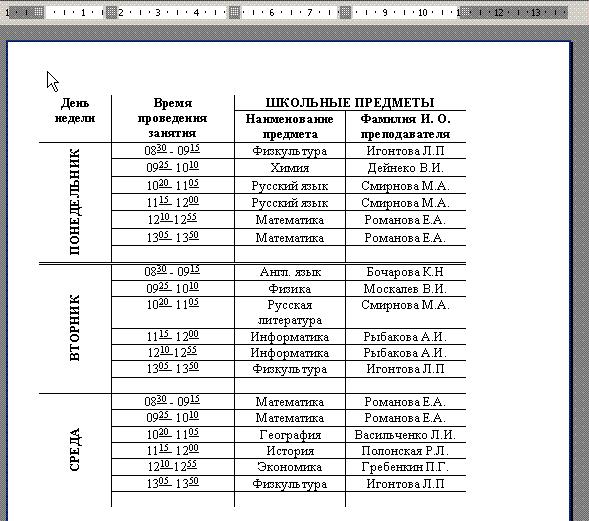
Then click on the field that is located to the right of the other switch and enter the dot symbol there from the keyboard. Depending on the type of separator indicated at the bottom of the window, the number of rows and columns is set. All lines of one paragraph will be in one row. The text of the second paragraph will be on the second line and so on. In field Number of columns the maximum number of points in a paragraph will be set, and in Number of lines The number of paragraphs will be set. If you specify a different character as the delimiter, the numeric values will change because the number of delimiters in the text will be different. Below is an example table.
Selecting columns or rows . Selecting lines is done in two ways. The first one places the cursor on the cell, then press the left mouse button, and without releasing it, move it to the opposite corner, after which we release the button. For example, in a 5x5 table you need to highlight the second and third lines. In this case, the cursor is placed on the cell in the first column in the second cell (1,2) and then moved to the fifth column, in the third cell (5,3), as a result the second and third lines will be selected. You can take other corners of the table, for example, with addresses from (1,3) to (5,2) or (5,2) to (1,3), etc., where the first digit indicates the column number, the second - the number lines. To select a complete line, you need to select the cells on the line from the first (1) to the last column (5). The second method is to place the cursor to the left of the desired line and briefly press the left mouse button, and the line will be highlighted. If you place the cursor to the left of the table and click on the left mouse button, the line will be highlighted, and if, without releasing the mouse button, you move the cursor below or above the line, then the adjacent lines around which the cursor moved will also be highlighted. As soon as the desired lines are highlighted, you can release the mouse cursor. Columns are highlighted in the same way. To select columns, you need to place the mouse cursor over the columns, the cursor will turn into a vertical arrow, click on the left mouse button, and then move the cursor to the left or right to select adjacent columns. To draw or remove horizontal or vertical lines in a table (group of cells), you can use the button with border modes - Home →Paragraph → . If you move the mouse cursor over the table, an icon with a cross () will appear at the top left of it.
If you double-click on this icon with the left mouse button, two tabs for working with tables will appear at the top. Design tab
Using tables. Word tables are an extremely powerful tool for arranging text in rows and columns. In Fig. Figure 1 shows how a Word table looks on screen. Fig.1 View of a Word table on the screen There are many benefits to using tables instead of tabs. For example, if a piece of text doesn't fit on one line, Word automatically creates a new one and increases the height of the cells (creating the table in Figure 1 using tab characters would be quite difficult). In addition, when working with tables, you can easily rearrange rows and columns, and draw attention to certain elements of the table using borders and background fills. Inserting a table into a document. To create a table where the cursor is located, just click the Insert Table button on the standard toolbar and drag the selection to the appropriate number of squares, which Word uses to indicate the number of rows and columns in the table: The new table consists of rows and columns of empty cells, indicated by dotted grid lines on the screen. If they are not visible, turn on the Gridlines option in the Table menu. Although the grid does not appear in the printed copy of the document, you can add borders and shading to table elements that will be printed. If you don't know how many rows you'll need when you create the table, just create a table with one row. It's very easy to add new rows to the end of the table as you type (however, columns are a little trickier, so try to specify the actual number of them). Entering text into a table To enter text into a table cell, click on the cell and type it just like you would in a regular paragraph. Note that when you reach the right edge of a cell, Word automatically wraps the text and increases the height of the cells throughout the table row. If you press ENTER while typing in a cell, Word inserts a new paragraph inside the cell (each cell can contain one or more paragraphs). Standard Word techniques are used to edit and format text in table cells. To move the cursor to another cell, click on the cell and use the arrow keys. There is another way to move to the next cell (in table row order) and highlight its contents - the TAB key. Move to the previous cell using the SHIFT+TAB key combination. When the cursor is in the last cell of the table, pressing the TAB key adds a new row to the table. To insert a tab character into a table cell, press CTRL+TAB. There is also some strangeness - when inserting a tab stop at the delimiter, the text moves to it slowly, you don’t even have to insert a tab character into the cell. Inserting and deleting rows, columns, and cells Before inserting or deleting rows, columns, or groups of cells, you must first select the corresponding part of the table. A cell, row, or column is highlighted as follows: Once you select one cell, row, or column, you can hold down your mouse and drag to add additional cells, rows, or columns. Another way to select a group of adjacent cells is to place the cursor in a cell and hold down the SHIFT key and press the arrow keys. If the NUM LOCK indicator on the keyboard is not lit, you can select the entire table using the ALT+5 key combination. Adding entire rows or columns to a table works like this: To insert new rows at a specific location in the table, select the rows immediately below that location; the number of selected rows must be equal to the number of inserted rows. To insert just 1 line, just place the cursor anywhere on the line you want to add. Similarly, to insert columns, select as many columns as you want to insert to the right of the insertion location. To add one column, you need to select the column to the right of the insertion point. Click the Insert Rows or Insert Columns button on the standard toolbar. To insert into a table, you use just one button on the standard toolbar. When rows, columns, or cells are selected in a table, the button name changes to Insert Rows, Insert Columns, or Insert Cells, respectively. When the cursor is simply in a cell, the button is called Insert Rows. Outside of a table, it is called Insert Table and is used to create new tables in a document. Alternatively, you can right-click on a selected portion of the table and select Insert Columns, Insert Rows, or Insert Cells from the context menu. 2 rows will be inserted into the table shown below. At the end of each cell, Word stores a so-called cell marker, and at the end of each line, an end-of-line marker. These markers can be made visible by clicking the Non-Printing Characters button on the standard toolbar. In step 1 of the above algorithm, when inserting rows, you must include line end markers in the selection, regardless of whether they are visible on the screen or not. To insert a column from the right edge of the table, you must select the column consisting of end-of-line markers before clicking the Insert Columns button. As we learned earlier, you can insert a row at the end of the table by pressing the TAB key in the last cell: Select a block of table cells, the number and location of which coincides with the number and location of the inserted cells.
Fig.2 Dialog window Insert cells Turn on the Shift Cells Right option so that when inserting new cells, Word will shift existing cells to the right, or the Shift Cells Down option, similarly. You can also select the Insert Entire Row or Insert Entire Column option to insert entire rows or columns—even if only individual cells have been selected in the table. To delete rows, columns or cells from a table, just select them and execute the command Delete Rows, Delete Columns or Delete Cells from the Table menu. In addition, you can right-click on the selected fragment and execute the same commands in the context menu. If the selection does not contain complete rows or columns, Word opens the Delete Cells dialog box, which tells you how to rearrange the table cells after you delete the selection. To remove the contents of rows, columns, or cells (that is, the text or graphics they contain) but leave the cells themselves, select the rows, columns, or cells, and press DEL. Adjusting the cell size The width of a column in a table is changed by dragging the grid lines. To adjust the width of one or more cells in a column (rather than the entire column), select the cells before dragging. One column can contain different widths. You can have Word automatically adjust the width of one or more columns to fit the width of the text they contain. To do this, select the column and double-click on the last one. right line grids in the selected fragment. Certain keys pressed while adjusting column width affect how Word deals with the width of the cells to the right of the grid line being dragged: Please note that when you drag the leftmost grid line, the indent separating the selected table rows from the left margin of the document changes. Word automatically drags the table row height to match the height of the text it contains. However, you can assign a minimum or exact height value to a row using the Cell Height and Width command on the Table menu. All cells in the same row always have the same height. Moving and copying lines, columns and cells To move entire rows or columns to a new location in the table, select them and drag them to the new location with the mouse. Rows or columns disappear in their former place and appear in a new one. To copy rows and columns rather than move them, hold down the CTRL key as you drag. When selecting table rows, you must include end-of-row markers in the selection, otherwise only the contents of the cells are moved or copied. To move the contents of table cells, select the cells and drag them to a different location. Word deletes the contents of the selected cells (leaving them empty) and pastes it into the receiving cells, destroying what was previously there. To copy the contents of a cell, hold down the CTRL key while dragging. Note that to move or copy the contents of cells, you should not include entire columns in the selection. A selection can include all cells in a row, but line end markers must remain outside the selection. Using Table Menu Commands Above we described working with tables using the standard toolbar, mouse and context menus. Usually these interactive methods are the fastest and most convenient. The Table menu provides alternative options for inserting and modifying tables; In addition, it allows you to perform some additional operations that are not possible using interactive techniques. Table 3 shows the purpose of the menu commands. Table menu commands and their actions
Word tables are a convenient tool for creating and editing small and simple lists. They allow you to enter data and format it as you wish. It is possible to set formulas in cells, as well as sort information. If desired, the user can convert the Word table to text. All these methods allow you to successfully work with documents consisting of a group of records. However, for more complex work related to database tables, it is necessary to use appropriate tools such as Excel or Access.     The Spelling window, in which, using the Dictionaries button, you can open the Auxiliary Dictionaries window, which can be created and deleted. These are user dictionaries, which are a text file custom.dic, adjusted directly in text editor. 2.14 Formatting characters A typeface is a type of font. Point size is the font size. Kerning - adjusting the distance between characters in... Tables.Item(i).AutoFormat(tformat, tappbrd, EmptyParam, EmptyParam, EmptyParam, EmptyParam, EmptyParam, EmptyParam, EmptyParam, EmptyParam); And about one more way to create tables People interested in working with MS Word may also have come across components on the Internet that turn appropriately formatted text into a table. So we’ll just figure out how they work... Method. The quickest way to select a picture that has already been inserted into a Word document is by clicking on the selection bar. The highlight bar is located to the left of the text on every page of a Word document. Exercise 5 Copying text. Type the text below, observing the format and setting the parameters: Left indent - 1 cm right - 1 cm First line - indent... In Microsoft Word, you can not only print text, but also make a table. It is inserted into the text using certain buttons, which we will talk about now. You can select a certain number of rows and columns for your table and edit it at your discretion - merge cells, expand, narrow, delete cells and rows, print text inside the table and much more. But there's one here important point. It will not be possible to perform calculations in a table created using Word. That is, if you need to not only draw a table with words and numbers, but also perform some actions with the numbers (add, multiply, calculate percentage, etc.), then you need to use Microsoft Excel. It is worth noting that Word has a special button for inserting Microsoft Excel tables. But you need to be able to handle such tables correctly. An example of a table created in Word: How to insert a table in Microsoft WordIn the first lesson, teaching how to work with the Word program, we talked about the fact that there are two types of the program - the older one (2003 and earlier) and the newer one (2007-2010). They are somewhat different from each other, so in this lesson we will learn how to insert tables in both the older Word program and the modern one. But in both cases, first you need to indicate the place on the sheet where the table should be. That is, the blinking cursor (blinking stick) should be in the place where you want to insert the table. Let me remind you: to move the blinking cursor down, you need to press the Enter button on the keyboard. And to raise it higher, press Backspace (delete button). In older versions of Microsoft Word (2003 and earlier), there is a special item for inserting tables at the very top of the program on the right side. It's called "Table". And in the Word program of a more modern version (2007-2010), in order to insert a table, you need to click on the “Insert” inscription in the left top corner programs. When you click on this text, new editing buttons will appear. Among them there is a button (inscription) “Table”. Creating tables in WordIf you click on the “Table” inscription (button), a list will open in which Word offers several ways to insert tables. First, let's talk about the classic method - “Insert table...” (Insert - Table).
Click on the item “Insert table...” (Insert - Table) - a small window will open.
At the top of this window you need to print how many columns and rows there should be in our table. For example, I specified three columns and four rows. Also pay attention to the bottom of the window. The dot should be on the “Constant” item, and the adjacent white field should indicate the value “Auto”.
Other column width settings are used extremely rarely, in exceptional cases, and we will not consider them in this lesson. And finally, click on the OK button. A table with the number of columns and rows we specified should be inserted into the document (on the sheet). In my case, the following table was inserted: How to delete a tableLet's talk about how to delete a created table. It’s worth talking about this right away, because often the table is inserted in the wrong type. This usually happens because people specify the wrong number of rows and columns. But deleting a table from Word is not so easy. In fact, there is nothing complicated about it - you just need to know how exactly it is done. You can delete a table created in Word different ways. Now we will learn how to do this in the best possible way, in my opinion. in a simple way, with which you can delete a table in any version of the program. First, you need to select the table that you want to delete. In order to do this, move the cursor over the first cell of the first row of the table (not inside the cell, but slightly to the left, outside the table). By the way, cell is a separate rectangle that makes up the table. That is, any table consists of a certain number of cells - small rectangles. Press the left mouse button and, without releasing it, drag to the very end of the table. Here is an important point - you need to drag to the last row of the table and a little lower. The table will be colored - this means that it has been highlighted. But in order for it to be deleted, it must stand out in a special way, with a small “tail” after the table.
Once you have selected the table, press the Delete (Del) button on your keyboard. If you selected the table correctly - as written just above - then it will disappear. Advice. If you still cannot delete the table, select it, then right-click on the selected (shaded) one. A list will open, click on the “Cut” item. How to draw a table in WordWe have just learned how to create tables in Word in the classic way. But there are other options. For example, you can draw a table. In order to do this in an older version of Word (2003 and earlier), you must also click on the “Table” inscription at the top right. From the list, select “Draw table”.
And in the modern version of Word (2007-2010), you should also click on the “Insert” tab at the top, and then click on the “Table” inscription. From the list, select “Draw table”.
The cursor (mouse arrow) will take the form of a small pencil. So we will draw a table with it. First, let's draw the base of the table - a rectangle of the size that our table should be. To do this, move the cursor (in our case, a pencil) to the place where the table should be. Then press the left mouse button and, without releasing it, “draw” a rectangle of the desired size.
Release the mouse button and the table base will be drawn. Now all that remains is to draw the details - rows and columns. This is precisely the rare case when it is extremely difficult to explain this process in words. The principle is as follows: you need to click the left mouse button inside the table and draw a line. The Word program will “help” you with this - the line will be “completed” on its own. The main thing is to show Word the direction. Try drawing several rows and columns.
Let me remind you that if you suddenly do something wrong, you can always go back a step or several steps by using the “Undo” button at the top of the Word program. When the table is ready, double-click the left mouse button on an empty space. The cursor should become a wand again, rather than a pencil. Many people like to “draw” tables much more than to insert them in the classic way. “Drawing” tables is especially convenient when you need to create a complex table. For example, like this:
We will talk about how to make such a table in the classic way - by inserting a table - in the following lessons. Other Word tablesWell, and finally, a few words about other types of tables. In addition to regular tables, you can insert an Excel table in Word. This is a type of table in which you can not only enter the required values, but also “calculate” (add, multiply, calculate percentage, etc.). In order to insert an Excel table into older versions of Word (2003 and earlier), you need to click on a special button. This button is located at the top of the program, next to the other editing buttons. Most likely, it will be hidden under a special small button of a darker color, on which arrows are drawn. It is located in the upper right corner of the program. By clicking on this button, you will see a small list of additional Word buttons. Find among them the button for inserting Excel tables and click on it. In modern versions of Microsoft Word (2007-2010), in order to insert an Excel table, you need – again – to click on the “Insert” tab, then on the “Table” inscription. From the list, select “Excel Table”.
The table will be inserted into the document (on the sheet) in the place where the blinking cursor is installed, that is, where the stick is blinking. In order to be able to delete this table, you first need to pin it - left-click on an empty space. Then select the table and click on it once. After this, you need to press the Delete (Del) button on the keyboard. In modern versions of Microsoft Excel (2007-2010), there is another type of table - “Express Tables”. This is a set of ready-made tables with a design that can be inserted into a document and edited - change numbers and values, add or delete rows and columns. Also in Word 2007-2010 there is the ability to quickly insert a table. To do this, you need to go to “Insert”, click on the inscription “Table” and use the upper part of the window that appears.
The principle of operation is simple - you move the cursor (arrow) over the squares, and the Word program generates a table based on the number of rows and columns you select. Despite the simplicity of this method, it is not very convenient and is limited in capabilities: the maximum number of rows is 8, and the maximum number of columns is 10. Use table styles to format an entire tableAfter you create a table, you can format it using table styles. By hovering your mouse over one of the predefined table styles, you can preview what the finished table will look like.
Note. To access additional styles, click the arrow button More .
Adding or removing bordersYou can add or remove borders to give your table the look you want. Adding borders to a table
Removing borders from an entire table
Add borders to individual cells
Remove borders in specific cells
Show or hide grid linesGridlines represent the boundaries between cells in a table that has no borders. If you hide the grid in a table with borders set, the changes will not be noticeable because the grid lines follow the border lines. To see the grid lines, you must remove the boundaries. Unlike borders, gridlines appear only on the screen and do not appear when the table is printed. If you turn off the grid, the table will appear as it would be printed. Note. Grid lines do not appear in web browser and in preview mode. Show or hide table gridlines in a document
Add a cell, row, or columnAdding a cell
Adding a line
Adding a Column
Delete a cell, row, or column
Merging and splitting cellsMerging cellsTwo or more cells located in the same row or column can be combined into one. For example, you can combine multiple cells in one row to create a table header that is shared across multiple columns.
Splitting cells
Repeating the table title on subsequent pagesWhen working with very long tables, you have to break them into parts in places page breaks. In this case, you can configure the table so that the table title is repeated on each page. Page breaks. If the page break happens to be on a long line, part of that line wraps to the next page by default. To present the data contained in a table that spans several pages, make appropriate changes to the table. Prevent table rows from moving to the next page
Force a table to move to the next page from a specific row
Practical task
Using tables. Word tables are an exceptionally powerful tool for arranging text in rows and columns. In Fig. Figure 1 shows how a Word table looks on screen. Paragraph formatting Keyboard shortcut A comment Increasing the left paragraph indent Indentation moves to the next tab stop Decrease the left indent of a paragraph CTRL + SHIFT + M Indentation moves to the previous tab stop Fig.1 View of a Word table on screen There are many benefits to using tables instead of tabs. For example, if a piece of text does not fit on one line, Word automatically creates a new one and increases the height of the cells (creating the table in Figure 1 using tab characters would be quite difficult). In addition, when working with tables, you can easily rearrange rows and columns, and draw attention to certain elements of the table using borders and background fills. Inserting a table into a document. To create a table at the location where the cursor is located, just click the button Insert table (Insert Table) on the standard toolbar and drag the selection to the appropriate number of squares, with which Word indicates the number of rows and columns in the table: The new table consists of rows and columns of empty cells, indicated by dotted grid lines on the screen. If they are not visible, enable the option Net(Gridlines) on the menu Table(Table). Although the grid does not appear in the printed copy of the document, you can add borders and shading to table elements that will be printed. Advice If you don't know how many rows you'll need when you create the table, just create a table with one row. It's very easy to add new rows to the end of the table as you type (however, columns are a little trickier, so try to specify the actual number of them). Entering text into a table To enter text into a table cell, click on the cell and type it just like you would in a regular paragraph. Note that when you reach the right edge of a cell, Word automatically wraps the text and increases the height of the cells throughout the table row. If you press ENTER while typing in a cell, Word inserts a new paragraph inside the cell (each cell can contain one or more paragraphs). Standard Word techniques are used to edit and format text in table cells. To move the cursor to another cell, click on the cell and use the arrow keys. There is another way to move to the next cell (in table row order) and highlight its contents - the TAB key. Move to the previous cell using the SHIFT+TAB key combination. When the cursor is in the last cell of the table, pressing the TAB key adds a new row to the table. Advice To insert a tab character into a table cell, clickCTRL+ TAB. There is also some strangeness - when inserting a tab stop at the delimiter, the text moves to it slowly, without even having to insert a tab character into the cell. Inserting and deleting rows, columns, and cells Before inserting or deleting rows, columns, or groups of cells, you must first select the corresponding part of the table. A cell, row, or column is highlighted as follows: Once you select one cell, row, or column, you can hold down your mouse and drag to add additional cells, rows, or columns. Another way to select a group of adjacent cells is to place the cursor in a cell and hold down the SHIFT key and press the arrow keys. If the NUM LOCK indicator on the keyboard is not lit, you can select the entire table using the ALT+5 key combination. Adding entire rows or columns to a table works like this: 1. To insert new rows at a specific location in the table, select the rows immediately below that location; the number of selected rows must be equal to the number of inserted rows. To insert just 1 line, just place the cursor anywhere on the line you want to add. Similarly, to insert columns, select as many columns as you want to insert to the right of the insertion location. To add one column, you need to select the column to the right of the insertion point. 2. Press the button Insert rows(Insert Rows) or Insert columns(Insert Columns) on the standard toolbar. To insert into a table, you use just one button on the standard toolbar. When rows, columns or cells are selected in a table, the button name changes to Insert Rows, Insert Columns, or Insert Cells(Insert Cells). When the cursor is simply in a cell, the button is called Insert rows. Outside the table it gets the name Insert table and is used to create new tables in a document. In addition, you can right-click on the selected fragment of the table and execute the command in the context menu Insert Columns, Insert Rows or Insert Cells. 2 rows will be inserted into the table shown below. At the end of each cell, Word stores a so-called cell marker, and at the end of each line, an end-of-line marker. These markers can be made visible by clicking the button Non-printing characters on the standard toolbar. In step 1 of the above algorithm, when inserting rows, you must include line end markers in the selection, regardless of whether they are visible on the screen or not. To insert a column from the right edge of the table, you must before clicking the button Insert Columns select a column consisting of end-of-line markers. As we learned earlier, you can insert a row at the end of the table by pressing the TAB key in the last cell: 1. Select a block of table cells, the number and location of which coincides with the number and location of the inserted cells. 2. Press the button Insert Cells or right-click on the selected block and execute the command in the context menu Insert Cells. Word opens a dialog box Inserting Cells, shown in Fig. 2 Fig.2 Dialog window Inserting Cells 3. Enable the option Shift right(Shift Cells Right), so that when inserting new cells, Word will shift existing cells to the right, or the option Shift down(Shift Cells Down), similarly. Alternatively, you can select the option Insert whole line(Insert Entire Row) or Insert whole column(Insert Entire Column), to insert complete rows or columns - even if only individual cells have been selected in the table. To remove rows, columns or cells from a table, just select them and run the command Delete lines(Delete Rows), Remove Columns(Delete Columns) or Delete cells(Delete Cells) on the menu Table. In addition, you can right-click on the selected fragment and execute the same commands in the context menu. If the selection does not contain complete rows or columns, Word opens a dialog box Removing cells, which specifies the rearrangement of table cells after deleting the selection. To remove the contents of rows, columns, or cells (that is, the text or graphics they contain) but leave the cells themselves, select the rows, columns, or cells, and press DEL. Adjusting the cell size The width of a column in a table is changed by dragging the grid lines. To adjust the width of one or more cells in a column (rather than the entire column), select the cells before dragging. One column can contain different widths. Advice You can have Word automatically adjust the width of one or more columns to fit the width of the text they contain. To do this, select the column and double-click on the rightmost grid line in the selection. Certain keys pressed while adjusting column width affect how Word deals with the width of the cells to the right of the grid line being dragged: Key pressed while dragging Word Actions Changes the width of all cells on the right proportionally, without changing the overall width of the column. Changes only the width of cells that are close to the right, without changing the overall width of the table. Sets equal width for all cells on the right, without changing the overall width of the table. Shift+Ctrl Does not change the width of the cells on the right. The overall width of the table changes. Please note that when you drag the leftmost grid line, the indent separating the selected table rows from the left margin of the document changes. Word automatically drags the height of table rows to match the height of the text they contain. However, you can assign a minimum or exact height to a row using the command Cell height and width(Cell Height and Width) on the menu Table. All cells in one row always have same height. Moving and copying lines, columns and cells To move entire rows or columns to a new location in the table, select them and drag them to the new location with the mouse. Rows or columns disappear in their former place and appear in a new one. To copy rows and columns rather than move them, hold down the CTRL key as you drag. When selecting table rows, you must include end-of-row markers in the selection, otherwise only the contents of the cells are moved or copied. To move the contents of table cells, select the cells and drag them to a different location. Word deletes the contents of the selected cells (leaving them empty) and pastes it into the receiving cells, destroying what was previously there. To copy the contents of a cell, hold down the CTRL key while dragging. Note that to move or copy the contents of cells, you should not include entire columns in the selection. A selection can include all cells in a row, but line end markers must remain outside the selection. Using Table Menu Commands Above we described working with tables using the standard toolbar, mouse and context menus. Usually these interactive methods are the fastest and most convenient. Menu Table opens up alternative options for inserting and modifying tables; In addition, it allows you to perform some additional operations that are not possible using interactive techniques. Table 3 shows the purpose of the menu commands. Menu commands Table and their actions Table menu command Description Insert Inserts a new table into the document or inserts new rows, columns, or cells into an existing table. Delete Deletes selected rows, columns, or cells. Merge cells(MergeCells) Merges adjacent rows into one cell. Split cells(Split Cells) Splits one cell into two or more cells on the same row. Select line(Select Row) Selects a row in a table. Select column(Select Column) Selects a column in a table. Select table(Select Table) Selects the entire table. Autoformat(Auto format) Allows you to quickly change the general appearance of the table according to one of the standard formats. Cell height and width Allows you to adjust the height, left indent and alignment of rows, as well as the width of columns and spacing between them. Headings(Headings) Marks one or more table rows as headings. If there is a page break within a table, Word repeats the heading at the top of the next table. Convert to text(Convert Table to Text) Deletes the selected table and converts the text it contains to regular paragraphs. If the selection is outside of a table, the command is called Convert to Table. In this case, it creates a table and inserts the selected text into it. Sorting(Sort) Sorts the contents of table rows. Formula(Formula) Inserts a formula into a table cell. Split table(Split Table) Splits a table into two and inserts plain text between them. Net When checked, this option causes Word to display dotted grid lines on the screen around cells throughout the table. Word tables are a convenient tool for creating and editing small and simple lists. They allow you to enter data and format it as you wish. It is possible to set formulas in cells, as well as sort information. If desired, the user can convert the Word table to text. All these methods allow you to successfully work with documents consisting of a group of records. However, for more complex work related to database tables, it is necessary to use appropriate tools such as Excel or Access. Literature 1. M. Halvorson, M. Young “ Effective work with Microsoft Office" 2. R. Borland “Working effectively with Microsoft Word” 1. Technical documentation for working with the Word word processor (Microsoft Press) TutoringNeed help studying a topic?
Our specialists will advise or provide tutoring services on topics that interest you. IN MS WORD DOCUMENTS Guidelines for laboratory, practical and calculation and graphic work according to the course "Computer science" For students of all directions, full-time education 1.1. Goal of the work ……………………………………………. 4 2. Using tables in MS Word documents.. …………. 4 2.1. Creating tables in MS Word documents….. …….. 4 2.2. Entering data and moving through the table ......... 7 2.3. Editing tables……………………………8 2.4. Changing the text orientation……………………. 14 2.5. Inserting and deleting cells, rows and columns...... 14 2.6. Merging cells ………………………………… 16 2.7. Formatting tables …………………………… 16 2.8. Adding padding to the table……………….. 18 2.9. Numbering of rows and columns……………………… 18 2.10. Splitting tables………………………………….. 19 3. Convert text to table and table to text. 19 3.1. Convert existing text to table 19 4. Sorting and performing calculations in tables ..... 21 4.1. Sorting tables ………………………………….. 21 4.2. Performing calculations in a table ……………… 22 5. Work order……………………………... 24 5.1. Creating Tables by Transforming Text.. 24 5.2. Entering text into table cells……………………. 25 5.3. Moving around the table …………………………… 26 5.4. Selecting text in a table ………………………. 27 5.5. Calculated tables, entering formulas……………. 29 6.Security questions ……………………………………… 31 7. Literature…………………………………………………………….. 31 1.1. Goal of the work The purpose of this topic is to master the techniques and methods of working with tables in the MS Word editor: creating tables, entering data and moving through the table, editing tables, formatting tables, converting text to tables and tables to text, sorting and performing calculations in tables. 2. Using tables in MS Word documents. In your work with text editors, you often come across organized information. The best way to store such information in documents is through tables. In addition, you can use tables to present a variety of lists, checklists, financial information and solve a large number of other problems. Tables may even contain illustrations to enhance the understanding of the information contained in the table. For example, a list of goods, in addition to the product name and price, may contain a graphic image of the product - very clearly. MS Word provides you with a wide range of tools for working with tables, simplifying most practical tasks. Table commands make it easier to create and edit a table, as well as organize and format the data it contains. A table is a grid formed by columns and rows. The intersections of columns and rows form table cells. Each cell is independent of other table elements, and you can set it to the required size and format. Cells can contain text, numbers, graphics, or formulas. If you enter text into a cell, when it reaches the right edge it will automatically wrap to the next line according to the width of the cell. When you change the width of a column or cell, the text will automatically wrap to the next line (as the width decreases) or return to the previous line (as the width increases) to completely fill the new cell size. |


| Read: |
|---|
Popular:

New
- How to choose the right flux
- What are quasars and what are their functions in the Universe?
- English words that cannot be translated
- Abbreviations in English: common and informal
- Conditional sentences in English
- Zinaida Reich and Sergei Yesenin Women sung throughout the centuries
- Pavilion in the Tsar's village of Quarenghi
- Grand Duke's Palace on the English Embankment Alexandrovka Estate
- Russian Seven Publishing house Russian Seven
- Bugs, secrets and cheats for the game Sparta: War of Empires


