Site sections
Editor's Choice:
- English level determination
- DIY floor lamp shades
- Installation of walls from gypsum cardboard How to fix a partition from gypsum cardboard
- Do-it-yourself ideas and workshops for making lampshades for a floor lamp and table lamp
- Decorative bead curtains: do-it-yourself beauty Do-it-yourself bead curtains schemes
- Curtains for the kitchen with your own hands with patterns and features of creating different products
- Master class: do-it-yourself floor lamp
- Create an organizer or do-it-yourself toolbox Post an DIY tool post
- How to make an arch in your apartment with your own hands, and what materials are needed
- Accessories for storing tools in the garage, workshop
Advertising
| Storage of hand tools in the workshop. Create an organizer or do-it-yourself toolbox Post an DIY tool post |
|
Practical storage systems for a garage or workshop. 1. Magnetic tape
Magnetic tape for storing small metal parts. The tape glued to the wall in the garage can be used to store drills, scissors, bolts, nuts and other small metal parts. Such a magnetic holder is very convenient to use and will help prevent the loss of small but important parts. 2. Plastic containers
Shelving made of plastic containers. From large plastic containers and wood blocks, you can build a large rack for storing tools, wires, spare parts and any other things. The organization of such a rack will allow you to clean up and significantly save space in the workshop or garage. 3. Rails
Railings for trash bags and paper towels. On one of the free walls of the garage you can place several small roof rails, on which you can conveniently place rolls of garbage bags, paper towels, sandpaper, scotch tape, skeins of rope and much more. 4. Brackets for furniture
Brackets for furniture storage. Many gardeners use a garage to store folding outdoor furniture. So that it does not stand in the corners and does not take up much space, make a vertical rack for it with wooden or metal brackets and screw it to one of the free walls. 5. Jars
Storage of nails, bolts, self-tapping screws and other trifles. Bolts, nuts, nails, screws, screws and other little things do not take up much space, however, it is extremely inconvenient to store them in mixed form. To clean up these things will help banks with lids screwed to the bottom of the wall cabinet or under the worktop. 6. Lattice under the ceiling
Lattice for storage of pipes and skirting boards. A plastic grill screwed into the corner of the garage under the ceiling is ideal for storing the remains of water pipes, baseboards, profiles and other long things. Such a storage system will help to significantly save space in the garage and prevent possible breakdowns of fragile building materials. 7. Organizer for screwdrivers
Wooden organizer for screwdrivers. A small practical organizer for screwdrivers, which any man can do just by drilling the right amount of small holes in a bar of wood. Such a product can be hung on one of the walls of the garage or workshop to store all the screwdrivers in one place. 8. Vertical storage systems
Vertical panels for storing things. Several perforated panels made of metal or plywood under the table or in the cabinet will provide an ergonomic and convenient place for the vertical storage of a small hand tool. 9. Plastic pipes
Storage systems made of PVC pipes.
10. Tassels
Hanging brush storage. Paint brushes and spatulas are very convenient to store in limbo on a thin wire or on a thin steel rod. 11. Rack for the garden tool
Wooden stand for garden tools. To garden tool does not occupy a good third of the garage space, store it on a special rack, screwed to one of the walls. Such a rack can be made with your own hands from pieces of wood, a wooden pallet or pieces of plastic pipes. 12. Multifunctional shelving
Shelf rack with shelves. A wooden pallet, supplemented with shelves from pieces of wooden slats, will become a functional component of the garage and will help to place a huge amount of hand tools and small ones in one place. 13. Holder for fishing rods
Storage of fishing rods. An ordinary wire mesh can be used to create a convenient fishing rod holder. Such a storage system can be fixed under the ceiling so that it does not take up space below and does not get underfoot in the autumn-winter season. 14. Pegboard
Often, visiting a workshop, one can witness such a landscape: drills with tassels and nail files stick out from a breathable plastic cup, nails interspersed with screws and bolts are scattered across a pair of cans, and screwdrivers with clamps and wrenches are buried in the bowels. a disposable bag hanging somewhere under the ceiling. However, once there comes a time when the owner of the establishment realizes that it is still worth paying attention to the storage of tools and various pieces of iron. If this moment has come and you, carefully read our article, where we want to talk about a few simple tricks that will help maintain order in the place where you usually worship. Tool storage: small tricks that make life easier for the home masterSo, we turn to those tricks that will allow you to always have at hand all the necessary tools and materials. The trick is the first: a shelter for bobbins
But this option with a nail-screw-containing suitcase even gives some intelligence :).
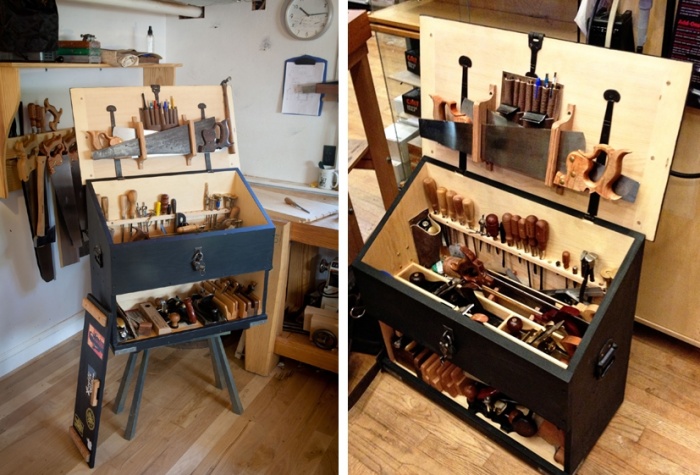
The second trick: we organize the storage of tools between heaven and earthVarious tools, nuts, washers can simply be hung. To do this, you will only need the wire necessary for bending hooks and hooks of various shapes, and, as can be seen in the photo, a fiberboard sheet, preferably perforated. We don’t even tell about the details of the creation of this “masterpiece”: it seems to us that this is understandable even to a hedgehog :).
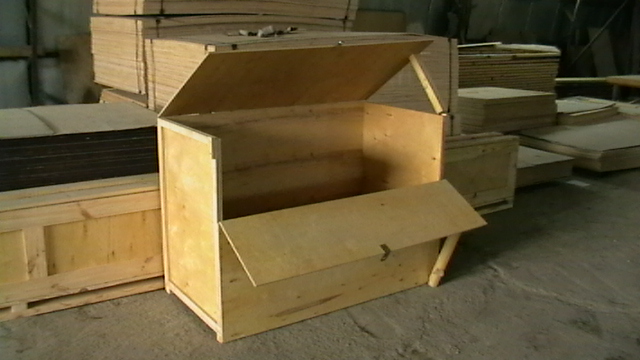
Trick Three: A multi-story dormitory for nailsSuch a multi-story plywood box for storing hardware is able to produce any more or less sleek home craftsman.
Trick four: a quiet haven for millingHaving thought about arranging accessories for storing the necessary tools with your own hands, you can build elementary storages for drills or mills of the following types:
Cunning fifth: the eternal life of disposable platesWhy disappear in vain disposable plates? To store various tools in the garage or in your workshop, cut them in half and screw the halves to the wall - and you will get great pockets for storing anything!
Trick Six: Using GravityA magnetic tape on the wall, a plastic can, a metal washer fixed at the bottom of this can - and before you is a convenient and at any time mutable storage for various little things that you should always have at hand.
Seventh trick: a restraint for clamps and similar toolsThe pendants shown in the photo are suitable for storing “big-headed” tools - clamps, hammers and the like.
Trick 8: say NO to moistureWe will describe this simple little thing in more detail. Tool storage is, of course, great. But do not forget about some materials and accessories that also need to be stored and which are afraid of moisture. For them, you can build a plywood box, the inner surface of which is sheathed with geotextiles, and the outer one with foam. Shelves can be arranged inside the box, and stored “valuables” can be placed, for example, in old plastic canisters, having been prepared accordingly.
So, we have outlined everything that we have managed to find for you at the moment. Of course, this is far from all the tricks and tricks that will ensure convenient storage of tools and materials. We hope that the options we have proposed will open up great opportunities for your personal imagination. As the great Samiznaetekto said, comrades for work! Wiggle your convolutions and your hands! A good host will always have a whole arsenal of tools at hand: from nails and self-tapping screws to pliers, a level and a set of screwdrivers, not to mention a drill, puncher and screwdriver. Very often, a simple household repair does not begin in any way due to the fact that the master cannot find all the tools he needs in the apartment or garage. To avoid this, all working tools should be stored in a specially designated place - a tool box. What are the tool boxes, what requirements they must meet, and how to make a tool box with your own hands - this is an article. Varieties of Tool BoxesIn fact, the tool box is a box with or without a lid, divided into several compartments of various sizes and shapes. Small boxes are designed to store fasteners, they may contain drills, tips or other small parts. As a rule, such boxes are divided into several compartments, each of which has a separate cover. Such boxes are easy to carry, because they weigh a little.
Larger cases are needed for storing and transporting large tools, such as hammers, saws, drills or jigsaws. Quite huge boxes will be needed to hold punchers, levels or hammers in them. Such tool boxes are often made on wheels so that they can be moved and transported. Professional tool boxes may vary depending on the skill of the master: so a plumber needs one set of equipment, and a car mechanic needs a completely different one. You can find such boxes in building supermarkets or in specialized stores, often they are sold complete with the tools themselves.
Cases are divided into several categories. Here, not only their size is taken into account, but also the design, as well as the material of manufacture. Structurally, these can be:
Important! When choosing a box for your tools, it is better to give preference to multifunctional boxes, where each part has its own place, and small compartments are closed with lids. Otherwise, all tools run the risk of mixing in one pile during transportation. What tool boxes are made ofCases and boxes can be made of various materials, but the main requirement for them is one - the boxes must be light, since the tools themselves weigh a lot. There are a few more nuances that you need to know about those who buy a case for their arsenal of tools:
Today, the most popular materials for such boxes are:
Attention! All materials must comply with special standards, because if the box breaks at the most inopportune moment, all heavy tools will fall to the feet (or head) of the unfortunate owner. If the tool box is metal or wooden, you can still do it yourself, then you can only buy plastic boxes. How to make a DIY tool boxIf the owner decided to make a box for his inventory on his own, first of all, he needs to determine the size and choose the design of the box.
To do this, you need to inspect all your tools, measuring the most dimensional elements and taking into account small things (bolts, nuts, washers, etc.). According to these parameters, the dimensions of the container itself and the internal compartments are calculated. Toolbox designSpeaking about the design of the boxes, they do not mean their shape, but the way of opening and the presence of additional sections. The following structures are considered standard:
With your own hands, it will be easiest to make a case for tools, because in this design there are no complicated mechanisms and hinges with which additional sections leave.
Important! Although the container with drawers folding over several floors, it’s quite possible to build it yourself. To do this, each pair of "floors" should be fastened with metal brackets, providing elements with mobility (as in the figure below).
Bringing Ideas to LifeIf we talk about the material for the independent manufacture of the box, then, of course, the easiest way to work with wood. For the first experiment, it is better to choose inexpensive wood - for boxing, a planed coniferous board is quite suitable.
The whole process of manufacturing a tool box consists of several stages:
The box is ready for use, it remains only to fill all its compartments with the appropriate tools and fasteners. The easiest tool boxBeginners of carpentry are offered a simpler design of the tool box - a regular box with a handle, but without a lid. The advantage of such a box is that it is suitable for tools of various sizes, if desired, you can even put a water level or a puncher here, or you can make a miniature box for the "apartment" master. Such a box consists of only six parts:
If desired, the design can be supplemented by internal partitions or complicated by its compartments with covers or doors.
All elements are assembled in one design, fixed with carpentry glue, then additionally fastened with self-tapping screws. Particular attention should be paid to the handle fasteners - it must be strong and reliable. It is possible to assemble a tool box on your own not only from boards, depending on the arsenal of tools, plywood, chipboard, OSB, galvanized metal or aluminum sheet can be used.
There is nothing complicated in the manufacture of such a box, and the advantages of the product are obvious: the tools and fixtures will be in a certain place, at any time it is enough to get a box from the pantry or garage and carry out the necessary repairs.
There are many professions in which various types of tools are used. Most often, tool boxes are purchased for their storage, but sometimes it’s easier to make a high-quality storage yourself
Decide on two criteria:
Box classificationAccording to the case material:
By type of stored instruments:
There are many tool box companies, such as stanley fit–american firms keter - no less popular Israeli company, Spanish company tayg, German Kroftand many others characterized by quality and price of products. As an alternative to all these firms - the opportunity to make a tool box with your own hands. You can thus save on cost and get a very competitive option that meets exactly your requirements. Types of BoxesTool boxes made in home workshops are mainly made of wood and come in a variety of shapes. Boxes of the classical form - "bast basket" are popular and simple to manufacture. in second and third place - a box in the form of a chest - a container, and in the form of a case.
Materials for making a tool box
Manufacturing steps Using this technology, it is possible to produce boxes of more complex structures, creating due to the restraints the necessary number of compartments and niches. Using the same technology, it is possible to manufacture a closed box, which is more reliable and convenient for transporting tools. Additional steps in the manufacture of a box with a lid For self-made popular now transformer boxes you’ll have to break your head more, but to realize this idea is quite realistic. For this, with the help of computer programs, it is necessary to develop the design you want, and to make it real you will find a set of necessary elements that can be purchased in special stores. The number and complexity of the items you select depends on your requirements for the box. Assembly can be done on a wooden base using aluminum strips and corners. Fasteners are made using rivets. If you are a purposeful and creative person, then the process making tool boxit will not be difficult, but when you see the fruits of this work, you will increase your self-esteem and save budget funds. This article is about how to make a wooden tool box. If you have many tools and want to keep them in order, the best thing you can do is create a simple box of wood. From our experience, we find them very useful, as they are lightweight, durable and provide plenty of room for storing tools. Don't forget that you can adjust the size and design to suit your needs. The main components of the tool box are made of 20 mm boards, as they have a beautiful appearance and are very durable. In addition, we recommend that you stick the joints and fasten everything with cuts. Try to screw the screws as symmetrically as possible. Upon completion of assembly, it will be necessary to sand the entire surface of the box. Make sure all edges are smooth. Otherwise, you may damage your hands on sharp edges. Also, be sure to check that all screw caps are level with the wooden surface. Get rid of dust and chips before painting. What you need to make a wooden tool boxIn order to make a wooden tool box, you need the following: Materials Instruments
Tips
Time
Drawer DesignCreating a simple wooden tool box is one of those projects that can be done in less than an hour. But it can make your life easier, especially if you work a lot with tools.
The first step of the project is the markup. As you will see in the next stage of the project, we will use 1 × 8 boards to make a tool box. Therefore, you should use a carpenter's pencil and a square ruler to mark lines on wooden boards.
In order to get precise cuts, we recommend using a jigsaw or a good circular saw. Make sure that the saw has smooth teeth, otherwise it can tear off the edges.
In the picture, all the components needed for the box. A circular machine can simplify the job, as many cuts must be made at an angle.
You must use this drawing in the manufacture of the components for the box. Be sure to double-check all measurements, otherwise the components may not match.
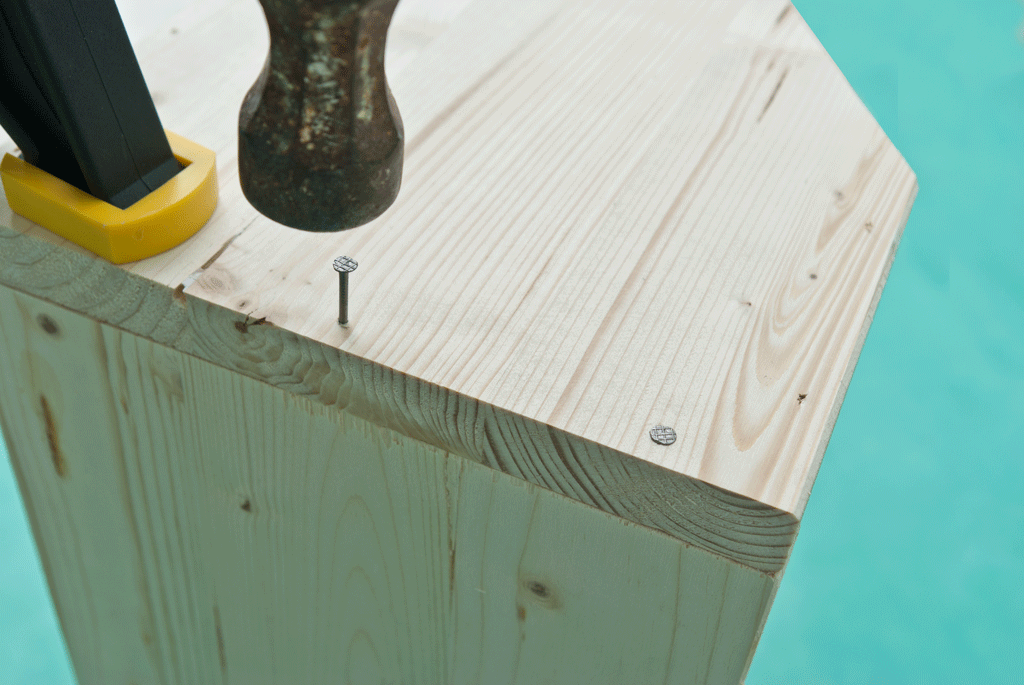
After creating the wooden parts, you need to drill holes along the edges. As you can see in the picture, you need planks on a wooden block to prevent surface damage. Drill three holes in the bottom and two holes on the sides.
If the edges of the bottom are not smooth, you should carefully sand them with 120 emery paper before reassembling. Coat the lower ends with wood glue to strengthen the joint. Remove excess glue with a dry cloth, otherwise you will take the time to clean it.
Press components firmly and leave for half an hour. If you use good glue, it will hold together the joints well. Nevertheless, screw the screws into the drilled holes anyway.
In order to get a solid structure, we recommend the use of self-tapping screws. Work carefully to prevent damage to wood components.
After installing all the components together, the tool box should look like the one shown in the photo below.
Make a handle from a cylindrical wooden rod. The diameter of the handle is approximately 20 -25 mm.
Add some wood glue to both ends of the rod before reinstalling it. Then drill a hole and tighten the screw. Hold the handle while tightening, otherwise it may budge.
Do not forget to smooth the edges of the wooden components with sandpaper.
After completely sand the entire surface of the box with sandpaper.
If you want your box to have the same dimensions as in our article, we specify that 1 inch equals 2.54 cm. |


 If you are interested in one or another type of craft, and you are not sitting at home, with folded arms, naturally, you are going to have a fairly large number of tools. So that your tools are always at hand and safely stored, they need to provide a safety system in the form of a separate enclosed space called a box for storing tools.In addition to safety, the use of such a box will greatly help in the work, since the filling will be neatly sorted into compartments and in the future you can find the necessary device “blindly”. Also, this device is needed for car owners, or rather owners of trucks and gazelles. In the car, the box must be well fixed. And this means that when making it with your own hands, you need to think carefully about where it will be in the car and how to fix it there.


Popular:

New
- DIY shoe rack made of wood with photo and video
- How to make sliding doors
- How to build a wooden house yourself How to build a wooden house with your own hands
- How to make a garden path from corks from plastic bottles What you need to make a path from caps
- Calculate Profiled Timber Home Calculator
- Ready bath 6x6. Projects of houses and baths. The disadvantages of brick baths
- DIY summer kitchen in the country
- Ventilation in the bath: an overview of traditional schemes and nuances of arrangement
- How to make heating in the bath in winter - options for effective heating systems
- Step by step instructions with photos