Website sections
Editor's Choice:
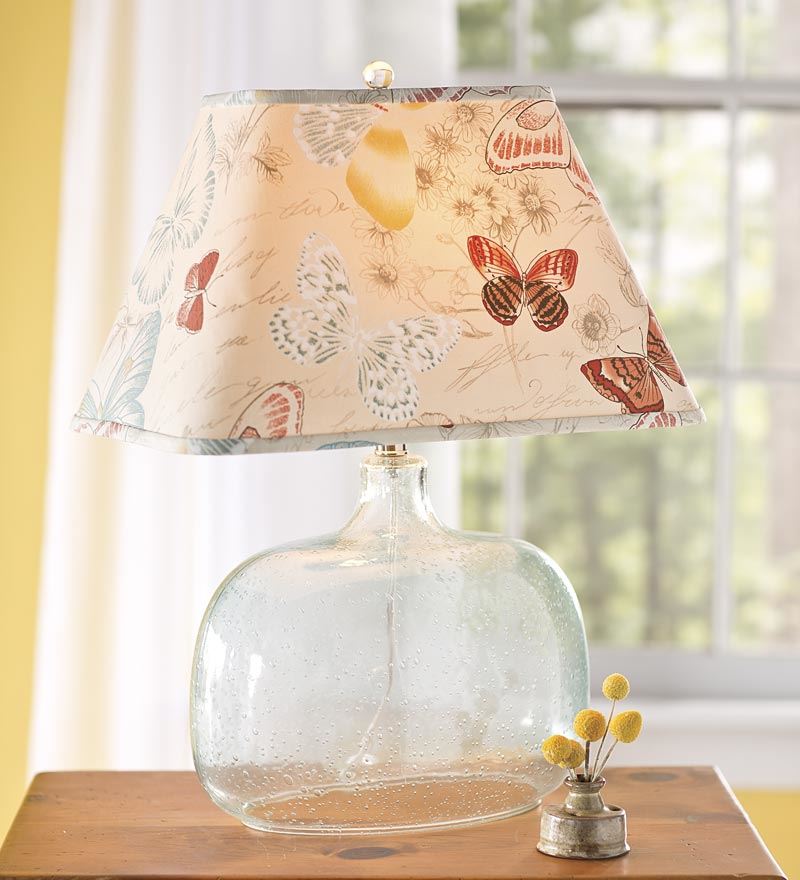
- English level determination
- DIY floor lamp shades
- Installation of walls from gypsum cardboard How to fix a partition from gypsum cardboard
- Do-it-yourself ideas and workshops for making lampshades for a floor lamp and table lamp
- Decorative bead curtains: do-it-yourself beauty Do-it-yourself bead curtains schemes
- Curtains for the kitchen with your own hands with patterns and features of creating different products
- Master class: do-it-yourself floor lamp
- Create an organizer or do-it-yourself toolbox Post an DIY tool post
- How to make an arch in your apartment with your own hands, and what materials are needed
- Accessories for storing tools in the garage, workshop
Advertising
| Frame lampshade. DIY floor lamp shades |
|
Ever since the time when the grandmother’s floor lamp with a shelf on the leg, the lampshade of which was decorated with fringe, was a family heirloom, passing from generation to generation, the soothing light of the floor lamp has been associated with pacification and homeliness. After some oblivion, floor lamps experience a period of rebirth. Now they can be seen again in almost every house. Bright, sometimes even blinding light, like loud noises can not only tire, but also annoy, so twilight is sometimes simply necessary. A floor lamp in this sense, the miracle is how good and quite capable of bringing peace of mind and calm.
Lighting the room is almost the main aspect in the interior. By combining light with shadow, we somehow create a mood in the house. Central lighting, with all its attractiveness and economy, to illuminate the whole room once and for all, does not create coziness and a certain, hmm ... sincereness is a completely different matter, lamps with dim lights, all kinds of sconces, table lamps and, of course, floor lamps. The latter, well, just the same aristocracy among the lamps. Of course, the main function of a floor lamp is to provide a certain level of illumination of a room or part of it, but their usefulness does not end there. Whatever it may be, it will be remembered for dinner, the designer would say that the floor lamp helps to “zonate” the space. Obviously, the area in which the floor lamp is located is intended for relaxation - with a book, in a soft armchair and with a cat on his lap. In addition to the obvious functions, there is also an underlying functional - decoration. You can choose an option for any style of interior. There are models that successfully fit into the interior, and will not distract attention to themselves, in contrast to them there are many floor lamps that can become a sort of raisin of the interior of the living room or bedroom, and even the pantry. It all depends on what effect we expect from the presence of a floor lamp in the room.
If we talk about the advantages of floor lamps in comparison with wall or table lamps, then they have a number of obvious advantages: Floor lamps with a lampshade, this is the most classic version of a floor lamp, consisting of a stand, a high tripod and a lampshade fixed at its peak. It is the lampshade that is responsible for the technical characteristics of the device, the level of dispersion and background illumination. Well, the main contribution to the attractiveness of the lamp as a whole, as a rule, is behind it, behind the lampshade. A lot of materials are traditionally used as a material for the manufacture of a lampshade - fabric, fiberglass, glass, paper, ceramics, metal and plastic, well, all kinds of designers with home-made not deprived of imagination, sometimes it’s used that even take out the holy ones. Thinking of making a small table lamp, we were faced with the task of making a lampshade. It was decided to make it rag, for this a wire frame was needed. Since it was available, I used it. What was used in the work. Materials Such lampshades in the factory are traditionally made by the method of resistance welding, here, for the lack of such, soldering is used.
The wire was first used galvanized steel. The previous frame and similar work was made of brass, for convenient soldering. But the cost of brass wire that went to one frame was approximately equal to the cost of a whole galvanized steel bay, from which you can make more than a dozen such gizmos. Practice has shown that the assembly is no less convenient, it is soldered, galvanized steel, it is good when choosing the appropriate flux. Was used "soldering acid" - zinc chloride. And the usual tin-lead POS-40.
First of all, we form “parallels” - rings. The wire was sold in the form of a small bay, and the cut pieces were already striving to curl into a ring, they should only be slightly corrected. To fix the “parallels” in their places, small carnations are hammered into the wooden template, they do not allow the rings to slide.
The “parallel” rings are formed and soldered, we proceed to the “meridians”. It is convenient to measure the length with a rope, bit off the wire a bit with a margin. Directly on the template, the "meridian" formed. On the arcuate part, the workpiece had to be straightened a little, reducing its radius; in the lower part, the workpiece was straightened almost completely. Marks were made with a pencil on a wooden blank, the wire of "parallels" in these places was cleaned with a medium-sized sandpaper and tinned with zinc chloride. Then, the soldering spots of the “meridian” blanks were cleaned up and blasted, and they did not need to be marked - the two ends and the middle-bend. "Meridian" was applied in the right place, with the left hand in a rag glove, the middle was pressed, a flux was applied and soldering was done. Then the ends of the “meridian” were soldered, it was even easier, the workpiece was molded so that the middle almost reached its place. After soldering, the ends pressed tightly to their "parallels".
For simplicity, the workpiece was marked “visually”, by eye, that is. Soldered four "meridians", two, one opposite the other. The angle is 90 degrees, it is well defined by the eye, further, the “meridians” are soldered into the middle of empty sections, where the marking task is also very simple - divide the segment in half.
Such difficulties were encountered several times - a new soldering, next to the old one. No "step soldering" with different solders, just "old" soldering, an additional heat sink was organized in the form of pliers sponges. There was not enough heat to melt the solder and all that was needed remained in place.
Well, with the "meridians", the entire disc is evenly covered, but something is rare. I wanted the finished rag lampshade to have no egregious “faceting”. It was decided to add “meridians” in between.
Well, this is more like a hemisphere. Leave it. Small cloves are pulled out and the frame is carefully removed from the blank.
Now you should take care of mounting it on the lamp. Cartridge in a lamp with a small E14 socket, with a thread on the outside and a large carbolite nut on it. With this nut, the lampshade is clamped onto the lamp.
The platform for the nut is cut out with your favorite tool - a jewelry jigsaw with a large nail file. From galvanized "roofing" steel 0.5mm. A square blank is cut out with scissors for metal, diagonally drawn, at the intersection, the blank is slightly tiled. In this hole confidently, without slipping, the leg of the compass is installed.
Paradoxical as it may seem, direct procrastination turned out to be not so easy to obtain - I had to work pretty hard with a mallet on a wooden stump. It was decided to make mounts at four points so as not to be measured with the corners of the protractor (usually, they are made by three - they save wire and it is somewhat easier to get to the light bulb). Even a person who does not have experience in hand-made can make a lampshade with his own hands. For work, any suitable materials are used: the remains of fabrics, paper, threads, glass, plastic bottles, cups or spoons. The product can be given any shape by decorating it with beads, beads, feathers, dried flowers, hand-painted. The choice of style and style of the lampshade depends on the general idea of \u200b\u200bthe interior. The finished product will transform a standard floor lamp, ceiling lamp, sconce or table lamp. New life of plastic utensilsWhen considering how to make a lampshade, pay attention to the simple and affordable materials available in every home. Try to make an elegant and unusual ceiling with your own hands. As a material, use ordinary plastic spoons. Such a product is ideal for the kitchen, depending on the color of the spoons, it can be pure white, cream, green, orange. DIY is the easiest way to make a lampshade frame from a large plastic bottle with a cut neck.
The number of spoons depends on the size of the structure. Gently cut the handles with nippers, for work you will need only the main parts with a recess. At a plastic bottle with a sharp knife, cut the bottom and neck. Fasten parts of the spoons with the convex side up. Start work from the bottom edge of the future lampshade, attaching the parts close to each other. Place the second row with an overlap, in the form of scales. The more carefully the spoons are attached, the more beautiful the finished product will turn out. When finished, pass the cord with the cartridge through the holes and screw in the light bulb. You can make a ceiling for the chandelier from plastic bottles. Cut decorative leaves from them, and then collect a spectacular composition. The unusual design looks especially beautiful when the light is on. The craft will decorate the nursery or hallway; it will look spectacular on the veranda or loggia. For work you will need:
Draw the veins with the gentle touch of a soldering iron tip. Make the central vein deeper, lay the thread in it and slightly melt the edges. When the right amount of detail is done, saturate the threads with acrylic varnish using a pipette. Dry the workpieces. Assemble them in any design by sticking the gun to the frame. There are a lot of ideas how to make a frame for a lampshade. The easiest way is to roll it from thick wire and stick it to the ceiling using a gun. According to the described technology, you can make a lampshade for a table lamp with your own hands. The product will give dim diffused light and easily fit into the interior in a high-tech style. What can be made from threadsFrom strong threads, cord, twine or jute rope you can make a magnificent lampshade, suitable for the interior in an eco-style. It is suitable for a ceiling lamp or floor lamp, decorate the living room, nursery, hallway or kitchen. Very elegantly similar products look on the open summer veranda.
Inflate the beach ball and smear its surface with petroleum jelly. Make a small thread blurr. In the plastic cup, make 2 holes located one opposite the other. Place the glass on the saucer and pour PVA glue into it. Pull the thread through the resulting design, and then wind the ball with it in random order. The more tightly wound the threads, the less transparent the finished product will turn out. When the work is finished, set aside the workpiece for drying for 24 hours. Gently release air from the ball and remove it from the resulting ball of thread. Vaseline prevents the threads from sticking to the surface, so this procedure is done without difficulty. Cut two holes located one opposite the other. The top should be small, the bottom should be wider. Pass the cord with the cartridge through the holes, fix it with glue in the upper part so that the lampshade holds tight. A hand should pass freely into the lower hole, this is necessary to replace the light bulb. You can decorate the finished product by gluing coffee beans, beads or dried leaves. Fix the decor with a few drops of hot glue from the glue gun. There are a lot of ideas how to make a ceiling for a chandelier with your own hands, but for a start it is worth trying the simplest basic options. It remains only to suspend the structure to the ceiling and screw a suitable bulb into the cartridge. Classics of the genre: comfort with tasselsA special shade in the house or in the country will create a lampshade made of fabric: gunny, canvas, chintz or linen. Sewing it is easy. A strip of the required width is cut out of suitable material and hemmed onto machines from both edges. Then the matter gathers in a ring, a cord is pulled into the upper drawstring and pulled together so that the lampshade forms thick assemblies. The resulting product is worn on a frame that retains a beautiful rounded shape. You can search for options on how to make a frame for a lampshade in various online sources. The easiest way to use a thick wire, rolled into a ring. It will take two or three such blanks of different sizes. The smallest ring is attached in the upper part, the middle is glued in the center, the lower ring should be the largest. The finished product at the bottom can be decorated with fringe. It is also appropriate to decorate fabric shades with bows, embroidery, beads or sequins. The choice of decor depends on the style of the room. A lampshade for a floor lamp, made independently, will cost inexpensively, and its appearance can be quite worthy. Such a product will be a great gift, you can attract children to the manufacture, they will really like this option of leisure. Even kids can create a lampshade for a floor lamp with their own hands, this work will be an occasion for pride and a real decoration of a children's room. Photo galleryWe bring to your attention a successful selection of 36 photo-ideas of lampshades with your own hands.
Decorating fixtures or creating lampshades is not only interesting, but also useful. You can get the perfect item that fully matches the interior of your home, and at the same time, it's great to save money. You just need to buy the simplest lamp, and make it exclusive. After all, the basis of the cosiness and individual style of our home is things that are lovingly selected, or made with your own hands. A truly step-by-step instruction will help you to get a truly exclusive decor item, following which you can step by step invoice at least an entire furniture wall or kitchen set using decoupage technique, at least make an original cover on a sofa or chair, or after a few evenings, put a lamp in a new square lampshade of own production. A cozy house is not only the right furniture, but the right lighting. Thanks to the beautiful lampshade, the interior will become exclusive, and the room will become warmer and more comfortable.
A detailed workshop on the manufacture of lampshades will help create a unique, decorative interior item. Having familiarized yourself with all the possible manufacturing methods, you will be able to choose exactly the option that will be ideal for you. Lampshade MaterialHaving a finished frame, you can proceed with the selection of material for the lampshade. It could be:
Junk materials that are usually thrown away are also suitable:
Choosing the material for the lampshade, need to remember its color. It should ideally suit the created style. In addition, you need pay attention to the illumination of the room. If the room is poorly lit during the day, and it has twilight, then a lamp made of transparent or light material is more suitable for it. For a bright room, you can choose a dense and dark material for the lamp - but this will depend on the general decoration of the room. As you know, red and yellow color add heat and light to the room; therefore, to make the room warmer, you need to install a lamp with yellow or red lampshade in it. If the room is located on the south side, and the sun warms up its walls all day, then the lampshade for the lamp installed in this room may be blue or green. Gallery: DIY lampshade (25 photos)
How to make a DIY lampshade
To make cylindrical frame, you need to make two circles of the same diameter. If you need to make a classic frame for the lamp, then the lower circle must be of a larger diameter than the upper one. Rounded shape can be obtained if the partitions are not straight, but slightly curved. The classic frame will benefit from this. The shape of the frame will be interesting if there is a ring at the base and not at the top. It turns out that the concave partitions will be connected at the top at one point, and at the bottom - will be fixed at the same distance from each other. For the manufacture of the frame is best suited wire, since it can ideally hold its shape, moreover, it is non-combustible. Suitable for work copper, aluminum or steel wire with a diameter of 2 mm or more. DIY lamp designs
To get an exclusive model of the chandelier, you need to visit the exhibition of handicrafts. If the model you like costs a lot of money, then do not be upset. You just need to apply imagination, “turn on” your hands and head - then you can make an exclusive model with your own hands. Since the chandelier, as a rule, has not one but several identical shades, it will take longer to produce them than for one. Modern lampshades can have a variety of shapes, decorate them to your liking. Preference is given to products decorated with colored beads.
This method of creating a new lampshade is considered the simplest, moreover, the product is very light. Depending on the situation in the room, the color of the fabric with cardboard is chosen. The decor of such a product can be any. Filament lampshadeA ball made of threads looks very impressive in the interior. To make it, you need patience and perseverance, and besides them:
If, for some reason, you do not like the color of the product, you can repaint it in another, using paint in spray cans. Ready twine lampshade can be varnished, bead or beads. Paper lampshade
Many ideas for making a lampshade for a floor lamp made of paper can be found on the Internet. Different colors are used, different figures are cut out. The result is a unique creation that can decorate any room. DIY fabric lampshadeTo work, you will need:
For example, you can make a new lampshade for a lamp checkered fabric. It is sewn on a frame of a certain size. If the old lamp has a frame, then consider that half the work has already been done. And if the lamp frame is missing, then this is not a disaster - you can do it yourself, there is nothing complicated about it. A fabric-shade fabric shade is perfect for your country style. How to make a lampshade for a floor lamp? A master class on its manufacture can be found on the Internet. To stitch a lampshade onto a cylinder-shaped frame, you need to measure its circumference and height. On the fabric, make a pattern, according to the received sizes, then cut it out as a template. For the cone, you need to make a blank of whatman paper. Try on what was cut out, cut off all the excess. If something did not work out - you need to redo it. The fabric for the lampshade is attached to the cone, and you need to place the pattern or ornament correctly. To make the surface smooth, the fabric must be pulled. The lampshade fabric may be cotton or linen. Lampshade for the lamp in the nursery
Naturally, on a nightlight the child will want to see his favorite cartoon characters. It will be necessary to work hard, and with it cut them out of paper or buy ready-made translations. You need to use the idea of \u200b\u200ba print on cotton. For the bedroomIf the bedroom is purely female, then the ideal option for a lampshade would be a model, knitted with thread. The proposed option is knitted from white threads of type iris, which knit napkins to decorate shelves or tables. You can choose a pattern for thin knitting needles, if it will be easier for you. For a classic frame, a napkin does not start to be knitted from 3 air loops. The length of the chain should be slightly larger than the upper ring of the frame. Further, the lampshade fits in a circle, according to the scheme, like a napkin. It is possible that the height of the product will be longer than the length of the napkin, then it will be necessary to knit more in several rows.
White knitted lampshade can decorate with colored beads or colored ribbons - It all depends on your imagination. In a creative experiment, the main thing is to choose the right shade of small decorative elements. When the style, color scheme and shape are correctly selected, then even the most simple thing, made by yourself, will look exquisite. To make the lampshade, made by yourself, neater and more beautiful, you need to paint the new frame from a dense wire first, and then carefully wrap it with cotton tape. Then the fabric of the stitched lampshade will not suffer. ConclusionIt is very simple to update the lamp, the lampshade of which, over time, has lost its original appearance. After reviewing the relevant information and purchasing all the necessary materials, you can do a unique thing that will decorate the interior of your home. Original lamps and lampshades with your own hands. Ideas, workshopsDIY lamps and lampshades. Ideas, workshopsHello everyone! The creation or decoration of lamps and lampshades is not only incredibly interesting, but also quite useful: it allows you to not only create a unique item, and in full accordance with the interior of your home, but also save a lot of money. It is enough to purchase the simplest lamp for little money and beat it to your liking. And there are a lot of options on how and how to make, in a variety of techniques, using a variety of materials. I picked up for you and me ideas for creating and decorating fixtures, I hope you can find the right option for yourself :) Enjoy!
The lampshade is decorated using decoupage technique, the base of the lamp is made of books
The decor of the metal frame of the lampshade with feathers is very stylish :)
Quite often, fabric or paper flowers are used to decorate lampshades, the result is very romantic :) Candlework Fabric Flowers
Printed colors are used as colors here.
Twisted fabric flowers
Ready-made flowers are used here.
The flower is made of a chintz strip of fabric strung on one side and collected in a bud
Spiral roses from newspapers
The bottom of the lampshade is decorated with spiral paper roses.
Decor of ikeevsky lampshade with paper flowers
Shades of lace and knitted napkins look very nice
Adhesive shape
The balloon is inflated and lace napkins are applied to it with glue. After drying, the ball pierces, deflates and is removed.
A very beautiful option: a birdcage was used as the base of the lamp, the lampshade was decorated using decoupage technique with obsolescence.
Even an umbrella can be used for a chandelier :)
Even shreds-trimmings of fabrics will go into business: wound, tied with a knot. This option will fit perfectly into the design of a country house or children's room.
Buttons Buttons
For the manufacture of fixtures very often and successfully use various glass containers - cans, bottles. A little lower I gave a master class on the manufacture of such a lamp.
A bottle as the base of the lamp - a similar workshop is also given below
It’s a bit more complicated here - at the bottom on the back side of the bottle, a hole is drilled through which the cord starts.
The lamp is made of curly metal sheet
Origami technique successfully used to create lampshades
On the base of the lampshade glued fabric strips
Lampshade made of various retro leaves
Lampshade from the basket - why not? :)
The second life of a metal colander
Unnecessary forks and spoons created a very interesting version of the chandelier :)
A very nice solution: a metal mesh is pulled over the frame and the house is beaten. I think for a children's room.
And here's another bird theme :)
Painting lampshade with acrylic paints
Fine veneer lampshade
The base of the lamp is glued with sea shells
Knitted lampshades - look very cozy :)
Lampshade decor with memorable photos and slides
The flowers on this lamp are the bottom of plastic bottles :)
Lampshades are glued with paper circles
Plant shade :) I think it's still a little hot there :)
Lace shade
Decoupage technique is also applied here.
A very interesting solution is a wire as an art object :)
The lampshade is decorated with strips of fabric.
The lamp from the branches The lampshade is decorated with crumpled-compressed coffee filters (muffins)
Glass vase lampshade
Lampshade base - unnecessary toy soldiers glued and spray painted
Creative lampshade made of felt strips
Lampshade made of ping pong balls :)
Flower decor
And many, many different ideas ...
Workshop on manufacturing a can lamp with a metal lid from Tom & Brit (bestofinteriors.com)
We pierce a hole with a nail to create a hole
Insert the cartridge
We paint in one color
We screw in the bulb and insert it into the jar
The lamp is ready :)
Lamps from paper from the resource varrell.com
We need a picture of the castle
Cut, cut windows, glue
We put a battery-powered spotlight inside
Rope Chandelier by Sarah M. Dorsey (sarahmdorseydesigns.blogspot.com)
We need a rope, Mod Podge glue (can be replaced with diluted PVA), a ball
In order to create a wavy shape, Sarah used wooden slats. We spread the form, coat with glue for fixation.
After drying, spread on the ball and coat with plenty of glue
After drying, remove the lampshade from the ball and paint it with white spray paint - Sarah has four layers
Very beautiful lampshade from grandmother's squares from the author of Aboutgoodness.com
We fit the lampshade with fabric
We bend a strip of fabric in half lengthwise and twist into a roll
Straighten slightly
Apply glue to the bend and glue to the base
Master class on creating the basis for the lampshade from Kiri (ilikethatlamp.com)
Necessary components
The bottle is thoroughly washed, disinfected and dried.
Spray paint
Installation process
So the gin bottle turned into the base for the lampshade :) As you can see, the matter is quite simple and very interesting. Unleash your imagination, create and let it be beautiful and cozy in your home! Well, for those who still prefer to buy ready-made lighting fixtures, I recommend a look at a specialized online store Lampa.ua -, where a huge assortment of high-quality and stylish table lamps, chandeliers, sconces, accessories, etc. from the best manufacturers and at very flexible pleasant prices :) By the way, this online store according to Google statistics is the most popular among Ukrainian buyers :) Use with pleasure! I wish everyone good luck and good mood !! It happens that one wants to update the interior, but it is not known where to start. Sometimes you just need to change the lighting. But buying a new lamp is expensive, and in some cases it is not even required. We suggest you consider a few workshops on how to update a table lampshade What you need to create lampshadesDIY lampshades can be updated with absolutely any materials:
It is also imperative to have tools such as scissors and a glue gun. A simple and original way to decorate an old lampSuch lamps are very well suited for a feminine interior in chic style. To give the lampshade such a look, take the following materials:
A master class on how to update a lampshade for a table lamp with your own hands:
Tip: interesting do-it-yourself lampshades for table lamps with your own hands are obtained by combining several shades of colors that flow smoothly. Geographic lampshadeSuch a lamp will look great both in the living room and in the child’s room. You will need:
Master class on how to make geographic lampshades for table lamps with your own hands:
Geographic lampshade is ready! Book sheets as decorIn the same way as in the previous mater class, you can decorate lampshades for using book pages.
To do this, tear out a few sheets from the old book and trim their edges so that they are not shabby. Lubricate each sheet with PVA glue and stick it on the lampshade in a chaotic manner. The paper should protrude slightly around the edges. When all sheets are pasted, fold the protruding edges inward. Warm lampshade with ombre effectThis lamp is ideal for the cold season, as it will bring a note of warmth and comfort to any interior.
List of what you need:
A master class on how to make a beautiful lampshade for a table lamp with your own hands:
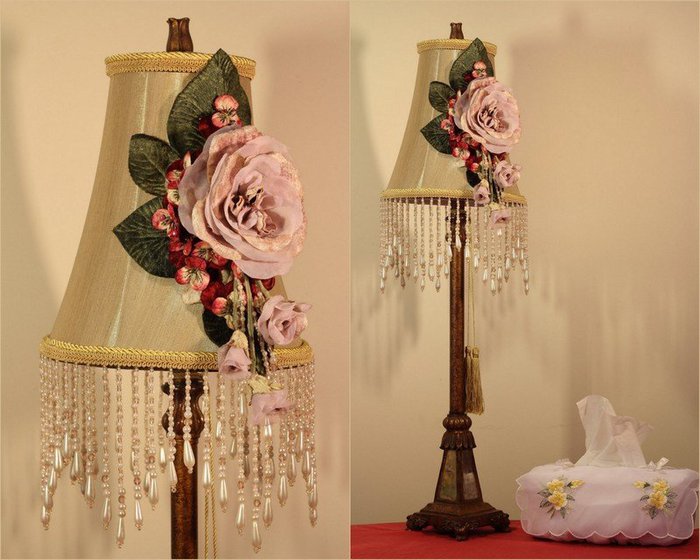
The warm lampshade is ready! Lampshade with roses
You will need to take such tools and materials:
A master class on how to decorate a lampshade for a table lamp with your own hands (a photo of the process is attached):
Volumetric lampshade is ready! New lampshade with ombre effect
To make a smooth and beautiful transition from one color to another, you need a suitable coating. To do this, it is recommended to make a lampshade with your own hands.
Master class on how to make a lampshade for a table lamp with your own hands with the ombre effect:
Everything is ready! How to make a lampshade from scratchThe previous workshop taught how to update a tired or outdated lampshade. And what if there is nothing to work with and not even a frame? Then you can easily make a lampshade yourself.
To do this, you need to take:
Operating procedureMaster class on how to make a new lampshade for a table lamp with your own hands:
A brand new lampshade is ready! |


 For work you will need:
 From the walls of the bottles cut leaves with cloves. The size is arbitrary, it is better if the leaves are different. Preheat the soldering iron and carefully outline the contours of the leaves with a sting so that they slightly melt and curl. Be careful not to spoil the workpieces.
 For work you will need:


 If there was a desire to make a permutation in the room, then along with it you need to update the chandelier and floor lamp. You can buy just a new product, or you can change the textiles on the lampshade with your own hands.


 The frame is a stable base, mainly consisting of two circles. The circles can be of different or the same diameter; they are interconnected by vertical partitions. The length of the partition is the height of the lampshade.
 I really want to repair not only the furniture, but also the accessories after the repair in the room. These include lights, chandeliers, floor lamps and table lamps. It is desirable that such an interior item be an exclusive detail; it can be installed in a room on a coffee table or in a bedroom on a bedside table or on a chest of drawers.
 If you want to update a lampshade for a table lamp, then cardboard is an ideal option. It should be durable, but thin, then the product will be completely unlike the others. The work is performed in the following sequence:
 The desktop should be covered with oilcloth or unnecessary newspapers, and only after that start work.
 So that the paper could not heat up and light up when the light is on, the lampshade should be quite large. Under such a lampshade, it is better to buy an economical bulb, which is less heated.
 Next, you need to choose an object for restoration: it can be an old table lamp or any other lamp that has long been "living" with your grandmother. Thoroughly think about its appearance, which should be suitable for the already created interior of the room.
 When a child is small, the lamp in the nursery is very relevant. You can always buy such a product, but to make it, you need not only time, but also imagination. Lampshade for the lamp is desirable to do with the child in order to develop his imagination. Since the ceiling will be in the children's room, you need to fully trust the taste of the child.
 The finished product must be washed and be sure to starchso that after drying it has a certain shape.


Popular:

New
- DIY shoe rack made of wood with photo and video
- How to make sliding doors
- How to build a wooden house on your own How to build a wooden house with your own hands
- How to make a garden path from corks from plastic bottles What you need to make a path from caps
- Calculate Profiled Timber Home Calculator
- Ready bath 6x6. Projects of houses and baths. The disadvantages of brick baths
- DIY summer kitchen in the country
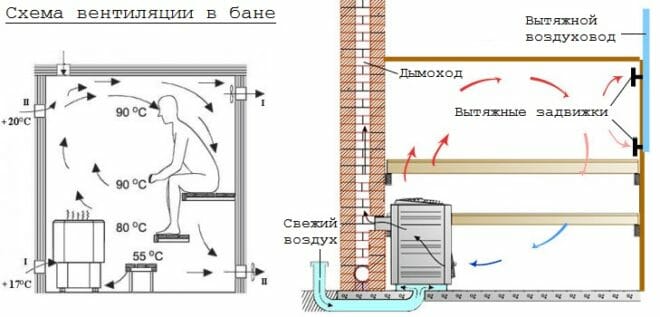
- Ventilation in the bath: an overview of traditional schemes and nuances of arrangement
- How to make heating in the bath in winter - options for effective heating systems
- Step by step instructions with photos