Website sections
Editor's Choice:
- How to insulate a concrete garage with your own hands
- Heat supply and heating of high-rise buildings Autonomous heating of a multi-storey building
- How and what to insulate the concrete floor in a private house with your own hands correctly
- Solar heating of a private house Heating of a private house from the sun
- Do-it-yourself heating of a two-story private house - schemes
- Penoizol: reviews, specifications
- How to choose a pyrolysis boiler for long burning?
- Bath brick insulation inside Thermal insulation of the brick walls of the bath inside
- Floor in a wooden house: insulation from the bottom with foam, mineral wool, using industrial equipment How to insulate the floor from below the underfloor
- Do-it-yourself insulation of the frame house in stages
Advertising
|
The floor is one of the cold elements of a wooden house. Streams of cold air rush directly to the floor. Often from its lower side there is also a coolness. To reduce the cost of consuming quickly leaving heat, it is worthwhile to insulate the floor in a wooden house from below. As soon as cracks appear in the floor, a draft begins to enter the room, which leads to an average of 30 percent heat loss. The technology of warming the lower part of the house does not cause much difficulty. Heat insulation can occur using completely different types of insulation. However, before starting repair work, it is worth paying attention to certain parameters:
To do the work on your own will not be particularly difficult. The main thing here is to remember that warming includes three main layers:
All these components carry an important semantic load. Successive work stepsWarming of the lower part of the room occurs with the implementation of several mandatory steps. These include:
When choosing the thickness of the layer of material for heat insulation, there are no specific criteria. Parameters must be selected individually for each type of room. Lag insulationA separate point is to consider insulation on the logs of the floor below in a wooden garden house. The advantage of this type of heat conservation is simplicity in operation. In this case, you will be able to save a fairly large amount of heat in a private house. So, work on insulation should occur in this way :.
The considered option is notable for its operational efficiency. The implementation of all stages of the work does not require the intervention of specialists, everything can be done with your own hands.
What material to use?Today in the consumer market you can find a large selection of materials for heat insulation. Each of them is endowed with individual, characteristic properties, a ruler of sizes, a method of installation, a price segment. Among them:
Sawdust insulationThe considered method refers to one of the oldest species. The main advantages of sawdust insulation are ease of installation and low cost. At the same time, it is possible to lay this type of insulation in hard-to-reach places. An important factor here is the ecological purity of the material. In addition, they can be used as a single material, or introduced as one of the components of the mixture for construction. Mineral wool insulationIf the house was built more than a dozen years ago, then mineral wool will be the best choice as insulation material. Today, this type is the most popular among consumers. The material is attracted by its ability to resist fire.
In addition, the following positive characteristics were noted:
However, along with the positive characteristics, there are a number of negative points. It is worth paying attention to them before the work on warming the floor from the tree from below begins. These include:
In connection with the latter, close attention should be paid to the additional installation of steam insulation. Mineral wool of mineral origin is realized in plates, mats. The side that is characterized by a high level of hardness is marked with a strip of blue. Laying of the material is carried out so that this strip is located in the upper part. For a wooden floor, it is preferable to choose plates. To ensure reliable heat retention, it will be considered sufficient to lay one layer of material.
Polystyrene insulationPolystyrene is otherwise known among consumers as polystyrene. Today he is among the leaders among thermal insulation materials. This is due to the fact that the foam has a huge number of positive characteristics. Negative ones are minimized. The insulation is characterized by low heat conductivity, steam penetration. It perfectly resists fire, chemical, biological influences. The structure of the material is cellular. This allows the foam to be in operation for a long time, while not losing its effectiveness as a heat insulator. Of the more significant disadvantages, good moisture absorption can be distinguished. Sometimes this can lead to the fact that some properties lose their significance. Polyurethane foam insulationThe material under consideration has a similar structure structure with polystyrene. In this case, the pores are filled with air, gases. This allows you to create a low level of heat conductivity in the material. In addition, the weight of the polyurethane foam is negligible. Today it is recognized as the best insulation. Important advantages of the insulating element include:
There was no particular difficulty in installing the type of thermal insulation under consideration. However, certain nuances still exist. So, for example, polyurethane foam is applied by spraying. It is impossible to do this without using specialized equipment. Tight, reliable adherence of the material to any kind of surfaces allows you to spray it almost everywhere. This application method will allow to insulate any surface, while its shape, size will not matter. The material lies in an even layer, each circuit will be observed. The formation of joints in this case is excluded. Polyurethane foam is practically not able to absorb moisture, which leads to the absence of the need to install a vapor barrier. ConclusionWe have considered far from all the insulation materials that can be found on sale today. Nevertheless, it is necessary to insulate the floor. Not only is a warm floor needed, so that the building can retain as much heat as possible, it will create a cozy, homely mood in each separate room. Of course, you can entrust the type of work under consideration to specialists in this matter. However, not every home owner has the financial ability to do this. In this case, it is worth resorting to the option of independent work: special skills are not required here. The main thing is to remember that there is a certain algorithm that should be strictly adhered to. 9171 10/06/2019 6 min. Every owner of a wooden house knows that in order to withstand the harsh Russian winters, winds and cold, it must be properly insulated. Thermal insulation materials must also be used on the walls of the house, on the ceiling and, of course, on the floor. A lot of precious heat can escape through the cold wooden floor. To avoid significant heating costs and to make the floor warm, you can use different materials. But now, modern high-tech insulation materials that allow the coating to breathe, and at the same time have high thermal insulation properties, are especially popular. Exactly such material is foam or extruded polystyrene foam. In the article, we consider the features of this insulation, find out its advantages and disadvantages, learn how to properly lay it when warming the floor in a wooden house. Description and features of floor insulation in a wooden house with foamPenoplex is the collective name for a heat-insulating material. Generally speaking, strictly speaking, Penoplex is the name of a company that produces building and finishing materials - by the way, our Russian one. Due to the popularity of their extruded polystyrene foam, this material, even from other manufacturers, is now called penoplex. Penoplex is made from the same raw materials as the familiar white foam. By the way, the latter can also be used for insulation. However, if the foam is always white, then the foam can be gray, and red, and even color. Penoplex took all its advantages from the foam, leaving the disadvantages. Extruded polystyrene foam is produced by foaming the feedstock. As a result of this processing, the output is a light but solid material penetrated by many tiny air bubbles. Thanks to this air gap, the material has really high heat-insulating performance. In addition to floor insulation in a wooden house, penoplex can be successfully used for thermal insulation of ceilings, attics, floors, walls. You will learn about the technology of warming a wooden house outside with mineral wool for siding. Material advantages polystyrene foam, comparison with polystyreneWe will find out what are the advantages of floor insulation in a wooden house with foam. This insulation provides reliable protection of the room from the cold. The material has really high and reliable thermal insulation performance. In addition to the fact that the material retains heat well in the house, it also has high soundproofing properties. Compared to polystyrene foam, polystyrene foam is more durable. Many people know how easy it is to break a fragile foam sheet. With modern penoplex this will not happen. Due to the fact that it is a solid material, over time it will not sag, exposing sections of the floor. By the way, such an incident often happens when warming with soft materials, for example, mineral wool. Penoplex is resistant to deformation, easily resists compression. In addition, you may be interested in material about features.
Penoplex is conveniently and simply mounted. No need to wear respirators and protective clothing. The plates of this material are light, if necessary, you can achieve the desired size by simply cutting the plate with a knife. Penoplex easily "gets up" on the glue, while securely fixing. Penoplex do not gnaw mice, bugs and other insects do not start in it. For an eco-friendly wooden house, such a problem sometimes becomes a direct threat to the preservation of heat, the integrity of the surfaces. For example, mice love to settle in soft mineral wool. But with penoplex this, fortunately, will not happen.
The safety of this insulation is manifested in the fact that penoplex does not emit any toxic substances. At work, he, unlike mineral wool, does not "dust", does not cause allergic reactions. In addition, extruded polystyrene is odorless. Penoplex is of different types. You can choose a non-combustible variety, which is important for a wooden house.
Characteristics of a heater penopleks. The material is laid in a rather thin layer, but thanks to its high heat-insulating characteristics and density, this is quite enough. Therefore, penoplex can also be considered a rather economical type of insulation. If you correctly install, and choose a high-quality foam from a trusted manufacturer, the material can serve for a very long time without any loss of its technical characteristics. With careful use, manufacturers guarantee uninterrupted foam service for at least 55 years. How and how to insulate a brick house from the outside will tell. MinusesFor balance, it is necessary to find out the disadvantages of warming floors with foam. The material has a fairly high price. This stops some homeowners. However, we must not forget that the installation of foam does not require a thick layer. The material is completely artificial. But thanks to this, mice and bugs do not start in penoplex. So it is quite possible to consider this drawback as a virtue. Penoplex does not withstand too high temperatures, deforming at the same time. But these temperatures are from plus 80 degrees on the one hand and minus 90 degrees on the other. Such differences in life are rare, therefore, we can say that this drawback does not greatly affect the qualitative characteristics of the material. The material does not tolerate strong mechanical stress. Do not forget that, in fact, these are balls inflated with air or gas, so the foam is quite fragile. Do not jump, run on a laid surface that is not yet protected by a floor covering. Summary: in comparison with the list of pluses, the disadvantages of the material look completely invisible, so you can safely go to buy this high-quality and durable insulation. Read also about penoplex insulation of the foundation outside. How to stackIn a wooden house, the floor is mainly blown due to the fact that the boards dry out over time, and cracks form between them, sometimes quite large. But if the floor is insulated with high-quality material, then even as a result of the drying of the floor covering, the heat in the house will not be noticeably less. Our recommendations for the competent installation of foam plastic when warming the floor in a wooden house. What is needed What tools and materials may be needed for floor insulation with foam.
You will read all the information about polystyrene adhesive for outdoor use. It should be noted that wooden floors can be insulated with foam in various ways. The most common and easiest of them is lag insulation. The result is a really warm floor. But in this case, high-quality waterproofing is necessary. Work stagesThe horizontal surface under the floor must be carefully cleaned and leveled. If you decide to insulate the floors in an already inhabited house, then before carrying out work, it is necessary to dismantle the floor covering. If it is still in good condition, then remove it carefully, so that after work, lay it back in place. Well, if you plan to replace the cover, then you can not especially stand on ceremony, and take off quickly. Check the condition of the subfloor. If it is deformed or has defects, carry out work to strengthen it. Prepared wooden logs must be positioned and secured so that there is no more than 70 cm of space between them.
Before laying the insulation, it is necessary to treat the logs and all wooden elements with antiseptic solutions. This precautionary measure will protect the tree from rotting and damage by bugs. After the antiseptic, the treatment with a water-repellent will also be useful. On a board or plywood, you must first lay out a layer of dense waterproofing filmtherefore, carry out installation work on the waterproofing. Keep in mind that this material is overlapped (about 15 cm) to ensure complete tightness and high-quality protection against moisture. It is possible that you will be useful to study the material about.
The scheme of insulation of the floor. The next step is the direct installation of insulation on wooden boards. When laying out penoplex, be careful not to form gaps and crevices during operation. Accurate material placement will provide reliable protection against the cold.
The floor covering is laid on top: laminate flooring, parquet, solid wood, etc. By the way, similar work can be done in an ordinary apartment. Such insulation is of particular relevance if you live in an apartment building on the ground floor. Penoplex can also be used as an insulator for the "warm floor" system. In this case, it will provide additional protection for the room from blowing and heat loss. In order to lay the material in this case, a concrete screed with floor pipes mounted in it is used. VideoOn the video, how floor insulation in a wooden house occurs with foam:
We examined the features of penoplex, as a heater for floors in a wooden house. It is important that the installation is quite feasible to carry out independently and that the foam has truly outstanding performance characteristics. Thanks to our recommendations, as well as your own hard work and accuracy, you will be able to provide your country house or cottage with a quality warm floor. Each person wants to live in a warm, comfortable and cozy house. But not all people at the initial stage of building houses think about thermal insulation. If it was decided to build a house of natural wood, then it will delight you with high heat-insulating qualities, a natural smell of wood, and durability. Insulation of the floor from below is simply necessary. There are many options for how to insulate floors. TO main materials relate:
Let's look at them in more detail and talk about each option separately, as well as their advantages and disadvantages. Attention: major work in wooden structures when insulating walls and floors is only necessary after complete shrinkage of the structure. As a rule, it takes about a year to shrink a new house. And if the house was built from, then the shrinkage can drag on for 5-7 years. When choosing a material for insulation, it is necessary to take into account such characteristics as:
It is best to consult with qualified builders before making your final choice. Mineral wool insulationMost often, people resort to warming with mineral wool. This is due to:
Also, the advantages of mineral wool can be attributed to it resistance to various types of damageboth mechanical and chemical. Mineral wool has a wide range of applications. But if you plan to use it to insulate a subfloor where there is high air humidity, then this is not the best option. For such rooms it is better to choose more moisture-resistant synthetic materials, such as polystyrene foam, polystyrene and others. Foam insulationAs for the foam, this material also has a number of advantages and positive qualities. The special structure of the material provides low level of thermal conductivity and vapor permeability. Also polystyrene is refractory, differs in reliability and resistance to mechanical and chemical damage. It has a high level of operation, simple and easy to use. note Polyfoam does not pass air. Sawdust insulationSawdust is considered the traditional method of floor insulation in wooden buildings. They differ affordable and low cost and ease of use. But keep in mind that this material does not deteriorate after several months of operation, it must be carefully prepared. Important: Freshly sawed sawdust is not suitable for floor insulation.
Sawdust with lime is mixed in a ratio of 1: 4 and poured into the space between the finishing and rough floors. To achieve maximum effect, it is necessary to make a layer of at least 20 cm. TO the benefits the use of sawdust can be attributed to them:
How to insulate expanded clayAs for thermal insulation, this method is also widely used in our country. This material is: natural and safe, lightweight, strong and durable. It absorbs moisture perfectly. To make the embankment more dense, it is necessary to apply 2 fractions of expanded clay: sand and gravel. Expanded polystyrenePolystyrene insulation is one of the more modern methods. This material is similar to polystyrene, but it is more durable. Expanded polystyrene not only does not pass moisture, but also steam. It is an excellent waterproofing agent. It is used not only for warming wooden houses, but also for roads and concrete foundations. Dry screedDry screed insulation is used only after wood shrinkage. The advantages of a dry screed should include:
A dry screed does not tolerate high humidity and is deformed under its influence. This does not affect the thermal insulation properties of the material, but can lead to damage to the finish coating. Glass woolAs for glass wool insulation, the positive characteristics of this material include: incombustibility, ease of use and environmental safety. But keep in mind glass wool shrinks, because of which the integrity of the thermal insulation layer may be violated. Proper lag insulationAny insulation in a private house with their own hands should be carried out in accordance with building codes and rules. All thermal insulation works are complex and are aimed at preventing the entry of cold air into the room. Floor insulation is carried out only after all basement and basement rooms have been insulated. Lagging insulation is a common method.
Double sexThis method is suitable for buildings. with high ceilings:
Features of ground floor insulation
Pie from additional steam and heat insulation layers will provide good and reliable protection against condensate and drafts. Features of thermal insulation of the second floorTo insulate the floors in a wooden house, roll materials should be used. They are lighter in weight and do not carry loads on the structure. To create a thermal insulation cake on the second floor, you will need to do the following:
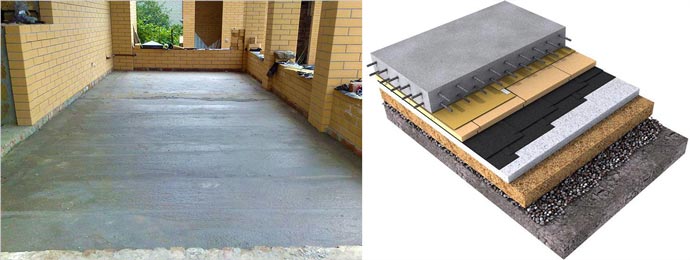
Concrete floor insulationTo insulate a concrete floor, you must create multilayer construction. This process is carried out in several stages:
As practice shows, this technology prevents heat loss.
Attic floor insulationTo insulate the attic, you can use any heat insulators. Before laying the insulating layer in the attic, it is necessary to make a frame of timber. Next, we proceed to the arrangement of the vapor barrier and put the insulation. As insulation of the attic floor, mineral wool or glass wool are perfect. How to calculate the thickness of the insulationnote, the choice of thermal insulation layer plays an important role. The thickness of the materials is calculated individually for each individual building and depends on climatic conditions, features of the building and the type of insulation you choose. Summing up, it can be noted that it is possible to insulate the floors in a wooden house on their own. The main thing is to choose the right consumables, get acquainted with the basic technologies and the layout scheme and prepare the tools.
Useful videosIn the video below, look at the option of floor insulation on logs in a wooden house:
This video highlights the common mistake of floor insulation - condensate, wet insulation:
Video - floor insulation with foam at the lags:
How to insulate floors with expanded polystyrene, what tools are needed, the whole technology - see the video below:
If you comply with all the norms and rules of the insulation device, then you can cope with the tasks in a fairly operational time. 26014 0 21 Independent floor insulation in a wooden house - 3 options for quality installationWooden houses in most modern people are associated with comfort and warmth. And in principle, this is true, because wood is a living, natural, breathing material. But many of my friends methodically step on the same rake, forgetting that the insulation of the floor in a wooden house is no less important than the insulation of walls and roofs. In this material, I will first tell you how to insulate the floor in a wooden house in the three most affordable ways, and then I will go over personally on the application of each type of insulation specifically for wooden buildings. Design options for floor insulation in wooden housesTo begin with, modern wooden houses can be built both on a light pile or strip foundation, and on a monolithic concrete slab, respectively, and the insulation scheme in all these cases will be different. In addition, the floors in wooden houses can be insulated both from below, that is, from the side of the basement, and from above, from the side of the living room. Naturally, it’s easier to do all this during the construction of the house, but not everyone is so lucky and sometimes they have to insulate the floors in the old house, which leaves its fingerprints on the technology.
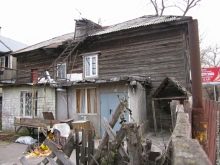
Option No. 1. Arrangement of thermal insulation in a house with a low undergroundThe low underground is a disease of most old houses and summer cottages. In my experience, almost all the owners who bought or somehow got a cottage built in the old way, back in Soviet times, face a serious problem of cold, and often rotten floors.
I’ll hasten to reassure you right away, it’s not necessary to break everything, if the log house itself is still whole and strong enough, you can heat the floor in a wooden house with your own hands in a few days, and for this, it is not necessary to be a real builder. It is quite confident to use a hacksaw, drill and hammer. As you probably already guessed, if the private house has a low subfloor, then the floors will have to be insulated from above. And for this we need to disassemble the entire structure completely, leaving only the supporting logs;
Option number 2. We warm the floor above the cellarThe correct insulation of the floor from below in a wooden house, in general, is carried out according to a similar technology, but believe me, doing it is much easier. Indeed, subject to the normal state of the final coating, you do not need to disassemble it. Otherwise, the technology is the same, only all actions are performed in reverse.
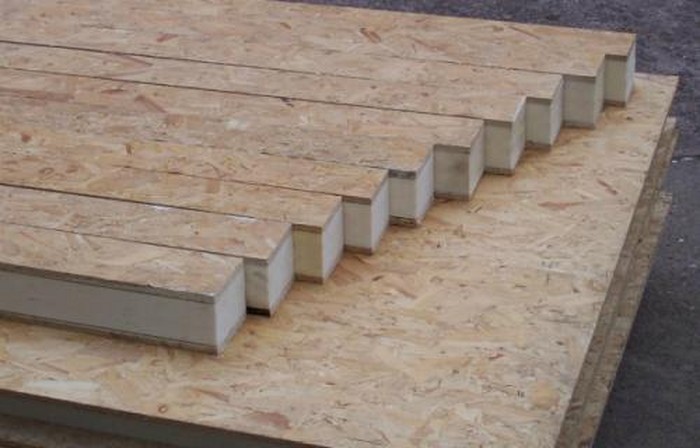
Option number 3. We insulate the floor of a wooden house standing on a concrete slabThe floor in a wooden house on a solid concrete base can be insulated using two technologies: installation on the logs and arrangement of the screed. The choice depends on what end result you want to see and how much you are willing to spend money on all this. Most often, in such houses the first option is used, according to it at the finish you get a coating of a natural floorboard.
Compared with the two previous options, in my opinion, it is much easier to insulate a concrete slab. As a rule, such a base initially has an absolutely flat plane, in addition, the weight of the insulating structure itself does not matter here. According to the first method, a wooden crate must be mounted on the stove. She will replace those bearing logs for us. Only at the beginning should concrete be laid with a layer of waterproofing. In this case, it is enough technical polyethylene. The thickness of the bars under the crate depends on the type of insulation. For a full-fledged floorboard with a thickness of 40 mm or more, the step of laying the guides of the battens ranges from 50 to 70 cm. In the case when it is planned to sew up the floor with thick plywood or OSB, the step is about 30 - 40 cm.
The battens of the battens are fixed to the concrete slab by anchors. Then, just like when installing from above, a heater is laid in the niches, and a finishing coating is sewn on top of it. Insulation of the concrete slab under the screed is even easier. Looking a little ahead, I’ll say that the best insulation here is extruded polystyrene foam, which is better known as Penoplex. I’ll talk about its capabilities later, but now back to technology. So this Penoplex, in a continuous layer, is laid on a flat concrete slab, attached to it and all the cracks are blown up with foam. Then you can choose: either lay a metal reinforcing mesh on it and fill in the screed, or equip the flooring from plywood, OSB or drywall and mount the laminate on it using floating technology.
In addition to extruded polystyrene foam, such a floor can be insulated with expanded clay. Of course, it will be necessary to tinker more, but the price of such insulation will be incommensurably lower. The technology here is about the same. Initially, concrete is covered with a waterproofing film with an approach to the walls, just above the finish. Then a layer of expanded clay is filled up and leveled horizontally.
You can put rebar on expanded clay and pour cement-sand mortar, it will be a wet screed. Or lay a double layer of plywood, OSB or drywall, this is already called a dry floating screed. Choose a heaterHow to do the insulation itself, we figured out, now it remains to find out which insulation for the floor in a wooden house is more suitable in a particular situation. In order to make it easier for you to understand, I conditionally divided all the materials into 2 large areas:
Traditional budget heaters
Since we are talking about self-cooking, I will take the liberty of giving you the 2 most popular recipes:
But honestly, I do not recommend them to you, this material quickly cakes, mice love it and when wet it completely loses its qualities. No matter how you try, soft cotton will have to be changed about once every 10 years. There are also mineral wool basalt slabs, they cost more, but their density and quality are much higher. I recommend that if you install cotton, then take only slabs with a thickness of about 100m.
New technologies
ConclusionInsulating the floor in a wooden house with your own hands is not as difficult as it might seem at first glance. If you choose the right insulation and prepare well, then the floors in a medium-sized house can be equipped with a maximum of a week. In the photo and video in this article, I posted additional information on the topic of insulation. If you have any questions, write them in the comments, I will try to help.
The method of floor insulation in a wooden house depends on the location of the floor. Increased requirements are applied to work on the ground floor of the building, especially if the main structure does not provide for a high basement or insulated basement. Technically competently carry out floor insulation from below. This method does not change the room parameters, allows you to use a soft type of insulation, reduces the degree of sedimentation of the condensate and provides uniform protection of the entire coating. Materials and Tools
Read also: Installation sequence
ATTENTION! Any mounting element made of wood should be treated with an antiseptic protective compound, regardless of its scope. What to do when the floor is concrete?
Some subtleties
When choosing a basis for insulation, the following should be considered:
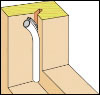
Installation of insulation is carried out using waterproofing to prevent abundant absorption of moisture, leading to swelling, and subsequently to the drying of the construction board.
How to insulate a wooden floor?There are a lot of materials on the construction market. They differ in cost, installation method, technical parameters and operational qualities.
Penofol - foamed polyethylene with a base of aluminum foil, while remaining environmentally friendly, it has heat and sound insulation qualities. It is not resistant to moisture and not durable, but affordable. Warming a wooden floor with penofol, know after 3-5 years, the work will need to be repeated.
Penoplex - a foamed type of polymer that retains its shape and has high strength. The cellular structure of the material improves heat transfer. Penoplex does not require additional waterproofing, as it is resistant to moisture penetration into its structure. It is lightweight, does not give a load on the foundation foundation and is popular for frame structures on piles.
Min cotton - a popular and affordable insulator having light weight and high noise insulation qualities. It is made of stone, glass and slag fiber. It is fireproof and easy to use. It is presented in the form of compacted plates or soft mats. The first type is marked, allowing installation in the right direction. The disadvantage is its instability to moisture, but with careful vapor barrier, this nuance can be eliminated. When working with any type of cotton wool, a protective suit should be worn so that the fiber particles do not come into contact with the body and do not cause allergies.
Eco cotton wool - New and unique in its properties material unlike other heaters. It is used both for private buildings and in apartment buildings. Polyurethane foam is sprayed using special equipment, which is its only drawback, since it is impossible to carry out the installation on its own.
Foam blowing with the help of a compressor unit allows the heater to penetrate into all cracks and voids, creating a dense coating with high vapor barrier qualities. When working, there is no need to lay a waterproofing layer, since it is resistant to moisture. Eco-cotton, despite the integrity and density after drying, does not weigh down the weight of the house, which allows it to be used for any type of substrate. At the same time, it is resistant to increased loads.
Expanded clay - environmentally friendly and absolutely harmless type of insulation. They make it from clay or slate, in the form of small porous in structure balls, fired at high temperatures in special furnaces. Expanded clay has increased resistance to low temperatures and soundproofing qualities. The material has the property of being compacted under its own mass by pressing together. As a result, their mass and pressure on the structure increases, and the thermal insulation qualities decrease. It is not recommended for wooden structures on a pile foundation, as the increasing mass of underground insulation leads to subsidence of the foundation. Wood shavings (sawdust) - accessible and safe. It retains heat and has sound and vapor barrier qualities. It can be used both for private buildings and for floor screed in apartments. The cement component allows subsequently laying such finishing materials as tiles, laminate and parquet. Chips before starting work must be processed with specialized compounds that protect its pests. Then it combines with water and cement, mixes thoroughly and is evenly applied to the base.
When using sawdust as a heater, it is recommended to use natural clay as the basis. It is also safe for the human body, but has better thermal insulation properties compared to cement. It is permissible to use this type of insulation if the structure does not have a strong foundation. Expanded polystyrene - has high thermal conductivity, is resistant to fire, has low sound and vapor permeability, but high thermal conductivity. It retains its qualities for a long operational period, is exposed to chemical compounds and other external factors.
Expanded polystyrene is convenient in operation, its plates are easy to lay, but this should be done on high-quality waterproofing, as it absorbs moisture, which can adversely affect the performance properties. Do not give it preference if a wooden house is located in a zone of low groundwater. Installation RulesEach of the above insulators is distinguished by its mounting properties, but they have the same thermal protection device, or rather:
You get an insulating “sandwich” that closes first with overlapping elements and directly with the main floor covering. Compliance with the above technology contributes to optimal thermal conditions without disturbing the air exchange in the house. When warming the floor in a wooden house from the bottom, get timber with a cross section of 5 or 10 cm. When fixing it from below between the main structure and the beams, an insulating layer is laid. Cover it with additional boards. About waterproofing
A protective layer is necessary to prevent the formation of condensate that contributes to the development of the fungus and rotting the wooden structure. Before mounting boards should be treated with protective compounds and primed. The waterproofing is laid on the side where the cold air comes from, i.e. from the outside of the structure. About vapor barrier
The warm air inside the living room coming from the heating system and household appliances penetrates through the wooden floors, colliding with cold flows at the outlet. As a result, condensate forms, which negatively affects the structure and leads to internal decay of the boards. Treatment with liquid solutions is not able to fully protect the living room, and therefore the laying of a vapor barrier is mandatory for non-moisture-proof heaters. The most affordable material is PVC film. It can be used both for steam and waterproofing. Installation of the film is done first when the sexual base is insulated from below. Know! The presence of a vapor barrier should be included in the design of the structure, if it was not installed, then do it yourself immediately after putting the structure into operation. Useful videos:
|


 The choice of material also depends on where and on which surface you place it: bottom or top, from the side of the basement, to insulate the attic floor or inside rooms.
 They must be aged in a dry and well-ventilated area for at least 6 months before use. To avoid mice and other pests in the sawdust, add slaked lime to them.
 Before you begin the workflow, you must:
 Since natural wood is prone to deformation, cracks can form in the floor over time. Therefore, the following work must be done:


Popular:
New
- Requirements and rules for installing a gas boiler in a private house
- How to insulate the cellar with quality materials from the inside
- How to insulate the door to the bath: energy flex, insulated frame and thermal curtain
- What covering material is best for greenhouses and greenhouses?
- Landing, care and application in landscaping
- It is better to plant in the winter. We are waiting for frost. What vegetables and herbs to plant before winter for an early harvest. Dates of autumn sowing vegetables
- Stone fence: technologies, options, features, personal experience How to make a stone fence with your own hands
- Design of an entrance hall in a private house: photos of various stylistic fillings
- Village curtains - bright solutions in the interior (70 photos) We sew curtains with our own hands to give
- Wallpapering options (60 photos): combination and other original design methods