Sections of the site
Editor's Choice:
- Online exam test in Russian language
- To prepare for the exam in social studies
- Compatibility of Leo and Scorpio: should fire be afraid of water?
- Characteristics of a Leo man born in the year of the rat
- Why do you dream of a boat on the water? Why do you dream of a boat?
- Seeing an adult daughter in a dream
- Why do you dream about a goat - why do you dream about a white goat dream book
- Dream Interpretation: Why do you dream about Strangling?
- “A worthless deal”: Sobchak’s speech in court in the “Putin case” was made public (video)
- Official and semi-official addresses Sample of an official address in tsarist times
Advertising
| DIY room layout made from paper. Templates of multi-story buildings made of paper for layout |
|
We continue the Cottage section and offer you an article. We will not suggest that you learn to use computer programs for 3D modeling, especially since it will still turn out to be a drawn cottage. We offer you two simple ways to make a beautiful, realistic and useful cottage model using only the skills acquired in school. A realistic model of a cottage with your own hands, as we have already said, is quite a thing. But the question may arise: “What is the use of a real model of a cottage, and even one made by yourself?” The answer is very simple: in this way you balance your ideas and the real world. So, there are ideas, thoughts, imagination, what the future cottage means to you:
All points are united by a common feature - it’s all in the mind. On the other hand, there is the real world in general, and the embodiment of ideas in material in particular. Of course, the full embodiment of the house is real. However, it is much more useful when a realistic model of the cottage is previously created. So, perhaps you know that in any major construction a model of the future house is ALWAYS made. For what? Precisely in order to harmonize ideas with really existing (at least in the layout) things:
What is the bottom line of balancing mass and significance by creating a realistic DIY cottage model? Well, at a minimum, the layout of the cottage will save you from many mistakes and clarify a huge amount of data.Simple example: there is Nice picture cottage, color and volumetric. However, the construction of a model of a cottage based on this picture showed the complete futility of such a plan. Why? Because the roof slope is just above the entrance. And in winter, everyone who enters and exits will receive a charge of rain and snow right down the collar. And considering that snow tends to fall off the roof, home owners will spend MANY hours just shoveling snow off the roof in front of the front door. Whereas simple realistic mock-up of a cottage with your own hands allows you to avoid a huge number of such mistakes. The question may arise: why do it yourself? Why not entrust this to specialists? Because living in this house is not for specialists, but for you. And the specialists, when making the layout, cannot read all your thoughts and desires about real comfort. Therefore, as a result, you will get a truly cozy and harmonious home - just not for yourself, but for those who made the layout. By the way, a layout is a useful thing, even if the house is built. With its help, you can clearly see and plan the redevelopment of rooms, the completion of premises, the placement of a garden and other vegetation. Not to mention the simply aesthetic contemplation of your own home from a bird's eye view. Therefore, we suggest you use two in simple ways create a realistic layout and anticipate problems in advance. The first option is a realistic model of a cottage made of foam plastic.To create a realistic model of a foam cottage you need:
Why foam ceiling tiles? Because this material came in handy. Firstly, it has a thickness of 0.5 cm, which is almost proportional to the thickness of the real wall, and secondly, the foam of the ceiling tile is very easy and quick to process - it can be cut into even pieces with an ordinary craft knife. PVA glue can be used as glue. Or the “Dragon” glue left over from the repair. To make a house model, you need to know exactly what you are doing. That is, you need to have a house drawing, sketch or plan with basic dimensions. In principle, a rough sketch by the architect is sufficient.
In practice, the scale used is 1 m = 2 cm. This proportion is easy to calculate, and the dimensions of the layout are good - the layout of the house is neither large nor small, the thickness of the walls is almost proportional. And then there is a lot of routine work - marking the foam, cutting out the foundation, walls, roof, gluing the pieces together. It is best to make a disassembled model of the house so that you can see the internal arrangement of the rooms, stairs and furniture. For this reason, you should not glue the second floor, but rather make it removable. All elements (if possible) are made proportional - length, width, height, angle of inclination, relative location.
Using the layout, you can clearly assess the spread of light during daylight hours. You just need to know in which direction to the north the house will be located. A few words about the layout of a cottage using cardboardTo model a realistic cottage layout using cardboard, you need thick cardboard from cardboard boxes. The best boxes are those in which the air conditioner, refrigerator and other large items were wrapped. Appliances. The thickness of this cardboard is also suitable for proportional modeling, just like foam plastic. Plus important positive point cardboard - it is cheaper than foam for the ceiling. On the other hand, cardboard is a little more hassle. However, just not knowing what and how to do. So, to create a cottage layout with your own hands you need:
The procedure for working with cardboard is essentially no different from working with polystyrene foam. Just one caveat: it is better to glue the walls across, not along. That is, build them up in layers, rather than placing them at full height all at once. This way the walls will turn out to be much stronger and, since they are cut to width, much neater than cardboard partitions that are immediately set to height.
Both cardboard and foam can be painted in “natural” colors for the home. This will help you decide on the colors in the interior (for example, using the article “Colors in the interior in the light of Goethe’s Doctrine of Color”). In addition, you can use color to draw the location of heating pipes, water supply, sewerage, ventilation, wiring, and so on. Which will make the real calculation much easier linear meters materials used. And at the same time it will allow you to avoid unnecessary loops and intersections. In the basement you can approximately place washing machine, boiler, for water and other “basement” elements. The bathroom, living room, kitchen and other useful and vital spaces are planned in the same way. That is, using the layout, you can, for example, determine the features of the layout of the premises. For example:
By the way, important nuance: The layout of a cottage is best done taking into account the site, and not just the house itself. This will help you choose optimal place the location of the house relative to the surrounding landscape - high-voltage lines, tall trees, swamps with mosquitoes, etc. This will also allow you to plan the site so that the problems listed above with trees, poles, mosquitoes, etc., do not arise later. Thus, a realistic model of a cottage, made by yourself, is a good help in building or renovating your own home
Based on materials from http://maketdoma.narod.ru/rukami.htm Joint creativity is a great idea for a family weekend or a relaxing evening in bad weather. Children always happily respond to an offer to spend time with their parents, and to fill this period with joy and make it useful for development, you can start making crafts. The most accessible material for homemade products is paper. It is sure to be in every home where there is a child, and provides enormous scope for the development of fantasy and imagination. Paper craft optionsPaper is an excellent material for children's creativity: easy to use, convenient, safe even for small children. She assumes various options applications. In addition to the fact that it is used for drawing with any tools (paints, pencils, crayons, milk, ink, sponge, plasticine), it is glued, torn, and crushed. Paper is produced in various colors, sizes, textures, and densities. You can cut out figures from paper to later act out scenes with them. It will be interesting for girls playing with paper dolls and clothes for them, made of the same material. Boys will enjoy making appliqués from colored sheets with the help of mom or dad.
Another unusual technique - papier mache, with the help of which real sculptural images are created from soaked pieces of paper. Having decided on the material for the craft, you should figure out what to make. One of the simplest options for paper crafts is making a house. A house is an image that is understandable and close to children. Various options buildings: a hut, a castle, a school, a country house, a high-rise building, a palace - they allow you to show your imagination and realize any creative idea of a child. In the future, the building can be actively used in role-playing games and dramatizations. Ideas for making a paper houseAs noted above, there are a great many options for manufacturing various designs. What kind of paper house to make depends on the desires and capabilities of the child. Very young children 2-3 years old will be able to participate in creating an applique or coloring a finished sample. Older preschoolers can already be actively involved in creating crafts based on drawings.
They can be made from the same paper house templates, but decorated differently. On New Year's Eve, construction of snow-covered forest huts, elf huts or Santa Claus will generate interest. They can be made small in size and used as Christmas decorations. Christmas houses are given a special charm by the lights of Christmas tree garlands, attached from the inside or from reverse side facade. Application made of colored paperMaking appliques from colored paper is suitable for young children who are just learning how to work with paper material and glue. It is also good to use this technique when preparing homemade cards. For a house made of colored paper using the applique technique you will need very few materials:
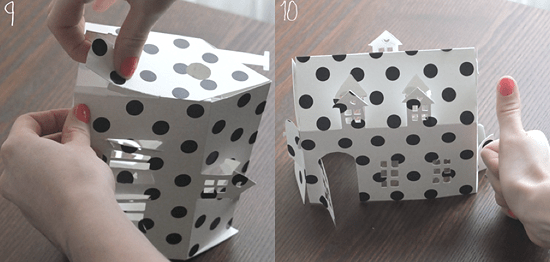
To create a castle or a beautiful tower, it is better to use ready-made templates, widely presented on various sites dedicated to creativity, scrapbooking, and postcard making. The diagram is printed on white paper using a printer, cut out along the indicated lines, colored with paints or felt-tip pens and glued to a postcard base or plain white cardboard. Decoration with rhinestones, beads, ribbons, sparkles will give a unique and festive look to even the simplest picture. Cardboard house according to templateTo make a three-dimensional model of a home, you will need to draw a scan or use ready-made templates paper houses for printing.
Various websites dedicated to children's creativity present many drawings with detailed instructions for cutting and assembling. You can create a house layout with your own hands. When using ready-made circuits, you should remember some points:
If you prepare several cylinders, painting them in advance, you will get a luxurious castle for a real princess. By cutting out tree shapes and a blue circle from colored cardboard, you can create a park with a lake around the building. Hut made of paper tubesAn unusual hut can be make from paper tubes, using them as logs. To do this you will need the following materials:
The next stage will be the construction of a log house. Two paper tubes are laid opposite each other, two more tubes are placed on top of them, perpendicular to the first ones, it should turn out to be a square when viewed from above. The “logs” are held together with glue, then the second row and subsequent ones are laid in the same way. Construction is completed by attaching gable roof for the finished log house. To do this, a thick sheet of cardboard is folded in half, and the end parts in the form of arrows are attached to the fold, which are lowered inside the house along opposite sides. After the product has dried, you can cut out windows and doors in the walls with a sharp knife, or simply glue them on the outside. The windows can be decorated with platbands, coloring the structure accordingly. You can use more than just scissors and glue to get an image of a house on paper. It will be much more exciting create a craft in origami style, following the instructions for folding the figure:  In European countries there is a tradition of decorating the windowsills of residential premises for Christmas. One of the most popular installations is a cardboard silhouette of houses with glowing windows.
Having selected a suitable diagram, all that remains is to carefully cut out the silhouettes along the contour, cut out all the windows and doors in them, install the craft on a cardboard stand with the façade facing the street, and hang it from the back LED garland or place electric candles. Garland lamps should be attached with tape to the back of each window. You can make snowdrifts of cotton wool near the buildings, add glitter and the cardboard sheet will look like a magical Christmas town! Girls will be delighted with a homemade home for dolls or small collectible figurines. You can make such a craft from a large sheet of thick cardboard according to the drawing or use a box from household appliances for this.
In a structure intended for games, large openings should be left on the sides. The child's hand should easily pass through them to place furniture and dolls inside. You don't have to make a roof, leaving the walls. In this case, the house will be one-story. Making a house out of paper is an interesting and creative activity that will be of interest to both adults and children. This affordable material can easily be used to make various crafts that can be used in games or to decorate a room.
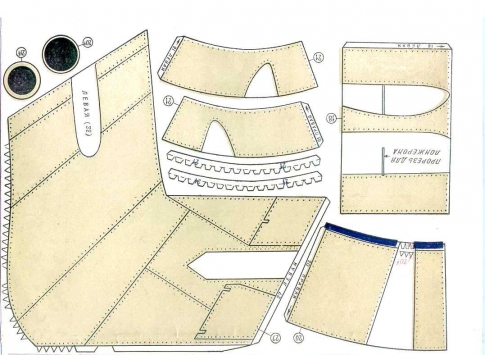
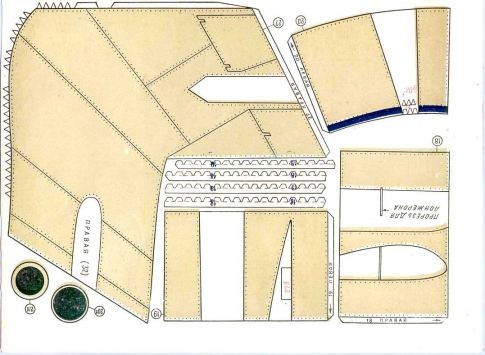
Attention, TODAY only! We will make a cute Victorian house made of paper with a diagram from Lisa in this master class with our own hands. And as always, making such a craft will be very simple, since the layout of a paper house is already ready in every detail, you just need to download the diagram, print it and use it as a template for your craft. You just need to choose the right thick paper with the print you like; such creative paper is now sold in large quantities in art stores and craft stores. How to make a house out of paperAnd so for the future craft of a Victorian paper house we will need the following materials: - thick paper with print;
We print the diagram on regular printer paper to use it as a template. We carefully cut out all the necessary holes on the template and, applying it to a previously prepared thick sheet, transfer all the hole marks to it. All solid lines are cut out and dotted lines are folded.
Then, using a ruler, we cut through the door windows with a breadboard knife and cut out the layout kennel. If you only have a white sheet of thick paper on hand, you can always additionally decorate it with stickers or paint it. You can also print the layout directly on a clean thick sheet of paper - 200 g printer paper is ideal for such crafts, and then decorate it yourself.
In order for all the corners of the house to be neatly bent and not to break, it is necessary to crease all the folds - just walk in a stack along a ruler, pushing through all the folds.
Then you can fold the house out of paper, fastening the edges and inserting them into each other.
By the way, such a house made of paper can also serve a practical role, for example the role of a candlestick - you can hide a battery-powered electronic candle under it.
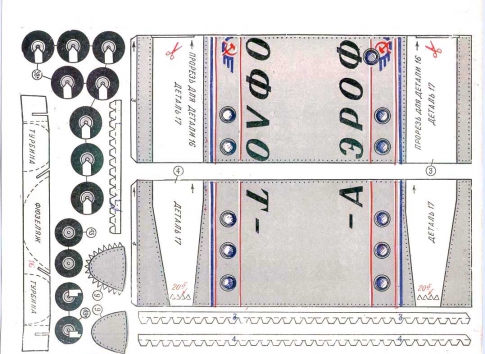
Three-dimensional modeling is a fascinating activity that will not leave either children or adults indifferent. It is modeling that makes it possible to see a three-dimensional image of a future building or equipment. There are many ways to use simulation. Let's focus on one of them. How to create a house model from paper? Why is this layout needed? And what is needed to make it? Creating a model with your own hands is not only about bringing your architectural and construction perspectives to life. This is a great way to do original gift for a child, to capture a piece of the history of the construction of their own home, to improve their creative skills. It is undeniable that a three-dimensional model of a house made of cardboard or paper is useful not only for students, architects, builders, but also as an excellent advertising engine. After all, having seen your future home in such a miniature form, having examined it from all sides and from different angles, you will certainly want to purchase it.
Before you start work, you need to stock up on everything you need:
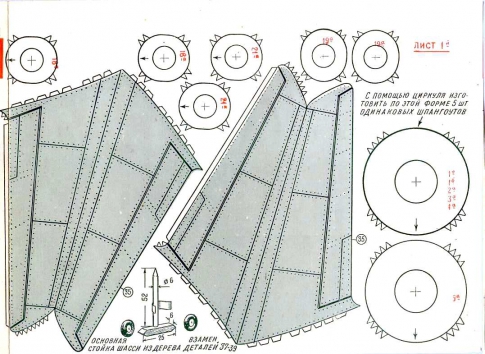
Cardboard or paper for modeling should be thick and textured. The accuracy of creating a layout directly depends on the accuracy of the drawing, so you should be especially careful when drawing out the details of the future layout. First you need to decide on the original building from which the model will be made. And indicate the scale with which the house model will be built. Typically a scale of 1:100 is used. The next stage of modeling is the construction of a development – an image of the layout unfolded on the plane of paper or cardboard. The construction of the sweep begins from the reference point. This can be any corner of the building along which all segments will be measured.
Step by step and slowly, the layout of the house layout is built, taking into account the exact size of the walls, gables and the allowance for flaps for gluing. Separately make markings for the roof of the building and the stand. The stand is made 1-2 centimeters wider than the base of the walls of the house model. This modeling principle is quite simple and does not require any special knowledge. After the layout of the house has been built, it is necessary to draw or glue window openings and doors from colored paper. And after that, start final assembly paper house models.
If the house model is more complex, then it is made by gradually creating the building facades, roof and base. Using a stiffener, the model is assembled into a complete composition.
Internal partitions, windows and doors are attached using glue or tape. Bending the parts of doors and windows forms a stiffening rib and allows you to independently maintain the shape. To give the model additional stability, internal partitions can be made of rigid cardboard or foam.
To detail a three-dimensional model of a house, furniture and interior items are made from paper. This is quite simple, since paper is a very plastic material. Furniture pieces are cut out on paper, glued together and placed inside the building model. If the area of the house model is not large, it is advisable to display interior items against the background of the model walls.
For the purpose of spatial orientation, the model performs modeling of the adjacent area, green areas and infrastructure. To do this, use multi-colored paper, dry twigs of trees and shrubs, paint and children's toys. The implementation of such a model allows you to determine the placement of the house relative to the cardinal directions, the installation of communications, drawing up an estimate for the construction of the house, landscaping the garden plot and other construction features.
The color scheme plays a special role in modeling a house. With the help of color, you can effectively emphasize the advantages and hide the shortcomings of the designed house, as well as focus on the main details of the room. Paint finished monochrome paper model not worth it at home. This may lead to deformation of the layout structure. It is better to glue the necessary colored elements from colored film or paper. A paper house model, unlike plastic and wooden models, is less detailed and durable. It is not resistant to moisture and temperature regime, which accordingly requires careful use. The main advantage of this layout is the speed and ease of assembly, as well as cost-effectiveness. Such hand-made paper models are indispensable for all kinds of presentations and exhibitions, and also as a basis for creating more complex modeling using plastic and detailing the internal content of the room. One example of creating a paper layout:
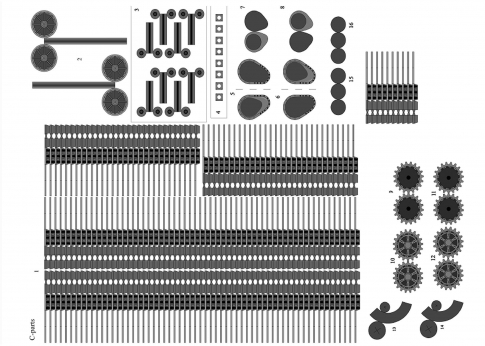
Dear readers, comment on the article, ask questions, subscribe to new publications - we are interested in your opinion :) Paper modeling can be classified as an activity that never ceases to interest a person. Many orphanages for creativity always organize design clubs, because paper models not only provide an opportunity to get a new interesting figurine or toy, but with their help you can improve your knowledge of physics and mathematics. Tools for workTo learn how to fold basic paper models, you will need simple devices like scissors, a utility knife, PVA glue and a brush for applying it. Give preference to PVA construction glue - of all varieties, it has the thickest consistency; it does not spoil the paper, making it wet and sticky, like regular glue. Different models are made up of different types paper - from tissue paper to thick cardboard. Beginners are advised to start with watercolor paper with a density of 200 grams per m 2 for large elements and drawing paper with a density of 140-160 grams per m 2 when developing small parts. Craftsmen create individual parts, such as masts, railings, and small finishing elements from polymer clay, plaster, plasticine, and self-hardening plastic. If you also complement your work with molded parts, stock up on various stacks and molds - like those used in ceramic floristry. How to make a paper modelThe workflow for creating a paper model takes place in several simple steps. Before starting the process, the master decides what kind of figurine he wants to design. In fact, almost any product can be made from paper, but paper modeling often involves the following options:
Figures of humans, animals, and plants are constructed much less frequently than others. After determining the product category, the main part of the work process begins. Creating a LayoutThree-dimensional paper models are made from several large and small parts - the diagrams of the elements must first be drawn on paper sheets of the desired color. A person cannot cope here without understanding certain knowledge of geometry and the ability to represent a three-dimensional image. To make it easier for beginners to learn, many specialized magazines began to publish drawings of ready-made developments for paper models, by gluing them together to create a figurine. You also need to cut out the layout according to the rules. For example, a solid line along the contour indicates the location of the cut, and a dotted line indicates the fold. But in each diagram the designations are individual, so before cutting you need to read the explanations for the figure. AssemblyAfter the drawings of the paper model are ready, the model is glued together and produced Finishing work, if needed. To make the surface of the product look realistic, craftsmen use different coatings: glossy varnishes, matting sprays, craquelure liquids, stains, etc. Paper car modelsA beginner in the business of paper modeling will enjoy this master class, which contains information on how to construct the famous model of a VAZ 21011 sedan car in just half an hour. Stock up on thick drawing paper or a coated sheet if the figurine is being created as a gift for a friend.
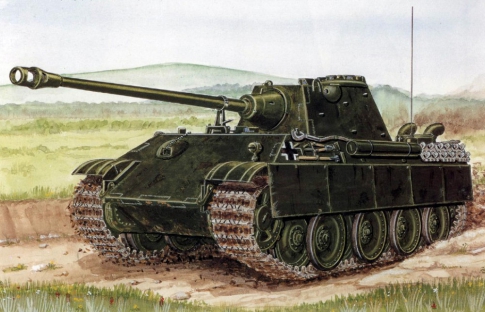
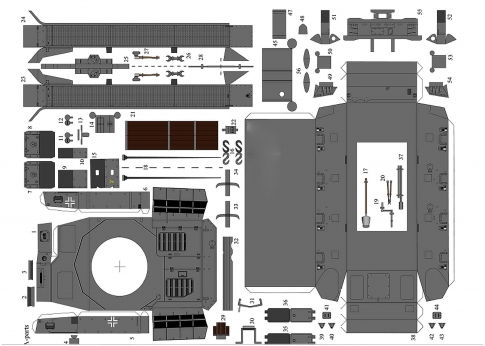
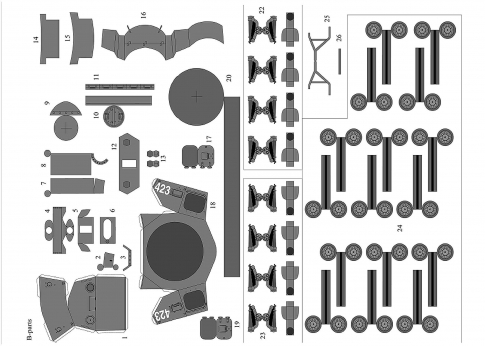
Please note that the tread strips need to be glued together to form rings that will be attached to the wheels in order to obtain the most voluminous paper models. Paper tank modelsDesigning military equipment from paper is somewhat more difficult than creating civilian vehicles because the guns consist of many small parts that form the body. To make sure of this, try to form a difficult but very interesting model German tank"Panther".
To glue the parts of the tank in the correct order, follow this video tutorial during assembly.
Sometimes the joints are connected with small errors, which is why white paper stripes appear on the model. You can get rid of them using felt-tip pens or pencils of a similar color to the armor. Paper airplane modelsIf you already have some skills in building paper figures, you will probably enjoy constructing a paper and cardboard model of the Tu-104 passenger aircraft.
To avoid bends and creases on the body and tail, stuff the parts with cotton wool during assembly. Decorate the plane as desired using decoupage sprays and paints. More simple model You can make a paper airplane with your own hands, following this video.
Take it for yourself and tell your friends! Read also on our website: show more |


 Art is of genuine interest origami- making figures from paper by folding it in different directions according to the proposed patterns.
 Boys will be interested in the process of making a real knight's castle, and girls will be interested in a palace for a princess or a fairy refuge.
 You can use ready-made diagrams or create a picture according to your own design. The main idea is to create a drawing of a house from
  The most
  Interesting volumetric products are obtained if the walls are made not rectangular, but round, like in a palace. To do this, you need to fold the rectangle with the short sides facing each other and glue them together. The result is a cylinder that serves as a tower for the castle. For the roof, take a sheet, roll it into a cone and fasten it in this state. After this, all that remains is to connect the two parts together using glue or tape.
 Need to prepare in advance identical paper rectangles, which, when rolled up, will form small tubes. When there are enough blanks, you can start creating “logs”. To do this, take one rectangle-blank, its edges are smeared with glue, and then connected. It is convenient to collect tubes by wrapping paper around a pencil.
 To make such a decoration yourself, you will need to find a template of building facades you like in
  Assembled model or


Popular:
New
- To prepare for the exam in social studies
- Compatibility of Leo and Scorpio: should fire be afraid of water?
- Characteristics of a Leo man born in the year of the rat
- Why do you dream of a boat on the water? Why do you dream of a boat?
- Seeing an adult daughter in a dream
- Why do you dream about a goat - why do you dream about a white goat dream book
- Dream Interpretation: Why do you dream about Strangling?
- “A worthless deal”: Sobchak’s speech in court in the “Putin case” was made public (video)
- Official and semi-official addresses Sample of an official address in tsarist times
- Why Faina Ranevskaya was never married Faina Ranevskaya and her men


