Website sections
Editor's Choice:
- View house designs 6 8
- Designing a one-story house with a sauna Layouts of one-story houses with a bath
- Chalet-style houses (80 photos): projects and ideas
- Independent manufacture of stairs to the second floor from wood
- Drawing stairs to the second floor of wood
- Wooden staircase to the second floor - step-by-step instructions for calculating and manufacturing
- Soft roof flat roof mounting technology
- Projects of single-storey houses in the Scandinavian style Houses from timber Scandinavian projects
- How to build a glass house Glass facade of a wooden house
- Roofs: types and design features
Advertising
| Panel for the veranda with your own hands. DIY panel - the best ideas and a master class |
|
The monotonous bare walls of the house inspire depression, so many try to decorate them with something. A panel is a great way to make the atmosphere of an apartment more comfortable and attractive. In addition, it can be made by yourself, from what is in the house. It doesn’t matter that you are not an artist or designer, the most important thing is the desire to create the beautiful. And then you can do really magnificent things that will decorate your home and delight others. And knowing how to make a wall panel with your own hands will help in decorating the apartment, use any master class that you find on the Internet. The panel can be made from almost any material - leather, cardboard, fabric, colored paper, photographs, shells. Someone even fits pasta, cereals, bottle caps, matches, seeds and other items. We present to your attention several original ideas that will tell you in which direction to move.
Panel ”Shine”Perhaps you have an old picture in your house. Feel free to take it and redo it. First take the picture out of the frame and upgrade the frame. Paint it silver, let the frame inside be white, for this you can use white paint. You do not need the picture itself, but you can create your own picture on the reverse side. Try gluing glitter patterns inside, decorate with silver tape or strips of paper. Your picture will create a wonderful impression with its unusual silver shine and decorate the room. In this way, you can do something else, show your imagination and create.
Fabric panelSince ancient times, people have made drawings of fabric and decorated them at home. Although now we have come to the rescue of completely different technologies, however, things made with our own hands made of fabric remain a priority. They look cute and give our house a special charm and coziness. Surely, in your house there will be some kind of fabric: chintz, satin, burlap, felt, silk, etc. Even several multi-colored shreds will do, they can form a really beautiful pattern. Take the base under your wall panel, it should be a dense sheet of cardboard or polystyrene. You can just stick the fabric on the base, and fasten it with adhesive tape at the back, and then hang it on the wall. Take pieces of fabric of different colors and make a panel of them, it will look great.
But a panel on shreds of fabric will look much prettier. To make it, you need to draw a picture on cardboard and indicate where and what rags will be. Further, following this picture, make shreds and attach them. In order for the work to look neat, it is better to bend the patches and sew them so that the cut parts are not visible. Only fabric folds should be flaunted on the basis. From felt, you can create cute and funny drawings, which are then placed in a frame. Such paintings will decorate the nursery and fill it with a cheerful mood. Cut animal figures or cartoon characters from felt using a stencil. Finished drawings can be found on the Internet and made by analogy with them. Then you can stick them on the base - a thick sheet of cardboard or other material. Sacking is an excellent material that will serve as a backdrop for the panel. To do this, you will need to pull it on the frame. To make the base look more attractive, it is better to trim the borders of the frame with bright braid. The picture inside you choose at will. From the burlap you can make various drawings or make flowers out of them and decorate the frame. Everyone shows his imagination as he wants.
Panel of photosThis is a great idea, especially if your albums have a lot of shots. Hang them on the wall in the living room or in another room to indulge in pleasant memories while looking at them. A photo collage can be made in any form, but it is better to make it in the shape of a heart. To make a panel from photos, take a piece of cardboard or plywood, make a background on it. Think about where and what kind of photos you place on it. Then cut the photos to fit them. Fill the interior of your panel with glue.
Sea panelMany of the sea holidays bring a lot of shells. This is a great material for decorating your home, which will remind you of warm, carefree days and warm your soul. For the basics, you can take an old vinyl record. To get an even background, you will need to paint over the white middle with a black marker or paint.
Shells are best secured with liquid nails. Collect all your shells, pebbles from the seashore, shell fragments and other things, try to make an attractive composition out of them. Use your imagination with might and main. When the panel is ready, you will need to varnish it. This will make the picture stronger and more durable. Crafts for creating panels
From the beads you create your own picture in different colors, but if the fantasy does not work enough, it is better to turn to the search on the Internet.
Weaving on nails is also a popular activity among needlewomen. The pattern is formed by fixing nails on the panel and weaving multi-colored threads into them. Volumetric panelsSuch panels always look magnificent and admirable. Volumetric paintings are formed from puff pastry, porcelain, polymer clay. Some prefer to use ready-made blanks, such as decorative fruits and vegetables, decorative flowers. Although to create three-dimensional images, you can adapt a lot of improvised material, such as porcelain cups, watches, plastic dishes, corks, buttons, etc.
Master class for creating puff pastry panelsPuff pastry is made from water, vegetable oil, flour and a little salt. Two glasses of flour, one tablespoon of vegetable oil and a pinch of salt are taken in 125 ml of water. The dough should be flexible enough, it should not stick to your hands. If you want to get multi-colored material, then you need to add dyes to the dough. Various herbs add flavor to the material.
When your dough is ready, you can roll it out and form a picture right on the dough sheet. Another way is to sculpt various details and decorate the panels with them. You choose the details for the picture yourself, as well as the plot of the picture itself.
After the parts are ready, you will need to support them in the oven for some time to fix the structure. At the same time, the temperature in the oven must be controlled, it should not exceed eighty degrees. If you are ready to wait, you can dry the dough in a natural way by putting it on the battery. After 5 days it will be ready and it can be glued on the panel. To make a three-dimensional panel more attractive, figures from puff pastry can be painted in various colors. A layer of varnish and panels will be strong enough for a long time to decorate the expanses of your apartment.
If you try to decorate your apartment with a panel of your own manufacture, then it will look better. And you do not need to invite fashion designers to the house and pay huge amounts of money to them. All you need is near you and costs a penny, and the beauty is extraordinary.
Create and decorate your home with attractive, home-made items. In addition, such an activity will give you minutes of peace and relaxation. Connect to it your household, especially children. This will surely captivate them.
How to make a decorative panel on the wall from improvised materials with your own hands for the interior of the kitchen, bedroom or nursery! The most common ways this is - we draw pictures (even if you are not an artist), photographs, fabric, threads or twigs - will always be found in a house or apartment. So why not make a beautiful decorative panel out of all this! Why mural? There are two reasons:
Here we picked up a lot of interesting ideas and ready-made master classes, all types are collected from the materials from which they can be made. Here are a lot of options for panels made from threads in the style of tapestry. Detailed lesson attached!
How to do a master class:
TIP: You can experiment with threads of varying thicknesses and colors, creating abstract patterns or specific patterns. Below you can leave the long ends of the threads, or cut them, at your discretion.
As an option, knitted "rugs" can be placed in a frame, and not hung on a stick. Original pictures turn out.
Panel with tasselsHow to do fast:
TIP: This method is much faster than the previous one, but it also looks very beautiful.
You can pretie the strings in pigtails, or thread some beads (or several) into a few beads. ATTENTION: The pompoms are made like brushes, so the next photo is also related to this option. A thread for such pompoms will take a lot, but they look amazing!
If you take the threads from a loose knitted product (for example, from under an old knitted sweater or scarf), they will be wavy.
MacrameMacrame weaving for panels can be of different levels of difficulty, but still, to make it, you need to have certain skills. Therefore, the photos selected in this paragraph are suitable for lovers of weaving, or those who purposefully decided to learn how to do this.
A large abstract painting with wood elements fits the definition of a panel. And you can try to make your own masterpiece at the same time, and at the same time an original lesson, and a way to relax.
A beautiful panel is obtained from slices of wood, simply laid on glue and varnished.
Small master class: Look at this heart, it could worthily adorn not only an apartment, but also a stylish cafe or office. And you can make it yourself and it does not require a lot of money (you only need to buy paint). So let's look at a small tutorial on how to make it. Necessary materials:
Step-by-step instruction:
In the same way, figures of a different shape can be made, and even broken old chairs, frames, and other wooden objects are suitable for making. To create such a panel, you will need canvas, masking tape and paint. Select the geometric pattern that you want to display, make a stencil on the canvas using the masking tape, and paint. When the paint dries, remove the masking tape, and attach the painting to the wall.
You can also make panels using ready-made stencils. This method speeds up the work and expands the range of possible patterns. A stencil can be bought at a decor store, or found on the Internet and printed (on paper that does not get wet from ink). An interesting way is to take flora objects, for example, leaves, or flowers, as a stencil. You can also make a decorative panel from personal photos or illustrations from the Internet. This panel looks great both in the living room and in the bedroom.
How to do:
Paper butterflies are also a good idea, but a slightly outdated topic.
And another, more complex, option, more precisely requiring more time to complete.  Panel puzzleA lot of carved regular hexagons glued to the canvas, and decorative honeycombs are ready to decorate the wall of your room. You can enlist the help of a child, and the process will go much faster and more fun.
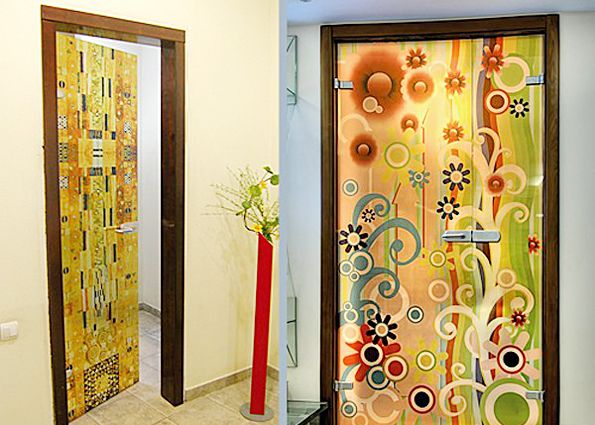
You can make a composition of several parts, as in this version. Each box is pasted with scrapbooking paper. Simple and original! Panel from the mirrorsDecorative panels from mirrors - this is an opportunity to expand the space of the living room or apartment. Just mirrors on the wall - now you won’t surprise anyone, but to create a picture from the mirrors or to cut out a bizarre shape from it is an excellent design move.
Panel from wallpaper or magazinesStripes cut from color magazines can also come in handy when creating a glued panel picture. For example, as in this photo, where they filled the silhouettes of two dogs. To create such a panel, first using a stencil, paint the entire canvas except the selected shape in black, and leave the paint to dry. And after that you can glue the strips. TIP: Also from the remnants of old wallpaper - you can make a stylish modern panel for a living room, for example, or a bedroom. Panel of dry leavesTo create such transparent leaves, you will need to work with special chemical solutions, but such a herbarium will definitely surprise your guests!
Drawings created by non-standard brushesHere for drawing you can take a brush from feathers, or threads. To get patterns, as in the photo, you need a brush dip in almost dry paint. Also for a similar result, you can use a duster.
It turns out that our fingers are an ideal form for creating delightful modern paintings. Thanks to this, a wonderful picture of the panel turned out. Drawings created using nails and threads look very beautiful and professional, although in fact no special skills are required to create them.
Such panels are economically viable (because you need a wooden base, about 50 thin nails and a ball of thread to work), and the field of action is incredibly wide (as you can see from the photo below). In a word, such panels are a wonderful way to express your creativity and make a new wall decoration. The scheme of work is as follows:
Here among the drawings there are animals and plants, inscriptions and abstract figures. Choose what you like.
There are also several options where the drawing is not done on a wooden base, but directly on the wall of the room. This option is done for a longer time and not on any wall. When you want to remove it, you will need to do a little wall repair to remove the holes from the nails.
Original bright accents in the interior can be paintings, photographs or panels of flowers on the walls. Decorating your own apartment is an opportunity to realize creative ideas and express yourself through unusual decor. You can create voluminous floral compositions yourself or order such creative works from experienced master decorators. You can add personality to the interior of your house by placing exclusive floral panels on the stele using other materials - twigs, fruits or ribbons.
Such works will surely be eye-catching due to their special characteristics:
Placing a flower arrangement on the wall, you can not be afraid that it will emit harmful substances and will be hazardous to health, because all the materials used are environmentally friendly. Depending on the type of room in which the panel will hang, it may contain artificial, living or dry flowers, fruits, pebbles, mother of pearl or other or artificial materials. Collected in one composition, they will create a certain image for the room.
How to make a floral panel yourselfTo decorate the walls, you can order panels from experienced craftswomen, but it is better to make such a composition with your own hands, especially since it is not so difficult. Such a floristic panel will be not only unique, but its performer will feel pride when guests will appreciate its work.
You can opt for the following colors:
You can not be limited to the list above, because some craftsmen make flowers from any materials at hand: cotton pads, plastic forks, fabric, dough, plasticine and other things.
Panel of artificial flowers - simple and effectiveThe easiest option to create a floral panel will be the composition of artificial flowers. Even a novice can do such a job, it is only important to decide on the general idea of \u200b\u200bthe composition.
The panel may show:
When collecting a composition, you need to pay attention to the color of the elements used so that they are combined with each other. All the necessary materials must be prepared in advance, so to create a floral panel with your own hands, you will definitely need artificial flowers, a base (burlap, paper, plywood, cardboard), glue (Moment or PVA), a frame and glass. To use glass or not depends on individual preferences. The decorative composition will be stored longer behind the glass, but if you refuse it, you can place some elements outside the aisles of the frame. Thus, the picture will turn out interesting and voluminous and enliven the wall. Original floral panel from fresh flowersBeautiful decorative panels can also be made from fresh flowers. In this case, the work will turn out to be more fragile and less durable, but very sensual and tender.
To create a panel of fresh flowers, you can use the following ideas:
When working with fresh flowers, one should not forget about water and special care, because they are easy to damage and thereby spoil the overall appearance of the composition. Pictures from fresh flowers look beautiful, complemented by other decorative elements - beads, sparkles, butterflies. From flowers you can create whole pictures or limit yourself to compact bouquets. Do it yourself: a panel of flowers (video)It is not so difficult to make a flower panel, it is only important to be patient, prepare the necessary materials and show your imagination. In addition, the elements used can be easily found, for example, dry roses from a gift bouquet or unnecessary processes of indoor plants, make flowers from old magazines or use other hand-made materials. Examples of panels from dried flowers with their own hands (photo in the interiors)
Interior design is a complex and multifaceted system, with many components. Just wallpaper or painted walls no longer satisfy the average consumer. I always want to bring some zest to the interior. A small detail that will guide the perception of the design as a whole. Panel of cuts What is a panelIn fact, a panel is any composition on a wall or ceiling that has its own, clearly defined place in the interior. By the way, any picture hanging in a house in a strictly defined place can also be considered a panel. As well as compositions from photographs or bas-reliefs.
Decorative panel on the wall The most popular materials are:
How the composition will look is a matter of taste and one's own idea of \u200b\u200bbeauty, and I will only consider a few of the most popular options that can completely change the whole design in the room.
What the composition will look like is a matter of taste and one's own idea of \u200b\u200bbeauty Choosing a place and topicAn important aspect of a well-designed design is harmony. It is she who creates coziness and comfort in the room. You can often find very rich interiors in which a lot of money has been invested, but from this they do not cease to be tasteless. On the other hand, you can consider the Japanese style of minimalism, where there is practically no furniture and accessories, but at the same time, grace and comfort are felt throughout.
An important aspect of a well-designed design is harmony. As for the general view, there are several tips that will help to correctly place accents and highlight panels from the general style:
Now that you have decided on the subject of composition and location, you can go directly to the manufacturing process with your own hands.
We make panelsThe most important thing that is needed in order to make a decorative panel with your own hands is patience and perseverance. This is often a very painstaking job that can take a lot of time. But the result will not be long in coming, so we stock up on a creative fuse and go ahead for work.
The most important thing that is needed to make a decorative panel with your own hands is patience and perseverance Composition of triplex at homeAbove, I have already mentioned compositions from photographs, they are the most in demand today. Photo archives have moved to computers, and the remaining albums have been gathering dust for a long time in drawers of tables or chests of drawers. To do this, you will need:
Panel from wedding photos Everything you need for the composition can be purchased in stores specializing in hobbies, and print a set of photos yourself on a computer, increasing them to the desired size.
We cover one of the glasses with paint and wait for complete drying. We choose the color ourselves based on personal preferences and tips presented above. Next, you need to make a collage, laying out the photos on stained glass. When the composition is ready, apply a thin strip of glue along the edge of the glass and gently cover it with a second layer. The glue seizes almost instantly, so everything must be done quickly and not to make mistakes.
Glass paintings on the wall Plaster bas-relief or volumetric compositionMaking a gypsum composition with your own hands is much more difficult than using glass, but in this way you can get a three-dimensional panel.
Plaster panel When the solution has dried, carefully remove the form from the container with sand and remove the cup. As a result, we got a cast that exactly repeats the copied product. The mold must be allowed to dry thoroughly, after which it is smeared with the same soapy solution and poured with a new portion of the mixture.
A modern wall panel is very often the merit of the whole family, when all the households work on a beautiful decoration. Today, such options are in fashion when there are beautiful works in the interior that are created by collective work. But it’s possible to start not with too large-scale events - first try to figure out how to make a panel of photographs with your own hands on the wall in an art style close to you. What are the panels?Pictures on the wall can differ in the following parameters:
Choosing a place for decorBefore you make a beautiful mural on the wall with your own hands, you need to determine its location. The shape, size and color scheme of the future canvas may depend on this:
Preparatory workThere are a huge number of options to make a wall panel with your own hands for absolutely any room. Photos of finished products can be found in catalogs or come up with your own project. To begin with, it is advisable to put the planned drawing of the panel on the prepared sheet of paper. With this sketch, it will be easier for you to determine the future shape, size of the painting and the materials that you will need in the process of creating it. Idea 1If you are going to use fabric as decoration, then you can, as a basis, take a piece of board, plastic or any other material that has a hard surface. The fabric should be pulled onto the base, and its allowances should be secured from the wrong side of the workpiece. The finished artwork is set in a frame, and then hung on the wall. Idea 2Also, the panel can be made without a frame. To do this, you need a piece of plywood or drywall. The front part of the workpiece is glued over with synthetic winterizer or foam rubber, and then the resulting “pillow” is covered with fabric. Next, the product is decorated. PhotopanelMaking a beautiful mural on a wall with your own hands is very easy if you have a lot of interesting photographs in your family album. This type of decor can perfectly decorate any room: a corridor, a nursery, a living room. Such pictures in the heart-shaped bedroom look very original. Materials and tools:
Sequencing:
Panel of threads and nailsDecorate the room of a young girl will help a picture in the form of a heart. You can make it with the help of threads and nails.
To make a panel on the wall with your own hands in the shape of a heart, you will have to try a little. Materials and tools:
Sequencing:
Button panelAlmost every house has a jar or casket, where for years different buttons have been stacked. In the end, there were so many of them that there was nowhere to go. Buttons of different sizes, colors, with arches or holes - all this can be a wonderful material for a picture that can decorate a boring wall. The very first thing that comes to mind is the painting “Money Tree”. As a rule, it is made of coins, but they can be replaced with buttons. Although no one can forbid you to arrange buttons with coins in one panel.
Materials and tools:
Sequencing:
Panel of salt doughSalty dough is a wonderful material for modeling. Som masterpiece manufacturing process develops fine motor skills well, which is very useful for children to make a speech.
Let's look at how to make paintings and panels with your own hands from salt dough. Materials and tools:
The dough can be made fragrant by adding different spices: black and red pepper, nutmeg, turmeric, cinnamon and more. And food colors will help to color it.
Sequencing:
Paper panelPaper is one of the simplest and cheapest materials. From it you can make a lot of very beautiful decorative elements for any room. This is possible not only for adults, but also for children. Read on how to make a beautiful wall panel with your own hands from colored paper.
Materials and tools:
Sequencing:
Stock footage
We hope that we could help you figure out how to make a wall panel with your own hands. Such work provides great scope for creativity. You can make absolutely any designer decor and decorate the room with your masterpiece. For many, such an activity can be not only a pleasure, but also a constant hobby. |


 You can also make other, less stringent forms. For example, stick circles a little different size and shades.


| Read: |
|---|
Popular:
New
- Wiring diagram for a chandelier with a double switch
- Mexican-style interior color fiesta
- How to connect a chandelier with your own hands: the rules and procedure for connecting a chandelier to a switch
- DIY Attic - Avoid Mistakes
- Set for growing plants "Promotion Plantation" - "How to grow a whole garden at home?
- Everything you need to know about plant illumination with LED strip Read more about the conditions of the action
- Liquid manometers, principle of operation, advantages We list the main places of use of such devices
- Texture map overlay coordinates
- DIY paper globe Print a map scan on a globe
- Convenient, tasty, fast: which barbecue size is right