Sections of the site
Editor's Choice:
- Protecting bathhouse walls from the heat of the furnace: rules for installing protective screens and casings At what temperature does galvanization release harmful substances
- How to make a heated floor in the bathroom with your own hands: a step-by-step guide
- Pouring the foundation for an extension to the house
- DIY bored foundation
- House project 1.5 floors made of brick. Projects of one-story houses: pros and cons. Which house to choose
- How to fix a crack in the foundation
- Shallow strip foundation for aerated concrete house
- Guide to pouring the foundation of a house yourself Making a foundation for a house
- What should be the depth of the strip foundation?
- What should be the distance from the gas pipe to the building Fire distances to protected objects
Advertising
| An extension to a house without a foundation. Pouring the foundation for an extension to the house |
|
Expanding living space is an extremely important step that takes place after the construction of a wooden or brick house. But not many people know how to make a foundation for an extension to a house. There are methods of rigidly connecting foundations or separating foundations and walls with a construction seam. This article will discuss step-by-step instructions on how to properly make a foundation for different types of extensions. Types of foundation for extensions Strip foundation - a reliable foundation for an extension Strip foundation - a reliable foundation for an extension There are various designs that differ in construction procedure and strength. Each has its own parameters and characteristics that affect the complexity of the construction. The main types are:
 For a strip foundation it is necessary to dig a trench For a strip foundation it is necessary to dig a trench If you plan to build a veranda, a strip foundation would be a good solution. It is a common type and is suitable for both lightweight and massive extensions. The differences will be in the depth of the foundation and the presence or absence of reinforcement. For such a foundation, a prerequisite is laying it in a trench. In the following diagram you can see options for placing the main building and an extension based on a strip foundation.
 It is recommended to build a columnar base for a small veranda It is recommended to build a columnar base for a small veranda A building on a columnar foundation is erected by placing metal pillars or reinforced concrete into the ground. However, this method is not recommended if you plan to add a massive room. A columnar foundation is suitable for a small veranda made of wood or plastic. The base structure can be made in the form of separate pillars. A pile foundation is a structure made up of a large number of piles connected using a cement mixture. This method is suitable for adding heavy structures, such as a basement.
Attaching a new foundation to an existing one Reinforcement is used to connect two buildings Reinforcement is used to connect two buildings There are 2 main methods of building a foundation:  The second method is more difficult to implement, but it is more reliable. It will be necessary to correctly calculate the depth of the foundation to prevent possible shrinkage of the building.
Filling the base for the extension
To get the dimensions of the future foundation, you need to dig up the finished foundation, then calculate its depth and width. A soil analysis is also carried out in advance, this will help determine its structure and the likelihood of shrinkage.
 Concrete must be poured within one day Concrete must be poured within one day How to properly pour the foundation for an extension? To do this, you must adhere to the following procedure:
Foundation for an extension to a house made of foam blocks
The material of the blocks is light enough, so there will not be much pressure on the soil.  FBS blocks are also installed in the trench and fastened together with a solution FBS blocks are also installed in the trench and fastened together with a solution The guide to building a foam block foundation for an extension to a house with your own hands is as follows:
Extension to a house on screw piles
Foundation for an extension on slabs
It makes it easy to tie a new foundation to the old one, thanks to the possibility of using reinforcement. The procedure is as follows:
As can be seen from the article, the extension to the house has a foundation. It can be of different types and constructed from various materials. You can carry out the work associated with it yourself, the main thing is to carefully follow the process technology. Increasing the usable space in a private property by adding new premises that stand on their own foundation begins with solving the problem of how to connect the foundation to the house so as not to damage both structures. The construction of additional structures usually begins after several seasonal cycles, during which financial resources have been accumulated, a desire has appeared for a new round of site development, and the standing buildings have begun to shrink normally in the ground. Building codes provide the answer to how to connect two foundations to each other, taking into account mutual influence. Connection requirementsIt is necessary to determine how to connect the new foundation of the extension with a residential building at the design stage, taking into account already existing factors. These include the following incoming conditions:
Full requirements for the calculation are contained in the set of rules SP 50-101-2004, which was developed in development of the regulatory rules contained in SNiP 2.02.01-83*, SNiP 3.02.01-87. In any case, the help of experienced professionals is not superfluous, since mistakes can be costly later. The result of linking the base and attached building structures with different values of foundation shrinkage is shown in this video
ShrinkageIn construction, there are established settlement standards for various structures, the foundations of which are designed and manufactured in accordance with current state standards. You can find out the standard and make a forecast for the design of your individual home using data from the reference tables:
When comparing the calculated indicators, a new support unit is attached to the foundation of the old building at a given depth, taking into account its own settlement after a certain time.  The upper marks of monolithic strip foundations of combined buildings are made according to calculation, and not according to level, as in this photo. It is the possibility of displacement relative to each other that determines what kind of connection between two foundations can be made. The following types of connections are used:
The possibility of a rigid connection into a single structure is significantly influenced by the geological factors of the site - in case of mobile or heterogeneous soils, for buildings with a large support area, it is necessary to make intermittent foundations (sometimes with different widths of the tape).
Combining foundationsIt is best to attach a new room to the existing foundation of the house using a rigid coupling. In this case (if all conditions are correctly taken into account), it is possible to connect the above-ground surfaces into a single whole without the expectation that gaps and distortions will appear between the elements and the floor level. But such a design solution is limited to sites with non-heaving soils that have high load-bearing characteristics.  In practice, this method is used for low-rise buildings, provided that the extension being built is functionally connected by one roof to the building that is already in use. Another condition for unification is the same type of foundation. If the strip base of a residential building turns out to be insufficiently wide, then it needs to be strengthened. Such work includes connecting the reinforcement of an old support with a new frame or laying connecting anchors by drilling, followed by filling the belt with branded concrete. The reinforcement belt prepared for applying the solution is shown in this photo. The connection of buildings consisting of several floors is carried out according to a more complex scheme, which involves the construction of covering walls with dividing seams on each side, as shown in the drawing.
Strip foundationsFor a permanent building attached to a house, with a commensurate weight of the building materials used, a stable support of a large area and load-bearing capacity is necessary. This request corresponds in most cases to a strip foundation.
 If there is access to the subfloor for work, the holes for pin-type tension elements can be made through, with the rods secured by flat plates. Rigid connections of tapes in the form of an open contour (U-shaped) are made in the same way, but the reinforcement is placed in rows with smaller spacing. If the connection side is long in the open strip, you can make several additional support points different from the monolith, as can be seen in the photo. If there is a need to change the depth of support on the soil of the foundation being added, it is filled with ledges, the height of which varies in steps of no more than 0.5 m. The first ledge is located at a distance of about 1 m from the old foundation. The connection is made with a reinforced concrete strip of the same thickness as the existing foundation of the house.
PlatesIt is possible to ensure the rigidity of the connection between the slab foundations of the house and the extension provided that they are sufficiently thick, about 0.4 m, and also if the old slab protrudes beyond the boundaries of the supporting walls of the building. Such protrusions are usually left during the construction of aerated concrete cottages. The outlet dimensions must be at least 0.3 m. This will make it possible to clean the reinforcing mesh of the slab and make a welded connection to the frame of the new extension. The connection of monolithic bases is carried out according to the following scheme:
Separate supportsIf there is a large discrepancy in the weight of the old and new structures, the degree of shrinkage of these structures will differ significantly in magnitude. In such cases, it is not recommended to make a rigid connection for the foundations - it is necessary to choose separate construction of the supporting elements. It is possible to attach other types of foundation to the existing foundation and to do this use the principle of connection through an expansion joint. The weight of the ceilings and walls of the extension should be distributed over its own support area, without creating tearing forces for the main foundation of the building. Depending on the operating conditions, the expansion joint can be:
The sedimentary option (in the absence of other significant influences) has a width of 1 - 2 cm. According to the conditions of the mutual influence of the supports, attachment to the load-bearing wall of an old house can be carried out with a deformation gap reaching 0.2 - 0.4 m, filled with elastic, moisture-proof material.  Frame wooden extensions are successfully operated on a pile foundation with a metal grillage, as in this photo. Light verandas or summer kitchens can be built on screw piles, even if there are already several nearby buildings around. This is especially convenient if the site is located on a slope, slope or with uneven occurrence of hard supporting rocks. At the design stage, the external design of expansion joints that visually separate the facade is envisaged in an open or hidden form, for example, hiding the gap with a subvertical drainpipe. On the façade side, they are usually covered with strips of a special flashing and sealed with low-strength decorative material, which will not prevent the outer walls of buildings from moving relative to each other with possible uneven settlement. Under the roof deck, gaps are bridged using a compensation device. An extension to a house, installed on separate supports, is a much less labor-intensive process than installing a rigid link, requires significantly less time and financial costs, and can also be done with your own hands without ordering special equipment A far-sighted solution is to provide for the possibility of an extension at the design stage of the main building of a private house. This will greatly simplify subsequent work and will contain ready-made design solutions, planned uniform settlement over the entire area of the foundation and will ensure the reliability of the foundation. Various life circumstances can lead to a decision to increase your living space. Extensions can be built for a kitchen, bedroom, bathroom or other living area. The main task in this matter is to choose the right type of foundation so that it is of high quality and reliable. Choosing a foundation type
The first type of base for an extension is the most universal. Strip foundations are suitable for both light and heavy buildings. To avoid subsidence of the strip base, you need to use a closed contour of the base. Columnar base can only be used for lightweight structures. Its advantages include extremely low cost and high reliability. The only disadvantage of a columnar foundation is that you cannot construct a basement in it. The supporting base here is brick or reinforced concrete pillars, the distance between which should be from 1.5 to 3 meters. Also, larch beams can act as pillars, but due to its fragility and high cost, this material is used extremely rarely. If the site of the planned extension has weak soil and the mass of the structure will be high, then it is better to use a foundation on piles, which can be made of steel, reinforced concrete, wood or asbestos. All piles must be connected with a strapping beam. Features of linking the new foundation to the old one
There are 2 ways to connect the new foundation to the old one:
Advantages Rigid reinforcement:
Expansion joint:
Flaws Rigid reinforcement:
Expansion joint:
Foundation for various types of extensions Brick extension
Before building a brick extension, you need to choose between two types of foundations - strip and columnar. When building a veranda attached to the main house, there is no need to connect the foundations into a monolith, since the main building and the veranda can be of different weights. To prevent a massive house from dragging down a light extension along with it, the veranda is installed on an individual foundation. In this case, a gap of 4 centimeters must be made between the two foundations. It is necessary to take into account the characteristics of the soil and the massiveness of the extension. Due to the heaving soil, the extension will move during use. Lightweight foundations cannot support massive walls, so they shrink under the influence of mass. Additional living space can be either attached or built-in. For the first type, you will need to build an individual base with a small distance of 4 centimeters from the wall of the main building. If you do not provide a gap, the extension will collapse over time, since its mass and the mass of the house will be different.
In most cases, for frame construction it is necessary to use a strip type of foundation, for the construction of which you must follow the following sequence:
Wooden extension
The base for an extension made of wood is best made from the same material from which the foundation of the main building is made. The following types of bases are used for a wooden extension:
Each of these types of bases has its own characteristics and nuances, but the first type is the most popular. The method of its implementation is specified above. But there is one small but very important nuance - the new foundation must be connected to the foundation of the main structure. Also, the choice of where to attach the additional foundation to the existing one is of considerable importance. If you plan to make a door to enter from the main building, then you can use the following method - to do this you need to expand the window opening downwards and later insert a door. This method will help reduce costs. To achieve a strong connection between two foundations, it is necessary to strictly follow the technology for constructing a new foundation and connecting it to the main one. To begin with, preparatory work is carried out, during which:
If there is a need for thermal insulation, then you can construct a closed veranda between the entrance to the room and the street, playing the role of a vestibule. This will prevent cold air from passing through the room. If the extension will be used exclusively in winter, the construction of a vestibule will be optional. The choice of foundation for the construction of an extension should be approached with great attention, since its choice is influenced by a large number of factors. The main ones are the material from which the extension is built and the type of soil. An error can lead to fatal consequences, in which the extension will gradually collapse or simply move along the ground. If you take into account all the tips and recommendations listed above, the constructed extension will serve for a very long time. Happy construction! Is it true that the foundation for an extension differs from the main one, what are its features? Many people are looking for the answer to this question, because when adding additional rooms to an existing house, you want these rooms to also have a reliable foundation. We have collected the most important tips and instructions in this article. Everyone knows what role the skeleton plays in the human body; similar functions are assigned to the foundation. In fact, this is the basis that is responsible for the reliability and durability of the building. Also, it is the foundation that ensures warmth and dryness in the room. If the base is of poor quality or does not suit specific conditions, then dampness will appear inside, the floors may become deformed and completely deteriorate. It also levels the ground level and prevents carcinogenic gas from entering the living room from the soil.
Extension base The choice of foundation should be treated with particular care. After all, it is necessary that it can easily withstand loads and correspond to the type of soil. At the same time, there is no need to overdo it, for example, if you can pour a strip or columnar foundation, then there is no point in replacing these simpler options with a complex monolithic foundation. Firstly, it is too expensive and not worth the investment. Secondly, the first ones are much easier to perform and you can do them yourself even without outside help, but you won’t be able to lay a concrete slab on your own. It is mainly built from stone or concrete, but there are also wooden structures. If the construction is lightweight, then you can give preference to a shallow foundation located above the freezing point. But most often its depth should be below this level. According to its purpose, it is divided into load-bearing and combined. The latter, in addition to standard load-bearing functions, must also provide seismic protection. There is also a special type, which includes “swinging” and “floating” foundations, their pressure corresponds to the pressure of the excavated soil.
Which types of base to choose from?In this paragraph, we will consider what types the foundation for an extension is divided into. Tape can rightfully be called universal, because it is perfect for both heavy and lightweight structures. It is located only under external and external load-bearing walls. It is mainly poured from concrete; to make the structure more reliable, it should be reinforced with iron rods. If you are going to make this type of base with your own hands, then it is better to give preference to the prefabricated version. The disadvantages include high cost.
Universal strip foundation But the columnar one, on the contrary, refers to budget options. But it is advisable to use it only if we are talking about lightweight structures, for example, you need to attach a frame extension to a wooden house. The supports are special pillars located at intervals of 1.5 to 3 meters. These pillars must be placed at the intersection of load-bearing walls. It is best to make such elements from brick or reinforced concrete, but larch beams can also be used. However, such supports are expensive, and wood is not durable.
How can two foundations be connected?The foundation for the extension can be rigidly adjacent to the base of the housing, resulting in the formation of a single structure. This solution is relevant if the site has a weak or non-heaving type of soil. You should also give preference to this option when you are going to make an extension of several floors and want to connect it with the main housing through one roof. If the base is a slab, then a monolithic foundation should also be poured for additional housing. In this case, it is necessary that its thickness is at least 400 mm or that the base of the residential building has protrusions. In this case, you can weld the slab reinforcement to the frame of the new foundation. In addition, if you wish, you can do everything yourself.
Monolithic foundation slab The “tape-to-tape” connection assumes the presence of a sand cushion and reinforcement with a longitudinal slot. Metal rods are driven into specially prepared holes in the base of the house and form a frame for the new foundation. Next, the joint is made using a release about 40 cm long. You can also build a separate foundation for an extension, which will be located in close proximity to the house. A sheet of roofing material should be placed between the two bases. This material acts as an excellent waterproofer; you can also place a layer of thermal insulation or get by with simple tow. In this case, it is very important that this layer allows the new base not to collect water during precipitation and not damage the foundation of the house. On the outside, special decorative overlays are fixed to the wall to cover the seam.
Laying the foundation - we do it according to scienceNow let's move on to the practical part and look at how to make a foundation for an extension with your own hands. This detailed instruction will help you save on the services of a specialist, because it is designed for independent execution of construction work.
Building a foundation for an extension with your own hands How to make a foundation for an extension to a house - step-by-step diagramStep 1: Selecting a BaseThe new foundation must fully correspond to the type of the previous foundation. In addition, the load and soil type are taken into account. For example, if we are talking about a massive extension to a brick house, then it is necessary to lay a strip or make a pile foundation. But if the additional room is adjacent to a wooden dwelling, then it is possible to get by with a cheaper columnar option. Step 2: CalculationsRegardless of whether you choose a rigid connection type or a separate foundation, the depth and width, as well as the dimensions of the foundation pillars, if any, should be the same as those of the foundation of the house. Determining these parameters is quite simple. It is necessary to dig a hole next to the wall of the house and measure the dimensions of the base. If there should be no questions about how to measure the depth of the structure, then to measure the width, you should take a rod, bend one of its edges 90° and insert it in a horizontal position under the foundation. Then we turn the rod until its bent part rests on the reverse side. After this, you need to make a mark on the rod and pull it out. By measuring the distance from the hook to the mark, we know the width. Step 3: Preparatory workBefore pouring the foundation for the extension, it is necessary to carry out preparatory work. If you decide to give preference to a rigid connection, then we dig a trench of the given dimensions and drill holes in the existing base. Moreover, their diameter must exceed the thickness of the reinforcement. Metal rods should also be prepared. It is necessary to make a longitudinal slot at their end and insert a special wedging insert into it. Step 4: Frame FormationWe drive the reinforcement with wedges into the prepared holes. The number of rods is taken at the rate of 20 pieces per square. In this way, the frame of the future foundation is formed. To ensure a reliable connection of the following parts, it is necessary to leave the edges of the reinforcement about 300 mm long, which will subsequently need to be welded. Step 5: Installation of formworkNow you will need wide wooden boards. We form the formwork of the given dimensions. We securely fix its walls with supports, earth, cinder blocks, etc. You can cover the inside of the formwork with polyethylene. The latter is especially true if you are pouring only part of the foundation and you will have to reuse these boards. Step 6: Pouring the MortarWe prepare a mixture of cement, sand, crushed stone and water. It is very important to keep the proportions correctly. For example, for M300 you can take 10 kg of cement, 30 kg of sand, 40 kg of crushed stone, mix everything well and fill it with 40 liters of water. If the concrete is too dense, you should dilute it with liquid, but only add it in small parts so as not to spoil the solution. We pour concrete into the formwork and wait several days until it completely hardens. We moisten it periodically, otherwise cracks may appear. Step 7: Formation of a columnar foundationMaking such a foundation is important when a lightweight extension is adjacent to a wooden house. We drill holes so that they are below the freezing level of the soil. We form a sand cushion and install fiberglass reinforcement. This material has excellent properties and does not require additional treatment with waterproofing compounds. Formwork of specified dimensions is also formed and filled with concrete. This foundation for an extension is the easiest to implement, and everyone can create it with their own hands. Step 8: Construction of a separate foundationBut when the number of storeys of the main and adjacent housing is different, then a separate foundation should be made in close proximity to the previous one. The distance between the two bases is from 2 to 5 cm, depending on the number of floors of the new room. The higher it is, the wider the seam is selected. We fill this gap with heat-insulating materials or tow. Then a special decorative overlay is attached to the wall of the home. It is very important to correctly mark the base. To do this, we pull the cord onto the pegs around the perimeter of the future site and check whether the diagonals are equal. If a heaving type of soil predominates on the site, then the floor of the extension must be made so that it is not lower than the flooring of the main housing by the amount of possible deformations. The foundation for an extension is an important stage in the construction of the entire structure. The main thing here is not to damage the main building. Therefore, you can make a reliable foundation with your own hands, but you must observe the basic technological nuances of construction. Determining the type of baseAn extension is an independent structure. It can be laid simultaneously with the construction of the main building. In this case, there will be no inconvenience when joining the two parts on which the house and the attached part will stand. However, most often the need to expand the living space arises after the house has been in use for a long time. In this case, it is necessary to attach new walls to the existing structure. And it is very important to follow all the rules and build a foundation for the extension of the house so that later, due to deformation of the foundation, the house does not become warped and it does not crack. To make the foundation correctly with your own hands, you need to find out the following:
Typically, house data is described in technical documentation. But if the building is not very new and no documents have been preserved, then you can determine what the building stands on as follows:
What types of connections are there?Taking into account the characteristics of the old foundation, the method of joining to the main house is chosen. There are several possibilities to make a connection between two bases:
The only requirement for any option is that the depth of the new foundation should be equal to or slightly less than the old foundation to allow for painless shrinkage. Where is the first option used?The bases can be connected in a rigid manner if:
Work progressOn a rigid coupling In the absence of heaving soil and with a stable foundation of the main house, a foundation for an extension is made on a rigid coupling. To do this you need:
In this way, you can attach the extension to any type of building with your own hands. Where is the second type used?Using the second type, you can build a foundation for an extension to a house if you need to connect parts from different materials. For example, make a veranda from foam blocks for a wooden house. Or from foam blocks to a brick house. Such a foundation for an extension to an existing house is separate, laid next to the old building and connected with an expansion joint. It’s not difficult to do this with your own hands, you just need to correctly connect the joints, sealing the seam with heat-insulating, moisture-resistant materials - for example, roofing felt and ordinary tow. Work progress:
Pile-screw methodThis is a good and quick method for lightweight structures made of wood, foam blocks and other materials; if you have a rigid and reliable grillage, it can also be used for heavier structures. The good thing about this method is that it is done quickly, does not destroy the existing foundation and can be used on any type of soil, including heaving and waterlogged ones. In addition, you can easily install any structures made of different materials on piles, including brick, wooden beams, foam blocks, etc. Pillar foundationA very common method, suitable for structures made of foam blocks, wood, OSB and other lightweight materials. Support poles are installed at the rate of 6 pieces per extension measuring 7 m by 3 m. Progress:
How to choose the best option?There is no point in making a serious foundation for a small veranda or other lightweight structure, say, from foam blocks or OSB. It is quite enough to use pile-screw supports. An extension made of foam blocks will normally stand on a shallowly recessed strip base. When building a heavy structure, you need to choose an appropriate reliable foundation. The construction of an extension to a building that has already been built is a process no less important than the construction of the main building. And since the risk that two building structures may move relative to each other is great, it is the arrangement of the foundation for the extension that is the most important stage of construction work. If you decide to make the foundation for an extension with your own hands, some useful tips are unlikely to be superfluous. Which specific foundation to choose: on screw piles, columnar or some other, depends on the material from which the extension is planned and the characteristics of the soil on the site. So, for example, a brick extension requires a serious and solid foundation, while a wooden house or one made of foam blocks requires a lightweight foundation.
Laying the foundation for an extension, regardless of which foundation is preferred - on screw piles or strip - involves the use of the following equipment and tools:
Main features of laying the foundation
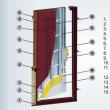
1. Old foundation. 2. New foundation. 3. Jumpers. 4. Products The foundation for an extension to a brick, wooden or foam block house is poured to a shallower depth compared to the main building. This is necessary to create a certain reserve for shrinkage. Moreover, if the main building stands on a concrete slab, the extension requires pouring another slab, and if a foundation on screw piles was used to build the house, then the extension will require a similar foundation. If you use some other foundation for an extension to the house, pressure may increase on the old foundation, which will cause additional shrinkage or even collapse of the structure.
You can tie two foundations – old and new – with your own hands in two ways:
The specific option is selected depending on the material from which the main structure is built and the characteristics of the soil on the plot. Thus, linking two foundations into a single structure is permissible if the main structure has not suffered severe shrinkage. In all other cases, a more optimal solution would be to construct a separate foundation. Rigid connection of two foundationsRigid connection of the foundation of the main building with extensions is allowed in the following situations:
To connect the strip foundation, a trench with a sand cushion is dug at the main foundation. The depth of the trench should not exceed that of the main house. Next, holes are drilled in the reinforcement in a checkerboard pattern to a third of the width of the structure. Reinforcement is driven into these holes, the protruding ends of which will later serve as the foundation frame for an extension to the house. When hammering in reinforcement with your own hands, you should keep in mind that on average about 20 reinforcing bars are required per square meter of area.
A rigid connection to a slab foundation is made only if its thickness is more than 40 cm. Such a connection is also permissible if the building’s base slab protrudes. Such indentations are usually left during the construction of buildings made of foam blocks and aerated concrete. The length of the protrusion should be about 30 cm and make it possible to expose the reinforcement of the structure for the purpose of subsequent welding it to the frame of the base of the extension. Separate foundation for the houseIf a brick structure is attached to a wooden house or a house made of foam blocks, due to the difference in weight, shrinkage will be uneven. In this case, it is not strongly recommended to connect the foundations. In this case, it is more advisable to build a separate foundation for an extension to the house.
DIY foundation for a frame extensionIf an extension to a wooden house or a foam block house is made from light-weight materials, most often a columnar foundation or a foundation on screw piles is made. At the same time, installing a foundation on screw piles with your own hands is the simplest and most inexpensive way to build a foundation for a frame extension. The main disadvantage of this design is that the foundation on screw piles is significantly susceptible to corrosion. But this problem can be easily dealt with using special anti-corrosion compounds. Among the advantages characteristic of self-made foundations on screw piles, we should first of all mention the high speed of construction. After the foundation for an extension to a house made of foam blocks or wood is completed, you can immediately begin building the extension. A pile foundation does not require additional reinforcement or wait a certain amount of time. If you have never previously laid the foundation for an extension to a house made of foam blocks, bricks or other material with your own hands, experts strongly recommend not to experiment. It is better to entrust the work to more experienced and qualified craftsmen working in construction companies. This will give better results than if you try to build a foundation with your own hands without the relevant experience. The construction of an extension to an already built house is no less important a process than the construction of a separate building. The risk of the house and extension structures shifting relative to each other is very high. Therefore, the most important stage of construction is the design of the attached premises. If you decide to do this part of the work yourself, you still cannot do without consulting a specialist. It will help you choose the optimal type of foundation depending on the conditions of the site and calculate the strength of the foundation for the extension. Foundation diagram: 1. Old foundation. 2. New foundation. 3. Jumpers. 4. Products. The complexity of the work, time and financial costs will depend on the conditions for the start of construction. There can be two starting situations:
Preliminary measurements and tool preparationTo determine the design and parameters of the foundation of an old house, a pit with dimensions of 1.5 × 1.0 m or 1.0 × 1.0 m is dug near one of the walls. Having reached the base of the foundation, the following are determined: for a strip one - the depth level and width, for a columnar one - laying depth and pillar dimensions.
Options for extensions: 1. Old house. 2. Extension. When developing a pit, you can also determine the nature of the soil under the base of the future foundation. The data obtained determines the type and methods of laying the foundation with your own hands. If you have a project for a built house, no preliminary research is required. There is no need to analyze the soil and determine the parameters of the main foundation. With the help of a specialist, you will be able to predict the possible shrinkage of the building in specific conditions, and carry out the main construction work yourself. To lay the foundation for the extension you will need the following list of tools:
Return to contents Basic principles of arranging the foundation for an extensionThe foundation of the attached room is poured to a depth slightly less than the depth of the foundation of the main building. This creates a reserve in case of predicted shrinkage.
Foundation pairing: 1. House. 2. Old foundation. 3. Pins. 4. Fittings. 5. Base. 6. Foundation base. If the house is on a concrete slab, another slab is poured for the extension. Accordingly, foundations with a similar type of load on the ground are attached to the strip, pile or columnar foundation of the main building. Otherwise, the extension may create additional pressure on the old foundation or lead to excessive shrinkage and collapse of the structure. When connecting the foundations of the extension and the house, you should not dig out the entire side of the foundation at once if it is more than 3 m long. This can weaken the stability of the structure and lead to structural deformations. After pouring the foundation of the extension, it is necessary to wait for it to shrink, and only then carry out further construction work. For example, if you build the base in the fall, then it is better to build the attached module itself in mid-spring. Linking old and new foundations with your own hands is done in two main ways:
The choice of the type and method of connecting foundations depends on the severity of the building being built and the soil characteristics on the site. If the main building does not shrink significantly over time, the foundations can be combined into a single structure. Otherwise, a separate foundation for the extension should be laid, connected to the main one through an expansion joint. Return to contents Rigid connection between the foundations of the extension and the main buildingThis design is acceptable under the following conditions:
If the building is erected on a columnar foundation, the reinforcement is fastened to the base, which must have sufficient width and height. Do-it-yourself pairing of strip foundations is done as follows:
Diagram of the rigid connection of the extension to the house: 1. Brackets. 2. Home. 3. Extension.
A rigid connection to a slab foundation is carried out when its thickness is at least 400 mm. Such a connection is also permissible if there is a protrusion of the slab from the basement of the building. Such protrusions are usually left during the construction of aerated concrete buildings. The slab must protrude by at least 30 cm and allow the structure’s reinforcement to be exposed for welding it to the frame of the extension’s base. Return to contents Separate construction of the foundation for the extensionIf there is a large difference in the weight of the main building and the extension, their shrinkage will occur unevenly. In this case, rigidly connecting the foundations is not recommended, and it is better to build a separate foundation for the extension.
It is more reliable to equip a separate foundation in a closed circuit. A reinforced concrete grillage is being erected against the wall of the building. Between the foundations a layer of roofing material or heat-insulating material (foam plastic, penoplex) covered with waterproofing is laid. During shrinkage of the extension, the layer protects the foundation of the house from damage. As an expansion joint, waterproofed boards are applied to the base of the house during the extension. Depending on the massiveness of the extension, the thickness of the seam is 2-5 cm. At the junction of the walls, the seam is covered with a decorative overlay, which is usually attached to the main wall. To install an independent foundation for light extensions (for example, under a frame veranda), preliminary markings are made.
|

 Experts recommend constructing an extension structure of the same type as that under the main building.
 For work you will need the following tools and materials:
 How to make a foundation for an extension to a house from FBS? This design is often erected for an extension to a wooden house.
 If the soil on which the construction is planned is weak, and the extension will exert a large load, you will need to use piles. The instructions for this work are quite simple:
 This method of extension is used if the thickness of the brick house exceeds 40 cm and in slightly heaving soil.


 In order to determine the parameters and design features of the future foundation, a hole with dimensions of either 1x1 m or 1.5 m is dug near one of the walls of the finished house. Upon reaching the base of the foundation, a more specific assessment of the size of the foundation is made. For a strip foundation - the width and depth of the foundation, and for a columnar foundation on screw piles - the dimensions of the pillars and the depth of the foundation.
 The rest of the reinforcement is laid after the formwork is installed and filled with concrete.
 It is easiest to build a separate foundation for a house made of foam blocks using a closed type scheme. To complete the task, a reinforced concrete grillage is erected near the wall of the building. In this case, a heat-insulating material (for example, roofing felt) is laid between the two foundations, which is covered with waterproofing. This layer avoids damage to the foundation of the building. Waterproofed boards are used as an expansion joint to the house during the foundation concreting process. For a wooden extension or an extension made of foam blocks, a two-centimeter joint thickness is enough. If we are talking about a more massive extension, the thickness of this seam should be increased to 5 cm. To disguise this seam, a special decorative overlay is usually used, which is attached to the main wall.


Popular:
New
- How to make a heated floor in the bathroom with your own hands: a step-by-step guide
- Pouring the foundation for an extension to the house
- DIY bored foundation
- House project 1.5 floors made of brick. Projects of one-story houses: pros and cons. Which house to choose
- How to fix a crack in the foundation
- Shallow strip foundation for aerated concrete house
- Guide to pouring the foundation of a house yourself Making a foundation for a house
- What should be the depth of the strip foundation?
- What should be the distance from the gas pipe to the building Fire distances to protected objects
- Series and parallel connections of conductors


