Sections of the site
Editor's Choice:
- Pork roll with filling
- Soup with melted cheese and chicken breast
- Step-by-step recipe for cooking broccoli in batter with photo Broccoli batter
- Lush sweet buns (7 recipes)
- Tortilla - what kind of Mexican dish is it and how to properly prepare it at home with photos
- Wheat tortilla Homemade tortilla recipe
- Calorie content of 1 eclair with custard
- Canned fish soup sardines with rice
- Dance with a woman in a dream
- Why dream of dancing with a guy
Advertising
| Sliding doors how to make a guide at the bottom. How to make sliding doors |
|
Reading time ≈ 3 minutes Recently, the trend of installing sliding doors at home has become increasingly popular. They are preferred to ordinary doors for a reason. In fact, sliding structures have a number of advantages, some of them: they open conveniently without squeaking or other noise, are non-traumatic, simple and inexpensive. Sometimes the main advantages include the fact that they allow you to save precious space in the room - well, one cannot but agree with this. Next we will talk about how to install sliding doors with your own hands, the material will be arranged as step-by-step instruction to installation.
One thing to note important point. If you have irrevocably decided to install sliding doors with your own hands (videos and photos of an auxiliary nature can be found directly on this page), then remember that such work is best entrusted to professional personnel, since only a masterful approach can ensure highest level installation, and therefore guarantee long and trouble-free operation of door components. The conversation about how to make a sliding door with your own hands is very complicated, so it is highly recommended to buy a ready-made kit. Step-by-step instructions for installing sliding doors
You need to imagine the moment that the door block is delivered to the apartment where it will be installed in the future, in a disassembled state. He gathers on the spot. The door leaf, frame and trim are packaged to avoid damage during transportation.
Let's consider the installation method when the door leaf has freedom of movement along doorway. Here it is necessary to note the main possible options for finishing the doorway: these are tiles, a decorative false frame and, most simply, ordinary wallpaper. We will not dwell on finishing with tiles or wallpaper, but will pay special attention to how to install a sliding door with your own hands using a false frame.
The false frame is installed in a previously prepared doorway and fixed with special wedges. To properly monitor the current installation, it is necessary to use a level and plumb line.
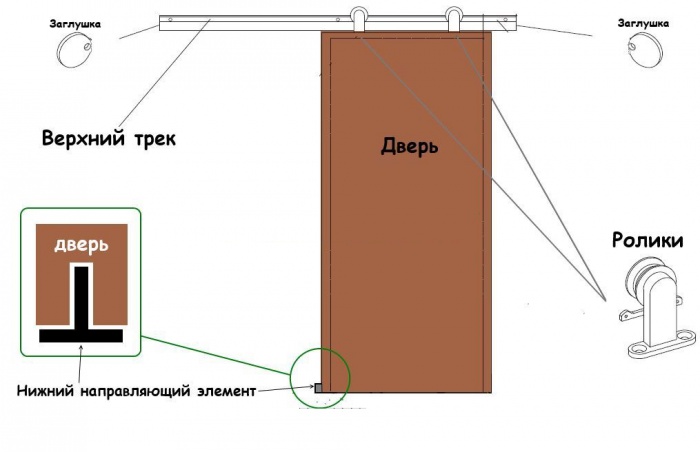
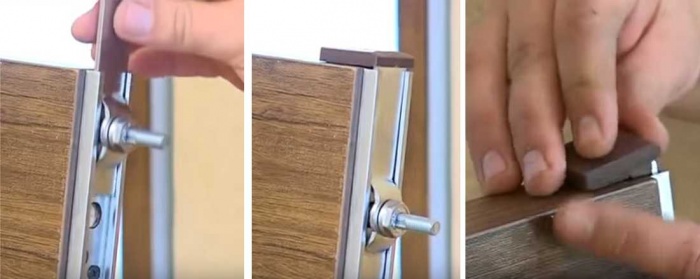
An important point: rollers, which are the main components, are attached to the upper end of the door leaf sliding system. A screwdriver is used for this. The holes are marked with a pencil.
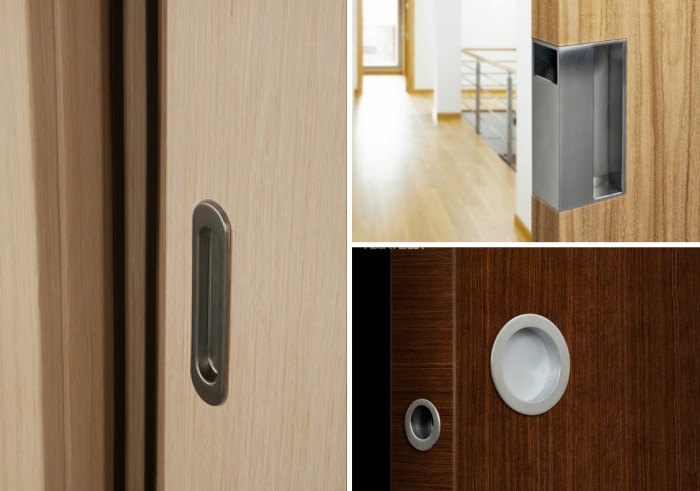
There are special fastenings for the rollers, which, like the first ones, come complete with the entire structure. Most often, a mortise handle is installed - this will make opening the door more convenient.
The most important point is when the rollers with the web are mounted in the guide. The blade is adjusted by level using the same pegs.
We must not forget that a special groove must be cut in the lower end of the door leaf for the flag roller, which, in turn, is designed to protect the door from lateral vibrations.
This roller is attached, of course, directly to the floor. To fill any gaps, it is used polyurethane foam, which serves as a good fixative.
We can conclude that assembling sliding doors with your own hands is not an easy task, requiring certain skills and availability necessary tools. It is recommended to entrust the assembly to professional workers. Installing sliding doors is one of the ways to solve the issue of rational and competent use of every meter in the apartment; you can do them yourself. Information on how to implement this and what is needed to make the structure will be useful for many owners of small-sized housing. VarietiesIn a specialized construction supermarket you can see a huge variety of models of sliding doors. They are divided into types and subspecies, taking into account various parameters:
Depending on the design and material of the model, its price category also differs, and given how rich the choice is, everyone can find a door option that suits them. Sliding doorsThis type of sliding door is the most common. It consists of one or two sections, which, when opened, move in one or different directions. In this case, the leaf panels are suspended on a rail mechanism, which sets them in motion. CassetteOperating principle cassette system similar to the design of a compartment door with the only difference that when moving the door is hidden in a special niche, which is camouflaged in the wall. It is sold complete with doors, but if we're talking about about self-production, it is made mainly from plasterboard. CascadeCascade doors are a structure of several leaves, one of which is fixed in a stationary position, and the rest move along a rail mechanism across the entire width of the opening when closing. When the structure is opened, all parts of its fabric are assembled on the side of the fixed sash. "Book" and "accordion"These types of doors are almost identical. Their designs consist of several sections connected by special hinges, with the help of which the sashes are compactly assembled on one side of the opening. The difference between “book” and “accordion” is only in the number of sections involved in the design.
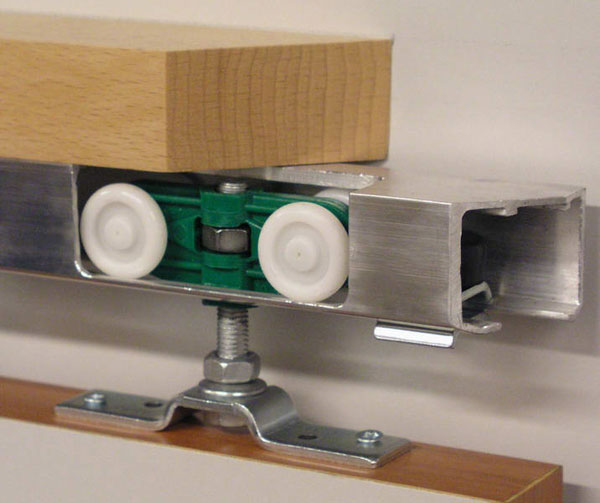
Sliding door mechanismRegardless of the type of sliding interior doors, the operating principle of their mechanisms does not differ significantly. Rollers are mounted on the canvas, which, moving along the guides, ensure the movement of the sashes. The guides are usually attached to the wall, but in some cases they are also fixed to the floor. In the case of framed door options, a separate running element must be installed on each section. Sliding door devices are divided into hanging and rail. In the case of a suspended mechanism, the running gear, one or more, is installed only on top of the structure, and an additional roller is fixed below to ensure easy movement. The rail mechanism looks the same, but the running elements are attached both above and below the door frame, that is, the lower roller does not move along the floor, but along a rail built into it. This design is more resistant to heavy loads, so it is suitable for door models with large dimensions. In order for the device to operate smoothly, it is necessary to carefully ensure that dirt and debris do not accumulate on the bottom rail. Step-by-step instructions for installing a sliding structureBefore you buy all the necessary components to make a good-quality sliding door yourself, you should make sure that its installation is possible in a particular room. It must meet the following conditions:
If the room meets all of the above parameters, you can decide on the type of model and begin preparing for installation. To select the most suitable option for self-made, you can use photo or video catalogs that can easily be found on the Internet on popular platforms. What is required to install the compartment?One of the most simple models For DIY production, a single-leaf sliding door is considered.
The mechanism for the design can be purchased at finished form or assemble from parts:
When choosing a canvas, you should consider that it optimal size is considered to be the one that slightly exceeds the perimeter of the opening, and the length of the guide rail is twice the width of the door. Installation of the structure mechanismFirst you need to determine the height sufficient for the door to block the entire opening when closed. To do this, apply a sheet to the wall of the proposed installation and to the side where the sash will slide off and, taking into account the height of the rollers, as well as an approximate distance of 2 cm, use a pencil to mark the place for attaching the guide. The result should be a smooth horizontal line. Next, a guide is installed on the drawn line, which can be fixed to the wall with self-tapping screws or special brackets. At this stage, it is important to take into account that there should be a small distance between the sections and the wall. After securing the guide, you need to assemble the roller device. To do this, mount the carriages, insert a screw into them and place them in the running element. Their number directly depends on the weight of the sash, that is, the heavier the structure, the more of them will be required. Securing the sashFirst of all, staples are placed on the door leaf at a certain distance from each other, but in such a way that they can withstand the weight of the entire section. Then the sash must be lifted, thread the screw into the brackets, and then fix it at the desired level. To make the structure even, the best solution will take advantage of someone's help. After the canvas is hung on the chassis, clamps are installed. They should be positioned in such a way that the leaf completely covers the doorway when closing and moves to the side at a convenient distance when opening. Handle installation and finishingTo fully use sliding doors made by yourself, it is enough to install a mortise handle on them, a ready-made version of which is easy to find in a construction supermarket.
The final stage in making doors with your own hands is their final finishing. It includes hiding the slopes behind the platbands and decorating the guide with a suitable strip. After which the installation of a single-leaf compartment door can be called complete. If the budget does not allow, but you still need to free up space in a small room, make sliding interior doors You can do it yourself even using improvised means. To make them, you will need any suitable fabric, for example, old door, and as a guide rail - an ordinary steel cornice with hinges. However, the service life of such a design is short, and no one guarantees its safety. 2018-04-18How to make sliding doors? This question arises for owners of small apartments when renovating or wanting to have more free space in a small room. Such doors allow you to divide the space of the apartment into zones, maintaining the appearance of the integrity of the volume. To make them yourself, you need to know a little about the tool and have at least minimal knowledge of what it is. Typical designs and their typesThere are several types of doors that differ from each other appearance, but the operating principle of their mechanism is almost the same. The main elements of a sliding door are closing doors, guide rails and a carriage with rollers. The operation of the system is based on the following principle:
In different designs, the number of mechanisms used can vary from 2 to 4 or more. It is possible to use several guides and door leaves, which are made of decorative panels and cover the mechanism. In this case, extensions, platbands or special fittings are used. Types of sliding doors:
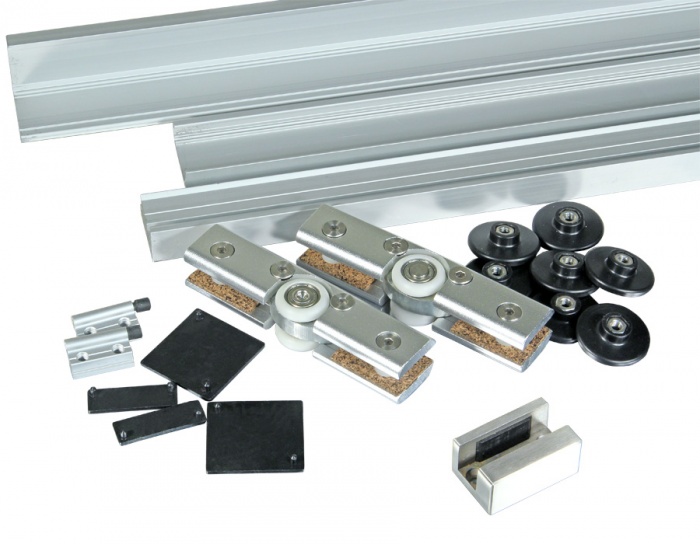
Sliding doors can have from 1 to 4 leaves. Sliding door mechanisms and fittings used
When creating such a design, it is necessary to select a carriage with rollers depending on the number of leaves, the material used for their installation and the type of door. These parameters are different when using, for example, MDF and glass sheet, both in weight and in the load created on the rollers. If you need to install a cascade structure, then you need to select rails with 2 gutters and attach 2 rollers to each sash. The same applies to the coupe and the accordion. The reliability of the installed door largely depends on the guides and carriage mechanism. At heavy weight structures (material – strained glass) you need to use 2 rails: one at the top and the other at the bottom of the opening. Locks, handles and other fittings for a sliding door are hidden in its leaf. This is done so that the doors do not interfere with each other when moving and can be hidden in a niche. The locks are vertical latches. If you need to select the fittings yourself (usually they come with the door panels), then it is better to consult a specialist. Sliding door installation optionsInstallation of such structures in rooms with small area allows the use of modern design developments. They can be used with standard apartment sizes, and in country house. There are many options for installing a sliding door. Let's look at some of them.
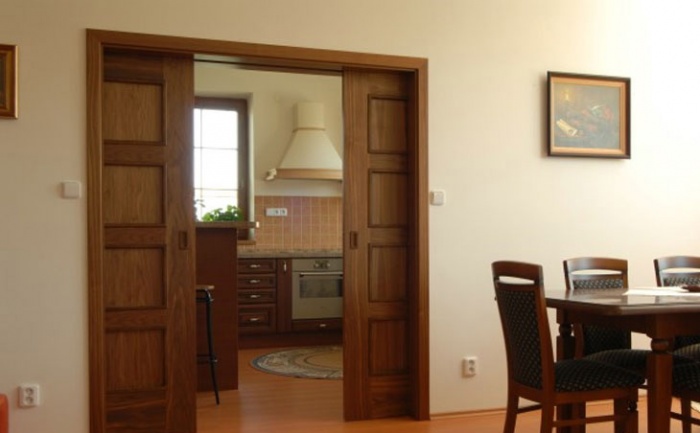
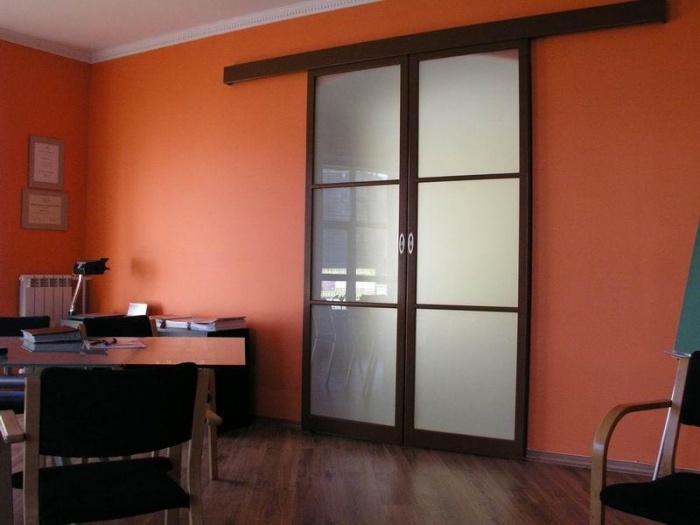
Most often, a double-leaf structure is used to separate 2 residential areas. At the same time, the room looks like a single whole when the doors are moved apart and is divided into two parts when they are closed. The entire area of the apartment is divided unevenly, for example, into an office (with the panels closed) and a living room. Another option is to install the structure between the main residential block and a balcony or loggia (terrace in the house). Typically, glass doors are used in this case. Another application of such devices is to separate storerooms or utility rooms from the main premises. To do this, you need to use sliding doors. The most difficult to manufacture are structures that move apart along a radius. Their installation largely depends on the degree of bending of the door leaf and the guide. They are used in rooms with a rounded configuration and in showers.
An easy way to make sliding doors yourselfIf the type of structure that the owner wishes to install in the apartment has been determined, then it is necessary to purchase necessary materials and tools on the construction market. Accessories can be purchased in specialized stores. The easiest way to start is by installing a single-leaf version of such a sliding door - this is the simplest and most commonly used design. At the same time, a person will acquire skills that will help him in the future independently cope with multi-leaf systems.
The technological process of work is as follows:
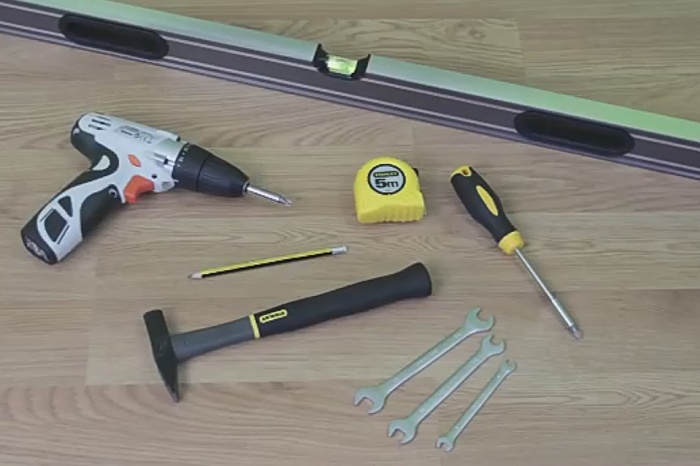
Installing a structure with a niche in the wall presents a certain difficulty. In order for the canvas to fit into it, you need to make an artificial partition from sheets of plasterboard. If you decide to install the rail on the floor, you need to make a groove in it. To do this you need to use a hammer drill. Tools, devices and materials for work
Self-assembly and installation of a sliding door is not very difficult. The most important thing when performing this work is to strictly follow the above technological chain and follow all recommendations. You need to correctly assess your strengths and financial capabilities and choose quality material for construction. If necessary, consult a specialist who performs such work. In small rooms, every meter of usable space counts. This is why many homeowners are replacing swing doors with sliding doors. Installing sliding doors yourself is quite simple. However, the mechanism for such a design costs almost the same as the canvas. Such expenses are justified if it takes up too much space; in other cases it is better to install a swing model. Sliding sliding doors have very low sound insulation, since they do not fit tightly to the wall. The noise of a structure installed in a pencil case is much better at hiding the noise. However, they do not reach the sound insulation level of a swing door. Types of sliding doorsSliding structures differ in the type of movable mechanism. On this basis, they are divided into rail and suspended. Each model has its own pros and cons. Hanging type model on top railThe suspension mechanism consists of a square profile with a groove, inside of which there are two curved strips. The rollers attached to the product run along these slats. The guide is made of metal, as are the rollers. But they have rubber or plastic linings that provide a soft and quiet ride.
When installing a sliding interior door on a rail, no devices or mechanisms are installed on the floor. All the fasteners that are on the canvas are two rollers on top. They move along the groove due to special wheels. Such doors are considered one of the easiest to install. Installing a sliding door includes the following steps:
The door fastening itself is very simple; in addition to the rollers and rails themselves, the kit includes plugs and fasteners. A product with a top rail has extremely low sound insulation rates. Therefore, it is not recommended to use such structures in living rooms. Sliding structures on railsOn sliding doors two mounting rails. Movable rollers are mounted at the top and bottom. This method of fastening makes the product very stable, so it can be shaken. Note! The metal profile of the fasteners is constantly clogged with dust and debris, which complicates cleaning in the house. Mounting optionsRegardless of the type of fastener, the installation of sliding interior doors can be:
Cascade. Similar designs are very popular in Asian countries. The model consists of 2-3 canvases. One is stationary, while the others ride on rails and move behind it.
If you plan to install sliding doors yourself, choose a compartment design. The models are easy to assemble and highly maintainable. The main feature that is necessary for installing an interior door with your own hands is a smooth opening.
You cannot place anything near the wall to which the base of the sliding door is moved, otherwise the movement of the door leaf will be disrupted. A significant disadvantage of the models is their low sound insulation. This is due to the fact that sliding doors are installed with a gap. Without it, the canvas will scratch against the wall. Cassette structures provide the best access to room space. Inside the niche you can install soundproofing materials that will hide the noise. However, installation of such a model is possible only at the stage of repair or construction. In addition, a decorative wall is assembled for the rail, and this deprives the room of useful space.Cascade products are a modification of compartment structures. The main difference is the larger number of guide rails. Installing such products is the most difficult, as high precision is required. Cascade structures are classified as premium for their complexity and aesthetics.
Installation FeaturesYou can install sliding interior doors with your own hands even if you don’t have specific skills. Installation instructions are included with each product. By following it, you can complete all the work yourself. Below the assembly process is described in more detail than in the standard instructions.
After aligning the opening, you can begin installation. The first step is to attach the rollers. Depending on the manufacturer and model, fasteners may have their own characteristics. To assemble some products you need to step back 15-20 cm from the edge, but most often the rollers are mounted right at the edge. To begin with, markings are made on the canvas for fasteners. Important! Make sure that the distance from the edge to the roller is the same on both sides.
At the marking site, drill holes 1 mm smaller than the diameter of the fastener with a drill. After the grooves are ready, the plates are fixed. Self-tapping screws are used as fastenings; their length must be at least 75 mm. The greater the weight of the canvas, the longer the fasteners. Special support holders are mounted into the plates, into which rollers are inserted. The fasteners on the sides of the canvas must be secured with plugs.
The rollers come with pins. The movable elements themselves are screwed onto them. If the model is not equipped with handles, they must be purchased separately. It is recommended to install the handles before installing the product in the opening. In a model without a groove, markings are made with a pencil and the material is removed along the contour with a carpentry tool. Fittings are attached to the resulting hole. Note! Only submersible fittings are suitable for sliding doors.
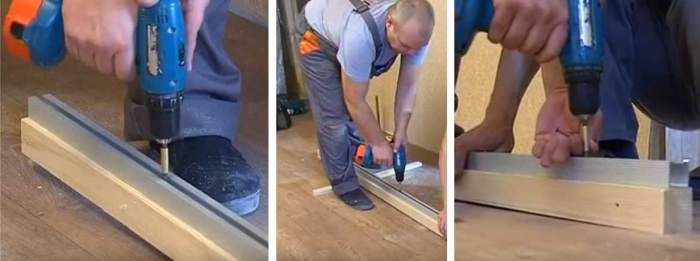
When the canvas is ready, the rail is attached. The easiest way is to screw the guide to the block, and not directly into the opening. To do this, take a wooden plank of square or rectangular cross-section with a side of 60 cm. The length of the block should be twice as long as the door itself and a margin of 5-10 cm. The rail is cut along the length of the block. The guide is screwed to the block with self-tapping screws from 85 mm. The minimum number of fasteners is 4, the more often the better. The recommended step between screws is 10 cm, the same distance is made from the edge of the canvas to the first fastener.
Next you need to measure the height of the bar. The rail is threaded onto rollers of the canvas and the height is measured. Using this value, holes are made on the wall for attaching the guide rail. The canvas should not stand on the floor. A distance of 8-10 mm is left from the floor to the structure itself. If there are no coverings on the floor, the thickness of the floor finishing is added to the value. The level is used to adjust the mark for mounting the bar. For this, fasteners from 12 cm are used, but more reliable fasteners are anchor bolts. IN concrete walls use dowels.
Markings for the guide are made with a thin drill or nail. After that, holes are drilled for dowels or screws and the timber is mounted. The final stage is inserting the sliding doors into the rail. After rolling up the structure, plugs are placed on the sides of the fittings; they protect the structure from slipping. When the door is open, a flag roller is screwed onto the floor. It regulates the movement of the blade along the vertical axis. The installation of a decorative overlay on the fastening profile will give the structure an aesthetic appearance. It is placed on finishing nails or self-tapping screws with decorative plugs. Screw the cover directly into the block.
To install a sliding structure, more materials and tools will be required. If you want to learn how to install sliding cassette doors, watch the detailed video instructions:
Almost any panel can be attached to a rail and a sliding door can be constructed. But for the system to function without failures, it is necessary to install high-quality fittings. Durable fasteners and rollers ensure long door life. Therefore, there is no need to save on accessories.
The canvas itself can be made independently. The cheapest option is a frame made of timber with a body made of plywood or chipboard. A solid product made of solid or laminated wood looks most aesthetically pleasing in the interior. However, the assembly of such a product will cost more. Products made from particle boards are covered with a film or a laminating surface. Wooden panels can simply be sanded and coated with protective compounds. It is very difficult to design a roller mechanism on your own. If you don’t have a special tool, including a cutter, you won’t be able to make the fittings yourself. It is much easier and cheaper to purchase a ready-made product.
|


Popular:
Online exam test in Russian language
|
New
- Soup with melted cheese and chicken breast
- Step-by-step recipe for cooking broccoli in batter with photo Broccoli batter
- Lush sweet buns (7 recipes)
- Tortilla - what kind of Mexican dish is it and how to properly prepare it at home with photos
- Wheat tortilla Homemade tortilla recipe
- Calorie content of 1 eclair with custard
- Canned fish soup sardines with rice
- Dance with a woman in a dream
- Why dream of dancing with a guy
- Death tarot meaning in relationships


