Sections of the site
Editor's Choice:
- Making a smokehouse from a gas cylinder Smokehouse from a propane cylinder with a folding shelf
- Apparatus for welding copper wires - How to make it yourself?
- Simple and convenient wicket lock
- A simple metal detector with two transistors
- Repair of ceramic faucets
- DIY DC welding machine: my diagram DC and AC welding machines
- Getting to know oriental cuisine - simply, quickly and in any conditions: do-it-yourself stove for a cauldron made from a pipe
- How to make a flowerbed from tires Photo of crafts from tires
- Varieties of dowels for thermal insulation of surfaces with mineral wool and expanded polystyrene Disc-shaped metal dowel fungus
- Fungi and dowels for fastening insulation Construction fungi for insulation
Advertising
| Circuit diagram of a metal detector using transistors at home. A simple metal detector with two transistors |
|
A simple metal detector using transistors. Hello to everyone who wants to build a metal detector. When carrying out repair and construction work, especially in old houses, you need a device that can be used to detect various metal objects located under a layer of wallpaper or in the thickness of walls or ceilings. To search for water pipes embedded in walls, wires randomly laid under a thick layer of wallpaper or in the thickness of plaster, as well as “treasures” and hiding places hidden under wallpaper or boards, a simple device is suitable that works on the principle of comparing two frequencies using the beat method. In my opinion, this is the simplest and most proven scheme on the Internet. It does not contain any deficient elements. This book is mainly dedicated to beginning radio amateurs. Well, if your brains haven’t dried out yet, then you can get started. The principle of operation of a metal detector comes down to the fact that when a metal object approaches the inductor coil of the generator - the main unit of the device - the frequency of the generator changes. The closer the object and the larger it is, the stronger its influence on the frequency of the generator (in our case, a transistor). Schematic diagram https://pandia.ru/text/78/360/images/image002_39.jpg" width="276" height="155"> 100 kOhm resistor marking - brown, black, yellow. Capacitor Stores a charge of energy
Transistor Switches voltage. Its pinout:
This is what the diagram assembled on cardboard looks like:
How to wind a coil: Take a 3-liter jar and 100 meters of copper wire with a diameter of 0.3-0.5mm. We wound 20 turns, solder the beginning of the winding to the capacitors and make a notch to which we then solder the wire from the emitter of the transistor. We wind up the remaining 10 turns and solder it to the bottom of the circuit, as if to another coil. As you already understood, there are 2 coils, everything must be symmetrical, because the metal detector will not work correctly. The coils must be impregnated with construction varnish and wrapped with thread.
Each coil makes a different sound: when it hits its El. One of the magnetic fields of the metal enhances the squeak, and in the other, on the contrary, the sound disappears. It is advisable to fill the transistors with wax. It operates at approximately 1 MHz. Depth: coin-10cm, pipe-15cm, hatch-20cm. It also looks for some non-ferrous metals. Photo of the assembled device.
The scheme was put together by me and it simply cannot help but work. Good luck!!!
Read in the article: Metal detector and its structure This model costs more than 32,000 rubles, and, of course, non-professionals will not be able to afford such a device. Therefore, we suggest studying the design of a metal detector in order to assemble a variation of such a device yourself. So, the simplest metal detector consists of the following elements. The operating principle of such metal detectors is based on the transmission and reception of electromagnetic waves. The main elements of a device of this type are two coils: one is transmitting, and the second is receiving.  The metal detector works like this: the magnetic field lines of the primary field (A) of red color pass through the metal object (B) and create a secondary field (green lines) in it. This secondary field is picked up by the receiver and the detector sends an audible signal to the operator. Based on the principle of operation of emitters, electronic devices of this type can be divided into:
The cheapest devices belong to the first type.  An induction metal detector has one coil that sends and receives a signal simultaneously. But devices with pulse induction differ in that they generate a transmitter current, which turns on for a while and then turns off abruptly. The coil field generates pulsed eddy currents in the object, which are detected by analyzing the attenuation of the pulse induced in the receiver coil. This cycle repeats continuously, perhaps hundreds of thousands of times per second. How does a metal detector work depending on its purpose and technical device?The operating principle of a metal detector varies depending on the type of device. Let's consider the main ones:

 Depth detectors operate on two coils, one is parallel to the ground surface, the other is perpendicular.
 Which metal detectors are suitable for making yourself at home?The simplest devices that you can assemble yourself include devices that operate on the principle of reception and transmission. There are schemes that even a novice radio amateur can do; for this you just need to select a certain set of parts.  There are many video instructions on the Internet with detailed explanations of how to make a simple metal detector with your own hands. Here are the most popular ones:
However, despite the fact that some entertainers are trying to offer systems for assembling a metal detector from a phone, such designs will not pass the battle test. It’s easier to buy a children’s metal detector toy, it will be more useful.  And now more about how to make a simple metal detector with your own hands using the example of the “Pirate” design. Homemade metal detector “Pirate”: diagram and detailed description of the assemblyHomemade products based on the “Pirate” series metal detector are among the most popular among radio amateurs. Thanks to the good performance of the device, it can “detect” an object at a depth of 200 mm (for small items) and 1500 mm (large items). Parts for assembling a metal detectorThe Pirate metal detector is a pulse type device. To make the device you will need to purchase:
DIY metal detector circuitsThe classic circuit of the “Pirate” series metal detector is built using the NE555 microcircuit. The operation of the device depends on a comparator, one output of which is connected to the IC pulse generator, the second to the coil, and the output to the speaker. If metal objects are detected, the signal from the coil is sent to the comparator, and then to the speaker, which notifies the operator of the presence of the desired objects.  The board can be placed in a simple junction box, which can be purchased at an electrical store. If such a tool is not enough for you, you can try to make a more advanced device; a diagram for making a gold-oriented metal detector will help you.  How to assemble a metal detector without using microcircuitsThis device uses Soviet-style transistors KT-361 and KT-315 to generate signals (you can use similar radio components). How to assemble a metal detector circuit board with your own handsThe pulse generator is assembled on the NE555 chip. By selecting C1 and 2 and R2 and 3, the frequency is adjusted. The pulses obtained as a result of scanning are transmitted to transistor T1, and it transmits the signal to transistor T2. The audio frequency is amplified using the BC547 transistor to the collector, and headphones are connected.  To place radio components, a printed circuit is used, which can be easily made independently. To do this, we use a piece of sheet getinax covered with copper electrical foil. We transfer the connecting parts onto it, mark the fastening points, and drill holes. We cover the tracks with a protective varnish, and after drying, we lower the future board into ferric chloride for etching. This is necessary to remove unprotected areas of copper foil. How to make a metal detector coil with your own handsFor the base you will need a ring with a diameter of about 200 mm (ordinary wooden hoops can be used as the base), on which 0.5 mm wire is wound. To increase the depth of metal detection, the coil frame should be in the range of 260−270 mm, and the number of turns should be 21−22 vol. If you don't have anything suitable on hand, you can wind a reel on a wooden base. Copper wire spool on wooden base
Twisted pair coil in 5 minutesWe will need: 1 twisted pair 5 cat 24 AVG (2.5 mm), knife, soldering iron, solder and multitester.
Brief instructions for setting up a DIY metal detector “Pirate”Once the main elements of the metal detector are ready, we proceed to assembly. We attach all the components to the metal detector rod: the body with the coil, the receiving and transmitting unit and the handle. If you did everything correctly, then additional manipulations with the device will not be required, since it initially has maximum sensitivity. Fine tuning is performed using variable resistor R13. Normal operation of the detector should be ensured with the regulator in the middle position. If you have an oscilloscope, then use it to measure the frequency at the gate of transistor T2, which should be 120−150 Hz, and the pulse duration should be 130−150 μs. Is it possible to make an underwater metal detector with your own hands?The principle of assembling an underwater metal detector is no different from a conventional one, with the only difference being that you will have to work hard to create an impenetrable shell using sealant, as well as to place special light indicators that can report a find from under water. An example of how this will work is in the video: Do-it-yourself metal detector “Terminator 3”: detailed diagram and video instructions for assemblyThe Terminator 3 metal detector has occupied an honorable place among homemade metal detectors for many years. The two-tone device operates on the principle of induction balance.  Its main features are: low power consumption, metal discrimination, non-ferrous metals mode, gold only mode and very good search depth characteristics, compared to semi-professional branded metal detectors. We offer you the most detailed description of the assembly of such a device from folk craftsman Viktor Goncharov. How to make a metal detector with your own hands with metal discriminationMetal discrimination is the ability of the device to distinguish between the detected material and classify it. Discrimination is based on different electrical conductivities of metals. The simplest methods for determining the types of metals were implemented in old instruments and entry-level devices and had two modes - “all metals” and “non-ferrous”. The discrimination function allows the operator to respond to a phase shift of a certain magnitude, compared to a configured (reference) level. In this case, the device cannot distinguish between non-ferrous metals.  Learn how to make a homemade professional metal detector using improvised materials in this video: Features of deep metal detectorsMetal detectors of this type can detect objects at great depths. A good metal detector, made by yourself, looks to a depth of 6 meters. However, in this case the size of the find must be substantial. These detectors work best for detecting old shells or large enough debris.  There are two types of deep metal detectors: frame and transceiver on a rod. The first type of device is capable of covering a large area of land for scanning, however, in this case, the efficiency and focus of the search is reduced. The second version of the detector is a point detector; it works directed inward over a small diameter. You need to work with it slowly and carefully. If your goal is to build such a metal detector, the following video can tell you how to do it. If you have experience in assembling such a device and using it, tell others about it! This metal detector is capable of detecting: large metal objects (iron bucket, manhole cover, water pipe) at a depth of up to one meter, as well as small objects (coins or screws) at a depth of 15-20 cm. The device is built on the basis of the most common parts that are available in the supplies of any radio amateur. The metal detector is made according to the well-known and widely used principle in such devices of beats between the frequencies of two high-frequency generators. The frequency of one of them (reference) is constant, and the frequency of the second (search) changes under the influence of external metal objects that change the inductance of its coil when it enters its action zone. Schematic diagramThe schematic diagram of the metal detector is shown in Fig. 1. The reference oscillator is made on transistor VT1. Its oscillation frequency is determined by the parameters of the L1C3 circuit and is about 1 MHz. The search generator is made on transistor VT2; it also produces a signal of approximately the same frequency. The difference is that the reference oscillator circuit uses a small coil with a ferrite core. Fig 1. Schematic diagram of a simple homemade metal detector. Therefore, external metal objects have practically no significant effect on its inductance. The coil of the search generator circuit is wound on a larger frame in the form of a frame. It has no core. As a result, its inductance changes greatly as it approaches a metal object, which in this case begins to act as a moving core. Signals from both generators are sent to a diode mixer using diode VD1. As a result, the product of subtraction of generator frequencies is obtained on capacitor C12. The closer the values of these frequencies, the lower the audio tone on this capacitor, and the more different the frequencies of the generators are, the higher the sound tone in speaker B1, to which the signal is received (the product of the diode mixer). The signal enters through a low-frequency amplifier using transistors VTZ-VT6. Using a variable capacitor C7, the search generator can be configured in such a way that, in the absence of metal objects nearby, the sound tone in the speaker is the lowest. Then, as coil L2 approaches the metal, the frequency of the generator at VT2 begins to change. The frequency difference between the generators increases, and therefore the tone in the dynamics will rise. When the metal is precisely located, the sound will turn into a piercing squeak. Details and designCoil L1 should be wound on a ferrite rod with a diameter of 8 mm, for example, from a magnetic antenna of a radio receiver. The length of the rod is reduced to 30 mm. First, you need to put a frame on the rod - a sleeve glued together from whatman paper, which moves along it with some friction. Coil L1 should contain 110 turns of PEV wire with a diameter of 0.2-0.3 mm. The tap must be made from the 16th turn counting from the VT1 collector. Coil L2 is a search coil. It must be wound on a frame, which is a frame measuring 120 x 220 mm, made of plexiglass, plastic or wood. Winding should be done with PEV wire with a diameter of 0.4 x 0.6 mm. The coil should contain 45 turns with a tap from the 10th, counting from the VT2 collector. The coil must be connected to the main unit with a three-core shielded wire. The coil should be located at a distance of about 1 meter from the main unit (attached to an aluminum tube or wooden strip). The device itself (the main unit containing a generator on VT1 and an ultrasonic sounder with a speaker and a battery) can be mounted in a housing from a radio receiver. From the same receiver it is advisable to use:
The design may be different, it all depends on capabilities and desires. Capacitor C7 can have a minimum capacitance of no more than 10 pF, and a maximum of no less than 150 pF. Transistors KT315 can be replaced with KT3102 or KT312, KT316. Transistors MP35 can be replaced with MP35-MP38, and transistor MP39 with MP39-MP42. Diodes D9 - with any letter, or D2, D18, GD507. Speaker - any resistance from 4 ohms to 100 ohms, for example, a speaker from a radio receiver or headphones. The battery is 9 V, you can use a “Krona” or a suitable battery. Attention:Power supply from a 220 V mains source is not advisable, because this creates an alternating current background and reduces the sensitivity of the device as a whole. Settings
The setting consists of adjusting coil L1 in such a way that when the rotor of capacitor C7 is in the middle position and in the absence of external metal objects, the sound of the lowest tone is heard in the speaker. In the future, during operation, adjustment before starting the search will be made by capacitor C7. If there are no oscillations from the generator at VT1, you need to select the value of C4 and/or adjust the operating mode of the cascade by selecting the value of R2. If the generator at VT2 is not excited, you need to adjust C8 and adjust the operating mode of the transistor by selecting the value of R6. The device is highly sensitive, and working with it requires certain skills. So you need to practice. When working, it is important to take into account that when approaching ferrous metals (iron, steel, cast iron), the frequency of the generator on VT2 decreases, and when approaching non-ferrous metals, it increases. In this article we will talk about one of the simple metal detectors, the assembly of which can be carried out using available Soviet radio components. These include transistors marked CT and MP, as well as resistors and capacitors from popular radio equipment. Most of the necessary parts can be found without problems in old radio devices. The circuit consists of five nodes, the structure of which can be viewed in Figure 1:
This device resembles a metal detector with two transistors, but it has an added sound amplifier, and, despite its simplicity, it has good metal detection performance. It is perfect for mass search and collection of ferrous metal. If you find radio components and a little time, you can easily assemble a metal detector using the example of this educational article. Assembling circuit elementsThe circuit can be assembled on a one-sided foil-coated PCB. Guided by Figure 2, which shows the circuit of a metal detector using transistors, we count the number of connections and create the corresponding number of contact pads with a sharp object. After tinning, the board is ready for assembly of parts (Fig. 3). For better assembly, you can think over and draw a homemade printed circuit board.
Below is a list of required parts and instructions for some of them:
Metal detectors cannot operate without coils, which play a major role in the device. In the next paragraph of the article we will describe in detail their role in the work and the manufacturing process. Creating Generator CoilsThe primary coil L1 is exemplary and, together with capacitor C3, serves to create the reference frequency of the generator. The secondary coil L2 works in the same way, but it is made without a core. This allows metal objects to act on it and change the frequency of the generator, which leads to a difference in frequencies for the signal. Below is how to make homemade coils without much difficulty. For the frame of the L1 coil, you need a metal rod with a diameter of 8 mm and a length of 3 cm. You can use an antenna with a radio. Whatman paper must be wound around the rod. We do this to be able to adjust the frequency by moving the rod relative to the coil, so it is important that the Whatman paper fits very tightly to prevent spontaneous movement. After the final setup of the metal detector in the last step, you can fix the rod with glue. A sample coil is shown in Figure 5.
We wind the L1 coil with PEV wire with a diameter of 0.2 - 0.3 mm. We wind 110 turns on whatman paper strictly in one row, trying to avoid gaps or gaps between turns. At the 16th turn we make a tap without breaking the wire. After winding, you can varnish the wire, but you must ensure that the metal rod inside can move freely. We connect the wire according to the diagram. The second coil L2 is made in the form of a rectangular frame measuring 12 x 22 cm. The frame can be made of plastic, plexiglass, plywood and other non-conducting material. We make a tray or assemble only a supporting rectangle into which the winding can be laid in bulk. Finished samples can be seen in Figure 6.
The wire, as in the first case, we choose PEV brand, but with a diameter of 0.4 - 0.6 mm. We wind 45 turns, making a conclusion on the 10th turn. After the metal detector is fully manufactured and configured, it will be possible to fix and insulate the winding with varnish. The connection to the circuit is made with a shielded cable with at least two cores. Such cables are used in high-quality audio equipment and in trunk communication lines, and they can also be purchased at an electronics store. Making a metal detector designFirst of all, you need to decide what material the bar will be made of. It is better to give preference to dielectric material to eliminate problems with the operation of the metal detector. There are many options: PVC pipe, telescopic fishing rod, wooden pole. When choosing, it is worth considering such indicators as weight, flexibility, disassembly ability, and convenience. If you plan to spend a lot of time searching for metal, the light weight and comfortable armrest with handle will save you a lot of effort. But do not forget that lightweight material can bend. In the case of a PVC pipe, this can be compensated for by sand poured inside or additional supporting structures. With a collapsible rod there will be no problems with transportation. To implement this idea, you can visit a plumbing store and assemble an excellent metal detector with your own hands using various adapters (Fig. 7).
Once you have decided on the choice of rod, you need to attach the reel to it. Everything is simple here - no metal. Use plastic fasteners, pre-attached ears on the reel frame, adapters, or simply reliable glue. We place the circuit in a plastic box. You can make small holes for the speaker for good audibility. The board, speaker, primary coil and battery box can be secured with glue. We place the box a meter from the search coil and fasten it in a convenient way - using plastic fasteners or glue. At this point, you have assembled a simple transistor metal detector that needs fine tuning and testing. Device setupSetting up a metal detector involves creating the same frequency in both generators. When this result is achieved, the lowest, barely audible tone will be emitted from the speaker. First, remove all metal objects from the range of the metal detector. We take into account concrete walls and floors, since they may contain metal reinforcement. We set all variable capacitors to the middle position. By changing the position of the rod in coil L1, we achieve the desired tone or lack thereof. During further operation of the device, we use capacitor C7 for adjustment. After setting up, we bring a metal object to different distances from the search coil and make sure that the metal detector is working. If the metal detector does not work, we check the blocks and circuit parts. We start the test with transistors, and then check the diodes. To check the sound amplifier, just remove the resistor R9 from the generators and connect it to the sound output of any device that reproduces sound (Fig. 8).
If the parts and the amplifier are in working order, then we set up the transistor generators. To do this, we try to change the values of capacitor C4 and resistor R2 for the master oscillator, and resistor R6 for the search oscillator. You can try starting the second generator with tuning capacitor C8. The dream of finding treasure is increasingly being replaced in our time by a more realistic program of searching for precious metals in a natural or artificial environment. In modern conditions it is very important to find and extract valuable materials, who turned out to be among the waste, or in another uncontrolled environment. Equipment is an important component of such search technology. The search and extraction of gold and valuable metals from waste, garbage, in the natural environment is part of the recycling strategy, a technology for the effective processing of used materials, including. Searching for them in the ground or in masses of industrial and other waste not only requires the use of equipment, but also stimulates its improvement. Are being created devices of different levels and specializations. There is interest in such equipment among amateurs and enthusiasts of searching for valuable metals.
Using such a device, you can search not only for silver, but also for silver and other precious metals. Device principle any metal detector based on electromagnetic effects. Here's how typical metal detecting technology works:
A large number of metal detector models operate precisely on this principle. Technical differences in such equipment make it possible to obtain more complete information about the fact of detecting a metal object, for example:
The simplest, primitive metal detectors (usually these are homemade designs for searching for gold, silver and other metals by amateur enthusiasts) assembled from ready-made devices and products operating using electromagnetic effects. Many are familiar with the primitive, but quite workable circuit of a metal detector, in which an electromagnetic field creates a pulse element of a conventional calculator.
More complex amateur and professional metal detecting devices retain the logical basis of the technology in the form of three components:
Devices of different levels of complexity and functional potential can be divided into groups. Classification based on professionalism and user specializations – one of the generally recognized:
The distribution of search equipment is such that many devices of this type can be purchased at gardening and country supply stores. A device for searching and detecting metal is needed not only for recycling, but also for searching for artifacts and treasures. Numerous security systems for everyone well-known frames - one of the technology versions metal search. The settings of these frames are focused on searching for weapons and similar dangerous objects. CoilA very important node metal detecting equipment – reel or frame. This is most often a winding of a special configuration, the task of which is to form an electromagnetic field and capture its reaction to the detection of a metal body foreign to the search environment.
For amateur production of reels, frames of the most popular types are sold. The easiest way to make such a purchase is in an online store.
For this, improvised means are used– plastic products, plywood and even filling the assembled winding with construction foam. The search operator or treasure hunter strives to find the most effective technique for working with a metal detector, choosing the desired operating modes of the electronics and the correct techniques for manipulating the coil. Electronic circuitThe logical element of a metal detector is an electronic circuit. She performs many functions:
Many electronic devices are quite simple, Even a beginner can assemble them. The resulting device will be operational without configuration if the assembler exactly followed the recommendations of the developer of such a circuit. How to make "Pirate" yourself?
This name, containing abbreviated details of its device and the developers' website, wittily reflects the romance of searching for precious metals. Here the main advantages of this model:
The electronic circuit of this model does not require programming. In "Pirate" details available to everyone are used, a correctly assembled circuit is fully operational. Design and operating principleThe design and layout of the “Pirate” metal detector is traditional for equipment of this kind. It is a rod, at the lower end of which there is a coil, and in the upper part – electronic unit with battery.
Some craftsmen prefer that the sound signal from the device is supplied not by a speaker, but by headphones. In this case, the headphone cable departs from the electronic unit. The technology of operation of the device is pulsed. This allows us to provide very good sensitivity indicators for this class of equipment. Below is a diagram of an electronic unit on microcircuits. A similar circuit can be assembled using transistors instead of microcircuits. This version may require additional settings, available only to experienced radio technicians. This is why the transistor circuit is used less frequently. Materials, parts and blanksIn addition to the details and precision indicated on the circuit diagram of the electronic unit, for assembly metal detector for gold and other metals you will need to prepare some materials and blanks:
Below is one of these samples, suitable for assembling electronics on microcircuits.
The manufacture of the board is carried out by amateurs of homemade electronics, and even then not all of them. Most people who want to create a metal detector themselves prefer to buy such a part. To assemble the coil you will need a frame or frame, does not contain metal elements. An amateur craftsman can make such a frame from plywood, plastic, or select similar parameters from ready-made plastic products, for example, dishes. The frame can be purchased ready-made or made independently
The plastic frame for the coil is one of the most common metal detector parts on sale. The technology for manipulating the coil is such that this very fragile unit can suffer from impacts from uneven ground, stones, and sharp objects. To avoid this the coil on the frame is covered from below with a plastic plate. This plate not only protects the reel, but also ensures that it glides through tall grass. The search becomes more intense. Assembly procedure and design
Although the order of assembly is not fundamental. For those who manufacture a device for constant long-term work in the field of searching for non-ferrous metals and subsequent recycling (processing for reuse), ease of use is an important factor.
It is best to perform this stage of work using life-size modeling. Such modeling can be done using wooden parts of suitable shape, for example:
Having made sure that the assembled model of the device will be sufficiently functional and convenient, you can begin the final assembly. Ready-made device, usually, does not require configuration, it is completely ready to work. You can start searching for metal by choosing the desired level of sensitivity and the correct tactics for manipulating the coil.
Purchasing such a kit allows you to significantly simplify the production of “Pirate”. There is one of the proposals. Users of the “Pirate” metal detector who have skills in amateur radio modify the design of this device. That's just several directions such improvements:
A simple, inexpensive and reliable metal detector “Pirate” works properly in a variety of conditions. Homemade metal detector - pros and consCheapness, basic advantage self-production of any products, relevant for a metal detector. Here are some others dignity for a homemade device:
Despite its shortcomings, the Pirate model is very popular. This is explained by the simplicity of homemade production and the high performance of an inexpensive device. Recycling experts believe that the discrimination capabilities of a metal detector are not of great importance. All metals found are so valuable that recycling them is always justified. Focusing on finding gold requires not only equipment, but also considerable experience, accompanying knowledge and, of course, Good luck. Video on the topicThe video provides a detailed guide to making and assembling the Pirate metal detector with your own hands: ConclusionWhen the metal detector is ready, you can begin work. You need to be aware that not even the most advanced apparatus will allow you to find only golden hidden objects. A metal detector will help you find valuable metal, and it is very likely that it will be gold. It is best if the future metal and gold seeker has a realistic understanding of search techniques. Many features of the operation of finished equipment are very important for those who develop and assemble their own models. You need to have an idea of the technology in advance with such equipment - this is precisely the basis of its high-quality design. The success of finding gold increases with experience. Here most important elements such experience:
Properly assembled and debugged equipment will always help in the search for gold, and this valuable metal will definitely be found. In contact with |


 A metal detector is the most important tool for manually searching for metals in a chaotic natural or artificial environment.
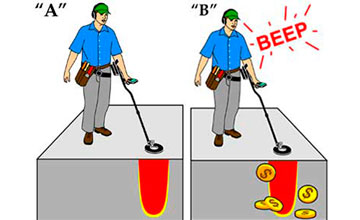 Reaction generated field on detected metal objects picks up the simplest household radio. The signal about such a find is audible, quite distinct and understandable.
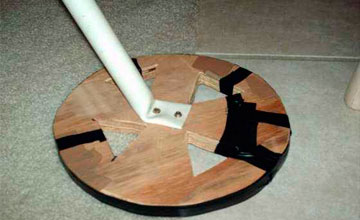 Many lovers make the coil frames yourself. This is done for reasons of cost savings or in the hope of obtaining a better-quality instrument of the author's design.
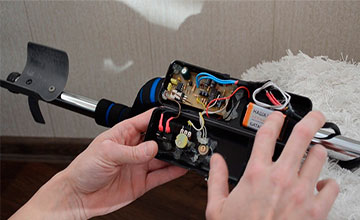 One of the most popular models of metal detectors designed for homemade amateur production is the “Pirate”.

 To successfully assemble a metal detector It is best to follow this procedure:
 Assemblers who need to assemble their apparatus as quickly as possible can use ready-made sets of parts.
 Here are the features of the “Pirate” model that users note:
Popular:

New
- Apparatus for welding copper wires - How to make it yourself?
- Simple and convenient wicket lock
- A simple metal detector with two transistors
- Repair of ceramic faucets
- DIY DC welding machine: my diagram DC and AC welding machines
- Getting to know oriental cuisine - simply, quickly and in any conditions: do-it-yourself stove for a cauldron made from a pipe
- How to make a flowerbed from tires Photo of crafts from tires
- Varieties of dowels for thermal insulation of surfaces with mineral wool and expanded polystyrene Disc-shaped metal dowel fungus
- Fungi and dowels for fastening insulation Construction fungi for insulation
- Experience in restoring the surface of masonry with polymer-based solutions Restoration solution


