Sections of the site
Editor's Choice:
- How to drill tiles to not crack: video, photos, tips How to drill tiles in the bathroom
- Ventilated facade
- How to align walls with lighthouses
- The installation of dormers: technology for installing window structures for the roof Triangular dormer on the roof design drawing
- Methods of attaching panels to the facade and how to properly fix a block house to the wall of a private house Installation of a block house how to start
- How to put tiles on an old tile Masonry tiles on an old tile
- Do-it-yourself garden bench from a profile pipe
- Making a pyrolysis furnace for a home and a bath do-it-yourself Pyrolysis furnace principle of operation
- How to paint heating radiators, so that later you do not bite your elbows?
- A do-it-yourself well in a country house: a guide for arranging a typical well from rings
Advertising
| How and from what to make a home egg incubator. How to make a DIY incubator: step-by-step instructions DIY incubator equipment |
|
There is a great opportunity to save money - to make an incubator yourself. It is not as difficult as it seems at first glance. From the article you will learn about the features of creating an incubator from available materials, what are the requirements for this process, and how to choose the right eggs for laying. Description and types of homemade incubatorsIncubators make different sizes according to the number of eggs that are used when laying. The role and location of the device plays a role. But even the simplest incubator should be equipped with a thermometer for fixing the microclimate, ventilation, egg trays. Did you know? The daily chicken has the same skills and reflexes as a 3-year-old child. pros
Minuses
For example, before starting the assembly of the device, it is necessary to provide for every little thing. It is possible to eliminate some of the shortcomings, since it is in the strength of everyone who is going to create an incubator. Then you can not think about buying a purchase. Homemade device requirementsIn order for a structure to carry out its functions effectively, it must meet the following requirements:
Important! It is the complex of these three components that provides the eggs with the same conditions as under the hen’s wing. General manufacturing rulesToday, home incubators are made from a wide variety of materials and devices (there are examples of such devices made even from a microwave). However, their manufacture must always comply with a number of general rules:
Did you know? At there are many functions in the chicken herd: it encourages chickens to eat, protects them from small predators, and prevents conflict between birds. How to make an egg incubator yourselfNow in more detail about how to make a home-made device for incubating chickens and other birds. To assemble the device, you will need diagrams and drawings with dimensions, as well as a set of tools and various materials from which you plan to create an incubator. Auto flipIf there is no desire to independently assemble a mechanism for automatic flipping (as described in the example above), then you can buy a ready-made design: it is fixed in any home-made device.
The operating principle of the automatic flipping mechanism is simple and efficient. It not only performs the functions of a hen, but also allows you to maintain the temperature inside the device, because the lid thus opens less often. Having such equipment, you do not have to worry about having time to turn over the eggs in the device in a timely manner. From the fridgeAn equally popular option for a homemade incubator is the manufacture of those from idle refrigerators. To do this, you can use both two-chamber and industrial devices, because their design provides for careful preservation of temperature (which is extremely important for the incubator).
In addition to the refrigerator, to create a device you will need:
It is worth preparing a number of tools for work:
Assembling a device from an idle refrigerator involves several steps:
Video: How to make an incubator for eggs from the refrigerator
FoamPolyfoam (or expanded polystyrene) is considered one of the most cost-effective and suitable materials for creating a home incubator. It perfectly holds heat, has a low weight and is easy to use. Did you know? The baby chick needs oxygen already on the 6th day of incubation. To make a foam incubator, you will need such materials:
Also prepare the tools:
Getting to the assembly of the device:
Video: DIY foam incubator
After collecting the incubator, you can proceed to the selection of eggs for laying. Not all of them are suitable for breeding birds. Therefore, it is important to know how to choose the right ones:
Important!If you plan to arrange eggs of various species (chickens, geese, ducks) in one tab, then use trays at different levels for this. Each bird has its own requirements for timing, temperature, and it is important to adhere to them for a successful result. But it is important not only to choose the right planting material, but also to prepare them for bookmarking:
After laying eggs, periodically check their quality. Already on the 6-7th day after the start of the process, it is worth enlightening them through the lamp: the blood vessels in the protein and the dark embryo should already be visible. Temperature conditions for different types of birdsTemperature is an essential condition for hatching eggs. Lack of heat slows down the growth of embryos, and prolonged hypothermia leads to death. Overheating can lead to the same consequences. If the embryos survive, the body parts and organs will be deformed as a result of the chicks. Different types of birds have their own parameters for a suitable microclimate:
Did you know?Hens cackle for a reason: they constantly exchange information about what is happening around, including their own well-being. So, making an incubator with your own hands is not so difficult and expensive. But you can create a device that is ideally suited to your conditions in terms of size, number of eggs for incubation. Before assembly, carefully study the rules and sanitary standards for such devices, otherwise the success of the enterprise will be in doubt. Many breeders, not having the extra financial means, build incubators themselves. Almost everyone can do such work. Of course, you have to work hard. An incubator is not, its creation is much more expensive in time and in finance. But, nevertheless, everything is possible. Homemade design has a lot of advantages:
You can find a great many varieties of models made by yourself. And all materials are good for construction. It can be an old refrigerator, a bucket with a crack or a basin. In this article, readers are invited to familiarize themselves with how to make incubators with their own hands at home. Variety of homemade incubatorsA home-made incubator has many useful qualities, the required number of eggs is laid in it, their further development is carried out artificially, which is as close as possible to the natural process, and most importantly, this is done at the time that suits the poultry farmer. Simplicity, reliability and economy only emphasize the benefits of a home-made design. You can not only select the desired size of the device, but also provide it with the necessary functions. On the Internet you can find enough images with home incubators and drawings created by breeders. Having decided to assemble your own model, you need to pay attention to all aspects. If you violate the temperature conditions, or the level of humidity, you can’t get the chickens out - the eggs will just go bad. Plywood constructionsTo produce an incubator, you need several sheets of plywood. The design provides for walls of double thickness. Free space is filled with dry wood shavings, provided to provide thermal insulation. The top and bottom of such an incubator is covered with a wooden beam.
The top cover is designed so that it can be removed. The drawing involves a window with double glazing. A synthetic winterizer is glued along the upper edge of the device, thanks to which the lid closes the structure as tightly as possible. On the edges of the lid you need to nail the trims. Provide ventilation to help holes that are drilled on each side of the lid. The plywood bar will allow you to regulate humidity and heat transfer; it is attached to the lid, but not tightly, but to ensure unhindered movement along the grooves of the bars. Inside, the incubator is equipped with electrical wiring; it is also necessary to install cartridges to screw in the bulbs. Carefully beat the slats that will hold the trays. In the bottom of the structure, you need to make several holes, they also serve as ventilation holes. At the bottom are containers filled with liquid. The egg tray is made in the form of a frame, a metal mesh is attached from below. The tray will move due to a special engine that provides movement. The initial temperature regime, which is set in plywood incubators, is 38.6 - 39.0 degrees. Foam constructionsDue to the excellent thermal insulation properties, foam is often chosen for the construction of an incubator. On the sheets, figures of the right size are cut out, which are then easily connected together using adhesive tape, and as a result, a cube or box should be obtained. Styrofoam walls provide better thermal protection.
Additionally, a 20 W bulb can serve as a heating system. This option will help to significantly save money, compared with heaters, which can also be used to provide heat to the incubator. The lamps are mounted at the top of the lid, but a gap of 15 cm from the eggs is maintained. The output trays are made either from pieces of wood that are suitable in size or a prefabricated structure is used. They are installed in the center, with the same interval to heating lamps and water tanks. When designing a foam incubator, the necessary distance between the walls and the brood tray must be observed. This is done to ensure proper air exchange. A rod is passed through the upper wall of the structure to which the tray will be attached. A handle is attached to the rod and brought to the surface, with its help, a systematic rotation of the eggs will be made. For the manufacture of trays, a dense mesh with a mesh size of 2.5 by 5 cm is used. To measure temperature, the device is mounted so that the scale divisions are outside. Intermediate bulbs put a container of water. To increase the evaporation area, special fastenings are made on containers, on top of which pieces of fabric are laid. Holes on the top and bottom of the incubator allow the design to provide the necessary ventilation and maintain humidity. Old refrigerator - new incubatorDo not get rid of the old refrigeration equipment, it is perfect for making a homemade incubator, having drawings on hand. Moreover, the design is ready for use; minor changes need to be made.
For the convenience of the incubation process, the freezer is removed from the refrigerator. 4 bulbs having a power of 100 W each are installed in this place. To control the rearing of young animals, you can make small windows in the door of the former refrigerator. Bottom is also set 25 watts foot. A tin or glass partition is attached above the paw. Tanks with water and a moistened rag are installed on top, which increases evaporation inside the incubator. The egg tray is placed higher, a thermometer is placed at the same level with it, with which you can monitor the temperature inside the home incubator. Instruction for the construction of a foam incubatorStyrofoam is the most popular material to make an incubator. It is distinguished by affordability, low weight, and thermal insulation properties. To work, you need to acquire the following materials:
Before the main work, you need to make a detailed drawing, where all necessary dimensions will be indicated. Instruction manual
To create better thermal insulation in a foam incubator, it can be glued with foil, which helps to retain heat. How to make automatic incubators with your own hands at home?You will need:
Tutorial step by step:
The very last step is to install a thermometer and water tanks. And now, the incubator is ready. It remains to make holes for the exchange of air, after which you can try the device in operation.
Poultry can be raised either with a brood hen, if any, or use an incubator. Most breeders prefer to use these particular machines. Incubators are both industrial type and homemade. Further, the article will describe in more detail what and how to do to achieve the desired result. Creating an incubator using your hands is quite simple and even an inexperienced poultry breeder can do it. Homemade machines have a fairly large number of advantages:
You should not think that home-made devices are only two times too expensive, in fact there are a lot of them. People even use materials that seemingly have outlived their lives, for example: old refrigerators, boxes, buckets, basins. A very large number of poultry farmers are engaged in raising young animals at home, and as mentioned above, not every farm has broods capable of hatching chickens. Such situations often arise that young animals must be received by a certain date. Good to know.In some companies involved in such machines, you can buy a kit and make a home incubator. However, many people have problems with the lever flipping trays, which is not so easy to assemble the poultry farmers without special skills. In this case, making the incubator much easier if you have the appropriate schemes or drawings.  Creating a chicken hatching machine is considered the most effective option compared to acquiring an industrial type device. In the first version, it is easy to take into account the features of the place where the incubator will stand, the individual design, as well as the conditions for breeding domesticated birds. In addition to the advantages already listed, home-made devices have the following advantages:
 An important feature of home incubators, which are mounted according to individual drawings, is that various auxiliary materials that have also been in operation are used for their manufacture. It is important to remember that they must meet sanitary requirements so that bird young animals can develop successfully. Poultry farmers themselves, most often choose one of the most popular do-it-yourself incubator models:
It is absolutely not necessary to make an incubator from those materials that were presented above. Any poultry farmer can decide for himself how and from what to create a useful machine for him. True, it is worth considering such a moment that it is necessary to choose the dimensions of the device correctly, and take into account some factors, namely, how many eggs will be laid, and where to install the lamps so that the incubation chamber is heated.  To make a quality car, you need to clearly calculate its size. These parameters will depend on what production volumes are planned on the farm, and, again, on the amount of incubation material that will be laid at a time. The second indicator is a priority. The average dimensions of the device 45-47 x 30-40cm (in length and width) is able to accommodate eggs in the following quantity, of course, approximately:
The type of heating system and the place of fixture of incandescent lamps will affect the size of the machine. Also a large role is played by the materials that will be used to make the incubator. 
 When starting work on creating an incubator, it is important to remember that, as a result, a machine should appear that provides the conditions necessary for the development of embryos in eggs and the hatching of healthy young animals from them in due time. If we talk about the design and equipment of the unit, then conditions should be created in it, similar to those created by the hen for future offspring. The most important indicators here are temperature and humidity. When designing the device, you must remember that the breeder must be able to control the temperature and humidity without any obstacles. Good to know.Egg incubation of most of the most popular types of poultry is carried out at a temperature of +37.1 to + 39 ° C. After placing the material in the unit, it is heated to a maximum, which is different for different species, and by the time the chicks are born, they are reduced to the desired minimum. You can get acquainted with the temperature for different species of birds in the following table. Temperature and humidity for egg incubation
 Before you engage in work on the creation of the machine, you need to decide on the basic materials for the manufacture. You can take large foam pieces or a simple cardboard box. An unnecessary refrigerator is also suitable. The main factor when choosing is the thermal insulation property of the material. Good to know.Foam structures will have the lowest heat loss, but a cardboard box can not boast of such a characteristic. An important role is played by the heating of the incubator chamber. To maintain the required temperature, lamps or a heating device are used, but you can track the performance with a thermometer. A very painstaking and burdensome job is the revolution of the incubation material, therefore it is recommended to automate the process, which will save a lot of time. Most often, overturning mechanisms are placed on large machines, where 200 eggs are laid.  Depending on which model needs to be made, the following tools are used:
How to determine the optimal incubator size? - mini, per 100, 500, 1000 eggs Most often, household farmers use incubators that hold about a hundred eggs with cells with a diameter of 45 mm and a depth of 60 - 80 mm (for laying egg products). Such designs have a size of about 60x60 cm and a weight of 3 kg. If desired, the machine becomes universal, due to removable grating-trays having cells of different sizes. As a result, not only chickens, but also geese, guinea fowl, turkeys, ducks or quails can be hatched in the same incubator. You can get acquainted with the sizes of various types of machines and their capacity in the following table. Capacity and size of incubators If there is no desire to buy an incubator, but the farm has an old refrigerator, then it can be given a new life. In the former food storage, the set temperature is ideally maintained, which is facilitated by the walls of the refrigerator, which have thermo-insulating properties. Place the egg trays in the shelves very simply, and thanks to the mounting grooves, all product tabs are evenly distributed along the inside of the chamber along the height of the machine. The volume of the refrigerator is enough to install below the water tanks with the help of which humidity maintenance is regulated.  Any incubator should be equipped with at least the simplest ventilation system. It will carry out air exchange inside the machine, help maintain the temperature and regulate humidity to create ideal conditions suitable for removing chicks. The optimum ventilation speed is 5m / s, and the fan must move the air mass. Above and below the refrigerator, holes are made (drilled) for air. To prevent air from entering the casing, the holes are supplied with plastic or metal tubes having the desired diameter. With partial or complete overlap of which ventilation is regulated.  The easiest method to heat the inner chamber is to use incandescent lamps (4 pieces of 25W, 2 pieces of 40W). Lamps are evenly distributed from the bottom and top of the machine. When installing lighting fixtures from below, it is important to remember that they should not interfere with water trays. An important part of the incubator is the temperature controller, they are of three types:
Using the first, the electric circuit is closed as soon as the desired temperature is reached, with the second, the heating is turned off, the third closes the circuit as soon as excessive pressure occurs.  During the incubation process, the eggs must be turned over several times a day. Under natural conditions, this function is performed by the chicken, but here the action of a special mechanism is necessary. The work is carried out by an electric motor, which brings the rod into operation, transmitting a motor impulse to the egg tray. To create such a mechanism you need:
 It remains to talk in more detail about how to convert a refrigerator into an incubator:
DIY incubator from the refrigerator: video Using a cardboard box is a very cheap way to make an incubator, but you should not expect that the resulting design will be durable and will last a century. The work is performed in the following order:
DIY incubator from a cardboard box: video The most popular and convenient material for mounting the incubator is polystyrene. Its cost is very small, besides the sheets have excellent thermal insulation characteristics, and the resulting design will not be very bulky and heavy. Foam incubator manufacturing
Homemade do-it-yourself incubator with a coup: videoAs you can see from the article, making an incubator with your own hands is quite simple. Such devices have different dimensions and equipment, it all depends on how many chicks are planned to be bred. Before installing the machine, you need to carefully consider the project to get a working unit.
FeaturesProbably, such a name, at least, will surprise many. How can a refrigerator be an incubator? The answer is, maybe it can! But all in order. As for the home-made device, many of our domestic poultry farmers successfully grow chickens even in the simplest incubators. Such a home-made machine can serve as a loyal assistant until the breeder acquires automatic industrial production. We also recommend that you familiarize yourself with incubators on aliexpress. What does it take to make a homemade incubator?
Drawing of a simple incubator A. Varvarova Materials and toolsAs materials and tools during work, we need:
Manufacturing instructionRefrigerator incubator So, if you have an old refrigerator, then do not rush to throw it away. It’s easy to build a homemade poultry incubator out of his cell. The fact is that the design of the refrigerator itself well maintains a constant temperature inside, which is very convenient for our case. All you need is a former refrigerator itself, 100 Watt bulbs (about 4 pieces), a temperature regulator, and a KR-6 contactor relay. So let's get started.
For visual clarity, we suggest viewing the drawing of a homemade incubator.  Fridge incubator drawing Automatic incubator from the refrigeratorIncubator from the refrigerator with automatic egg flipping - it is very convenient and completely replaces the usual device of industrial production. However, in order to do it, you will have to work a little. But as a result, depending on the brand of the refrigerator, you can warm up about 50 eggs at a time without any problems.
 Scheme of the device of a homemade incubator S. Kozin: 1-sensor temperature controller; 2-thermostat; 3-bulbs; 4-fan; 5-handle rotation of the trays; 6-trays; 7-plate; 8-bath with water. The simplest incubator out of the boxSo, for example, P. Yakimenko from Moscow offers us one simple construction. He made a homemade incubator out of an ordinary cardboard box measuring 56x47x58 cm. Inside, the cardboard is glued with paper or felt in two layers. A viewing window of 12x10 cm is made in the upper wall. Small holes for wires are also given. With their help, three light bulbs with a power of 25 watts are installed inside. Lamps for heat transfer should be installed at a height of 15 centimeters from the surface of the eggs themselves. And the holes where the wiring is threaded, it is important to plug with cotton wool to prevent heat leakage. Then they make wooden trays, a convenient door, slats for trays.  In such a simple home-made device, it is also important to maintain a high temperature, so we attach a thermometer to a special bar. For high humidity, put a container of water inside the device. In the first 12 hours after laying eggs, the temperature in the box should be about 41 degrees, in the next hours it should be reduced to 39 degrees. It is important to install such a device with your own hands, not on the floor, and not small bars 15-20 centimeters high. Constant air circulation must be carried out, both inside and outside the box. Video “An example of a homemade incubator from the refrigerator”In household plots, the use of large industrial incubators may be impractical because of their large capacity. To grow a small livestock of poultry, small incubators are needed, which can be done with your own hands, using improvised tools and materials. We present several methods for manufacturing incubators. However, even a home-made incubator must meet certain requirements, which you will learn about in this article. How to make a chicken incubator yourselfBreeding poultry is a fairly profitable activity, but for the uninterrupted production of productive young animals, you need to buy or make a device with your own hands in which the young animals will be displayed. You can learn how to make an incubator for eggs or quails with your own hands using improvised materials from the sections below. What you need to pay attention toFor full-fledged breeding of young birds, you should adhere to certain recommendations and requirements regarding the use of the incubator and its manufacture:
Breeding of young poultry depends on the location of the eggs inside the incubator. They need to be placed vertically (sharp end down) or horizontally. If the eggs are arranged vertically, they should be tilted to the right or left by 45 degrees (when laying goose or duck eggs, the degree of inclination is up to 90 degrees). If the eggs are placed horizontally, they must be turned at least 180 degrees at least three times a day. However, it is best to turn the eggs over every hour. A few days before hatching, the eggs are stopped turning over. rulesIf you are interested in how to make a homemade egg incubator, you should know that this device is made according to certain rules. To make an incubator you will need:
Figure 1. Common types of incubators: 1 - with automatic egg rotation, 2 - mini-incubator, 3 - industrial model Trays or gratings can be bought or made from metal mesh. It is important that there is room for free air circulation between the trays. FeaturesIn the incubator, it is necessary to establish good ventilation. Preference should be given to forced ventilation, as the constant movement of air will provide support for the necessary temperature and humidity inside the incubator. Figure 1 shows the main types of incubators that can be used to breed young poultry in a private household. Below is a video review of the operation of an industrial incubator for a thousand eggs. How to auto-rotate eggs in an incubatorIncubators without manually turning eggs are not very convenient, since a person needs to constantly monitor the incubation process and manually turn all the eggs over. It is much simpler to immediately make a home-made incubator with auto-rotation (Figure 2). Instruction manualThere are several options for arranging auto-rotate eggs in an incubator. For small appliances, you can simply equip a mobile grid, which is driven by a small roller. As a result, the eggs move slowly and gradually turn over. Note: The disadvantage of this method is that you still have to control the coup, since the eggs can simply budge, but not roll over. Roller rotation is considered more modern, for the arrangement of which special rollers that rotate eggs are installed under the grate. To prevent damage to the shell, all rollers are covered with a mosquito net. However, this method also has a significant drawback: for the manufacture of the auto-rotate system, you will have to take up free space in the incubator by installing rollers.
The best way is considered a coup method, in which immediately the entire tray with eggs is tilted by 45 degrees. The rotation is driven by a special mechanism located outside, and all eggs are guaranteed to warm up. How to properly lay eggs in an incubatorIncubation of poultry eggs should be carried out taking into account certain characteristics and maintain an optimal regime for the breeding of young animals. The table in figure 3 shows the basic requirements for the breeding of eggs of hens, ducks and geese. First of all, during incubation, the correct temperature should be maintained (minimum 37.5 - maximum 37.8 degrees). It is also necessary to regularly check the humidity, determining it by the difference in temperature on a “wet” and “dry” thermometer. If the “wet” thermometer shows a temperature of up to 29 degrees, then the humidity is about 60 percent.
The incubation regimen must also meet the following requirements:
It is important that insufficient heating of the eggs, regardless of the incubation stage, can slow down the growth and development of the embryos, as the chicks absorb and use protein worse. As a result of insufficient warming, most chicks die before hatching, and the surviving chicks later hatch, their umbilical cord does not heal and the abdomen grows. Underheating depending on the stage can cause some disturbances. In the first stage of incubation, they include:
During the second stage of incubation, underheating can provoke:
Egg overheating during incubation can cause external deformities (eyes, jaws, and head), and chickens begin to prematurely. If the temperature regime has been elevated in the last few days, the chicks may be deformed internal organs (heart, liver and stomach) and the walls of the abdominal cavity do not grow together. Strong and short overheating can cause the embryo to dry to the inside of the shell, swelling and hemorrhages will appear on the skin of the chick, and the embryo itself is located with its head in the yolk, which is not normal.
Prolonged exposure to high temperatures in the second half of the incubation leads to the early movement of the embryo in the air chamber; unused protein can be seen inside the egg. In addition, in the brood there are many chicks who pecked the shell, but died without drawing in the yolk. Violations of the humidity regime can also cause serious violations (Figure 4):
It is especially important to maintain optimum humidity (80-82%) during the bite period. It should be noted that during all periods of incubation, one should strive to maintain such a regime of temperature and humidity, which exists during natural incubation.
The duration of incubation depends on the type of poultry. For example, for chicken meat breeds it is 21 days and 8 hours. If the normal incubation mode was maintained, the beginning of hatching begins on the 19th day and 12 hours after laying the eggs, the chicks begin to hatch already on the 20th day, and after 12 hours most of the young growth appears. During incubation, the eggs should be periodically scanned with an ovoscope to detect damage in time (Figure 5). You will learn more details about ventilation and temperature conditions during incubation from the video. What is needed for thisTo properly lay eggs in the incubator, you need to preheat the device and prepare the eggs. For the breeding of young animals of any poultry, only eggs that were stored no longer than a week in a dark room with good ventilation at room temperature are suitable. Before laying them, they are necessarily translucent by an ovoscope and eggs are taken without damage, cracks and growths on the shell. FeaturesIn the incubator, you can only lay eggs of the correct shape and with a characteristic shell color for a specific bird species. In addition, you need to choose the right grid, which will correspond to the size of the eggs. For example, a quail requires a smaller lattice, and for a turkey quail, a larger one. It is also necessary to familiarize yourself with the temperature and humidity regime of incubation for each type of bird. How to make a homemade incubator from the refrigeratorVery often, home incubators are made from old refrigerators, since the housing of this household appliance is quite spacious and allows you to simultaneously display large quantities of young birds. You can watch how to make an incubator out of the refrigerator with your own hands with detailed instructions in the video. Instruction manualBefore starting the manufacture of the incubator, you need to make a drawing and a plan for connecting all the necessary elements. You also need to wash the case and pull out all the shelves and the freezer from it. The procedure for manufacturing an incubator from an old refrigerator includes the following steps (Figure 6):
It is also advisable to cut a small viewing window in the door so that it is more convenient to observe the incubation process without opening the door. How to make a foam incubator step by stepThe body of a home-made incubator can be made from an old TV box or a foam box, reinforcing it with a frame of wooden battens. Four porcelain lampholders must be fixed in the frame. Light bulbs for heating eggs are screwed into three cartridges, and a fourth light bulb serves to heat water in the bath. The power of all bulbs should not exceed 25 watts. Examples and drawings for the manufacture of simple incubators are shown in Figure 7. Note: The middle lamp is often turned on only at certain times: from 17 to 23-00. A bath of water to maintain humidity can also be made from improvised materials. For example, using a herring jar, cutting off part of the lid from her. From such a container, water will evaporate better, and the lid will prevent local eggs from overheating. An egg rack is installed inside a homemade incubator. The surface of the eggs on the grate must be at least 17 centimeters from the bulb, and the eggs under the grate should be at least 15 centimeters apart. To measure the temperature inside the incubator, use a conventional thermometer. To make it convenient to use the incubator, its front wall must be made removable and covered with cardboard or other dense material. For fixing use twists. Such a removable wall allows you to lay egg trays inside the incubator, place a bath and change the water in it, as well as carry out all other manipulations.
In the incubator lid, you need to make a window that will serve for ventilation and temperature control. The window is 12 centimeters long and 8 centimeters wide. It is better to cover it with glass, leaving a small gap in width. For additional ventilation along the long wall near the floor, you should also make three small square holes (each side - 1.5 centimeters). They must be open all the time for a constant flow of fresh air. How to make a microwave incubatorA microwave incubator is made according to the same principle as a device from a refrigerator. But it is worth considering that in such an incubator many eggs do not fit, so at home it is used mainly for breeding quails. When manufacturing an incubator from a microwave oven, some features must be considered (figure 8):
It is also necessary to provide for the protection of eggs from overheating by installing barriers on incandescent lamps. How to make do-it-yourself ventilation in an incubatorThe home-made incubator also does not provide a special egg cooling system, as they are cooled for several minutes during the turning process. During the entire incubation, a temperature of 39 degrees should be maintained. For ease of use, you can attach legs to the incubator. And since this equipment is very compact, and the egg incubation process is not accompanied by the release of unpleasant odors, young poultry can be hatched even in a city apartment (Figure 9). The manufacturing procedure for a simple homemade incubator is shown in the video. How to make a humidifier in an incubatorFor the normal operation of a home-made incubator, half a glass of water per day should be poured into the bath. If you want to increase the humidity level, you can put a rag in the bath, which is washed every two days. For laying eggs, special slats are placed in the incubator, and the eggs are laid in the gaps between them. Reiki should be rounded laterally. To make it easier to turn the eggs, you need to leave a free space in the tray corresponding to one egg. Note: The eggs in a makeshift incubator are manually turned 180 degrees. It will be better if the eggs are flipped up to 6 times a day with an equal time interval (after 2-4 hours).
To maintain humidity, no devices are provided in a homemade incubator, and this mode is supported approximately. To evaporate the liquid, it is recommended to install light bulbs of 25 or 15 watts. Before the bite starts, the evaporator is not turned on, and if you turn it off too early, then the eggs will form too hard shells that the chicks cannot break. Breeding chickens is simply not possible without special equipment. Often, poultry farmers acquire industrial machines, since they consider this the only possible solution. But to make such an incubator with your own hands is not difficult. In this case, the device will not only be much cheaper, but also fully comply with the requirements of the breeder. Breeding chickens is simply not possible without special equipment For the manufacture of the simplest home-made apparatus, foam is used. To make such an incubator yourself is very simple.
The entire manufacturing process is reduced to several stages:
Incubator from the refrigerator: how to do it yourself
For manufacturing, you can use a two-chamber or an ordinary old refrigerator. As in any other case, the work begins with the preparation of the drawing and the drawing up of a diagram according to which all elements will be connected. All the shelves are pulled out of their own refrigerator. To make such an incubator, you must be guided by the following instructions:
Automatic egg flipping incubators: how to do it yourself
In order for the incubation process to be correct and successful, the eggs must periodically rotate. Manually doing this is both inconvenient and undesirable, as this violates the temperature regime. That is why it is recommended to independently assemble a device equipped with a rotary mechanism. To do this, you need the following materials:
Step-by-step instruction:
Manufacturing a multi-tiered incubator
To increase productivity, devices consisting of several tiers are often used. It is much more difficult to assemble such a design, but if you take care of the preparation of the drawings, the installation process will become much simpler. Assembly is carried out according to the following scheme:
Heating system
Regardless of the type of incubator and materials used, special attention must be paid to the heating system. There are a number of requirements that must be followed:
The regulator can be used in several types:
Even an aspiring poultry breeder can make an incubator independently. But there are a number of points on which productivity directly depends:
DIY incubator (video)A simple home incubator from the refrigerator (video)The main advantage of a homemade incubator is its cheapness. After all, you will have to spend only on supplies. In addition, only in this case it is possible to precisely select the dimensions of the equipment and calculate the required number of trays depending on the scale of production. Moreover, the workflow is not at all complicated and fascinating. Talk about secrets ...Have you ever experienced joint pain? And you know firsthand what:
Please answer the question: does this suit you? Can such pain be tolerated? How much money have you already “poured” into ineffective treatment? It's time to end this! Do you agree? Today we publish an exclusive interview with Professor Dikul, in which the doctor revealed the secrets of getting rid of joint pain, treating arthritis and arthrosis. Attention, only TODAY! Making an incubator with your own hands is very simple and even not very experienced poultry farmers can do it. Homemade incubators have many advantages - low cost, reliability and simplicity, the ability to make a design for a large number of eggs. There are so many options for homemade devices. Sometimes the most unexpected materials are used to create them - refrigerators, buckets and even basins. The article examined how to make an incubator correctly at home. Types and drawings of devicesMost breeders breed chicks at home. There is not always a brood hen ready to hatch birds. In addition, you often need to get young animals at certain times. According to experienced bird breeders, a simple hatchery home incubator can sometimes give up to 90% of bird hatchery. Some manufacturers offer to buy kits for the manufacture of home incubators. But the lever flipping of the tray is difficult to assemble a person who does not have special skills. But if you have the appropriate scheme or the necessary drawings, then you can make an incubator with your own hands without any problems even at home.
A homemade home incubator can be made from various improvised materials - wood scraps, an old refrigerator, or even out of a box. It is important to ensure good thermal insulation of your device. On the modern market there is a large selection of heat-insulating materials - polystyrene foam, mineral wool and much more.
The incubator is heated using conventional incandescent lamps with a power of 25-40 watts. For a small device, 4 lamps are enough. It is also possible to heat incubators with electric heating elements. If you use lamps, the eggs should be located at least 25 cm from the heating element.
If the air heats the nichrome wire, then the eggs can be at a distance of 10 cm from it. It is very important not to allow drafts, otherwise chickens may not hatch. Out of a cardboard boxThe simplest version of such a device for the home can be built from an ordinary cardboard box. Inside, glue it with paper and felt in several layers. At the top, make a window through which you will monitor the process. For the wires, make small holes through which you connect the 25 W electric bulbs. Lamps are placed 15 cm above the eggs.
Seal the holes around the wires with cotton so that the heat important for future birds does not go away. The trays can be knocked down from wooden slats, on the walls of the box also attach the slats on which the trays will be mounted.
You can use a fan from a broken computer. To increase the humidity inside the incubator, place a small container of water at the bottom. Such an incubator should not be installed on the floor, but on wooden blocks, at a height of 15-20 cm from the floor in a place in your house where there are no drafts. From a bowl or basinSuch home-made devices for the home are perfect if there are interruptions in electricity. To make it, you will need two bowls or similar containers of the same size, preferably metal. Such round containers will warm evenly, which means the eggs too. The bowls are placed one on top of the other so that a cavity forms inside. On the one hand, they need to be fastened together by furniture canopies or in another way convenient for you. This way you get an opening lid.
It’s better, of course, to make a hole and insert a cartridge into it, but in this case you can no longer use the bowl for its intended purpose. In a deep container, the lamp can be installed horizontally, and in large basins, install several bulbs (select their number by samples). In the lower bowl, pour 1.5-2 cm of sand, then put the foil, and lay straw or hay on top. Make some small holes in the foil so that moisture evaporates from it. You need to install the entire structure where your home holds about the same temperature. When you have assembled your device, warm it up, and put a thermometer in the center at the height where the eggs will lie.
If the lights are turned off in your home, then you can put the incubator in a pot of warm water and cover with a blanket. So you can not be afraid for the safety of your eggs. You can also put the incubator near the battery, and in the summer - take it out to the sun. Spray the eggs with water every day and turn them 180 °. Making a foam incubatorThe incubator frame for eggs made of polystyrene is made of wooden blocks, and inside and outside it is lined with plywood. Styrofoam sheets are inserted into the cavity between the plywood layers. Some poultry farmers tin the wooden frame, and inside the incubator they insulate the incubator with a layer of foam.
An axis is inserted through the top wall of the foam structure onto which the egg tray is attached. The handle of the axis is brought out, and with its help the eggs are flipped. Trays should be made of a dense grid with cells of 2 by 5 cm. Set the thermometer so that its scale looks out. At the bottom of the housing, 4 lamps of 25 W each are installed.
Between the lamps, install tin baths for water.
Give a U-shaped bend to several pieces of copper wire and attach to the bathtubs, and cover them with pieces of fabric on top - this will help increase the evaporation area. Make about 10 holes in the upper and lower walls of the incubator, through which fresh and moist air will move. From the fridgeVery often, breeders use old refrigerators to build an egg incubator at home. In fact, this is a ready-made home incubator, which should only be slightly modified for the convenience of the process. The freezer is removed from the refrigerator. In its place are placed 4 lamps of 100 watts. A small window needs to be cut out on the refrigerator door in order to control the incubation process.
A single 25 W lamp is also installed at the bottom. A glass or tin partition is mounted above it, on which a tray of water and a piece of wet cloth are placed to increase the amount of fumes.
You can make a device with the ability to flip eggs in the process. First make the body tougher. To do this, boards are attached to the side walls, which are connected from below by bars. In the boards, make recesses in which the bearings are inserted, thanks to which the eggs will be flipped. After this, frames or egg trays are installed, a cable is attached to the frames, with which the trays are flipped. The end of the cable is brought out and fixed on the engine. In order for the coup to be carried out correctly, you should prepare the device drawings in advance and discuss them with a professional. A fan is built into the back wall. In refrigerators there is a chute through which water is discharged, it should be installed in the opposite direction and water should be supplied through it to the fan when the chickens begin to hatch. Automatic incubatorsTo achieve maximum productivity, eggs must be in certain conditions. The most important thing is to carry out the egg flipping in time and maintain the necessary temperature regime, the fluctuations of which should be within half a degree. This is quite complicated, so some poultry farmers use home-made automatic devices with a thermostat.
Bimetallic plates, barometric sensors and electric contactors can act as a temperature regulator.
In addition to thermoregulation, automation is also responsible for flipping trays. To do this, you need a Dream-12 device with a supply voltage of 12 V. A humidity regulator is also required. You can use computer units to provide power.
It is better to buy trays for automatic incubators in the store. The bulbs are connected in series of 2 pieces - 2 at the top and 4 at the bottom. Place trays of water at the bottom of the incubator, and the incubator at the top. When your incubator is ready, you should test its operation for two to three days.
If the eggs awaken at a temperature of 41 ° C for at least 10 minutes, the embryos will die. Turning trays should be carried out 2-3 times a day. To achieve maximum chick hatching, much attention needs to be paid to the selection and storage of eggs in special conditions. Eggs need to be stored lying.
Storage temperature - not higher than 12 °. Turn them over from time to time. Irregularly shaped eggs with a rough or thin shell are discarded. Using an ovoscope, eggs are examined for the presence of two yolks or an oversized air chamber. Before the incubation process, the eggs must not be washed, as this violates their natural protection. Differences of incubators for quail eggsMany poultry farmers are interested in how to make an incubator for quails with their own hands. For the manufacture of a homemade quail incubator, the same materials are used as for chicken incubators. The main difference is the size.
A do-it-yourself quail incubator can be two to three times smaller than chicken. If you make an incubator for quails with your own hands at home, you can make it the same size as chicken, only three times more eggs will fit in the trays. If you decide to engage in breeding birds at home, then for this purpose you will need an incubator, with foam as a heater. It can be used not only for breeding chickens, but also other birds. In this article, we will tell you how to make a foam incubator. What is needed
This unit consists of the following parts:
Before starting the assembly process, we recommend making a drawing of the future design. Different materials can be used to make the incubator body. Perfectly for this purpose, plywood, sheets of chipboard, cardboard boxes, an old refrigerator are suitable. The main criterion by which the choice of material is made is to ensure proper thermal insulation. You can use felt, polystyrene, batting.
DeviceIn order to ensure proper ventilation, we make a gap of up to eight centimeters between the wall and the tray. When working with a large incubator, on the foam, which is used as a heater, it will also be necessary to make holes so that carbon dioxide can escape through them. A certain distance should also be between the bottom and the floor, as seen in the photo.
Heating systemHeating elements can be placed in different places of the incubator relative to the trays:
If you do this unit with your own hands, then the best option is to install heating from above. It is in this case that the situation of returning the maximum amount of heat will be achieved. To determine at what distance it is necessary to install them, you should analyze the power of the heater.
Egg trayThe easiest and cheapest way to make an egg tray with your own hands. In this case, use wooden boards. The frame is easy to make from a metal or nylon mesh, as shown in the video. The cells must be made in such a way that a chicken egg can easily fit in them. The most convenient option is to make a design according to the drawings of the furniture drawer. During the operation of the incubator with foam, you will need to constantly turn the eggs. If in the future you plan to produce this process yourself, then put a cross on one side of the egg before it begins.
If you wish, you can make a device for simultaneously flipping the entire tray. To do this, we will produce a movable frame without a bottom, with a width of 1-2 mm and a length of 10 cm. Next, cells must be fixed on it at a distance of up to 10 cm.
Additional devicesIn order for an individual to develop normally, the incubation process must proceed taking into account all the necessary conditions for this. Devices for control will help us with this. To determine the humidity in the incubator, the main heater, in which the foam is, use a psychrometer. It is sold at any veterinary pharmacy. You can also do it yourself. To do this, you will need 2 thermometers, which will need to be attached to the board, as seen in the photo. Next, one of them is immersed in a bandage, and then in water. Thermometer number two does not need to be immersed in water. Now, to determine how much air is humid, it will be enough to calculate the difference between these two indicators. In order for the temperature in the incubator to be constant, it is necessary to install a temperature regulator. It can be an electronic device with a power of not more than three hundred watts. He will have to keep the temperature regime within 35-40 degrees. The temperature controller must be placed in a plastic base. It must also be equipped with a temperature control device, a sensor and a load indicator. This device will work continuously.
BenefitsPreviously, a bucket and a table lamp were enough to remove quail. Now this method can be considered quite risky. It is better to make the device yourself, because such materials as polystyrene, plywood and iron are not very expensive and publicly available. A self-made incubator has several advantages:
To summarizeIf you make a foam incubator with your own hands, you will get a fairly cheap way to breed domestic chickens. This unit can be used many times. You can keep the resulting offspring yourself, thereby providing yourself and your whole family with healthy nutrition. It will also be very profitable to sell the chicks received. That is, a device made from ordinary material can become your home business. Ravilov V.V. | 2015-03-17 Suppose that the gentle March sun aroused your craving for increasing the number of poultry, and there is no desire to tinker with a hacksaw for wood or metal, then you can make an incubator out of sheet polystyrene foam (polystyrene). We will not reinvent the wheel and discover America, but take advantage of the successful experience of our Australian fellow craftsman. He independently, with his own hands, in a matter of hours, made an incubator, of small capacity, for chickens and made a photo and video report on his research. So the word is Candyman. I made this incubator from expanded polystyrene and named it Esilbator, after the chicken who laid the eggs for my first egg incubation experiment. I cut the size of the incubator walls with duct tape to ensure the required strength and tightness.
As a heating element in the incubator, 60-watt incandescent bulbs are used, and another, I do not know its power, the marking has been erased. The temperature in my incubator is regulated using an industrial temperature controller, and the uniformity of heating of the eggs is ensured by two fans, one of which is installed at an angle of 45 degrees, and the second pumps heated air from the lamp compartment into the egg compartment. The photo below shows a 60-watt light bulb with a reflector.
Second lamp, unknown power
The main fan, it pumps the heated air from the heating compartment into the incubation compartment.
Both lamps, in addition to the thermostat, are connected via a dimmer. This simple addition gives me even more control over the temperature, since I do not have central heating at home. When you need to quickly increase the temperature, I turn on the second lamp and make the light brighter.
In the incubator, on both sides, I installed water tanks. Firstly, it gives the required humidity. Secondly, tanks in water serve as heat accumulators and ensure even heat distribution, complementing the installed fans. I used conventional fans for PCs with a diameter of 80mm. To control the temperature and humidity in the incubator, I used two conventional thermometers and one digital thermometer / hygrometer.
The eggs in my incubator are installed in standard, plastic egg trays, which were mounted on cardboard rolls with a diameter of 4 cm for ease of turning. Yes, I turned the eggs by hand, the incubator was in haste. For the conclusion of chickens and used only fresh eggs. In order not to acquire an ovoscope, the built-in flashlight of the phone was used to shine through the eggs.
Eggs on day 5.
On the seventh day, the blood ring became clearly visible.
|
|||||||||||||||||||||||||||||||||||||||||


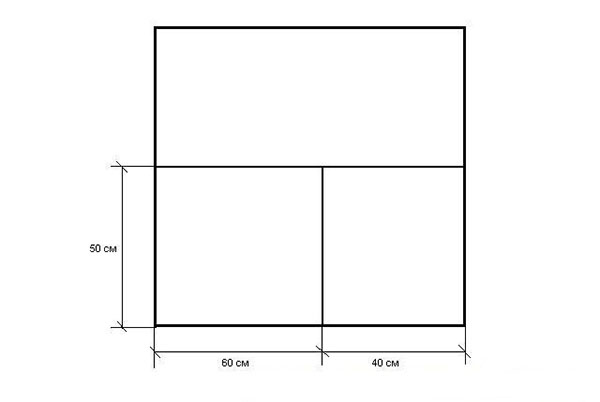


 Figure 2. Scheme of automatic egg rotation in the incubator
 Figure 3. Optimal incubation modes
 Figure 4. Normal development of the embryo (left) and possible defects in violation of the humidity regime (right)
 Figure 5. Possible defects of eggs during transmission by ovoscope
 Figure 6. Scheme of manufacturing a household incubator from an old refrigerator
 Figure 7. Schemes of manufacturing simple incubators from the refrigerator and box
 Figure 8. The order of manufacture of the incubator from the microwave do it yourself
 Figure 9. Drawings for making simple incubators do-it-yourself
 For the manufacture of the simplest home-made apparatus, foam is used
 For manufacturing, you can use a two-chamber or ordinary old refrigerator
 In order for the incubation process to be correct and successful, the eggs must periodically rotate.
 To increase productivity, devices consisting of several tiers are often used
 Regardless of the type of incubator and materials used, special attention must be paid to the heating system


 Fig. 1. Styrofoam Incubator
 Fig. 2. The incubator device is quite simple
 Fig. 3. View of the finished incubator from above
 Fig. 4. 60 watt lamp heating element
 Fig. 5. Incubator auxiliary lamp (watt 40, no more)
 Fig. 6. Incubator main fan
 Fig. 7. Dimmer knob
 Fig. 8. Temperature controllers
 Fig. 9. Thermometers
 Fig. 10. Thermometers
 Fig. 11. Thermometers
 Fig. 12. Mobile Ovoscope
 Fig. 13. Screening eggs on the 5th day
 Fig. 14. Screening eggs on the 5th day
 Fig. 15. Screening eggs on the 5th day
 Fig.16. Screening eggs on the 7th day
Popular:
New
- Sawdust mulching: technology and advantages of the method How to process sawdust for mulching
- Which wallpaper is better to choose?
- Shelves for the bathroom
- Installation of platbands on interior doors
- Installation of ceiling panels: durable finish Installation of wall panels on the ceiling
- Exact calculation of expanded clay blocks at home with examples
- How to install a crate under a soft tile?
- How to calculate how much glue is needed for wallpaper
- Do-it-yourself geothermal heating of a country house
- DIY construction and repair blog


