Sections of the site
Editor's Choice:
- How to drill tiles to not crack: video, photos, tips How to drill tiles in the bathroom
- Ventilated facade
- How to align walls with lighthouses
- The installation of dormers: technology for installing window structures for the roof Triangular dormer on the roof design drawing
- Methods of attaching panels to the facade and how to properly fix a block house to the wall of a private house Installation of a block house how to start
- How to put tiles on an old tile Masonry tiles on an old tile
- Do-it-yourself garden bench from a profile pipe
- Making a pyrolysis furnace for a home and a bath do-it-yourself Pyrolysis furnace principle of operation
- How to paint heating radiators, so that later you do not bite your elbows?
- A do-it-yourself well in a country house: a guide for arranging a typical well from rings
Advertising
| How to make a ceiling from plastic panels? Installation of ceiling panels: durable finish. Installation of wall panels on the ceiling. |
|
Installing PVC panels on the ceiling is a great way to finish. The decorative properties of the panels allow you to achieve the desired visual effect, and their cost - to save on the installation of suspended or suspended ceilings. Some facts about PVC panelsFirst, it's worth figuring out what we're dealing with. PVC is the abbreviation for thermoplastic polyvinyl chloride polymer. Polyvinyl chloride is a white solid that results from the polymerization of vinyl chloride. This material is used for the manufacture of linoleums, films, molded products, including panels and window profiles. PVC ceiling panels are obtained by mixing polyvinyl chloride with a number of components (plasticizers, stabilizers, fillers, pigments, etc.). Then the mixture is loaded into a special machine - an extruder, where it is softened. A formed panel already leaves the extruder, which is subsequently cut into pieces ranging in size from 2.6 to 6 m. The next step is painting, applying a protective layer of varnish and drying the material. PVC ceiling decoration is available in several versions, which allows it to be classified according to two criteria:
The way the ceiling will be is an individual decision, depending on the preferences and design of the room. But strength and durability depend on the quality that can be checked upon purchase. To do this is quite simple - just a few points, and you can determine the level of quality of the material offered by the seller.
High-quality PVC finishing materials have a number of positive properties, thanks to which they have become so popular:
The disadvantages of polyvinyl chloride are as follows:
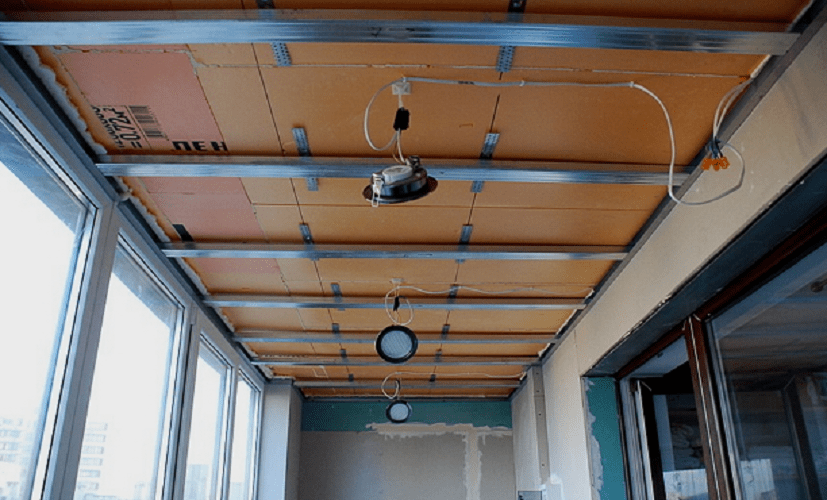
How to hem the ceiling with PVC panels?The installation of PVC panels on the ceiling is carried out using a suspended frame. This frame can be made of metal profiles or wooden battens. The principle of the crate is single, but has some differences in installation. It is also necessary to remember that the wooden frame is used only in dry places, and the metal frame can be used in rooms with high humidity. The device of the wooden suspension frame:
The device of the metal suspension frame:
DIY installation of PVC panels on the ceiling: a phased work planSo, after preparation, the action diagram is as follows: DIY installation of PVC panels on the ceiling - step-by-step diagramStep 1: Calculate Required Material
A good owner who decides to make repairs in his home will, first of all, draw up a detailed list of his actions, calculate all financial costs, and draw up a repair plan. Only specialists in the field of finishing work know that one minor flaw can spoil the whole picture of a new repair and require numerous corrections. In rooms with a high degree of humidity, very often the ceiling and walls are exposed to the negative effects of frequent changes in temperature, because of this the constantly forming steam creates ideal conditions for the formation of fungus and mold. Repair in the premises of such a plan must begin from above, with the "king" of the room - the ceiling. The best option is a PVC ceiling. To make the installation of pvc panels on the ceiling we need:
Buy building materials with a little more calculation than necessary. Often breaking tools, also purchase a few pieces so as not to waste time on additional trips to the store. PVC panels vary in size (from 25 centimeters to 3 meters). If the repaired room is small, it is better to take narrow panels (up to 50 centimeters), in larger rooms you will need wider panels. It is worth noting that PVC panels are the most popular material for decoration. A professional in the field of decoration, and an ordinary amateur can work with him. But, mounting these panels alone is quite difficult, it is better to work together or three. Choosing PVC panels
When choosing PVC panels, there are several subtleties with which you can calculate instances of poor quality. We list them:
Fixing the lathing for PVC panels
The ceiling of plastic panels is installed in 2 stages:
The crate can be purchased at hardware stores or made independently from metal or wooden battens. Reiki fix about 50 centimeters from each other, this is enough to mask the irregularities of the ceiling. To correctly fix the frame, you need maximum attention and accuracy. To do this, look for the smallest height, draw two straight, horizontal lines from the lowest point, using a cord and chalk. With the help of the level, we check the horizontal lines, if necessary, adjust. The correct installation of the entire frame depends on the accuracy of the drawn markup. When installing the crate, watch for the formation of strictly right angles. After fixing the frame, check that it should be perpendicular to the PVC panels. To do this, you must:
Before you start installing plastic panels, remember or make a written layout of the wiring and communications wires, chandeliers and fixtures, so that in the event of a short circuit or breakdown, you do not have to break the entire ceiling in search of a reason. Installation of pvc panels on the ceilingMeasure the length of the ceiling, carefully cut the panel according to this length. Experienced experts recommend cutting off 1 centimeter less than the length of the profiles. Fasten plastic panels tightly to each other, carefully monitoring the absence of gaps. We place the PVC panel inside the profile and fix it with screws. It’s better to start mounting panels from the extreme side. The first fixed panel plays an important role in further work, the entire surface of the future ceiling will be oriented to it. In the event of an error or uneven installation, the following PVC panels will not fit into each other's grooves. The best reference point for correct operation are perpendicular walls.
Further repairs will go a little faster. If the crate is fixed well and the first control panels are laid correctly, the subsequent PVC will be easily and evenly installed. We attach them to the mounting profile one by one. Remember, panels should be fixed as tightly as possible to each other. The edges of the plastic are neatly inserted into the slats. The last panel, as a rule, does not fit completely, it will need to be cut off. To do this, measure the distance from the last installed panel to the wall with a tape measure. Draw a straight line with a pencil, using an electronic grinder, cut it. A piece of the last panel should also stand into the cladding as evenly as possible, between it and the wall there should be no gaps and voids. If it is necessary to minimize the financial costs of repairing the ceiling, then you can put a wooden frame instead of a metal frame, and replace the self-tapping screws from iron with brackets. These materials are much cheaper and fixing it is much easier. But, there are significant disadvantages: in rooms with a high percentage of humidity, the tree is very short-lived. Under the influence of water and steam fumes, the wooden cladding begins to deteriorate and soak, deforming the structure of the plastic panels.
Before starting repair work and installing plastic panels, determine exactly where to install the lighting fixtures. If these are small spotlights, then you will not need to additionally strengthen the frame. And if it is a heavy massive chandelier or additional suspended ceilings will be installed, then additional rails can be installed in the frame by reducing the distance between them. That is why it is recommended that before starting the installation of PVC panels to draw a diagram of the future location of all devices, that is, no longer have to remove parts of the panels for mounting fixtures or chandeliers. It is possible already during the installation of panels to drill small holes for installing devices. As soon as the installation of a new plastic ceiling is completed, it is possible to bring electrical wires out or, conversely, hide numerous communications and wiring from prying eyes. For creative people with a well-developed imagination, the opportunity to experiment with the color scheme of PVC panels is provided. Shelf in the bathroom with plastic ceiling, if desired, can even be a person without experience. Especially if he has assistants with detailed instructions on how to make a ceiling of plastic panels with your own hands. The main stages and nuances can be seen in the video. There is nothing complicated in installing a false ceiling, sheathed with plastic panels, so many homeowners are thinking about how to do all the work on their own. But even experienced builders sometimes do not know all the nuances of working with plastic, and for masters without experience, a step-by-step guide is all the more useful.
Each owner can make a plastic ceiling in his bathroom Why is the ceiling made of plastic panelsPolyvinyl chloride, aka PVC - a practical and fairly reliable finishing material, which is great for rooms with high humidity. The ceiling made of plastic panels is easy to care for, it is not afraid of mold. A variety of colors and textures allows you to design a bathroom in the most suitable color scheme. Of course, plastic is inferior to the aesthetics of suspended ceilings, but it allows you to quickly and most importantly inexpensively upgrade the room.
PVC panels for the ceiling can be of different colors Design features of suspended ceilingsThe design of the suspended ceiling is quite simple - it is a frame that is attached to the base ceiling and sheathed with a suitable finishing material. If we are talking about the bathroom, then the frame is better to make not from wooden beams, but from metal profiles for drywall. When the added profiles are attached directly to the ceiling, the structure is called the hemming structure, and if they are lowered on the suspensions, it is suspended. The ceiling frame consists of thin wall profiles (UD), screwed around the perimeter of the room and wide guides (CD), which are attached perpendicular to the stripes of plastic.
False Ceiling Mount How to choose plastic panelsTo choose a really high-quality material, you must pay attention to the stiffeners, the more they are, the stronger and more reliable the panel will be and the less risk that after a few years it will deform under its own weight and from moisture. Coloring should be uniform, without greasing, smudges and especially without unpainted areas. The back of the panel should be uniformly painted and even.
Types of Plastic Panels Calculation of the required number of panelsPVC panels go on sale in widths of 10, 25 and 50 cm, lengths from 2.5 to 4 or 6 meters. To accurately calculate the amount of material, you need to pre-select the panel, determine their direction in the room and measure the length of all sides of the sheathed ceiling. For example, the size of the room is 2.5 * 2.7 meters, panels (0.5 * 3 m) will be laid along the larger wall. That is, their length of 3 meters will be enough, there will be a small trim. Width: 2.5 m / 0.5 m \u003d 5 pieces. Of course, hardly anyone wants to buy an extra three-meter panel for reinsurance, but you need to at least make sure that the store still has material from this lot (others may vary in color) and in case of damage to the panel, there will be where to buy the same.
Adjusting the size of the plastic panel for the ceiling PVC profiles and cornicesThere are several types of various components, in particular profiles and cornices for the installation of polyvinyl chloride in stores, but not all of them may be needed, so you need to familiarize yourself with the main ones in advance and decide which ones are needed and in what quantity.
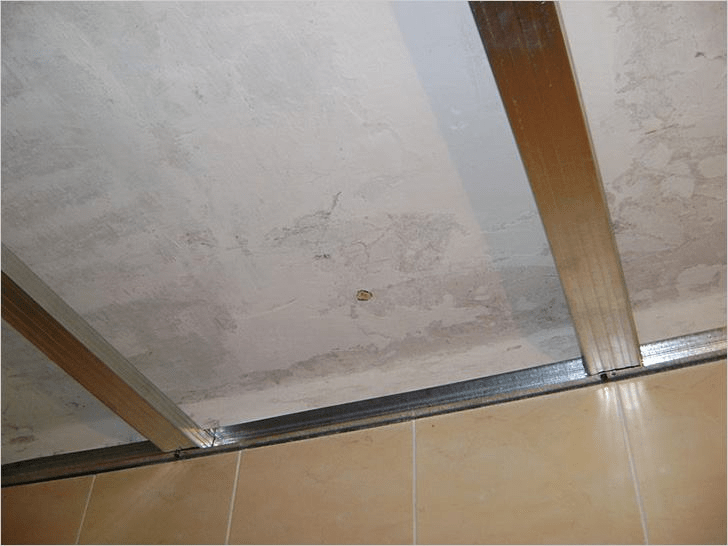
Types of False Ceiling Mounts Procurement of material for the crateFor the crate, you will need profile guides (CD) and wall (UD), their standard length is 3 or 4 meters. The required length of the wall profiles is equal to the perimeter of the room, along the same wall, if possible, an integral profile is fixed. Wide profile guides are fastened in increments of 60 cm. You will also need straight or anchor suspensions, “quick installation” dowels and “fleece” screws. Preparatory workThe beauty of suspended ceilings is that the base foundation does not need to be primed, puttyed and generally specially prepared. Only the old finish is removed, and the surface is recommended to be treated with an antifungal compound. But sometimes they don’t even do it, the old whitewash or paint simply hides under the new ceiling.
Suspended ceiling Frame mountingStart work with marking around the perimeter. A line is drawn strictly on the walls on the walls, and a new ceiling will begin on it. If the walls are tiled, you can draw a line just along the seam between the tiles. When the marking is done, a guide wall profile is cut and holes are drilled in it with a step of 50 cm. You can also drill directly on the wall if there is an assistant, but if it is not there, it will be difficult to make the first pair of fasteners. From revolutions of the drill, the profile walks a little and can loosen the previous fastening, especially often this happens in old buildings, where a thick layer of plaster or a ceiling line coincides with the masonry seam.
Installation of the lathing under the plastic ceiling For installation of guide profiles it is more convenient to use dowels “quick installation”. They are inserted into the drilled hole and clogged with a hammer. Next, measure and cut a wide guide profile. If the bath is perfectly even, you can cut all the strips at once, but if the walls are at an angle, as is often the case in Khrushchev, it is better to take individual measurements for each profile and cut it separately. The profiles are lowered to the required height using straight or anchor suspensions with a pitch of about 60 cm. The ends of the CD profile are inserted into the UD and the clutches are fixed together with “fleas”. Wiring
Scheme: arrangement of electrical wiring After mounting the frame, wires are brought to the points where the lamps will be, and they are fixed. On the "tails" is not worth saving, a long wire can always be cut, but it is undesirable to build up, especially in the bathroom. If a chandelier hangs on the ceiling, reinforce the structure at the installation site, install an additional suspension, and pre-position the profile in such a way that the chandelier is attached precisely to the metal base. If this is not possible, secure the transverse jumper.
Installation of plastic panelsThe starting profile, in which the panels will be fixed, is fixed from the bottom to the wall profile with self-tapping screws. It can also be glued directly to the tile with “liquid nails”. Advice! If spotlights will be mounted in the ceiling, it is more convenient to cut openings under them before installing the panel, manually or using a “crown” drill. But in this case, the panel becomes more fragile and can crack if it is excessively deflected. Fastening locks are located on both sides of the panel. After installing the first panel, the lock on one side will be hidden in the start profile, and on the other it is screwed to the guide profile with screws with a press washer. The next panel is mounted in the same way.
Schematic: mounting plastic panels It is trimmed, the ends are inserted in turn into the profile guides, the canvas is leveled and pressed tightly against the lock of the previous panel until it clicks lightly. There should be no gap between the panels along the entire length. The last panel rarely enters its entire width, so it is cut with a construction knife. To simplify the installation, it is made somewhat shorter than the distance from one wall to another, so that it literally several millimeters goes on the profile on each side. First, they put the panel in one of the corners and from it lead into the longitudinal starting profile, when the panel has gone completely, it is aligned and pulled to the lock of the previous panel. If she sits too tightly and cannot be pulled up with her palm, you can glue on each side a piece of ordinary tape and pull on the free edge of the tape.
Installation of panels without U-shaped plastic profiles
Mounting plastic panels to the frame When the walls and the frame are smooth in the bathroom, the panels can be screwed directly to the profiles. This method is simpler, especially considering the difficulties with installing an extreme panel, but no less reliable. The joint between the walls and the ceiling is covered with an ordinary baguette, which is fastened with "liquid nails." Installation of plastic panels on the ceiling in the bathroom: video
Plastic ceiling in the bathroom: photos
With proper preparation and organization of the working process, the installation of a suspended ceiling from PVC panels takes an average of 4-5 hours. It will take about one day to clad the ceiling of the kitchen or bathroom, at a leisurely pace. In any case, the installation of a false ceiling with your own hands is much faster than in the case of using drywall. The best option for giving Features of the suspended ceiling made of plastic panelsCladding material based on PVC plastic can hardly be called an ideal choice for ceiling cladding in residential premises. Usually, the installation of plastic on the ceiling is rather skeptical, unless, of course, we are talking about a utility room, a balcony, a porch in the country. There are a lot of reasons for such skepticism regarding a suspended PVC ceiling, we note two of the most important:
Of course, all these shortcomings can be easily overcome if you plan and make a false ceiling with your own hands, taking into account the basic requirements for ventilation, insulation and soundproofing of the room. In this sense, a suspended ceiling made of PVC panels is no worse and no better than other finishing methods.
PVC panels have a wide selection of colors It must be remembered that the use of smooth and rigid panels has its positive aspects, for example, maintenance of suspended ceilings is much easier than in the case of any other type of decorative finish. In addition, PVC is highly resistant to all kinds of dust and pollution, so the risk of damaging or destroying the ceiling is minimized. Important! One of the strongest arguments in favor of installing a suspended ceiling made of PVC is the ease of manufacture. The ability to build a ceiling lining with your own hands, exactly as the owners imagine, without nerves and alterations, is expensive. Another nuance that must be remembered is associated with the method of mounting the ceiling trim. The ceiling plane is formed in the process of dialing and joining panels with end locks. The material is laid on the ceiling rails and at the same time, as it were, the end clicks into the end. If the installation is done carelessly, then the joints become visible on the ceiling, and a kind of “striped” structure forms. Calculation of material for suspended ceilingAny repair or construction begins with an estimate. It will be correct to pre-calculate the amount of material and the future cost of installation. It is not difficult to calculate the suspended ceiling, but remember that the number and range of panels, frame parts and fasteners depend on the installation method and the dimensions of the ceiling surface.
The simplest frame under PVC For small rooms, the calculation of components and materials for hanging decor is performed as follows:
For the installation of suspended ceilings with dimensions of 2x2 m and more, a slightly different frame assembly principle is used. The number of plastic panels is calculated similarly to the previous option, but the list of profiles for mounting the cladding must be supplemented by the following method. In this case, to install suspended ceilings, you must first assemble the supporting frame from a galvanized metal profile with your own hands. Most often they take the material used in the installation of suspended drywall structures.
PVC of any size can be mounted on the frame In the set you will need to add metal suspensions and a P-profile, 60 mm wide. The step between the individual slats is 60 cm, knowing the width of the room, you can easily calculate their number by dividing the transverse dimension in meters by 0.6. It is recommended that the extreme profiles of the suspension frame be removed from the walls by a distance of not more than 20 cm. Suspended ceiling heightThe installation of panels on suspensions is suitable for rooms in which the distance from the floor to the draft ceiling is no more than 3 m. In this case, the material of the hanging decor can be laid on a frame made of steel or wooden battens fixed to ordinary tape hinges.
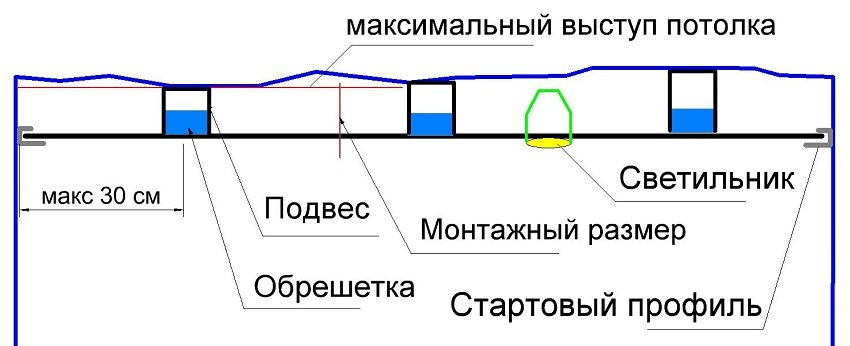
Lost at least 10 cm in height If you plan to do-it-yourself installation of a suspended ceiling made of plastic panels at a height of more than 3 m, then the frame must be reinforced with crossbars, and the entire structure should be suspended on adjustable wire suspensions. Structurally, they are not much different from the standard tape version, but at the same time it is possible to adjust and fine-tune the length of the pendant mount. Installation can be carried out at a level of 10-60 cm from the concrete slab. Important! Installation of this type of suspension system requires leveling and adjusting the level of suspension tension in order to align the frame horizontally and plane during installation. Drawings for false ceilingWhen planning the installation scheme of the future frame, it is necessary to consider the distance of the suspensions from the nearest wall. For tape fasteners, it is necessary that the fixing point on the ceiling is no further than 20 cm from the wall, for adjustable wire structures, the distance can be increased to 60 cm.
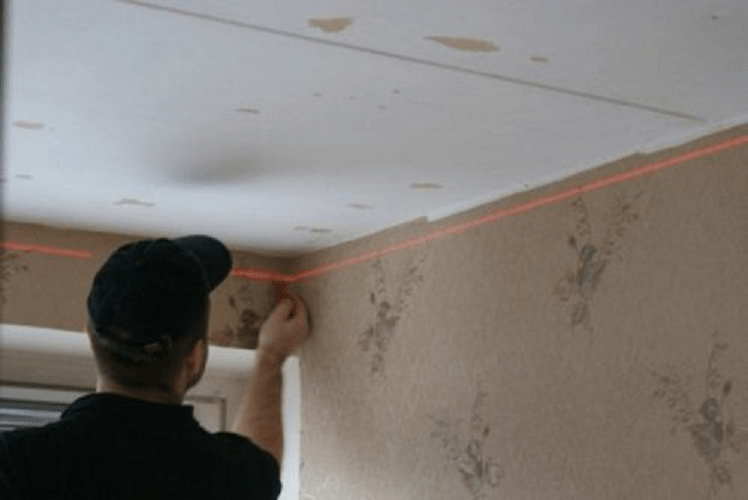
Even a wooden crate needs a drawing In order to prevent a mistake during installation, it is easier and best to draw up a drawing of the placement of fixtures on the ceiling. The fact is that the hook, for which the supporting P-profiles are suspended, can be installed on the frame with a certain step. The maximum adjustment range, as a rule, is limited to 50-100 mm, therefore it is necessary to choose the fastening point so that the hook goes away from the vertical by no more than 70 mm. How to make markings for a false ceilingInstallation of the future frame, arrangement of attachment points will be simpler and more convenient if you use a laser level in your work. It is necessary to draw a horizontal line on the walls corresponding to the height of the plastic panels. According to the same marking, guides and starting profiles will be laid.
Any walls can be marked with a laser level The next step is to mark the installation lines of the supporting P-profiles. Directly along the stretched masking cord or along the laser beam, lines are drawn that will have to coincide with the axes of the profiles or the supporting wooden planks of the hanging frame. How to make a frame for a false ceiling with your own handsDespite the fact that the cladding based on plastic panels is considered collapsible, it is not recommended to remove or disassemble the laid PVC panels, even in extreme cases. Each such dismantling may result in damage to the suspended material, therefore, all work associated with the draft ceiling must be completed before the installation of the suspension frame and the installation of decorative finishes. If the suspended ceiling is supposed to be insulated and soundproofed, then before the first rails are laid, it is necessary to lay wiring and communications, for example, water pipes, electrical wiring and cable channels. Sometimes an additional plastic box is placed in the ceiling space, which is displayed in the attic or outside the room. This is done in order to ensure the normal removal of water vapor, which will inevitably fall behind the plastic cladding through cracks and joints. Metal frame for installing a false ceilingAssembly of frame structures begins with the installation of guides and starting rails on the walls of the room. The profile is mounted on the vertical surface of the walls according to a pre-made marking, using a puncher and dowels, clogged in increments of 60 cm.
28 mm guide profile The next step is to install suspensions on the rough ceiling along the marking lines. Each tape is fastened with at least two dowels, the loop petals do not bend and are in a horizontal position until the installation of the supporting P-profile.
Before mounting, the profile must be aligned with the horizon Important! This is the most critical part of the installation, you need to align the profile exactly with the markings in order to avoid deformation of the frame. How to make a wooden frame for a false ceilingThe installation of the supporting structure made of wooden timber and battens can be performed according to a scheme similar to the previous method. In this case, instead of a galvanized main P-profile, a bar with a section of 35x35 mm is attached to the ceiling.
If you attach directly to the ceiling, you have to use pads to align If the ceiling dimensions are small, less than 2.5x2.5 m, then the wooden rail can be laid without the use of suspensions. To perform the installation of the frame, initially on the walls it is necessary to sew a supporting plastic or metal profile. In fact, this is a corner, on the shelves of which the edges of PVC plastic plates will rest. Then, on walls with a start and finish rail, at a level 10 mm above the edge of the reference corner, one load-bearing beam with a cross section of 40x40 mm is nailed. Insulation or sound insulation is sewn onto the beams, after which additional transverse battens are filled for installation of an already plastic PVC decor. PVC suspended ceiling lightingThe best option for a luminaire on a plastic ceiling decor is built-in spotlights with LEDs or housekeepers. The electrical wiring and the assembly block must be laid in the ceiling space even before the installation of the plastic cladding.
PVC installation and wiring can be done simultaneously In the places where the lights are installed, a hole with a diameter of 60 mm is cut out with a circular drill, in which the luminaire body will be installed in the future. How to make a covering of a false ceiling from PVC panelsThe laying of plastic plates starts from the starting profile. On the end surface of the first PVC panel, it is necessary to cut the spike of the lock, after which the material is wound over the supporting profiles, leveled and attached to the supporting frame using clamping brackets.
Panel Layout For your information! The size of the plastic panels is measured so that between the walls and the edges of the material there is a gap of 2-3 mm. PVC has a sufficiently large coefficient of thermal expansion, so the material must be laid on the frame with the possibility of its movement. Otherwise, at the first serious heating of the ceiling, the cladding may be arched.
End Drill Screw DIY suspended ceiling: step by step instructionsImportant is the right choice of material. Traditionally, thinner slabs with a thickness of not more than 8 mm are used for ceiling suspended cladding. Wall material is much thicker and stiffer, for ceilings it is too heavy and uncomfortable. Most owners prefer DIY installation of a suspended ceiling made of PVC panels in the form of one continuous plane, without seams and joints. Whereas when using wall material it is rather difficult to hide the lines. In addition, it is necessary to choose the right material and design of the supporting frame. If the ceilings are high enough, or in a room, such as on a balcony, there is a difference in temperature and humidity, then it is best to use a metal profile. Whereas for the kitchen, bathroom or hallway, any living room, false ceilings on wooden slats are made in the same way:
When assembling the frame, special attention must be paid to the strength of fixing the dowels on the walls. If you have to plug plugs into the plaster, you will either need to increase the depth of the hole, or use glue to fix the fasteners on the plaster layer.
In the event that monophonic plastic panels are used for cladding the ceiling, then before you start laying the material, you need to take the package to a brightly lit place, you can go outside and carefully examine it. Often, even in one package, you can find several plates that differ in shade from the main color scheme of the plastic lining. Such PVC panels are placed in the darkest areas of the ceiling decor. How to care for suspended ceilingsOne of the disadvantages of PVC plastic is its good susceptibility to static electricity. This means that all house and street dust will easily stick to the ceiling. Given that condensation very often falls on PVC, the result is an explosive mixture of stains and dirty stains. It is very simple to remove suspended ceilings, for this you can use a homemade brush with a foam sponge, or just a damp cloth for furniture maintenance. PVC can be washed with water. If organic solvents and abrasive cleaning powders are not used, the material will last for at least 20 years. ConclusionInstallation of a false ceiling made of plastic panels can be called with confidence one of the most simple and affordable ways to make your own decor. If you do not drop the material and follow all the instructions related to leveling the frame, then even in the absence of experience you will get a fairly high-quality, even and beautiful ceiling finish.
Choosing the decoration for the ceiling, it is recommended to consider those types that can be mounted with your own hands. Suspended structures that do not require preliminary cleaning and leveling of the rough base are practical in this regard. performed on a pre-equipped frame. Where is better to applyThe main enemy of any decoration (including ceiling) is high humidity. The wettest rooms in the house and apartment are, kitchen and toilet. In the presence of poor ventilation, water and other fumes begin to settle on the ceiling surface, causing a gradual damage to the material and the appearance of fungus. For such conditions, you need to choose a moisture resistant finish. Plastic panels fit these requirements.
Advantages and disadvantagesLooking closely at the building material, the first thing they study is its characteristics. Ceiling PVC panels are plastic lamellas (length - 270-300 cm, width - 25-30 cm), equipped at the ends with thorn-groove connection elements. Advantages of the material:
Among the shortcomings, one can single out a common weak spot for all suspended structures - they somewhat conceal the living space. For this reason, such a finish is not recommended for use in rooms with low ceilings. You can also highlight some simplicity and simplicity of plastic panels, which are inferior to more expensive rack, or stained glass systems. Do-it-yourself step-by-step instructions for installing ceilings from pvc panelsIn order for the suspended ceiling from pvc panels to turn out to be as beautiful and durable as possible, it is important to follow a certain sequence of operations during its installation. Material procurementThere are a lot of varieties of plastic panels: they have different sizes, design and texture. Of particular importance is the width of the individual lamellas. In small rooms it is better to take a lining up to 25 cm wide, for more extensive ones - products of a larger width (for example, 50 cm). To calculate the required amount of material, first determine the area of \u200b\u200bthe trimmed ceiling, multiplying its width by length. The resulting number is divided by the area of \u200b\u200bone plate (usually this parameter is indicated on the package), adding at least 15% to the cropping to the result. In addition to panels, you must also purchase special connecting elements:
Along the long walls, parallel lines are drawn with a pitch of 40-60 cm: after that, it is quite easy to determine the total length of these guides. Around the perimeter of the room will require the installation of a more rigid supporting profile or beam. When calculating the fastening material, the total number of guides and the fastening step (usually 30 cm) are taken into account. When choosing between a wooden or metal frame, the small price of the first option and the ease of installation are taken into account, and the second is increased moisture resistance. To work, you must also stock up on the following tool:
Foundation preparationAs already mentioned, during the installation of PVC panels, the preliminary alignment of the base is not carried out. In this case, elementary preparatory measures are enough. The rough surface must be freed from the old finish, lighting, dirt and dust. It is advisable to remove too weak sections of the base with a pickaxe, sealing up the formed holes with rough putty. After the solution has dried, the entire base is treated with antibacterial impregnation. MarkingBefore making a suspended ceiling from PVC panels, it is necessary to mark the base. To indicate the general level of the suspended structure, each of the walls of the room to be trimmed is marked with a line. In this case, you must immediately select the type of fixtures. The registration also takes into account the presence of differences, the laying of hidden communications. For further convenience, wiring from the upper edge of the crate to the base is left at least 20 mm: in this case, the frame is most practical to mount on suspensions. For the reference point for marking, the most lowered overlap point is selected. Based on it, the walls are equipped with appropriate marks: to apply them, you need a water level. You can get a solid line when using a chalky thread: with it, connecting sections between individual points are beaten off. The installation location of the transverse mounting lintels is similarly marked: they are installed strictly perpendicular to the direction of the lamellae laying, at a distance of 40-60 cm from each other. The construction of the mounting crate
As the material for the frame, wooden blocks or a metal profile for drywall are used. If the decoration is carried out in a room with a high level of humidity, it is recommended to use a metal crate. These structures are very convenient to align thanks to special suspensions, allowing to lower the level of the finish surface by 30-40 mm. To avoid significant concealment of living space, the distance from the ceiling to the crate is recommended to be no more than 4 cm.
Using the expansion bolt shield nails, preliminary equipment of a profile and walls with corresponding openings will be required. When installing the start profile, it is necessary to apply a level, this will allow the initial and final segment of the perimeter to converge at one point. At the next stage, metal suspensions are fixed along pre-beaten longitudinal lines. The optimal distance between the individual devices is 80 cm. For fixing, self-tapping screws or dowels and nails are also used here: after installation, it is better to bend them right away, which will simplify the installation of the main guides. Adjusting the main profile along the length, a gap of 5 mm should be left along each edge, the obtained segments are embedded inside the starting profile, fixing on self-tapping screws to the suspensions. During this procedure, it is necessary to check the guides for horizontality and straightness. Panel Mounting
The finished frame around the perimeter is decorated with a special P-profile, into which a ceiling skirting board is inserted. This will allow you to get between them and the crate mounting distance for installing the first lamella. The ceiling from the PVC panels in the bathroom is convenient in this respect, since this room usually has an even rectangular shape. This makes it possible to initially cut panels of the same size, making a margin of 5 mm for the thickness of the profile. The first strip is inserted inside the U-shaped profile with the spike forward: it is fixed to the frame using a self-tapping screw with a wide hat. The spike of the second panel is immersed in the groove of the previous one (you can help yourself with a narrow spatula). Carrying out a further set of slats, it is important to achieve a snug fit to each other. The last strip, as a rule, needs longitudinal cutting: you need to do this carefully. The typed plastic surface is formed around the perimeter of the ceiling skirting trimmed at an angle of 45º. To mask the corner joints, special overhead plugs are used. Ceiling light device
To mount in fixtures, it is necessary at the stage of construction of the frame to accurately mark their location. This will allow you to initially lead to the necessary sections of the wiring. Cut out seats for lighting during installation of the panels, for which a sharp knife or milling cutter is used - this will ensure the accuracy of their placement. In the niches done, the installation and switching of the fixtures is immediately carried out. Electrical wiring is released outside, and the installation of lighting is carried out after finishing work.
Only special care is needed, because in addition to ordinary moisture, fat deposits and soot accumulate on its surface. In this case, non-abrasive detergents are used for cleaning. SummaryA suspended PVC ceiling is not a difficult view for independent implementation of all such structures. Despite the simplicity, plastic panels are popular in the decoration of kitchens, bathrooms and loggias. With subsequent care for the finished surface, there are not so many restrictions on how to wash the ceilings from plastic panels. |


Popular:
New
- Sawdust mulching: technology and advantages of the method How to process sawdust for mulching
- Which wallpaper is better to choose?
- Shelves for the bathroom
- Installation of platbands on interior doors
- Installation of ceiling panels: durable finish Installation of wall panels on the ceiling
- Exact calculation of expanded clay blocks at home with examples
- How to install a crate under a soft tile?
- How to calculate how much glue is needed for wallpaper
- Do-it-yourself geothermal heating of a country house
- DIY construction and repair blog


