Sections of the site
Editor's Choice:
- How to unlock ariston washing machine
- Pros and cons of LED lighting
- Pulse relay: device and connection
- How to calculate the illumination of a room with LED lamps?
- Plastic box - do-it-yourself aesthetic view of electrical wiring
- Electricity consumption of a warm floor: electric and film
- Installing a pump in a well: how to properly install pumping equipment
- Electrician Toolkit Overview
- How to choose a water heater: the most complete list of evaluation criteria
- 1 acoustics on the example of Sven SPS-860 and Realtek ALC889 codec
Advertising
| How to repair the hob (panel) |
|
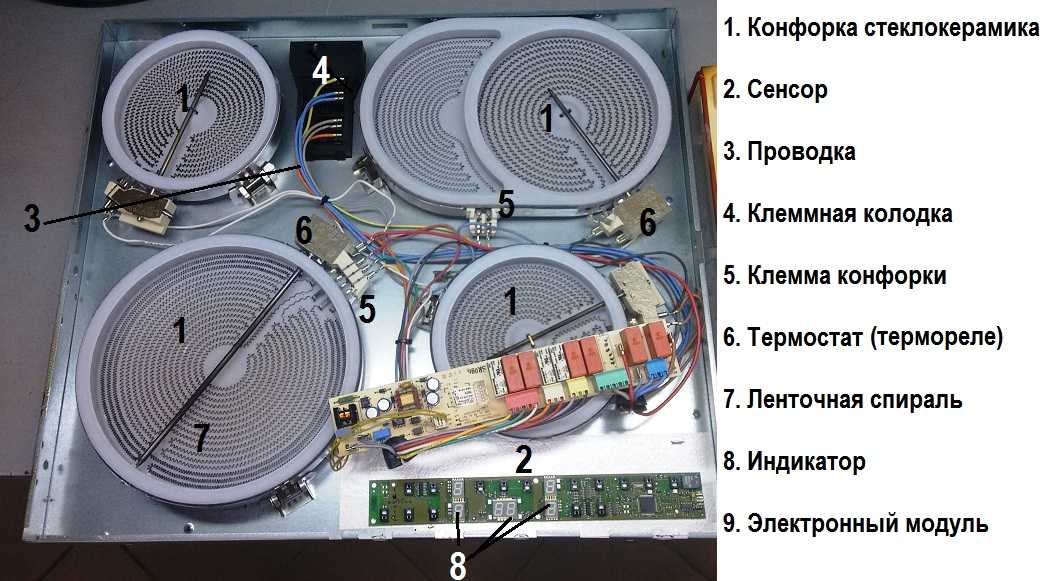
There are more and more appliances in the house, willy-nilly, you begin to think that it would be nice to be able to repair at least simple damage on your own. To help - this article, which will consider a simple repair of the hob with your own hands. Please note - if the equipment is under warranty, it is better not to go into it at all. All that is possible in this case is to replace the power cord. In other cases, it is better to contact the service. Well, if there is no guarantee for a long time, you can try to repair the hob yourself. The hob (surface) is called electric and induction cookers with a ceramic or glass-ceramic coating. Under this coating are heating elements - burners. These burners can be of different types: As you can see, the burners are different, different processes are used for cooking, but the general arrangement of the hobs is the same. To make it easier to look for breakdowns during the repair of the hob, you need to know how the equipment is arranged. Hob deviceThe main components of the hob are the burners and the control panel. Each burner has contacts for connection and a control relay (thermal relay). Through the contacts, the burner is connected to the control panel, and the thermostat monitors the surface heating temperature and turns off / on the power. Problems with burners are most often associated with incorrect operation of the remote control or loose / burnt contacts.
The control unit and burners are connected to each other using wires. This is another source of problems. You can deal with the breakdowns of these devices without special skills. You will also need a soldering iron. Since if an element is damaged, it will be necessary to buy the same serviceable one, install it in place. When carrying out these works, you should not rely on memory. It is best to take a picture of everything before starting work. Later, in the process, also periodically take photos. In any case, each time before you change something in the node, take a picture of it. It will be easier to install a new element or replace the old one.
The most difficult thing to understand is the breakdown of the control unit. This requires serious knowledge of circuitry. If they are not, it is better to contact a specialist on this issue. The arrangement of parts, their shape may be different, and depend on the manufacturer, model, but in general the structure of the hob with electric burners is very similar. Management problemsThe most difficult case is problems with the control board. There is little you can do on your own. How to understand that the control unit is to blame? By the absence of a signal when pressing the buttons. If the power is turned on, but then when setting the operating modes, there are no sounds or visible changes in the state, most likely the problem is in the control. In this case, the repair of the hob consists of simple steps. If the stove does not “obey” you, first thoroughly clean the surface - dirt can cause this behavior. Next, check the power settings. If the mains voltage is too low, the operation of the control may be affected.
The control panel is the most difficult area to repair If the voltage is normal, but there are no changes, we try to restart the programs. To do this, de-energize the hob. If it is connected through a plug with a socket, remove the plug. Switching off the button is not enough. If you connected the stove through the terminal block, it is easier to turn off the machine on the shield. The stove must be in a de-energized state for at least 10 minutes. Then you can turn it on and try again. If there was a simple "glitch" of control, it helps, if the problems are more serious - no. If all actions did not bring results, call the wizard. Do-it-yourself hob repair: what to do if the burner does not turn onIf the burner does not turn on, there may be several reasons:
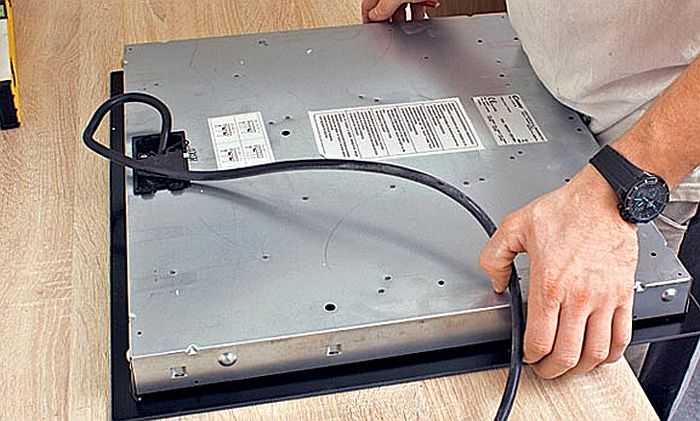
All these problems can be fixed by hand. Repair of the hob begins with its showdown. It must be disconnected from the network, disconnected from the countertop. Transfer the hob to a table covered with a clean cloth, turn the glass down, unscrew the fixing bolts located on the sides, carefully holding the ceramics, turn over and remove the ceramic panel. So we get access to the insides and can repair the hob with our own hands.
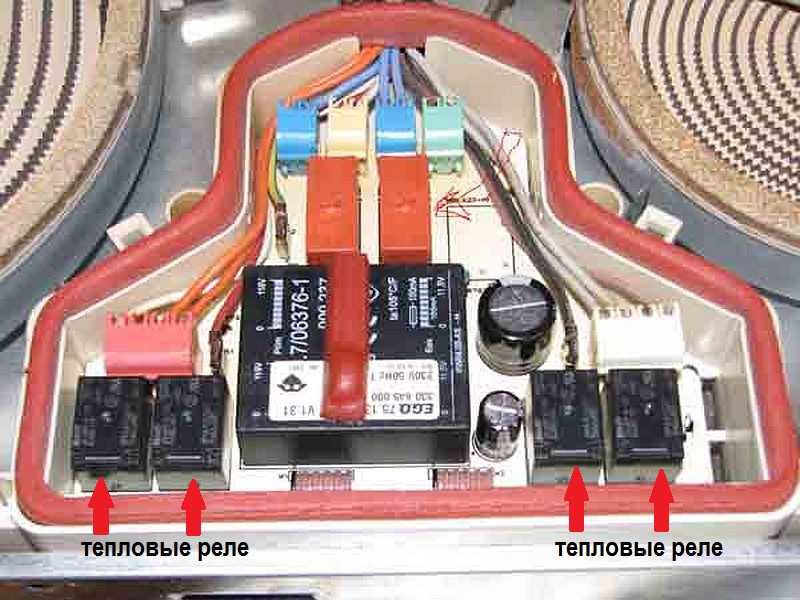
The first thing to do - inspect the wires that go to the non-working burner, checking contacts. Violation of the integrity of the wires and burning of the contacts is a very common cause of breakdown. In private homes, mice can gnaw on wiring, and contacts burn due to insufficient assembly quality. If visually everything is in order, we pull the wires, checking the quality of the contact. If traces of soot are visible somewhere, we disassemble the contact, clean it to bare metal, pack it back, install it and clamp it well. The last step in checking wiring and contacts is measurement. We take a multimeter, check the wires for integrity (we call) and for insulation breakdown (to the case and to each other). If there are no deviations in the wiring, check the thermal relay. It is located next to the burner (electromechanical), covered with a plastic cover. In some models, the relays are placed in the control unit (electronic). Then, in order to determine which relay is responsible for heating the burner we need, we track it by wire.
If the relay is electromechanical, pry off its cover with a screwdriver, inspect the contacts. There may be charred, twisted or fused contacts. It is to be replaced. If the relay is electronic, it makes no sense to open it. We measure its resistance, compare it with the serviceable ones standing next to it. There is a deviation - a replacement is needed. If the relay is ok, it's possible burnt burner. To check, we measure the resistance. If it is large or tends to infinity (break), the problem is in the spiral, heating element, etc. To find a replacement, we are looking for the burner number (written on its body). With this number we go to the store or look through the Internet. Further repair of the hob - replacement of the burnt burner. Solder all the wires, remove, put a new one, connect. If it doesn't turn on at allIf the equipment does not turn on at all, immediately check voltage. If the voltage is low, the hob may not turn on. In order to avoid such situations in the future, it is advisable to install a stabilizer. This will significantly extend the life of the equipment, since electronics are very sensitive to power quality, namely, electronics are the hardest to repair (and more expensive). With normal voltage, we will continue to repair the hob power cord inspection. Oddly enough, many breakdowns are associated with damage to it - frayed, bent, crushed, burst / melted insulation, etc. First, we inspect the cord (disconnecting from the network), then we call for the integrity of the wires and for the breakdown of the insulation (each wire to the ground and to each other).
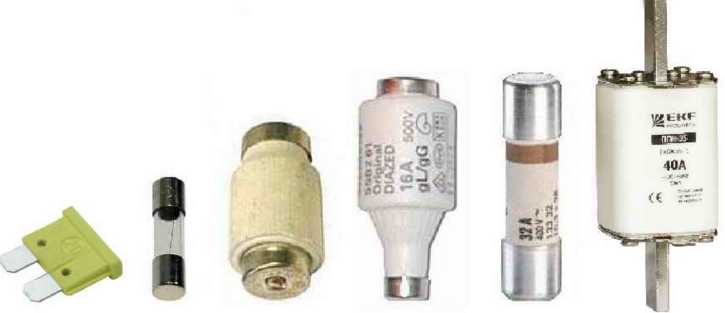
Next step - checking contact in the terminal block. A loose or oxidized contact can also cause the hob to not turn on. What to do in this case? Unscrew the contact, clean it from oxides, tighten it well again. If the stove still does not show signs of life, find fuse. It stands at the input, burns out during power surges - to protect more expensive parts from damage. It may look different, but most often it is a glass or ceramic tube with metal caps around the edges. Some types of fuses are shown in the photo below. There may be such options.
We found a fuse, then we take a multimeter and measure its resistance. It should be small. If the device shows an open (infinite resistance), the fuse is blown. Another way is to put the multimeter in continuity mode and touch the probes to both ends of the fuse. The device is silent - it burned out. We take out the blown fuse, replace it with a similar one. It is for a similar one - with the same parameters (indicated on the case). Putting a "bug" or with less sensitivity is not recommended - the next power surge, the breakdowns will be much more serious. Of the easy checks, one remained - to check is the food coming from the terminal block to the control box. Maybe the wiring is damaged or the contact is loose/loose somewhere. Do this again with a multimeter. We check the wires for integrity (you can - by dialing, you can - by measuring the resistance) and the presence of insulation breakdown (to the case and to each other). If all parameters are normal, you can turn on the power and carefully measure the voltage at the input of the control unit. The voltage is normal, but the hob still does not turn on - problems in the control unit. Further repair of the hob is associated with this unit. |


New
- Tonsillitis in adults - what is it, symptoms and treatment, causes, photos and first signs What is throat tonsillitis
- Diseases of the male genital area Chronic inflammatory diseases of the female genital area
- Signs of gastric and duodenal ulcers
- Prostate cancer of the fourth stage: the possibilities of modern medicine
- What is useful lemon water for weight loss, face, hair
- How to talk to a girl and not seem boring What is the best way to communicate with girls
- Foods rich in zinc
- Is the treadmill an indispensable exercise machine or just a complicated toy?
- Kievan Rus: education and history
- What vitamins are good for facial skin?


