Sections of the site
Editor's Choice:
- How to unlock ariston washing machine
- Pros and cons of LED lighting
- Pulse relay: device and connection
- How to calculate the illumination of a room with LED lamps?
- Plastic box - do-it-yourself aesthetic view of electrical wiring
- Electricity consumption of a warm floor: electric and film
- Installing a pump in a well: how to properly install pumping equipment
- Electrician Toolkit Overview
- How to choose a water heater: the most complete list of evaluation criteria
- 1 acoustics on the example of Sven SPS-860 and Realtek ALC889 codec
Advertising
| How to connect a three-gang switch |
|
Modern trends in lighting control systems are developing not only in the direction of comfortable operation and diverse design, but also in increasing the level of economy. One such method is the use of three-gang switches, which can control three groups of lights from a single access point. The advantages of using a single three-loop device are obvious. This is an aesthetic appearance, less labor-intensive laying of electrical cables to the connection point. Knocking out one technological niche in the wall to accommodate the mounting box instead of several. Such devices are used to illuminate rooms with a complex configuration, long corridors or control several rooms from one point: a bathroom, a bathroom and a hallway. Recently, I have often been asked by mail and in the comments and asked to advise on such a seemingly ordinary device. Therefore, today we will analyze in detail the topic of how to connect a three-gang switch. P.S. this example uses three-gang switch schneider electric. The three-gang switch is subjected to more intensive use than the rest of the electrical switching equipment. The reliability of the device design should provide an average service life of up to 10 years. Faults that occur during operation can be divided into two categories:
Any breakdowns that lead to a violation of the integrity of the device or its individual elements require the replacement of the entire product. Work on the repair or replacement of switches, as well as any other electrical equipment, must be carried out by a specialist with the appropriate level of clearance. The room where the repair work is carried out must be de-energized without fail. These switches can be purchased at any electrical supply store. , which is quite complicated at first glance, will also not present any particular problems after carefully reading the provided article. The design of the three-gang switchA large number of electrical equipment companies produce many models of switches. The devices have significant differences in external design and slightly smaller internal composition. However, the restrictions imposed by a typed electrical wiring network in apartments force the use of switches with a limited number of switching sections in the control mechanism. If it becomes possible to carry out a deep modernization of the electrical network, the use of triple switches will provide more flexible and economical control of lighting sources. Connecting a three-gang switch, in fact, is no different from connecting one and two-key. One of the supply cables is connected to the input of the switch, and the cables of the lighting devices are connected to the output contacts (to the corresponding contacts of the switching block). The differences are in the number of contacts of the switching groups - one, two or three. The photo shows the mounting part of the simplest, typical three-gang switch. The difference between the input contacts, to which the phase is supplied, and the output contacts, to which the cables leading to the lighting lamps are connected, are clearly visible. The neutral wires of each lamp are combined together and connected to the neutral wire in the box. Installation of the three-gang switch mechanism itself in the socket is carried out using a caliper, which is fastened with screws or with special spacer legs. After the switch mechanism is securely fixed, a decorative frame is installed on top, which is fastened with latches. Wiring diagram of a three-gang switchThe use of a triple switch is justified when there is a need to control a large number of lighting zones and / or multi-level lighting. This will make it possible not only to control the consumption of electricity, but also facilitate the technical implementation of design solutions in the room.
However, for the effective use of the device, proper execution and optimal wiring diagram for a three-gang switch.
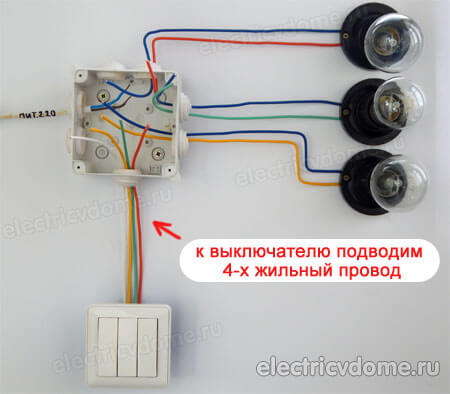
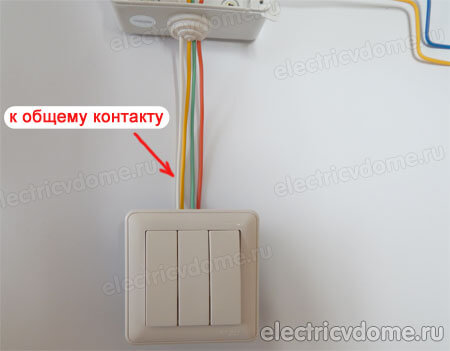
The power cable enters the junction box from the shield: blue wire zero, brown phase. The phase must be connected to a switch (in our case, to a common contact). A white wire is connected to the common contact of the switch (it can be seen in the photo), the other three that go from the box to the switch are wires connected to the "output" contacts (in the box they will be connected to the phase wires of the fixtures). The process of connecting the device will require the following set of tools: a flat and Phillips screwdriver, depending on the type of screws used in the mechanism, a stripper or side cutter - a tool for stripping insulation, can be replaced with an ordinary knife, wire cutters or pliers.
The algorithm for performing installation work may have the following items. At the installation site of the device, four wires must come out of the wall. It can be a four-wire cable. More often there is one single wire, which is the phase coming from the junction box, and a three-wire that goes to the lighting fixtures through the junction box.
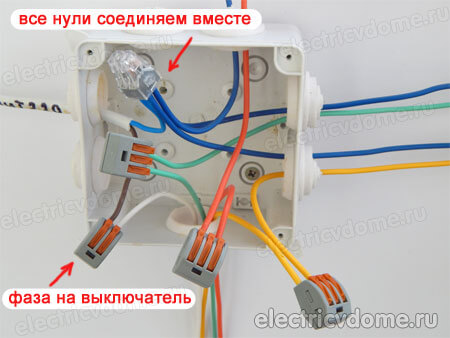
We collect the wires in the box. To connect the wires, I used wago self-clamping terminal blocks, they are very convenient and practical. If there are no such terminal blocks at hand, you can use ordinary twisting (it will be even better in terms of reliability).
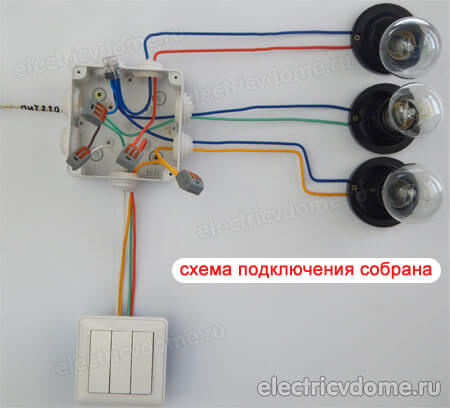
The connection diagram of the three-gang switch is assembled. I'll explain a little. We connect the zero of the supply wire with all the neutral wires of all fixtures (in our example, the neutral wires are blue). Then we connect the phase of the supply wire to the common contact of the switch (these are brown and white wires). There are three wires that "came" from the switch and three phase wires from each lamp. For clarity, I put together a scheme for color coding i.e. the red wire that "came" from the switch is connected to the red wire of the lamp, then the green wire that "came" from the switch is connected to the green wire of the lamp, etc. I want to remind you that the connection diagram of a three-gang switch should be assembled in such a way that a phase wire was connected to the switch input from the network. It is the phase, and not the neutral wire, that is connected to the input of any switch, where it will be interrupted. The neutral wires from the network are immediately connected directly to the neutral wires of the luminaire.
This connection method is regulated by the instructions Rules for Electrical Installations- PUE. If the wiring diagram is incorrect - if the phase is applied to the lamp, and zero is switched on through the switch, the network will still function, but deviation from the standard version is fraught with danger during operation. In this case, even when the switch is turned off, all electrical wiring will continue to be energized. When replacing light bulbs, a person will be at risk of electric shock. Damage or breakdown of the insulation, in the absence of the provided grounding of the lighting device, will lead to voltage in the device case. And, as a result, an electric shock at the slightest touch.
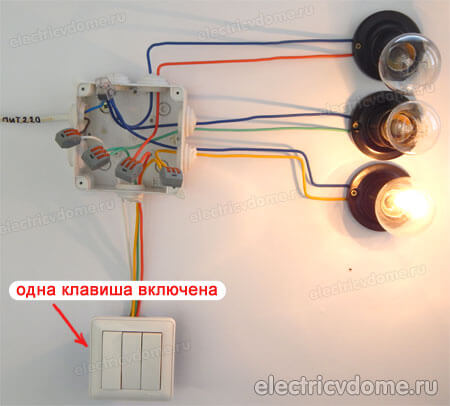
Let's try the scheme in action. Turn on one switch. One lamp lit up - everything is correct.
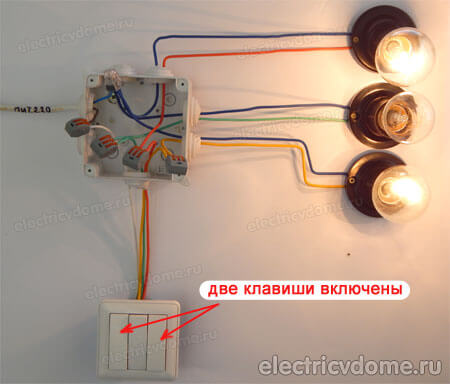
We turn on another switch key, another lamp lights up.
To determine where the phase and neutral wires are located in the junction box, you should first try to visually determine the belonging of the wires by marking. Then, using a tester or an indicator screwdriver, you will finally be convinced of this. Connecting wires to a three-gang switchThere are various models of triple switches: for external, internal installation or combined - in one housing with a socket. Before that, you need to get to the connection terminals. To gain access to the three-key switch mechanism, you must pull out the keys and remove the frame. This operation can be performed without the use of a special tool. First you need to remove the keys. The edge of the key is pressed with a finger against the wall in the off position, the other, protruding edge is picked up with a fingernail or a flat screwdriver and pulled towards itself. Basically, in new devices, the keys sit on the guides quite tightly, you do not need to apply excessive force to remove it, you can damage the front element and ruin the entire switch.
The switch frame is attached to the mechanism with a clamping insert, which is located in the middle. The fastening can be made in the form of guides that fit tightly into the mechanism or, as indicated in the photo, in the form of latches that should be pryed with a screwdriver. The method of fastening the wires in the mechanism is with clamping screws. Before inserting the stripped wires, make sure that the screws are not completely screwed into the slots. The three-key switch has four contacts for connecting wires: one for input and three for output. In the switch mechanism itself, a common terminal should be separated, to which the phase wire should be connected and the terminals from which voltage will be supplied to individual lighting sections. As a rule, these contact groups are divided into separate blocks and placed on the back of the device.
No more than 5-10 mm of insulation is removed on the wires so that no bare wire is visible from the contact hole. The clamping screws are tightened firmly, when checking for removal, the wire should not have any play. If for connection of a three-gang switch stranded wires are used, then in order for the wires not to break off when tightened with a screw clamp, it is necessary to put on special NShVI lugs on the stripped part of the wire. After completing the installation work, the circuit breaker is assembled in the reverse order. Related content on the site: |


New
- History in dates Three scenarios for Ukraine
- Michelson and Morley experience
- Division of labor, commodity production and market relations
- Division of labor in economic theory - abstract
- Who are the Great Russians and where do they live The formation of the Great Russian people of northeastern Rus'
- Acai berries - benefits, harms and contraindications
- Kirill Sarychev: oatmeal with protein, a press and weights for a powerlifter
- Plum seed oil (unrefined, organic)
- I am a big tea lover. I especially respect green
- Ivan-tea with the addition of mint The chemical composition of the plant


