Sections of the site
Editor's Choice:
- How to unlock ariston washing machine
- Pros and cons of LED lighting
- Pulse relay: device and connection
- How to calculate the illumination of a room with LED lamps?
- Plastic box - do-it-yourself aesthetic view of electrical wiring
- Electricity consumption of a warm floor: electric and film
- Installing a pump in a well: how to properly install pumping equipment
- Electrician Toolkit Overview
- How to choose a water heater: the most complete list of evaluation criteria
- 1 acoustics on the example of Sven SPS-860 and Realtek ALC889 codec
Advertising
| How to make a warm floor in a private house |
|
Underfloor heating is an ideal way to heat a private house. It is much more practical, environmentally friendly and economical than a standard radiator system, but it requires more effort during installation. The warm floor creates ideal convection in the house - the heated air from the entire surface of the floor rises up, without being drained from the radiators and without heating the walls and ceiling. And walking on a warm surface is very comfortable and pleasant - you will never freeze, and your baby will be able to safely play on the floor even in the harshest winter! Underfloor heating in a private house can be of two types:
As a rule, electric underfloor heating is rarely used in cottages due to its disadvantages: high power consumption, small heated area, high probability of its failure. Typically, such a system is used in apartments or small rooms: restroom, bathroom, hallway. The advantage of the electric floor is that it is very easy to install - just spread the sheets on a flat surface, lay linoleum or laminate on top, connect and use. Underfloor heating in a private house is the best solution! A water heated floor is much more difficult to install - it requires the creation of high-quality insulation, pouring the screed and connecting the collector. At the same time, it is designed for long-term operation (with proper installation, the system lasts more than 30 years), has low inertia (a well-heated floor holds heat well and does not require constant supply of new portions of hot water).
water floorUsing this system, you can eliminate pipes and radiators along the walls and under the ceiling. A water heated floor is the only way to equip “French windows” (from the floor). They can also save you a lot of money. The fact is that one circuit is allocated for each room - if you do not use any rooms, you can turn them off altogether or set the minimum value for the consumption of warm water. Methods for arranging a water systemThere are three ways to install the system:
Less often used laying on a wooden floor. Usually it is torn off, a screed is poured under it and then a system is created. But there are also less expensive options, when the insulation and pipes are located directly on the finished floor, and are poured from above with self-leveling mixtures or screed. The main disadvantage of this solution is a significant thickening of the flooring and a decrease in the usable volume of the floor.
Laying pipes in special shapes on a wooden floor Most often, the installation of a warm floor in a private house occurs on the ground. First, the top layer is removed, then a pillow of pure sand (up to 10 centimeters) is poured on it, it is compacted with crushed stone (7-10 cm of fine fraction), a waterproofing material is spread (roofing material or a special membrane). A rough screed is arranged on top, on which insulation and pipes are placed. If the house has concrete slabs or a screed is poured, then the process is greatly facilitated - you only have to level the base and repair any large cracks with a sand-cement mixture. Creation principleAfter you have prepared the base, you need to:
Filling pipes with cement-sand screed
The last step in installing a water-heated floor in a private house is laying the finish coat. It can be linoleum, laminate, parquet, carpet, ceramic tiles, etc. Little tricks
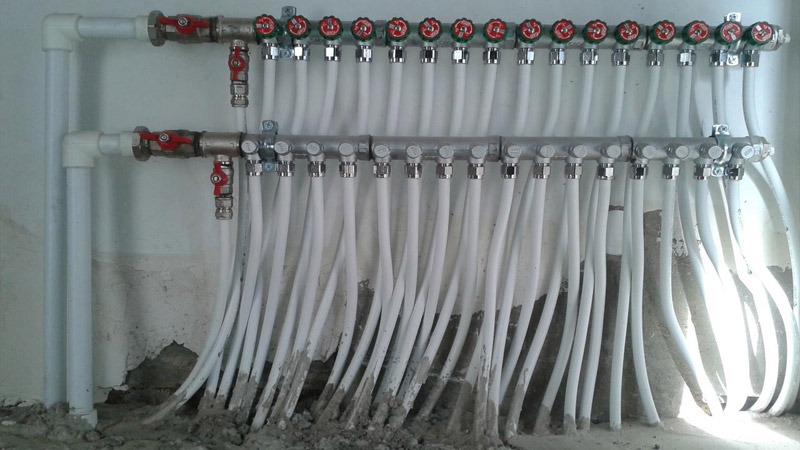
Collector - the junction of all pipes Manifold balancingWarm floors in a private house rarely have an equal length of contours in different rooms. To equalize the water pressure, collectors (combs) are used, which allow you to adjust the temperature in different branches. To adjust the temperature regime, you need to remove the protective caps and use the valves to equalize the pressure of the passing stream. If necessary, you can block some circuits altogether if you are not using the premises. |


New
- Tonsillitis in adults - what is it, symptoms and treatment, causes, photos and first signs What is throat tonsillitis
- Diseases of the male genital area Chronic inflammatory diseases of the female genital area
- Signs of gastric and duodenal ulcers
- Prostate cancer of the fourth stage: the possibilities of modern medicine
- What is useful lemon water for weight loss, face, hair
- How to talk to a girl and not seem boring What is the best way to communicate with girls
- Foods rich in zinc
- Is the treadmill an indispensable exercise machine or just a complicated toy?
- Kievan Rus: education and history
- What vitamins are good for facial skin?


