Sections of the site
Editor's Choice:
- How to unlock ariston washing machine
- Pros and cons of LED lighting
- Pulse relay: device and connection
- How to calculate the illumination of a room with LED lamps?
- Plastic box - do-it-yourself aesthetic view of electrical wiring
- Electricity consumption of a warm floor: electric and film
- Installing a pump in a well: how to properly install pumping equipment
- Electrician Toolkit Overview
- How to choose a water heater: the most complete list of evaluation criteria
- 1 acoustics on the example of Sven SPS-860 and Realtek ALC889 codec
Advertising
| How to make grounding in a private house |
|
If you are reading this article, then you probably already know why grounding is done in a private house. Important ReminderAnd for those who still doubt the expediency of such work, we recall. Grounding is designed to remove dangerous voltage from the housings of electrical appliances and other devices powered by the mains, and it also protects the latter from failure. Dangerous voltage (potential) may appear on the body of the electrical appliance as a result of damage to one of the wires (phase) and it is removed from the body through special wires to the ground. It is only about protective grounding. There is also a working ground, but it is used in industrial equipment. If you ignore the grounding installation, then there will be a high probability of electric shock to a person. For example, a washing machine poses a great danger in this regard, there were cases when, as a result of the lack of grounding, people were electrocuted by water draining after washing. It is not difficult to guess that the water received a dangerous potential from an ungrounded case, the dangerous voltage simply had nowhere to go. Why is grounding important?Firstly, it is the safety of the residents of the house, we have already mentioned this above. Secondly, if you are building a new house, whether you do it yourself or the contractor does all the work, everyone must adhere to special standards: SNiP (building codes and rules, GOST and PUE (electrical installation rules). According to these norms and rules, even during the construction of private houses, the so-called system TN-S(house electrical system with grounding). If this system is organized after the construction of the house, then it will be necessary to dismantle, for example, all two-wire wiring, and change it to a three-wire one, and this is very expensive. Of course, you can then make grounding to only one outlet, for example, to connect a washing machine. But it is better to do this immediately during construction and on all outlets. This is what the experts recommend. If an old private house was purchased, then, taking into account the peculiarities of the operation of modern electrical appliances, you will most likely also have to make a grounding system. Indeed, in old houses, starting from the Khrushchev era, the rate of electricity consumption per apartment did not exceed 1.3 kW, while there were safety plugs at 6A.
But in this case, it will be possible to deal with grounding yourself, and we will talk about this further. Let's talk about contourThe contour is a complex, but quite understandable design. It consists of external and internal devices, which in turn are divided into: 1. External devices: stakes-electrodes dug in at 2 meters, connected in the upper part to each other by plates. A grounding conductor departs from the electrodes, which is a round or flat steel. The ground conductor goes to the switchboard in the house and, as a rule, is connected to it through a copper wire.
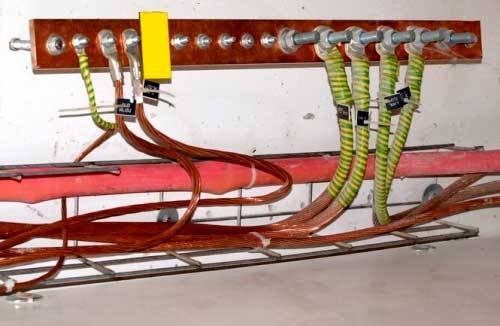
2. Internal devices: ground wires that come from sockets, and directly to the switchboard in which, using a special bus, the wires of the external and internal system are combined.
Now let's look at how to mount such grounding yourself in your home. Grounding schemesFirst you need to decide on the grounding scheme. In our case, two of them are applicable, these are closed (triangular) and linear. Closed Circuit. It consists of three pins driven into the ground located at the corners of an equilateral triangle (when viewed from above). The pins in the upper part are interconnected by horizontal ground electrodes, there are also three of them.
The advantage of this system is that if one of the horizontal grounding switches fails, the entire system will continue to work. Linear scheme. It consists of three grounding stakes that are driven into the ground on one line and connected to each other by two horizontal metal strips (ground electrodes).
Such a scheme, although simpler than the first, is less reliable, since if at least one horizontal jumper fails, the entire system stops working. Which scheme to use is up to you, but we recommend the triangle scheme, as it will last for decades. But that is not all. Grounding schemes can be improved. For example, it would not be a mistake to drive grounding stakes into the ground in the form of a rectangle or oval.
Or improve the linear circuit by adding a pair of stakes and a pair of horizontal ground electrodes. And also install a linear circuit with two or more groups of ground electrodes. Pictured in the center. Also, a lot will depend on the capabilities of the area where the grounding will be mounted, but more on that later. So which line should you choose?Let's first look at the conditions under which certain types of contours are used. Closed triangular contour:
Two groups of linear grounding:
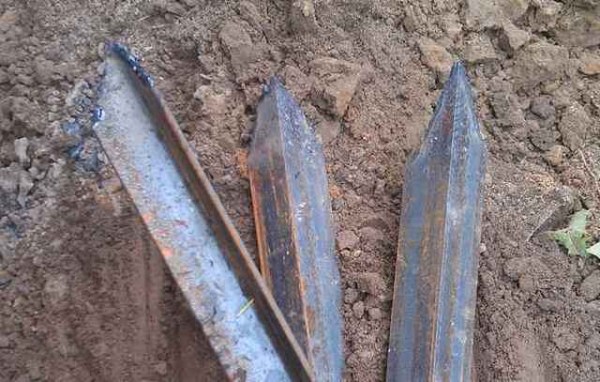
There are many other factors, so in this case it is best to consult a specialist, and do the work yourself. We prepare material and toolsWe will proceed from the fact that we are making a closed triangular grounding circuit, since it is the most popular. First, let's deal with the material, and based on what it will be, we will prepare the tool. So, from the material we will need: 1. For vertical ground stakes, you can use: a pipe with a wall thickness of at least 3.5 mm and a diameter of 30 mm, fittings with a diameter of 2-3 cm, a corner of 5x5 cm (preferably stainless steel). The length of any material must be at least 2 meters.
2. Metal strips with a section of 40x4 mm, at least 1.2 meters long. 3. The same as in item 2 metal strip, but preferably stainless steel. Its length will depend on the distance from the installation site of the grounding stakes to the place where it is brought into the house.
4. Copper wire for the phase conductor with a diameter of 6 mm. Cooking tool. We will definitely need:
Where to drive stakes? The place for driving the stakes should be not far from the blind area of the house, no more than one 1.2 meters.
First of all, it must be safe and not visited by people and animals. If you do not have unvisited places around the house, then this area should be fenced off. Work progressDigging trenches. The depth of the trenches should be 0.5 - 0.7 meters. Their top view should represent an isosceles triangle with sides 1.2 meters long.
To the place of the grounding plant in the house, if necessary, a trench with the same depth is also dug. We hammer stakes. We hammer stakes in the corners of the trench to a depth of 2 meters. We leave 20 - 30 cm for welding other structural elements.
Do not forget to sharpen the stakes, for example, if you have a corner, then this can be done with a grinder. During the driving of stakes from above, they can be watered with water, which will play the role of a kind of lubricant. Thus, the work will go faster, and the sledgehammer can be used easier. Welding. We weld horizontal steel strips to the stakes. Separately, we weld a metal plate going to the place where the grounding enters the house. Connecting to the ground bar. Using a copper wire with a diameter of 6 mm and bolts, we connect one end of the wire to the metal plate and the other to the bus.
How to check grounding?There are many ways to check for proper grounding. Professionals and experienced electricians do such a check using special devices, for example, the old but proven PKP-3.
Or use a more modern megger.
Check the resistance of the metal bond and the resistance of current spreading (check with a megger). Current spreading resistance should not exceed 4 ohms.
But what if you do not have such devices. There is a popular way to check the correctness of the grounding installation work, using a conventional lamp with a power of more than 100W. We screw the lamp into the holder with carrying. We connect one end of the carrier to the 220V phase, and the other end to the ground loop, or rather to one of the horizontal plates. If the lamp burns brightly, as if it is connected to an outlet, then the work has been done correctly. If it is not bright enough, then the welding work was most likely of poor quality, it is necessary to better weld the joints of the structure. If the lamp is off, then it is necessary to check the entire circuit for integrity, starting from the ground shield, somewhere a significant mistake was made. Summing upAs we can see, it is not so difficult to make grounding in a private house with your own hands, it will be enough to choose the right type of circuit for the house and prepare the necessary material and tools. For welding work for 1 hour, you can hire a specialist or ask a friend. For earthworks, too, a lot of mind is not needed. If you don’t understand how to bring all this into the house and connect it to the switchboard, then you can also hire an electrician. At least it will be much cheaper than giving all the work to some company that will rip you off in full. At the same time, they still do not guarantee complete electrical safety. THIS MAY BE INTERESTING: |
New
- Pros and cons of LED lighting
- Pulse relay: device and connection
- How to calculate the illumination of a room with LED lamps?
- Plastic box - do-it-yourself aesthetic view of electrical wiring
- Electricity consumption of a warm floor: electric and film
- Installing a pump in a well: how to properly install pumping equipment
- Electrician Toolkit Overview
- How to choose a water heater: the most complete list of evaluation criteria
- 1 acoustics on the example of Sven SPS-860 and Realtek ALC889 codec
- Grounding and zeroing: purpose, difference, features


