Sections of the site
Editor's Choice:
- How to unlock ariston washing machine
- Pros and cons of LED lighting
- Pulse relay: device and connection
- How to calculate the illumination of a room with LED lamps?
- Plastic box - do-it-yourself aesthetic view of electrical wiring
- Electricity consumption of a warm floor: electric and film
- Installing a pump in a well: how to properly install pumping equipment
- Electrician Toolkit Overview
- How to choose a water heater: the most complete list of evaluation criteria
- 1 acoustics on the example of Sven SPS-860 and Realtek ALC889 codec
Advertising
| How to install a bathroom fan |
|
To get rid of excessive humidity, fungus and mold, as well as to create good air circulation, it is customary to equip the bathroom with forced ventilation by installing hoods in the ventilation pipe. It's best to do this when you're renovating your home or bathroom, because it's a good idea to have a fan installed in your bathroom. This does not require a lot of costs from the developer, and it will not be superfluous. The need for forced ventilationForced ventilation in the bathroom should be done if the conventional ventilation system is not effective. Misted mirrors, condensation on the walls, and constant dampness are sure signs of a faulty ventilation system. In a bathroom without a fan, an unpleasant odor and pathogenic microbes appear - mold and fungus, which have a negative impact on human life and health, reduce the life of the shower cabin and washing machine, and also lead to the destruction of the joints between the tiles. If you encounter these problems, first of all you need to check the ventilation duct for serviceability. It is very easy to check it: bring a lit match to the air exchanger grate. If the flame reaches the grate or goes out, then everything is in order with the ventilation duct, it does an excellent job with this area of \u200b\u200bthe bathroom, and additional ventilation is not required.
And when the match does not go out, the flame reacts weakly to draft, not swaying at all, then it's time to clean the air ducts and install an exhaust fan. To clean out, lower a cone-shaped weight into the ventilation duct on the roof. In the absence of traction "in the old fashioned way" you can make a gap under the door - cut a piece of the door to the bathroom a couple of centimeters. This "advice" does not stand up to scrutiny. It does not always help, secondly, it should be remembered that it is the 21st century on the street, that many owners have expensive doors installed, with a design that involves tightly closing them. What does not even the most expensive door look like after this kind of “modernization”? It might be better to think about how to install a fan in the bathroom. Hood installation requirementsIn order for the bathroom fan to do its job efficiently, take care of a few conditions:
Preparatory workIndependent connection of the fan in the bathroom is not at all difficult, but useful, since the hood is necessary for every room of this nature. Choose a moisture-proof fan for the bathroom with a hydrostat that controls the humidity in the room. Such a fan turns on automatically when the humidity in the bathroom rises above the set value. Self-installation of an exhaust fan in the bathroom involves laying a cable, expanding the ventilation duct if necessary, connecting the hood to electricity and direct installation into the ventilation duct, sealing the voids with mounting foam, puttying if desired after the formation of the foam. The process is not complicated, and you can cope with this on your own without the involvement of specialists.
To increase the efficiency of ventilation, it is necessary that on one side of the bathroom there is an air inlet (supply ventilation), and on the other - an air outlet (exhaust ventilation). But too close the location of the exit and entrance reduces the ventilation of the room. To bring fresh air into the bathroom, install a grate at the bottom of the door. It can be purchased at a hardware store and installed independently on any door, or you can purchase a bathroom door with a grate already installed. Connecting the fan to the power supplyHow convenient an exhaust fan will be in use depends on its technical and functional capabilities, as well as on the method of switching it on. When choosing a specific scheme for connecting a fan in the bathroom, you need to weigh the pros and cons, if possible, because it is not always advisable to redo an unsuccessful option. Cord useThere are several options for connecting domestic bathroom exhaust fans to electrical power. Many hoods are equipped with a switch in their housing. As a rule, this is the cord that comes out of the case. By pulling it, the device is turned on or off.
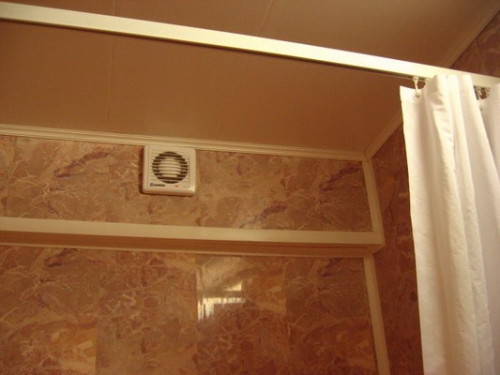
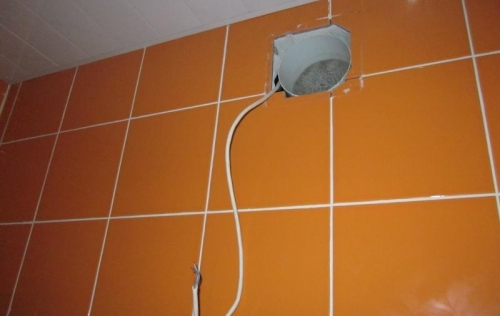
However, such models are not always convenient, because fans are often installed under the ceiling or in another hard-to-reach place - above the bathroom or toilet. If the repair work in the bathroom has not yet been completed, then this type of turning on the hood seems to be the most profitable, you can additionally install a switch instead of a cord in a convenient place, laying a separate electrical wire from the fan to it and hiding it under further lining. With light sourcesThe fan can be switched on simultaneously with the light sources. When you enter the bathroom and turn on the light, the hood also turns on, and accordingly, when you turn it off, it turns off, that is, there is one switch for two. However, if the “timer” function is not provided in the fan, it simply may not have time to completely update the air before you leave the room. In addition, if you go to the bathroom at night, you will wake up everyone in the household with annoying noise from the fan. Two-gang switchIf there is no dampness in the bathroom and the forced ventilation system is needed only when taking a shower or bath, you can connect the fan to a separate switch just before entering the room. Install a two-key switch at the entrance: one key will be responsible for the lighting, and the second for the exhaust fan. Self-activationIn this case, you yourself will be able to turn on the fan and turn it off as needed by pulling the string or pressing the button. Automatic shutdown additionally provides for the installation of a motion or humidity sensor. The exhaust fan in the bathroom starts to work at the set humidity level or in response to the movement of people, and turns off after a certain time on the timer. This technique is quite convenient, but not available to everyone, so it is used extremely rarely. WiringWhen installing a fan in the bathroom and connecting it to the power supply, all safety standards must be observed. Before starting work, you should make sure that the electrician in the network is turned off. When connecting wire contacts, it is recommended to use not “twisting”, but special terminal blocks, which provide a more reliable contact. Connect copper wiring to the installation site of the exhaust fan. When redecorating a bathroom without replacing tiles, the wiring must be run over the tiles. In order to maximize the masking of the cable, it can be sent to a special plastic box. You can start mounting the fan after connecting the device to the mains. Site preparation for the fanThe most convenient place to install an exhaust fan in the bathroom is the outlet of the room, which leads to a common shaft. A similar technological hole is present in almost all apartments to create natural ventilation. A standard ventilation duct is capable of providing air passage, which is blown by a fan with a capacity of not more than 100 cubic meters per hour. To install the hood in the opening of the ventilation duct, it must be selected taking into account the diameter of the channel for a tight fit of the device. The diameter of such a hole, as a rule, is 100, 150 or 125 millimeters.
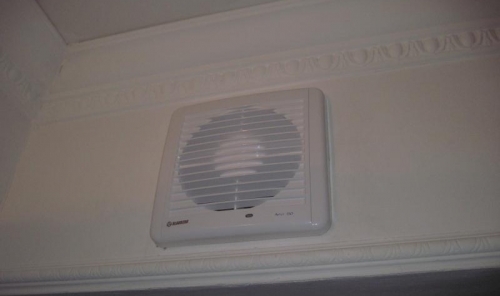
If the diameter of the ventilation duct is smaller than the diameter of the exhaust fan, then you can easily fix it, you just need to expand the hole with a puncher. If it turned out to be of a larger diameter than that of the fan, select a plastic pipe or corrugation for the diameter of the hood and insert it into the hole. After that, seal the voids around the pipe with foam. After setting, cut off excess foam with a sharp knife and putty if necessary. Puttying is necessary only in the situation when the size of the hole exceeds the size of the ventilation grille. If the bathroom in your home is too large, then you are advised to buy a more powerful exhaust fan. In this case, to install such a device, it is necessary to punch an additional ventilation duct in the wall. Such a procedure can only be trusted by qualified specialists. Installing a fan in the bathroomBefore connecting the fan to the bathroom, it is worth checking the presence of an insert-instruction in the kit, which describes in detail the installation and operation of the device in Russian. Goods that come without such instructions may turn out to be of poor quality or brought into the country illegally, and this provokes many problems with their maintenance and repair. Installation of the hood in the bathroom will take you no more than 15 minutes. Remove the front cover of the machine. Apply silicone or a special polymer adhesive to the place where the device adjoins the wall. Plastic fans are very light, so this fixing technique will be enough. Next, insert the fan into the pipe, corrugation, or directly into the hole, press firmly against the wall for a couple of minutes and attach the front cover to the self-tapping screws, they often come with the fan. To prevent various insects from entering your house through the gap of the hood, install a mosquito net on the fan before attaching the cover. Now you know how to install a fan in the bathroom. Exhaust fans designed for bathrooms have many advantages, however, one rather big drawback is known in practice - high noise characteristics. There are only a few ways to muffle the device: you can trim the ventilation duct with special sound-absorbing material or install a silencer directly behind the fan. |


New
- Tonsillitis in adults - what is it, symptoms and treatment, causes, photos and first signs What is throat tonsillitis
- Diseases of the male genital area Chronic inflammatory diseases of the female genital area
- Signs of gastric and duodenal ulcers
- Prostate cancer of the fourth stage: the possibilities of modern medicine
- What is useful lemon water for weight loss, face, hair
- How to talk to a girl and not seem boring What is the best way to communicate with girls
- Foods rich in zinc
- Is the treadmill an indispensable exercise machine or just a complicated toy?
- Kievan Rus: education and history
- What vitamins are good for facial skin?


