Sections of the site
Editor's Choice:
- How to unlock ariston washing machine
- Pros and cons of LED lighting
- Pulse relay: device and connection
- How to calculate the illumination of a room with LED lamps?
- Plastic box - do-it-yourself aesthetic view of electrical wiring
- Electricity consumption of a warm floor: electric and film
- Installing a pump in a well: how to properly install pumping equipment
- Electrician Toolkit Overview
- How to choose a water heater: the most complete list of evaluation criteria
- 1 acoustics on the example of Sven SPS-860 and Realtek ALC889 codec
Advertising
| We connect the three-gang switch correctly: diagrams, photos, tips |
|
At first glance, connecting a three-gang switch can cause difficulties and misunderstanding for a person who does not deal with electricity every day. In fact, there is nothing complicated in this. If you have ever installed a switch, you know that in a single one there is only one output terminal, and in a double one there are two. So, the three-key switch differs only in that it has as many as three output terminals.
This saves a lot of space on the wall, especially when such a switch is connected to a socket in the housing. Agree, it is very convenient to turn on / off the light from one place in different corners (in the toilet, corridor and bathroom) or adjust the brightness of the light with several bulbs, different lamps or lighting zones in one room / room. Which, by the way, will help save electricity by 20-30%. How to connect a triple switch correctlyBefore connecting the three-gang switch, be sure to de-energize the network by turning off the machines near the meter. If there is a public access to the switches, hang a note on it about the installation work. For work you will need:
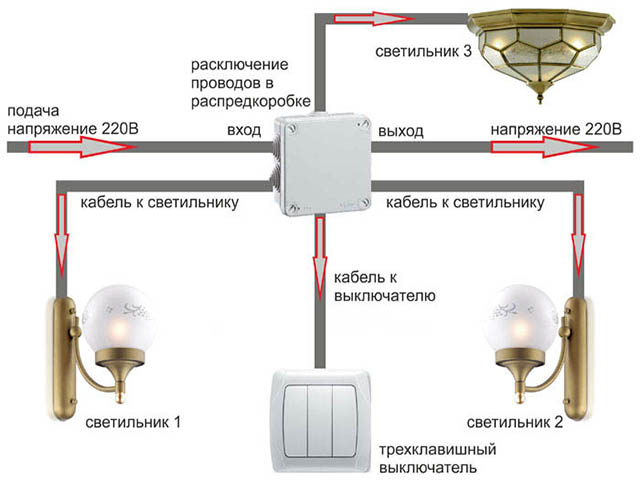
First you need to disassemble the three-pin switch to get to its terminals. This is done easily: pry the keys themselves with something thin, and then remove the frame. Now let's take a closer look at connecting a triple switch. There should be four wires going to it. It can be a four-core cable at once, one core of which will be a phase. Although more common is the exit from the wall of a single-core wire - a phase - and a three-core one nearby - for lighting devices. You can determine the phase using an indicator screwdriver.
Connection is done in just three steps:
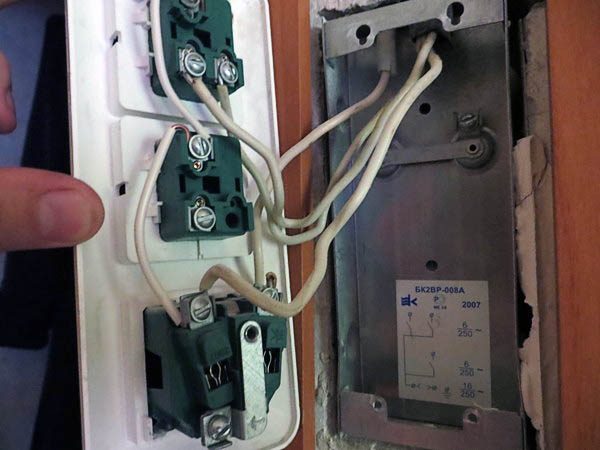
The wires in the switch are fastened with clamping screws. No more than 5-10 mm of insulation is removed from the cable so that there are no bare wires. If the wire is stranded, use special NShVI lugs so that it does not break off when the screws are tightened. That's all. As a result, our three-gang switch connection diagram is assembled. It remains to mount it in the socket, unfasten it with screws and install the lining with the keys in place. By the way, the version of the multipole switch with a socket has almost the same circuit. The only difference is that a separate neutral wire is connected to the outlet, and the phase is common. It can be connected either by parallel cables (separately to the socket and separately to the switch), or by one cable (by a jumper from the socket outlet to the common contact of the switch). The figure below shows the diagram of the second connection. 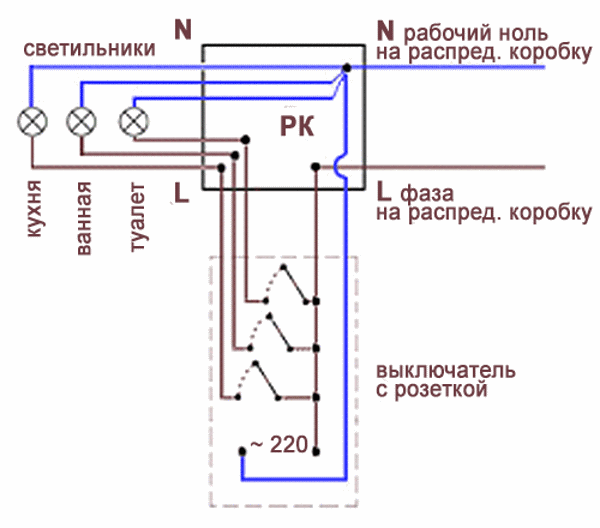
Some rules:
These are not all models of triple switches that can be found in electrical stores. There are decorative (colored, cherry, wood, etc.), waterproof, child-resistant, USB output, LED backlit and many other options. |

New
- I am a big tea lover. I especially respect green
- Ivan-tea with the addition of mint The chemical composition of the plant
- What is useful wheat porridge for the body
- Recipe: Soy Schnitzel - An excellent and tasty substitute for meat during Lent
- How to make ginger tea
- Coconut manna: benefits and harms, recipes with organic product Coconut paste how to use
- "Healthy" vegetable oils - a possible cause of obesity
- Adnexitis: causes, symptoms and treatment of the disease
- Herpes during pregnancy. Types, symptoms, treatment. Treatment of herpes during pregnancy Ointment for herpes during pregnancy
- What is pink catharanthus and how to care for it?


