Sections of the site
Editor's Choice:
- How to unlock ariston washing machine
- Pros and cons of LED lighting
- Pulse relay: device and connection
- How to calculate the illumination of a room with LED lamps?
- Plastic box - do-it-yourself aesthetic view of electrical wiring
- Electricity consumption of a warm floor: electric and film
- Installing a pump in a well: how to properly install pumping equipment
- Electrician Toolkit Overview
- How to choose a water heater: the most complete list of evaluation criteria
- 1 acoustics on the example of Sven SPS-860 and Realtek ALC889 codec
Advertising
| Serial and parallel connection of sockets: loop and star |
|
Any work related to the design and installation of electricity requires a professional solution to the issue. And the installation of outlets is no exception. Power cables are allowed to be carried out in an in-house shield using one of two mounting methods. What connection options can be used, how to connect sockets in parallel and in series, we will consider in the article. Today, sockets are connected in two ways: in the first, a separate electrical wiring line is equipped for each point, in the second, several points are connected to one source at once. The choice of method depends on the type of sockets: whether single-phase sockets are used, equipped with grounding or without it, or three-phase devices are installed to power devices that operate on a 380-volt network. Image Gallery
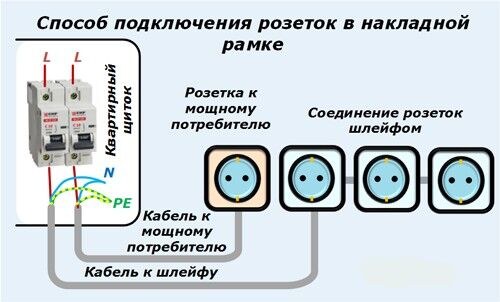
Sockets with separate lines are the only right option for servicing powerful household appliances such as a washing machine or electric stove Daisy-chaining is chosen if it is necessary to power electrical outlets of the same group. These groups are formed in accordance with the location of appliances around the house. The method involves the connection of all elements to a common power line of electrical wiring. In order to nullify the risk of disabling several points at once, the masters recommend including no more than two or three outlets in one system. This point is clearly spelled out in SP 31-110-2003: it is allowed to connect up to three additional electrical receivers with a loop.
A significant "minus" of such a scheme is that if one of the cores is accidentally damaged at the point of contact, all the elements following it stop working. The only condition is that the total current load does not exceed twice the value of the operating rated current of the first (head) power receiver. But, in any case, the circuit created in this way is designed for a load whose total indicator does not exceed 16A. If the operating conditions are not observed, there is a high probability of creating emergency situations. When connecting sockets, it is not at all necessary to use a clean type of wiring. With the right approach, they can be combined, for example, to bring the power cable to the junction box. And after it, send one cable in the form of a loop, and bring the other separately to the power point of powerful equipment in the house. The number of power lines laid from the shield depends on how many wiring routes are supposed to be laid.
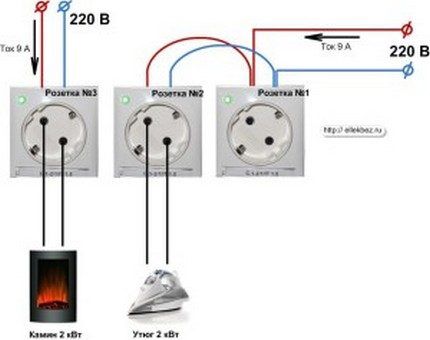
To connect an electric fireplace with a power of 2 kW, it is worth providing a separate independent outlet, while the iron can be safely powered from points connected by a daisy chain. Regardless of the type of method chosen, wiring can be done in one of two ways:
The open version is more convenient and easier with respect to not only installation, but also maintenance and control. But regarding the aesthetic aspect, an open wire is not always appropriate. And besides, the open installation method “eats up” part of the usable area: it is impossible to hang a shelf on top of the cable or move furniture close to the wall.
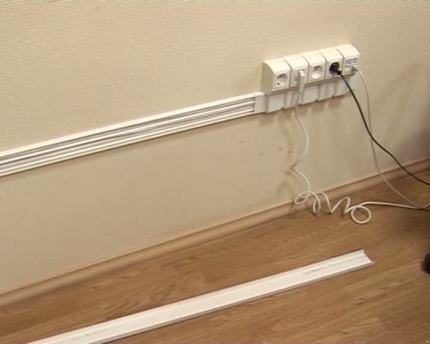
With an open installation method, cable channels or plastic skirting boards are used to protect the PE conductor from mechanical damage and make it more presentable. The inner space of most cable channels has partitions between which it is convenient to place wires. Control over the state of the track is carried out through the upper removable part. The closed wiring option is convenient in that it eliminates the possibility of accidental damage to the cable, while making it invisible to others.
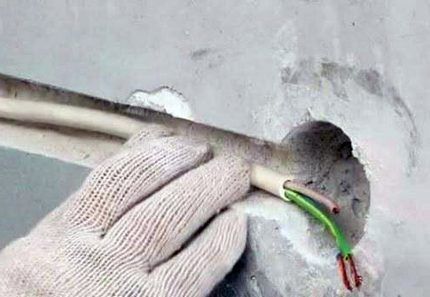
In order to minimize the need to "unravel" the walls to create a strobe, closed wiring is performed at the stage of construction or repair work until the finishing is completed. But the “invisibility” of closed wiring can also play a cruel joke when trying to “hammer in a nail”. Therefore, there is an unspoken rule: lay the wires relative to the sockets strictly vertically or horizontally. Peculiarities of daisy chain installationAs already noted, the daisy chain method is used to connect sockets that are in the same group, which power low-power devices such as a computer, audio equipment ... This type of connection is more cost-effective and technically simpler. After all, for its implementation there is no need to lay a lot of cables and use additional protection. But it is worth noting that each additional point of the created chain will make it more vulnerable. For example, we know that the rated current per outlet should not exceed 16A. If you connect such a load to one point, then nothing terrible will happen. But when such a load is turned on for at least 2-3 sockets of one line, its total readings will increase, as a result - the supply cable may not withstand.
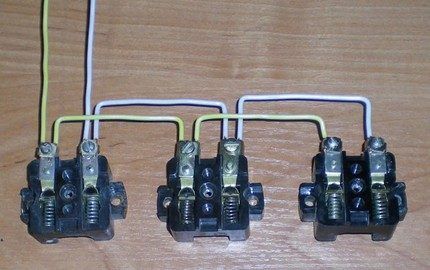
The key condition for a daisy chain connection is that the cross section of the jumper conductors will correspond to the conductors of the main supply line. According to the PUE, with a daisy chain connection, it is not allowed to break the PE conductor of the protective ground wire. Its contour in any case should remain inextricable. The use of one of the technical solutions helps to reduce material costs when connecting a PE conductor to sockets: Using special connectorsThis type of connection is chosen if it is necessary to connect sockets that are located almost close to each other. With a daisy chain connection, the main contact wire, connected from the power shield, goes to the seat of the socket box. From it, he feeds the first outlet, from which, through its own contacts, power goes to the second outlet, from the second to the third.
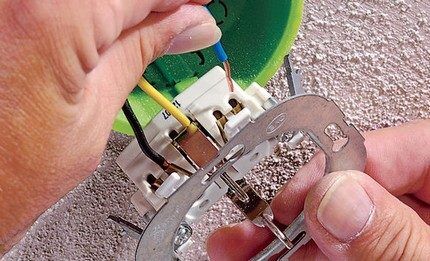
All conductor cores: blue for zero "zero", red-brown for "phase" and yellow-green for "ground" - are connected in parallel When mounting with a loop, the incoming and outgoing cables are connected directly on the contact part of the device. For this reason, masters recommend using models equipped with a flat spring contact. In extreme cases, samples are suitable, the contacts of which are made in the form of a plate pressed by a bolt. Devices in which an ordinary bolt plays the role of a contact are not at all suitable for this purpose. One of the mandatory operational requirements when connecting sockets with a loop is the need to reduce the contact resistance in the circuit between the contact terminals of the socket and the contacts of the electrical plug. To achieve the desired effect, the terminals are given shapes that allow you to increase the area of \u200b\u200bthe contacts themselves, as well as the force of their compression. Today, Scotchlok type connectors are often used to mount a protective zero. This type of clip-on connector is equipped with mortise contacts.
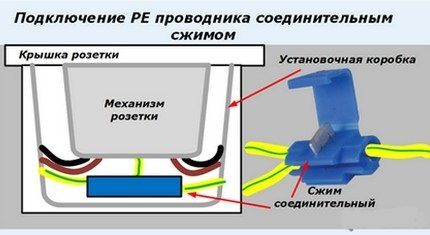
To create a branch, the clip-on connector is mounted inside the installation box, placed between the bottom of the device and the socket mechanism To use a clip connector, you should choose products that provide additional space for its placement. Through the contact of the first socket, the phase wire of the supply cable and the PE conductor of the loop that goes further to the second socket are connected. On the second contact - neutral wires of the supply cable and a cable to the second outlet. By the same principle, they connect to the third and subsequent outlet, if its presence was provided for by the power wiring diagram. According to the PUE, clause 1.7.144, in order to connect the open conductive part of the device to a neutral or ground conductor, it is necessary to make a branch in the cavity of the housings of electrical installation products intended for this purpose. These include sockets. The main task when connecting sockets equipped with grounding is to ensure a reliable connection of the elements throughout the entire line. After all, if the ground contact for some reason burns out in the main power outlet, all other participants in the circuit will lose their protective zero. Therefore, if necessary, a branch of the grounding conductor is used the most reliable type of connection - crimping.
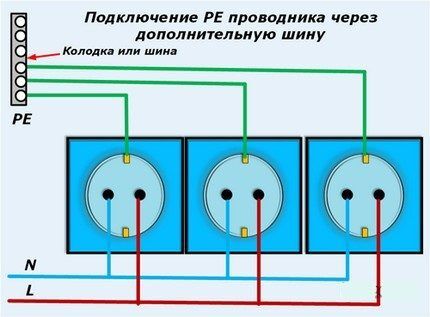
To perform crimping, the cleaned ends of the wires are inserted into the cavity of a special metal sleeve and crimped using manual press tongs The method involves, in addition to the use of conventional twisting of wires, additional insulation and crimping of their ends with a sleeve. This ensures uninterrupted contact of the chain elements and its high mechanical strength. Installing an optional junction boxThis method involves the installation of sockets connected to the shield of a branch box or a connecting block next to the cable. In this case, the cable branches in the junction box in the area before being led to the socket.
The use of an additional junction box for PE conductors also allows you to connect the grounding contacts in parallel when wiring sockets with a loop The connections inside the junction box leading to each outlet are most often made by welding. It is recommended to lay the insulated ends of all conductors in junction boxes so that they do not intersect and do not touch each other.
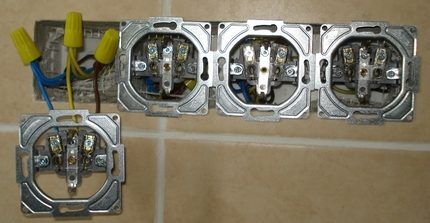
When planning to make new connections from the junction box in the future, at the installation stage it is worth leaving a supply of a cable 15-20 cm long In both cases, when the phase and zero wires are connected to the sockets, a loop is formed, and a branch is formed from the PE conductor. Therefore, when looping sockets, it is important to observe the polarity of the contacts: remove the zero from the terminal with a zero conductor. Do the same with the phase wire. Taking into account the number of working electrical appliances, the number of sockets in the room can reach 10 pieces. Using tees and extension cords is not always convenient, and besides, it is dangerous. In this case, the problem is solved by installing socket blocks instead of a single outlet. The design of the socket block, which includes up to four separate elements, is connected in the same way as a single socket.
The main difference between the overhead frame and the socket block is that each element in it is assembled into a serial loop from one to the other. When connecting the blocks, the cores of the conductors are connected by any of the methods described. Bare areas are insulated with a heat-shrinkable tube or wrapped with insulating tape. Parallel connection specificsA feature of the parallel circuit for connecting sockets, otherwise called a "star", is a separate connection to the shield of each outlet. The third well-founded name is “boxless”, because. suggests the possibility of abandoning the junction box. The method is actively practiced in European countries, and in our country it is used to provide a separate line of powerful consumers, most often in combination with loop technology. Image Gallery
A parallel circuit is also used to connect three-phase power outlets that will power powerful electrical appliances. In this case, the cross section of the conductors supplying such consumers should be at least 2.5 square meters. mm. For greater reliability, they should have a small current margin. This will make it possible to compensate for the actual deviation from the diameter indicated by the manufacturer from their nominal value, which is often the “sin” of products presented on the modern market. In addition, such a solution will ensure the possibility of equipment operation in overload mode. This method of installation is beneficial in that the performance of each individual point does not affect the functioning of the other participants in the chain. For household appliances, such a scheme is considered the most stable and safe.
The parallel method of connecting sockets ensures the independence of each power point: no matter how many sockets are present in the circuit, the voltage will remain uniform The connection of a three-phase socket equipped with grounding is carried out using a separate four-wire wiring. The cable, which includes three phases, ground and zero, goes directly from the shield. The purpose of the wire is easiest to determine by the color of the insulation:
Grounding is essentially a protective zero. In order for it to remain so, it is necessary to ensure its reliable and permanent connection throughout the entire line. To connect the wires and connect to the outlet, first shorten their ends. The use of side cutters will allow you to do the job as accurately as possible. The end of each wire is stripped of 15-20 mm from external insulation with a sharp knife. The wires are connected in the following sequence:
To obtain a more reliable assembly, some craftsmen roll the bare ends of the strands into a loop or ring so that their diameter matches the size of the legs of the screws. After that, each screw is unscrewed in turn, its base is wrapped with a wire ring and tightly tightened.
The scheme is used not only for powering separately located sockets, but also for connecting blocks that include two or more points When connecting socket blocks, all the advantages of the circuit are preserved. The only thing is that the connection process takes a little more time and effort. Increased costs are not an argument for those for whom safety is a priority. If you look at the situation more globally, then sometimes it is better to immediately invest more money and effort by equipping an autonomous power line for the outlet. Then you don’t have to think every time whether it is possible to use the point to connect this or that electrical appliance. Video instructions for electrical installationVideo tutorial on the application of the loop method: Video: one of the safe options for connecting sockets: Provided that the amount of electricity spent on household needs only increases every year, and therefore the requirements for the reliability of sockets will certainly increase, a parallel wiring scheme should still be preferred. Especially when it comes to serious energy consumers. To power lamps, electric alarm clocks and similar devices, a cable connection option is suitable. |
New
- Tonsillitis in adults - what is it, symptoms and treatment, causes, photos and first signs What is throat tonsillitis
- Diseases of the male genital area Chronic inflammatory diseases of the female genital area
- Signs of gastric and duodenal ulcers
- Prostate cancer of the fourth stage: the possibilities of modern medicine
- What is useful lemon water for weight loss, face, hair
- How to talk to a girl and not seem boring What is the best way to communicate with girls
- Foods rich in zinc
- Is the treadmill an indispensable exercise machine or just a complex toy?
- Kievan Rus: education and history
- What vitamins are good for facial skin?


