Sections of the site
Editor's Choice:
- How to unlock ariston washing machine
- Pros and cons of LED lighting
- Pulse relay: device and connection
- How to calculate the illumination of a room with LED lamps?
- Plastic box - do-it-yourself aesthetic view of electrical wiring
- Electricity consumption of a warm floor: electric and film
- Installing a pump in a well: how to properly install pumping equipment
- Electrician Toolkit Overview
- How to choose a water heater: the most complete list of evaluation criteria
- 1 acoustics on the example of Sven SPS-860 and Realtek ALC889 codec
Advertising
| We consider various schemes for connecting a water heater |
|
In most cases, water heaters are installed in bathrooms, in the kitchen or in the toilet, as well as next to other plumbing points. The water heater connection diagram itself is not difficult, the main thing is to clearly follow the instructions below. The connection procedure consists of several stages: preparation, installation of the boiler, connection to the water supply and electrical network. Let's take a closer look at each of the stages. Preparatory activitiesBefore starting work, you should determine how high the bearing capacity of the wall on which the installation is planned. We need to find out if it can withstand the weight - and considerable - of the heater. If there is a suspicion that it will not withstand, then you can design a small stand to support it, or install additional brackets for the device. Important information! Due to the fact that the speed of temperature adjustment in our case does not play a special role, the boiler can be installed in any convenient place. Otherwise, the installation procedure is not difficult: holes are drilled, dowels are clogged, a boiler is hung up. But to do everything right, you need to prepare the necessary equipment and supplies. Let's get acquainted with the list.
Now let's move on to the installation. As we found out, the boiler will be hung on the wall, and as close as possible to the tap: the fact is that when moving, the temperature of the working fluid decreases somewhat. Important information! The installation height depends solely on how convenient the operation will be. The user must set the required modes without any difficulty.
The installation procedure should be as follows. Step one. We decide on the place of installation (this must be done immediately after purchasing the device). It is important that this place meets a number of requirements:
step two. Without exception, all storage boilers (namely, these are installed in most cases) have a fairly powerful heating element, because the liquid, obviously, needs to be heated quickly. For this reason, the water heater connection diagram implies a number of peculiar requirements for laying wires (their diameter depends on the recommendations of a particular manufacturer, although on average it is from 0.4 to 0.6 cm). In addition, it is desirable to find out the capabilities of the meter, the maximum current strength with which it can function normally (if this figure is below forty amperes, then such a meter must be dismantled and replaced with a new one). To install the heater, you will also need a switch rated for the required number of amperes, and a 3x6 or 3x8 wire.
Step Three. It's time for the actual installation. First, take a marker and draw a line on the wall, which will be the lowest point of our water heater. Next, we measure the distance of the mounting plate, located in the upper part of the case, from this line. After that, at both points marked on the wall, we drill holes. Important information! There are no holes on the bar itself, since it will cling to hook-type anchors built into the surface. If the walls are made of concrete, then we “charge” the puncher with a drill made of Pobedit, but if the wall is ordinary, wooden, then an ordinary drill for wood is also suitable (its diameter should exceed that of the dowels). We hammer dowels there, if necessary, use a hammer. We screw iron anchors into the dowels - a kind of hooks with which the water heater will be hung. We twist the anchors to the stop (as a rule, it is about 10-12 centimeters). We cling to the boiler on the anchors by means of the mounting plate.
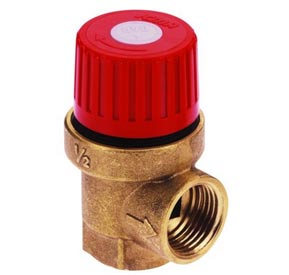
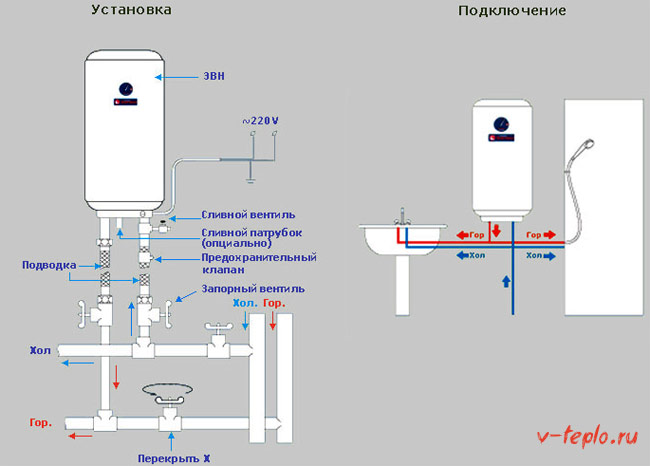
Boiler safety valve Earlier we talked about how to properly install a safety valve for a boiler, connection diagrams and prices. In addition to this article, we advise you to read this information In principle, this completes the installation of the heater. As you can see, there was nothing super complicated about it. Video - Installation of a water heaterStage two. Connection to the water supply systemTo connect, we take elastic hoses, but instead of them, you can use both PP and metal-plastic pipes. Any boiler has a pair of connectors to which pipes can be connected:
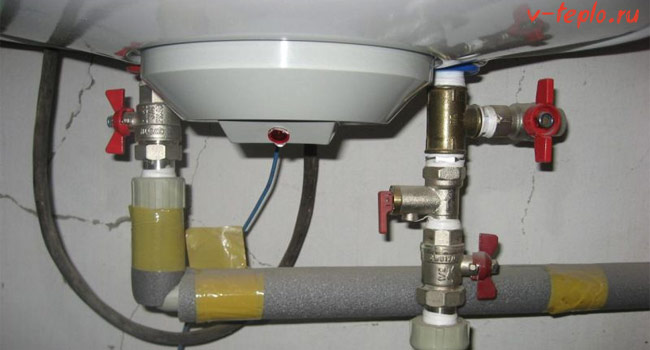
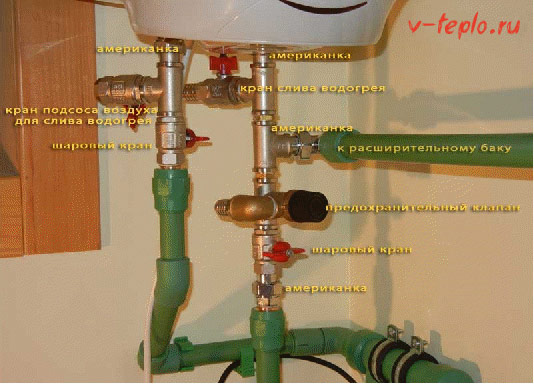
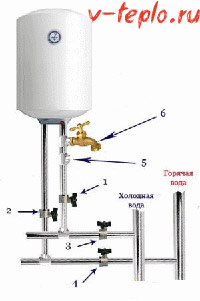
These connectors can be seen in the water heater wiring diagram below.
In places where hot and cold water is indicated, there should be house risers (if we are talking about a city apartment). The numbers 1 and 2 indicate the taps that shut off and resume the supply of water to the storage tank and back from the boiler. With a functioning device, all taps must be open, and with a non-functioning device, respectively, closed. The numbers 3 and 4 indicate the water supply taps going into the room. They are necessary in order to, if necessary, stop the water supply. And, finally, 5 is a check valve that protects the heating element from overheating (if the water supply is turned off, the boiler tank will not heat up in vain, and the heating element, therefore, will not burn out). Important information! To understand the essence of the process, let's briefly consider how the water heater itself works. The water in it is supplied from below, and if for one reason or another the water supply is interrupted, then all of it will pour into an empty pipe. At the same time, the heating elements will warm up the air and will soon burn out. And a check valve is needed in order to prevent an emergency. Such a device should be included in the kit of any good boiler, special attention should be paid to this. The number 6 indicates the tap that empties the storage tank. With the help of such a tap it will be possible to drain the water from the device during dismantling. Indeed, in the tank - depending on its capacity - there can be up to 150 liters. Now let's start the workflow. Step one. We install the safety valve that comes with the kit where cold water will flow into the device. The joint in this case must be wrapped in advance with a sealant. step two. We fasten the hose to the fuse located at the bottom of the tap. There is no need to use a sealant here, since the nut is already equipped with a rubber gasket that plays a similar role. Step Three. We also fasten the other end of the hose to the pipe intended for hot water supply. Traditionally, we refuse to use a sealant.
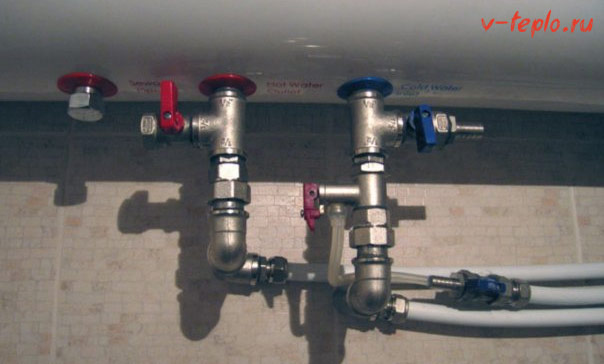
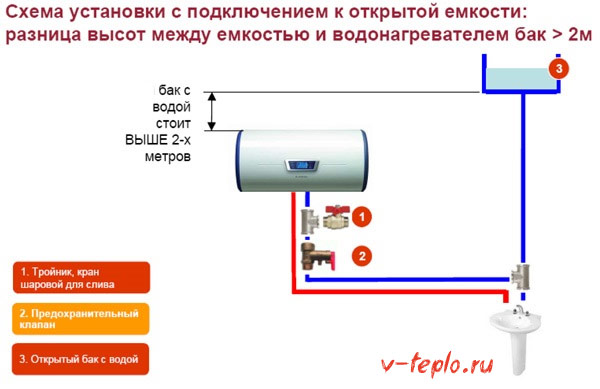
Step Four. Next, we connect one end of the cold water hose to the water supply line, and attach the other to the inlet connector of the water heater (recall: this is indicated in blue). But before that, a tap must be installed in this place so that, as noted above, the water supply can be shut off at any time. This concludes the "water" part of the work. Now let's talk in more detail about the appointment of cranes. Operation of water heater tapsTaps numbered 1 and 2 are required to shut off the water when the heater is not in use (for example, during dismantling). But taps 3 and 4 belong to city apartments - there they are installed to connect to a centralized water supply. Valve 4 deserves special attention. With its help, the movement of hot liquid between the riser and the room stops when the boiler is running. And now let's find out what is the scheme for connecting a water heater to an open tank. We connect the boiler to an open tank In this paragraph, we will focus exclusively on private houses and cottages. There, as you know, in the absence of a centralized water supply, special tanks are used to accumulate water, located in most cases on the roof. Although this will not become an obstacle to the use of a water heater! It is only important that the distance between the tank and the heating device does not exceed two meters; another important point: if the pressure in the line exceeds six bar, then a reducer is installed without fail - in front of the water heater - in order to be able to reduce it (pressure). Scheme - If the tank is less than two meters above the boiler.
Scheme - if the tank is located more than two meters above the boiler.
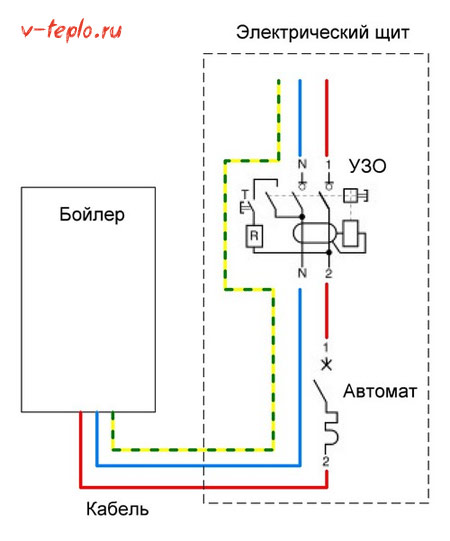
Stage three. Connecting the appliance to the mainsLet's make a reservation right away that the boilers need a standard 220 volt power supply, as well as special grounding. For this reason, it is preferable to connect them to an already existing outlet installed for a washing machine using a plug (of course, this is only possible if the outlet has been wired through an individual line and all requirements have been met).
It is also possible that this will force you to check the wiring throughout the house. It was a wiring diagram for a water heater. Connecting a boiler in an apartmentWe have already mentioned this point in passing, now we will discuss it in more detail. How is this setup different? The fact that in most of the apartments there is very little free space. Therefore, water heaters are often mounted on the back wall in the toilet (that is, where a wall cabinet is usually located). The algorithm of actions is the following.
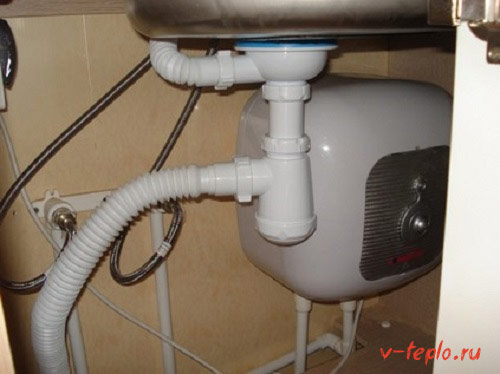
Step one. Buying a boiler For our purposes, a device with a volume of no more than ten liters is suitable - larger models simply will not fit into the cabinet. Then we free the cabinet from all contents in order to gain access to the sewer pipes. step two. We measure the center-to-center distance of the fastening as accurately as possible. We designate the height of the cabinet, the distance between the wall and it. After receiving all the necessary numbers, we take a tape measure and proceed to mark the surface of the wall. Next, we make holes in the required places, hammer in the dowels there, and screw the anchors into them. Step Three. We hang the water heater with the help of anchors. Step Four. Reattach the cabinet door. After that, it remains to connect the device to the mains and centralized water supply (we do this as described in the paragraphs above). Installing a heater under the sink An excellent place to install a water heater can serve as a void under the sink. We use a miniature device for this, preferably a rectangular one. After installation, it will not interfere, and the protection against moisture is very reliable. Although here, too, it is imperative to take care of grounding, otherwise there will be a risk of electric shock.
Important information! Never underestimate miniature boilers! Almost all of them have a capacity that allows you to get about two liters of heated water per minute. As for the installation scheme, it has no significant differences from the one already described. What should be avoided during installation?
As a result, we note that modern technologies allow any person, regardless of his place of residence (city, village), to have the proper level of comfort, an important element of which is constant hot water. The boiler has many advantages, the main among which is complete autonomy, and the water heater connection scheme may well be implemented by oneself. That's all, good luck with your work and warm winters! |


New
- I am a big tea lover. I especially respect green
- Ivan-tea with the addition of mint The chemical composition of the plant
- What is useful wheat porridge for the body
- Recipe: Soy Schnitzel - An excellent and tasty substitute for meat during Lent
- How to make ginger tea
- Coconut manna: benefits and harms, recipes with organic product Coconut paste how to use
- "Healthy" vegetable oils - a possible cause of obesity
- Adnexitis: causes, symptoms and treatment of the disease
- Herpes during pregnancy. Types, symptoms, treatment. Treatment of herpes during pregnancy Ointment for herpes during pregnancy
- What is pink catharanthus and how to care for it?


