Sections of the site
Editor's Choice:
- How to unlock ariston washing machine
- Pros and cons of LED lighting
- Pulse relay: device and connection
- How to calculate the illumination of a room with LED lamps?
- Plastic box - do-it-yourself aesthetic view of electrical wiring
- Electricity consumption of a warm floor: electric and film
- Installing a pump in a well: how to properly install pumping equipment
- Electrician Toolkit Overview
- How to choose a water heater: the most complete list of evaluation criteria
- 1 acoustics on the example of Sven SPS-860 and Realtek ALC889 codec
Advertising
| Do-it-yourself hair dryer repair. Hair dryer diagram and disassembly example |
Hair dryer repairOf course, given the penny price, it’s easier to buy a new one, but still sometimes it’s nice to repair something with your own hands. Like an old hair dryer.
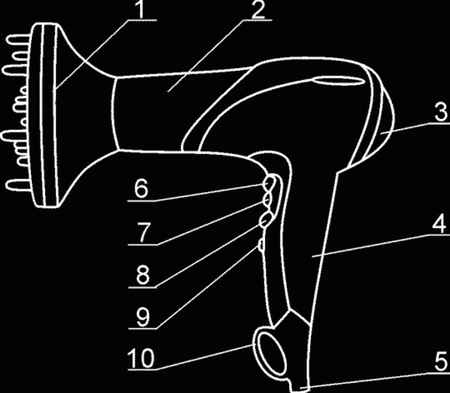
Absolutely any hair dryer can be divided into two main elements - a heating element and an electric motor. The heating element is usually a nichrome coil, it is she who heats the air. And DC motors create a warm directional air flow.  Electric motors in hair dryers are 12, 24 and 36 Volt, but sometimes in very cheap Chinese models there are 220 Volt electric motors. A propeller is attached to the motor rotor, which ensures the removal of warm air from the spiral. The power of the hair dryer varies from the thickness of the spiral and the power of the electric motor. Consider the design of the hair dryer in more detail:
1 - nozzle-diffuser, 2 - body, 3 - air duct, 4 - handle, 5 - anti-twist cord, 6 - "Cold air" mode button, 7 - air flow temperature switch, 8 - air flow speed switch, 9 - "Turbo" mode button - maximum air flow, 10 - loop for hanging the hair dryer.
The body of the hair dryer consists of two plastic halves, a front and rear ring and a mesh. The grid hemisphere is dismantled by a slight counterclockwise turn. The hardest part is pulling out the rear ring where the mains wire enters the base. This ring has lugs with holes and latches. The front ring is removed, although a little easier, but it also has two latches on the halves of the case and recesses in the ring (in the photo below, only one protrusion is clearly visible and the ring is worn before it). the main elements of the hair dryer and the diagram in the photos below: 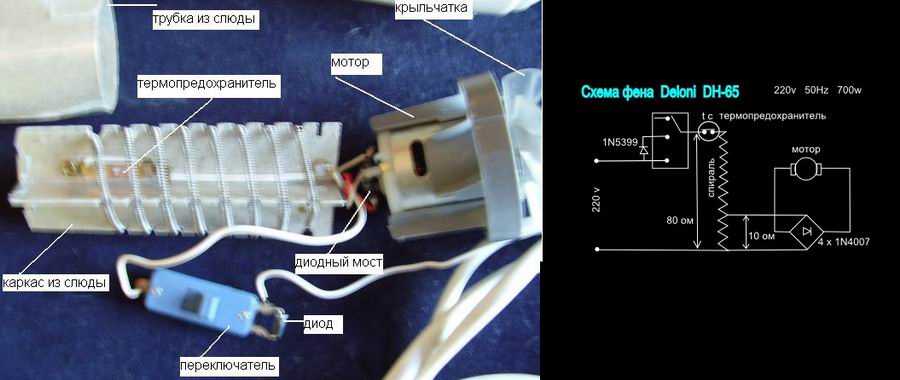
First, the front metal ring is removed, then the back mesh hides two self-tapping screws under it, unscrew them and remove the back cover from the handle (latched). Under the overlay are five self-tapping screws unscrew them.
Inspection revealed a classic violation of contact in the button that turns off the air heating. The contact moved a little and stopped closing the coil heating circuit. The repair was reduced to the correct setting of the contact position and fusing the top of the plastic stand with a conventional soldering iron
Job instability. Hair dryer switched off intermittently. First you need to pull out the plugs on the hair dryer handle. You can remove the plugs with a sewing needle or the sharp end of a thin knife.
Under the plugs are screws for a special U-shaped screwdriver. After disassembling the handle, we see - the warm air supply switch (blue), the hair dryer power switch (red). Here it is necessary to inspect everything very carefully in case of a quite probable break in the conductors or melting on the switches. 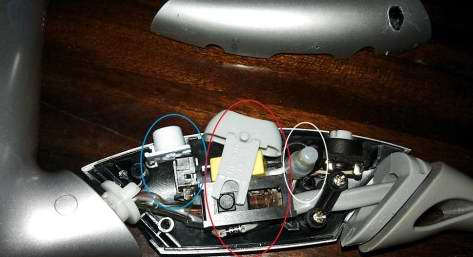
|


New
- I am a big tea lover. I especially respect green
- Ivan-tea with the addition of mint The chemical composition of the plant
- What is useful wheat porridge for the body
- Recipe: Soy Schnitzel - An excellent and tasty substitute for meat during Lent
- How to make ginger tea
- Coconut manna: benefits and harms, recipes with organic product Coconut paste how to use
- "Healthy" vegetable oils - a possible cause of obesity
- Adnexitis: causes, symptoms and treatment of the disease
- Herpes during pregnancy. Types, symptoms, treatment. Treatment of herpes during pregnancy Ointment for herpes during pregnancy
- What is pink catharanthus and how to care for it?


