Sections of the site
Editor's Choice:
- How to unlock ariston washing machine
- Pros and cons of LED lighting
- Pulse relay: device and connection
- How to calculate the illumination of a room with LED lamps?
- Plastic box - do-it-yourself aesthetic view of electrical wiring
- Electricity consumption of a warm floor: electric and film
- Installing a pump in a well: how to properly install pumping equipment
- Electrician Toolkit Overview
- How to choose a water heater: the most complete list of evaluation criteria
- 1 acoustics on the example of Sven SPS-860 and Realtek ALC889 codec
Advertising
| Repair of imported electric iron |
|
November 26 2005 Igor Davidovsky What does such a necessary device in everyday life as an iron consist of? According to the principle of operation, a modern iron has remained the same as it was in the days of our mothers. So, the iron consists of: a massive soleplate into which an electric heating element (heater) is embedded, a bimetallic type temperature controller, a thermal fuse, a water tank used in the steaming system, a handle, indicator lights for operating modes and buttons (knobs) for controlling the operation of the steaming system. Next, we will consider in more detail the purpose of the components of the irons and find out what you should pay attention to when buying a new appliance. Sole. It is the most important element of the iron. It is from her that your success in the “ironing” field mainly depends. First you need to decide what kind of sole quality plays a major role for you - durability or ease of sliding. If the first, then the sole should be based on stainless steel, which has been holding the lead for several decades, being still the most common material for making iron soles, but it does not differ in ease of sliding. True, in order to eliminate this drawback, devices from many manufacturers (Braun, Siemens, Bosh, Tefal, etc.) form a special air cushion between the sole and the fabric during vaporization, making it easier for the iron to slide. But still, it will not replace the sole, which already contains materials that provide a high slip coefficient. Most often, this is an ordinary enamel coating, which, although it has such an indispensable property, is still a delicate and vulnerable material, and if handled carelessly, scratches and chips may appear on such a sole. The same applies to Teflon coatings. Today, every self-respecting company has patented soles made from special compounds (compounds of various materials). Alas, apart from the mysterious beautiful names, we can get little specific information and, accordingly, we cannot blindly believe the manufacturer, who claims about the unique strength of his sole. In my opinion, the ideal option is a polished (mirror) steel sole. Temperature controllers are used mainly of the bimetallic type, this is a completely reliable iron assembly that does not cause much trouble. Irons with electronic regulators are less common, and their price is very different from ordinary bimetallic regulators. The electrical circuit of the irons, in principle, has not undergone any changes. The only thing that has been added is a thermal fuse that turns off the heating element if the main regulator does not work and the temperature of the soleplate exceeds the temperature of the thermal fuse. There are two schemes for connecting the heating element to the network.
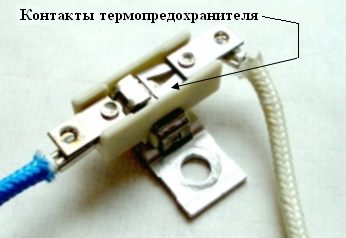
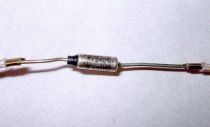
Thermal fuses There are two types: disposable and reusable. Reusable thermal fuses are made according to the bimetal principle (as is the main iron regulator). When the set temperature is exceeded, the contact breaks and the power supply circuit of the heating element is interrupted. After the iron has cooled down, the bimetallic contact again closes the power supply circuit of the heating element. Thus, the reusable thermal fuse prevents the iron from overheating (if the main thermostat has not worked) and burning out completely.
A disposable thermal fuse can only perform its function once. When the set temperature is exceeded, it breaks the power supply circuit of the heating element, thus protecting the iron from overheating and burnout of the heating element. Unfortunately, after the disposable thermal fuse has been triggered, further operation of the iron without repair is impossible. It is disposable and disposable in Africa.
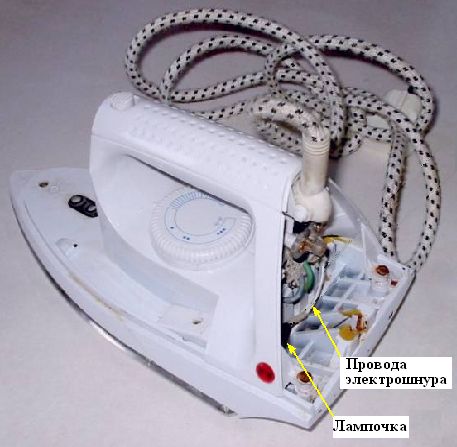
The steam system control buttons are used to adjust the supply of water for steam generation. Usually there are two buttons and a knob. One of the buttons serves for a one-time supply of a portion of water into the steam generation chamber (the so-called steam boost), the other for wetting clothes from a sprayer installed in the front of the iron. The knob serves to adjust the water supply for constant steam production (remember to turn off the water supply when the iron is not in operation, as this may cause a large puddle under the iron). Indication of the operation of the iron is carried out using light bulbs. Usually there is one red light bulb, it indicates that the process of heating to the set temperature is taking place. However, there are models with two bulbs - one red and one green. The red light performs the same function as in the first case, and the green one indicates that the iron is plugged into the mains (socket). Repair.Nothing is eternal under the Moon. One fine or not very day, plugging the iron into the outlet and waiting for 5-10 minutes, you realize that it does not work. So beautiful, comfortable, familiar and still does not work. The way out is to throw it away and buy a new one is not the best option. So, repairs are needed. In 80% of cases, the iron can be returned to working condition. In 20%, the heating element burns out and in this case it is really cheaper to throw it away and please yourself with a new purchase. For repair, you will need the following tool:
Before starting repairs, it is necessary to evaluate the external manifestations of the malfunction. 99% of irons have a light alarm. This, as a rule, is a red light bulb, signaling the process of heating the heating element (thermoelectric heating element). There are options with two lights - green and red, in this case the green light indicates that the iron is plugged in and 220 V is applied to it, and the red one indicates the process of turning the heating element on and off. If not one of the bulbs is lit in all positions of the thermostat, then the first suspicion falls on the serviceability of the cord. The biggest difficulty in repairing modern irons is their disassembly. Designers dictate their own rules, and therefore all the screws holding the structure are hidden, and it is quite difficult to find them. It is impossible to describe all the designs, there are a great many of them, but there are several general principles:
Electrical cord repairFirst of all, you need to remove the back cover that covers the place where the electrical cord comes from. Finding the back cover screws is usually straightforward. By removing the back cover, you can check the integrity of the electrical cord, 20% of faults are associated with a break in the wire at the point where the cord exits the iron or plug.
To check the integrity of the cord, you will need a tester or an ordinary dialer (a battery, a light bulb and a piece of wire). One end coming from the light bulb is connected to the pins of the plug, and the other, coming from the battery, alternately to the wires coming out of the power cord. It is not necessary to check the wire in yellow-green insulation, this is the so-called protective-zero wire. If the light is on, then the wire is in order and you need to look for a malfunction further. If the light is off, then you can be congratulated on finding the problem. To eliminate this malfunction, it is usually enough to shorten the cord by 10-15 centimeters and reconnect it to the place where these wires were screwed (after checking its integrity again, if the continuity light is off, then the wire is damaged near the plug and it must be replaced) It should be noted that the electric cord of irons is special, its wires have rubberized insulation that can withstand high temperatures. Therefore, any wire will not work here, it is needed in rubberized insulation. If the wire is normal, then you have to disassemble the iron further. Before further disassembly, it is necessary to sketch the wiring diagram, then this drawing will greatly facilitate assembly for you. Temperature controller repair.Having disconnected all the wires, you should try to remove the plastic case in order to get to the temperature controller and the heating element. First, remove the handle of the temperature regulator, for this we put a flat metal plate (you can use a knife) under the handle of the regulator and try to lift it up, applying little effort. If it doesn’t work out, we leave everything as it is and look for the screws that fasten the iron body to its base. There are no difficulties with the back of the case, but in front the screw is usually hidden either with a special plug or a lid (closing the hole for pouring water into the steamer). Be that as it may, after a thorough inspection, you will still find, guess, get to this screw or screws.
By unscrewing all the screws, you can remove the case and get to the details of the internal structure of your iron. Now you can continue troubleshooting further.
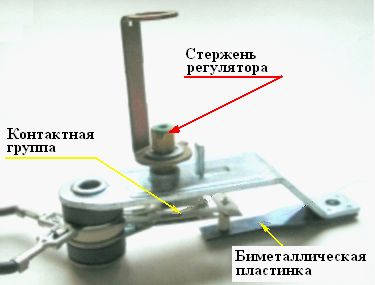
First, let's check if the temperature controller works, to do this, turn the regulator rod from one extreme position to another. It happens that the regulator is very difficult to scroll, in this case it is necessary to resort to the help of pliers and try to develop a rotation unit by turning the regulator rod several times from one extreme position to another. Having achieved ease of rotation, rub the threads of this knot with a simple soft pencil. Graphite is not afraid of high temperatures and has good lubricating properties. Turn the regulator rod from one extreme position to another.
In one of the positions, the contact group should work (with a characteristic click). Using a continuity test, check for the presence of an electrical circuit with closed contacts. To do this, we connect one end of the continuity to one contact, the other to the other, and, turning the axis of the regulator, we observe the light bulb coming on and off. If the light does not light up, you need to carefully clean the contacts with a strip of sandpaper or a nail file (from a manicure set). Thermal fuse repair.Next, you should check the integrity of the thermal fuse by connecting the continuity wires to it on both sides. If the light is off, then the culprit of the malfunction and the hour of your lost time is He. This happens in 50-60% of cases. The simplest way out of this situation would be to throw out this thermal fuse, and short-circuit the electrical circuit in this place. If the main temperature regulator is in good working order, the absence of a thermal fuse at work and the safety of the iron will not affect at all. In order to short-circuit an electrical circuit, you need a little imagination. There may be many options. This includes soldering with high-temperature solder, and crimping the conductors with a copper tube (from the stem of a ballpoint pen), using a spring from a lighter, and switching the 220 V supply wires. The main thing is to achieve reliable contact between the junctions.
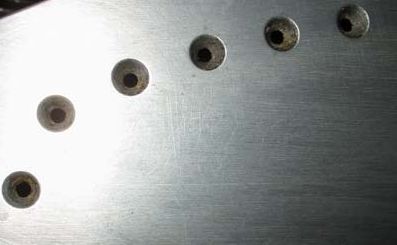
Iron soleplate with heating element, thermostat, steam chamber and thermal fuse (disposable) Heating element repair.If the thermal fuse, temperature controller and electrical cord are in good order, we are left with the only and most unpleasant option - the heating element burns out. In most cases, the heating element is rolled into the sole of the iron and its replacement is a technically rather complicated procedure and, accordingly, not economically feasible.
However, there are designs in which the current-carrying conductors are not welded to the contacts of the heating element, but are connected using ferrules. Rarely, but there is such a strong oxidation of the contact points of the tips and the heating element that the electrical circuit breaks. In this case, it is necessary to ensure the reliability of contact in this joint, which is achieved by carefully cleaning the joints with sandpaper, a file, a nail file, etc. If, nevertheless, the heating element burned out, and you decide to throw away the once so useful and beloved iron, keep the cord from it. You may need it when repairing your new favorite iron or other electrical appliance. In the end, it can serve as a weighty argument in the difficult task of educating the younger generation. Steam system repairSteam iron systems have several nuances:
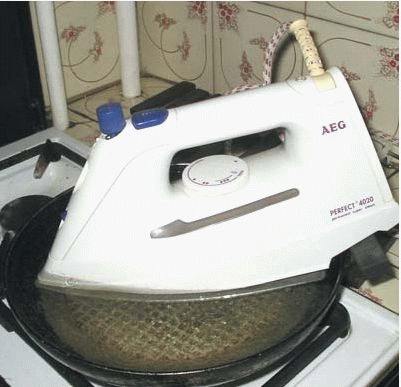
Repairing a steam system usually involves removing scale from your pet's internal steam cavities. During normal use of a home iron, after about half a year there is a need to clean the steam system. When using distilled water, this period increases several times. Cleaning the iron at home is quite simple. To do this, we need a container for water, in which we need to place it so that the water covers the metal sole by 1-1.5 cm. This container can be an ordinary large frying pan. Do not forget to set the steam regulator to maximum or to clean.
The iron should stand on metal spacers, the role of which can be successfully performed by ordinary coins. It is enough to lift only the back of the iron. In our case, no spacers were required, since the back of the iron rests on the edge of the pan and water can freely enter the steam chamber. In no case do not plug the iron into a socket for heating! Add table vinegar to the water at the rate of 1 glass of vinegar per 1 liter of water. after these preparations, we put our entire structure on the stove and bring it to a boil, after which we turn off the stove and let the water cool a little. We perform this procedure 2-4 times. Instead of vinegar, you can use citric acid or descalers for kettles. I have tried many branded products for removing scale from irons, but none of them allowed to achieve such a result as the method proposed to you.
And I'd rather not say anything about the price of these funds. After removing the scale, the iron is washed in cold water and left for a couple of hours to dry. That's all, now your assistant will not throw out scale flakes and leave stains on your snow-white linen. Before proceeding with the ironing process itself, it is necessary to prepare a workplace and an iron. The surface of the sole must be perfectly clean, as fluff and dust can stick to the fabric. Do not wipe the soleplate if it is still hot. It is advisable to iron woolen items and dark fabrics through a special ironing cloth, otherwise it will begin to shine. It is not recommended to put on clothes immediately after ironing, because a still warm fabric tends to wrinkle quickly: hang it on a hanger for half an hour, and it will retain its shape longer. Today, there are many types of different fabrics, both natural and synthetic, so before ironing a thing, look at the label, which indicates the optimal temperature for this type of fabric. If there are no recommendations on this matter, then first try ironing a small piece of fabric from the wrong side and, depending on this, increase or decrease the heat of the iron. Start ironing with thin fabrics (silk, acetate), which require a minimum temperature, gradually move on to fabrics that can be ironed at high temperatures. Start ironing mixed fiber fabrics first, look at the composition, and set the iron to match the fiber that requires the lowest temperature. Then proceed to things made of silk and synthetics (by the way, artificial silk can be ironed at medium temperature), and do not forget that it is undesirable to use the steam function on such fabrics - the fabric may shrink and lose its appearance. Natural silk can be wetted first and ironed immediately. Woolen items are recommended to be ironed at a moderate temperature, without using a steam boost. Fabrics such as crepe de chine shrink quite a lot after washing, so first soak it in warm water and then iron it at about 100°C. The easiest way to iron products made of cotton and linen: they can be ironed at the highest temperature, feel free to use steam. The only “but”: linen and colored cotton should also be ironed from the wrong side, otherwise there is a chance of shine on the fabric. Faux fur, suede and leather should not be ironed with steam (the fibers can simply melt). Fabrics with a shiny surface can be ironed on the right side and with steam, while matte fabrics can be ironed on the inside so that unnecessary shine does not appear. Fabrics with pile should be ironed from the back and in the direction of the pile, and for greater efficiency, you can put a pile fabric under it, then the pile will not wrinkle (a terry towel can also be used for this purpose). Save timeTo make the ironing process as efficient and fast as possible, we can give you some useful tips: start ironing shirts and blouses with a frill (if any, of course), then iron one sleeve (preferably on a sleeve specially designed for this), then the collar and top of the back, the back itself and, last but not least, the tucks. iron pleated fabric as follows: the folds in the upper part of the skirt, at the waist, are the most difficult to iron, so just steam the fabric without pressing the iron strongly against the fabric, and then hang the skirt on a hanger and let the fabric cool. iron dresses made of wool from the wrong side, and pockets and finishing details - from the front, but through a slightly dampened fabric. The ironing scheme is the same as for shirts: first the details, then along the entire length. to keep the creases on the trousers for a long time, run along them from the inside with dry soap, and then iron from the front side through a damp ironing cloth. Always carefully monitor your appearance, take care of your hair, clothes and shoes. Everyone knows that the main thing in a person is the mind, but they still meet by clothes ... ConclusionNaturally, there are more sophisticated irons with an electronic temperature controller, with a water supply for a pressure steaming system, cordless irons with a heating stand, etc. However, all of the above causes of malfunctions and methods for their elimination are also suitable for their repair. If the repair failed, we go to the store and choose a new assistant. Now let's talk about buying such a necessary household item as an iron. Before buying, first of all decide what exactly you need an iron for. If, in addition to your own person, numerous relatives also live in your apartment, and the wardrobe is filled to capacity with clothes, an iron with maximum power (2000-2400 W) and steam supply will be indispensable. But keep in mind that such a purchase will lighten your wallet by about $ 70-80 You can even purchase a steam station with which ironing time will be reduced to a minimum. But, firstly, it takes up more space than a regular iron, and secondly, such devices are quite expensive, in the range of $ 120-170, which is available only to wealthy people. If you are a lonely person, then an average power iron will be enough for you. (~ 1500 W). Equally important is the weight category of the iron. It was in the days of coal and cast iron irons that the laundry was ironed mainly due to the heavy weight of the device. Today, there is no need for this, so the lighter the iron, the easier it will be for you to handle it, although some people like heavier irons. A separate item is the water tank. In this case, the larger the capacity, the better. The most common models are with a capacity of 250 ml. The largest tank to date is 350 ml (one of the achievements of Siemens). Next, pay attention to the variety of steam supply functions. You should not buy an iron that does not have a constant supply of steam and a steam boost, which are necessary to smooth out deep wrinkles: even without steam, the wrinkle has disappeared from the surface of the fabric, you cannot be sure that it will be permanent. Most likely, after 1-2 hours it will appear again. Be sure to ask the seller to show the detailed characteristics of the steam functions, they are also of no small importance: if the maximum steam supply reaches 15 g / min, you are unlikely to be able to iron a thick fabric with it. It is also necessary to have an adjustment of the steam supply, since different types of fabric require different intensity. Some firms do not specify such parameters at all. Well, in this case, we can only hope for the good faith of the manufacturers. If you want the iron to last for a long time, then it must be equipped with protective functions (anti-lime rod, self-cleaning function, etc.) Each company has different protective functions, so ask the seller what the model you like is equipped with and how these functions are working. It's hard to recommend anything specific here, as they say, the taste and color ... Although I do not recommend you buy an iron with a replaceable cartridge, because it will not be so easy to buy a spare one, it is likely that you will have to go around more than one store before than you find it. So, you have already found out for yourself which device will suit you completely. There are little things left: choose the design you like and estimate the amount that you are willing to pay for the purchase. The main thing to consider in this case is the trademark of the iron. Philips, Siemens, Braun, Tefal, Rowenta, Bosch are leaders in the production of household appliances. Their quality is more reliable, and the devices themselves are more expensive, $60-80. If you are counting on $20-30 when buying, then you should pay attention to Scarlett, Unit, Binatone, Clatronic, Vitek, Vigod, etc. irons. Remember that if the iron meets all your requirements, ironing will cease to be torture, and when working with it, you will get, if not pleasure, then at least complete satisfaction. I hope that reading this article will help you choose, properly operate and extend the life of such a necessary device as an iron. Igor Davidovsky 2005. All the best, write© 2006 |


New
- Tonsillitis in adults - what is it, symptoms and treatment, causes, photos and first signs What is throat tonsillitis
- Diseases of the male genital area Chronic inflammatory diseases of the female genital area
- Signs of gastric and duodenal ulcers
- Prostate cancer of the fourth stage: the possibilities of modern medicine
- What is useful lemon water for weight loss, face, hair
- How to talk to a girl and not seem boring What is the best way to communicate with girls
- Foods rich in zinc
- Is the treadmill an indispensable exercise machine or just a complex toy?
- Kievan Rus: education and history
- What vitamins are good for facial skin?


