Sections of the site
Editor's Choice:
- How to unlock ariston washing machine
- Pros and cons of LED lighting
- Pulse relay: device and connection
- How to calculate the illumination of a room with LED lamps?
- Plastic box - do-it-yourself aesthetic view of electrical wiring
- Electricity consumption of a warm floor: electric and film
- Installing a pump in a well: how to properly install pumping equipment
- Electrician Toolkit Overview
- How to choose a water heater: the most complete list of evaluation criteria
- 1 acoustics on the example of Sven SPS-860 and Realtek ALC889 codec
Advertising
| Selection, installation and connection diagram of the ERA 4S ET fan with a timer in the bathroom |
|
Hello, dear readers and guests of the Electrician's Notes website. I am currently successfully completing a renovation in my bathroom. I will not talk about the stages of repair within the framework of this site, but I will share with pleasure about electrical work, though in my next publications. Don't miss out - the subscription form is located in the right column of the site. And today I would like to present to your attention an article about the choice, installation and connection of an exhaust fan in the bathroom. The bathroom room belongs to a room with increased danger, i.e. the relative humidity of the air in it exceeds 60% (PUE, clause 1.1.13). Humidity contributes to the appearance of mold and fungi, various insects, bugs and spiders (centipedes, wood lice, two-tailed, etc.), delamination and damage to furniture, accelerated rusting of metal structures, etc. In this regard, in order to reduce the humidity of the room, as well as to remove various unpleasant odors, it is necessary to install an exhaust fan, because. natural ventilation alone will not be enough. Naturally, before installing the exhaust fan, it is necessary to check the draft of the ventilation shaft. Personally, I check this using standard methods - matches or a sheet of paper. With normal ventilation, the flame should deflect towards the shaft. Similarly with a sheet of paper - it should be attracted to the shaft. If the mine is clogged and does not work properly, then you need to call special services to clean it. Unfortunately, this is exactly the case for me. How to choose a bathroom fanI chose a fan for the bathroom according to the following criteria. 1. Performance According to SNiP 31-01-2003 "Residential multi-apartment buildings", table 9.1., The amount of air exchange in the bathroom must be at least 25 (cubic meters / hour), i.e. in one hour, at least 25 (cubic meters) of air should be drawn out of the bathroom. Accordingly, the fan must be selected with a capacity greater than this value, and besides with some margin - it definitely won’t be worse, because the norms given in SNiP are minimal. 2. Noise The second criterion for choosing a fan is noise. It has long been known to all that increased noise levels for a long time cause harmful effects on humans. Our ear perceives sounds with a frequency ranging from 20 (Hz) to 20,000 (Hz). For measuring the noise level, the most interesting range is from 45 (Hz) to 11000 (Hz), i.e. Noise assessment is performed by a special device with a sound level meter for 8 medium frequencies: 63, 125, 250, 500, 1000, 2000, 4000 and 8000 (Hz). So, in the rules SanPiN 2.1.2.2645-10 "Sanitary and epidemiological requirements for living conditions in residential buildings and premises", clause 6.1., Appendix 3, there are requirements for noise levels from external sources, which is the exhaust fan. It turns out that the noise level from a running fan in the daytime (from 7-00 to 23-00) should be within 23-58 (dB) and at night (from 23-00 to 7-00) within 13- 50 (dB) at mid frequencies 63, 125, 250, 500, 1000, 2000, 4000 and 8000 (Hz). From experience, I can say that all fans with a noise level of up to 35-40 (dB) are quite acceptable for installation and do not create any discomfort. 3. Design The design of the fan is directly related to the place of its installation and the size of the ventilation shafts. The ventilation shaft channel runs in the corner of the bathroom. I already sheathed the walls with moisture-resistant drywall, and cut a passage hole into the shaft (vent) in the wall with a diameter of a little more than 100 (mm).
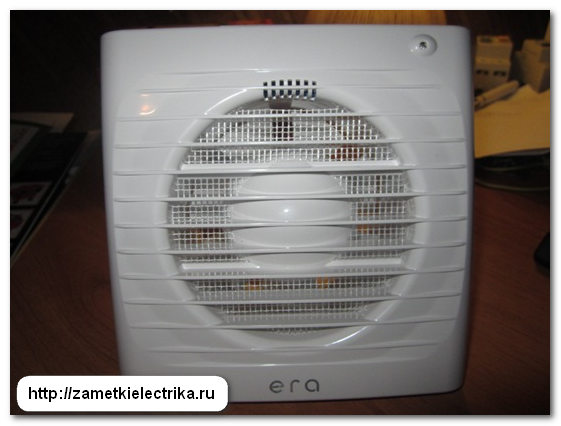
Accordingly, I will need a wall-mounted wall fan with a flange diameter of not more than 100 (mm). By design, fans are divided into: axial, centrifugal, radiator, duct, roof, etc. I will not go into details of their differences and applications, you can read about this on other specialized sites. I stopped my choice on an axial fan, because. they are easy to install, have good performance and reasonable cost. 4. Protection class Initially, I planned to purchase the simplest fan, but after thinking about convenience, comfort and economy, I decided that the fan would be controlled through a timer, so I began to look at models with electronic timers. There are many models on the market with different features, designs and price ranges. Here are the most common models: Silent (more silent), Electrolux EAF, Decor. As a result, I chose the ERA 4S ET axial exhaust fan from the Russian manufacturer Era (Ecovent in the old way). Packaging and appearance.
The price of ERA 4S ET at the time of writing was 947 rubles, which, in principle, became an advantage when choosing it, i.e. at a very reasonable and affordable price (not advertising), I got the performance I needed, and even with the additional features I needed.
The Era company has been on the market for a relatively long time and provides a 5-year warranty on its product, which cannot but rejoice. In appearance, I also have no complaints - quite a classic design.
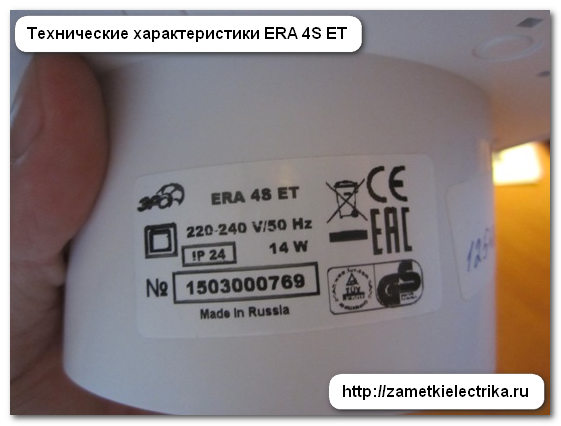
Decoding ERA 4S ET:
Dimensions.
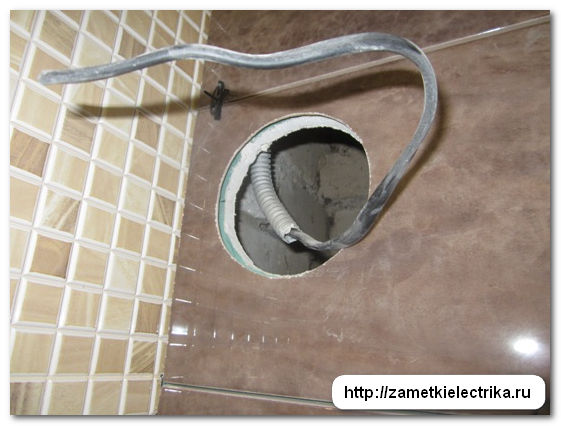
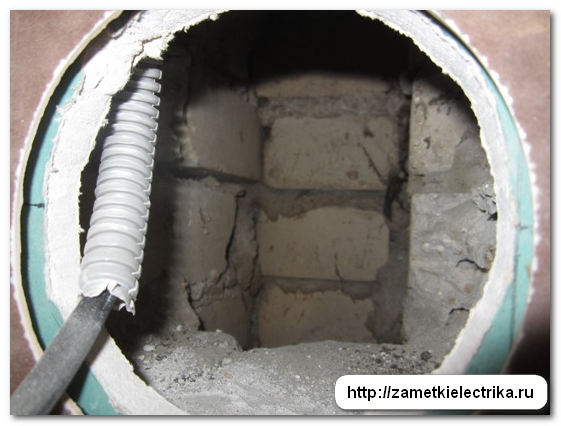
By the way, the noise level of this fan is quite acceptable. I once had a fan installed with a noise level of 45 (dB) - so it was very well “heard”. This fan model has a ball-bearing motor with protection against winding overheating, i.e. If the temperature of the motor windings is exceeded, the fan will automatically turn off. How to install a fan in the bathroomAs I already said, an outlet with a diameter of just over 100 (mm) was drilled in my wall. The supply cable VVG (3x1.5) is also laid there in a corrugated pipe from the switch.
Installation of an exhaust fan is carried out in this very hole.
Fastening to the wall is carried out using self-tapping screws that come with dowels.
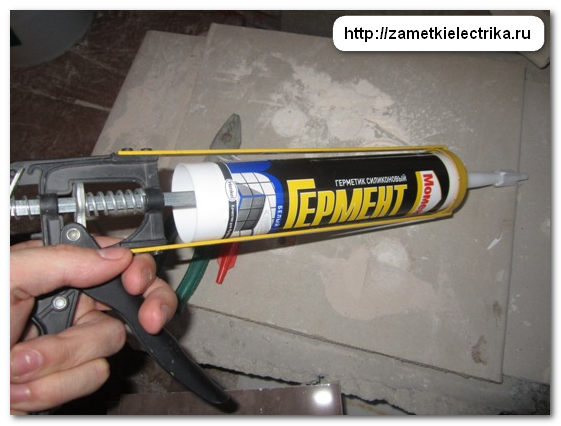
But I decided to install it not on self-tapping screws, but on Germent sanitary silicone sealant from Moment, because. I didn’t want to once again drill a new laid tile, and besides, in 4 places, what if it cracks, the glaze is chipped or something else happens.
I have already done this at the facilities more than once - it holds very tightly, none of the customers complained.
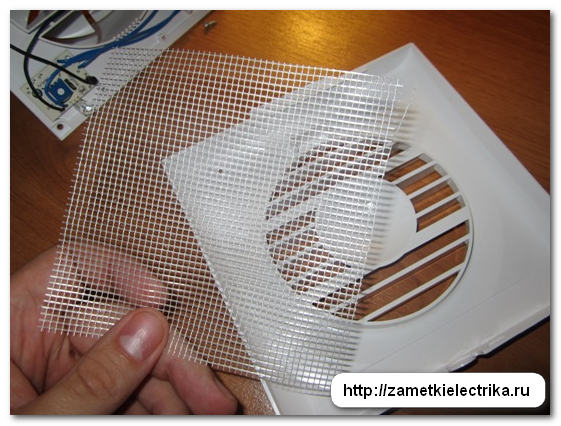
So, unscrew the small screw on the side of the fan and remove the decorative front panel.
The excess corrugation must be cut off, and the cable in the shaft must be moved to the side so that it does not interfere with the air flow.
We put the fan in the drilled hole and start the power cable. By the way, I did not use a hole specially designed for this to enter the cable, because. it didn't suit me. I had to drill a separate hole in the fan housing in the right place. We apply sealant around the perimeter of the vent, apply the fan, check its position by level, press it to the surface and let the sealant harden. To fix the fan, you can use masking tape. After about 2-3 hours, the sealant will harden.
How to connect a fan in the bathroomI have already said that initially I wanted to purchase the simplest fan without any additional functions, controlled from a separate switch button, but in the process of searching I changed my mind towards a fan with a timer. The fact is that a 3-core cable is required to connect a conventional fan, i.e. the fan must be supplied with a phase from the switch, zero and ground. To do this, I laid a 3-core cable from the switch to the fan installation site.
This is what the fan connection diagram looks like through. One key turns on the lighting, and the other turns on the fan. Very convenient: regardless of the lighting, if necessary, you can turn the fan on and off.
But the connection diagram of the fan with. In this scheme, when the lighting is turned on, the fan will turn on at the same time. Compared to the previous one, this scheme is not entirely convenient in the sense that after the lighting is turned off, the fan will also turn off without adequately ventilating the room. As an option, after leaving the bathroom, leave the lighting and the fan on for a while, but the main thing is not to forget to turn them off later, otherwise you will not be spared.
To connect a fan with a timer in the “correct” way, a 4-core cable is required: phase, zero, ground and controlled phase from the switch. In principle, the fan housing is plastic and there is nothing special to ground there, I use the third core (PE) in the cable for other purposes, but to control the timer.
For a fan with a timer, a constant voltage of 220 (V) is required at the L-N terminals, and the timer is controlled by a phase supplied from the switch to the “T” terminal.
After connecting, we put back the decorative cover with the mosquito net and tighten the fixing screw.
When installing electrical wiring, I decided to use junction boxes to a minimum, but. I will write a separate article about this.
A VVG (3x1.5) supply cable comes from the apartment shield to the switch socket.
|


New
- Tonsillitis in adults - what is it, symptoms and treatment, causes, photos and first signs What is throat tonsillitis
- Diseases of the male genital area Chronic inflammatory diseases of the female genital area
- Signs of gastric and duodenal ulcers
- Prostate cancer of the fourth stage: the possibilities of modern medicine
- What is useful lemon water for weight loss, face, hair
- How to talk to a girl and not seem boring What is the best way to communicate with girls
- Foods rich in zinc
- Is the treadmill an indispensable exercise machine or just a complicated toy?
- Kievan Rus: education and history
- What vitamins are good for facial skin?


