|
Make a staircase with your own hands.
You can do it yourself if you have hands where you need to, have a set of tools and most importantly - you want to make wooden stairs with your own hands. In this case, this article will allow you to try making stairs with your own hands and make a simple staircase to the veranda, which will cost the cost of a budget staircase, when you make a simple staircase, a spiral staircase with your own hands will also be affordable. During the “do-it-yourself-stairs” process, you will have to solve a number of issues: the technical calculation of the stairs, it would be nice to sketch a simple staircase scheme with your own hands, a drawing of what you will do when you decide to make wooden stairs with your own hands. To make the staircase yourself you will need tools: a hacksaw, a building level, a planer, sandpaper, a metal ruler, a pencil, a hammer, paint brushes, a drill, a screwdriver. Of the materials for the process “staircase in the house with your own hands” you will need: wooden boards 100x20x2.5cm, timber 150x25x5cm, timber 100x5x5cm to make balusters with your own hands, nails 10cm, 7cm, screws L \u003d 10.15cm, drying oil, stain, varnish, impregnation against decay, impregnation against woodworkers. In the course of work, some more tools may be required, but a very complex and special tool is not used in the construction of the stairs, so there will not be any special problems (not provided). If you cannot make a drawing for the construction of a concrete staircase yourself and a concrete staircase is too tough for you, use the projects of wooden stairs in Kiev, with their help you can make wooden stairs with your own hands, including you can get a beautiful modular staircase.
Stairs photo.
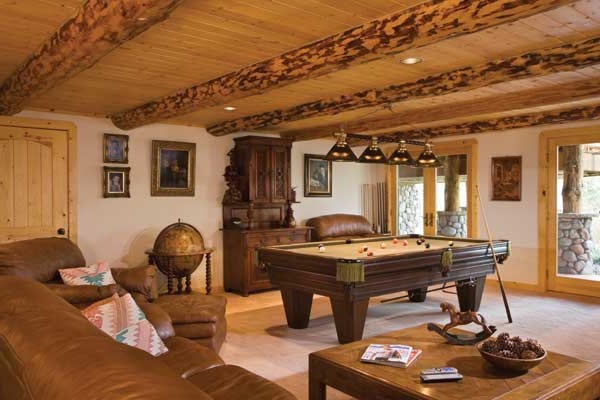
 So, we build the stairs with our own hands. First of all, you need to make the calculation of the stairs, think over the size of the stairs, the design of the stairs and determine the terms. The calculation of the stairs for a wooden house is necessary in order to make it convenient to climb, in addition, the stairs must meet the very specific safety requirements that are prescribed in regulatory documents. We will not bother you with the study of these documents, and we will give the basic requirements in the course of the story as make a staircase with your own hands. Now about the terms. Here are the main components that any staircase has a detail: degrees, under the steps, kosour, handrails. Kosour is the main bearing part of the staircase, it is the main load that takes place when people go up the stairs, there are options for stairs without under steps, but this greatly weakens the structure, so we will consider the option do-it-yourself stairs in the house (photo) under the steps. More clearly about the elements of the wooden stairs of the photo below, you can immediately see the approximate design of the stairs. So, we build the stairs with our own hands. First of all, you need to make the calculation of the stairs, think over the size of the stairs, the design of the stairs and determine the terms. The calculation of the stairs for a wooden house is necessary in order to make it convenient to climb, in addition, the stairs must meet the very specific safety requirements that are prescribed in regulatory documents. We will not bother you with the study of these documents, and we will give the basic requirements in the course of the story as make a staircase with your own hands. Now about the terms. Here are the main components that any staircase has a detail: degrees, under the steps, kosour, handrails. Kosour is the main bearing part of the staircase, it is the main load that takes place when people go up the stairs, there are options for stairs without under steps, but this greatly weakens the structure, so we will consider the option do-it-yourself stairs in the house (photo) under the steps. More clearly about the elements of the wooden stairs of the photo below, you can immediately see the approximate design of the stairs.
Stairs photo.
We have defined the terms. Now we need to size own wooden stairs
 hands (photo): ladder width, step width, tilt angle and height under the steps. If we talk about the width of the stairs, then they usually take a width of at least a meter, this is necessary so that furniture, appliances and so on can be brought into the house. In our case, the width is set by the departure of the terrace or porch. We recommend reading the article on the design of the bathroom. hands (photo): ladder width, step width, tilt angle and height under the steps. If we talk about the width of the stairs, then they usually take a width of at least a meter, this is necessary so that furniture, appliances and so on can be brought into the house. In our case, the width is set by the departure of the terrace or porch. We recommend reading the article on the design of the bathroom.
Calculation of the angle of the stairs, the width and height of the steps do-it-yourself wooden staircase (photo).
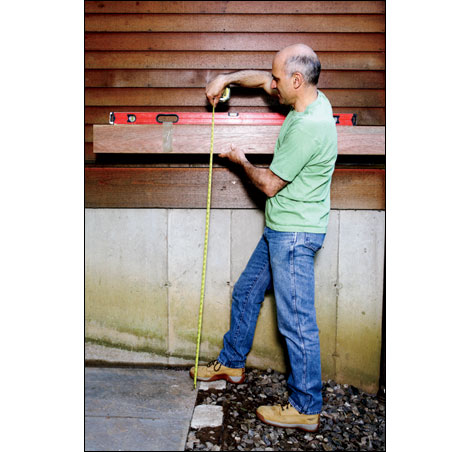
Determine the height of the stairs. To do this, we fix a straight board on the terrace, as the beginning of the stairs the photos are shown below, check the horizontal, adjust the horizontal if necessary and measure the height of our stairs. So that the level does not fall, it is fixed with tape on the board. In our example, the height of the stairs is 145 centimeters.
DIY stairs
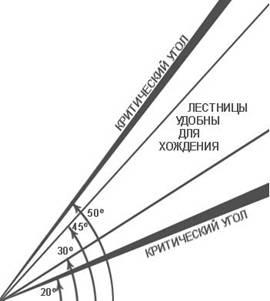 On the angle of the stairs. The angle of inclination of any stairs is regulated by standards and has a range of angles from 30 to 45 degrees. If you start to depart from these rules, then when you make a ladder, you will notice that the angle is less than 30 degrees, it is dangerous to walk, the angle more than 45 degrees, the staircase will take up a lot of space. The angle of inclination of a particular staircase is determined individually, depending on the number of steps and their height. The approximate ratio is summarized in the table of stairs for the house. On the angle of the stairs. The angle of inclination of any stairs is regulated by standards and has a range of angles from 30 to 45 degrees. If you start to depart from these rules, then when you make a ladder, you will notice that the angle is less than 30 degrees, it is dangerous to walk, the angle more than 45 degrees, the staircase will take up a lot of space. The angle of inclination of a particular staircase is determined individually, depending on the number of steps and their height. The approximate ratio is summarized in the table of stairs for the house.
Go rozmіri skodinkіv.
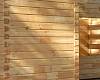
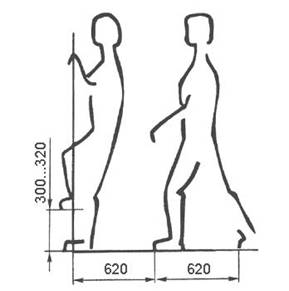
As practice shows, lestnica with a step height in the range of 140/170 mm with a tread width of 300 / 370mm is the most convenient and safe to move. This is explained by this. The width of the step is taken along the length of the foot of the average person, and the height of the step corresponds to the step height of the average person. The higher you make the steps, the greater its width will be and vice versa. But there is a rule - width 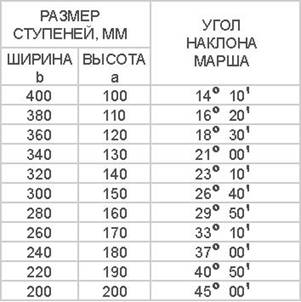 steps minimum corresponds to its height. steps minimum corresponds to its height.
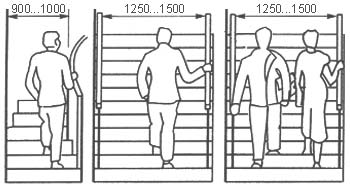
If you get very narrow standard round steps, then this is not very good for safety, but their width can be added another 20/40 mm due to the protrusions. Do not forget that we said at the beginning of this article about the width of the entire staircase, the most comfortable width is 1 meter, but if your conditions do not allow it, you can reduce it to 70 centimeters, this is usually done for the projects of the house in a narrow area, making the width less recommended. Our staircase has seven steps, the eighth step of the stairs in do-it-yourself cottages is the surface of the terrace.
DIY staircase photo schemes and blueprints.
Making a kosour do-it-yourself stairs in a wooden house.
  You need to see how you will attach the cosuor to the terrace. Mono rest it on the beams of the terrace, or make the beams fly out from under the platform. This must be done locally. In addition, the best option for the platform on which the concrete wooden staircase will rest. It is necessary to take a wooden beam, mark it as shown in the first photo, and cut out the grooves under the steps, in no case cutting them, the places of cutting will be stress concentrators, along which the staircase may collapse. First make one cosewor and then, using it as a pattern, mark up the rest, in our example four cosues. As you can see from the photo, the more corners, the stronger the structure will be. Place angles You need to see how you will attach the cosuor to the terrace. Mono rest it on the beams of the terrace, or make the beams fly out from under the platform. This must be done locally. In addition, the best option for the platform on which the concrete wooden staircase will rest. It is necessary to take a wooden beam, mark it as shown in the first photo, and cut out the grooves under the steps, in no case cutting them, the places of cutting will be stress concentrators, along which the staircase may collapse. First make one cosewor and then, using it as a pattern, mark up the rest, in our example four cosues. As you can see from the photo, the more corners, the stronger the structure will be. Place angles 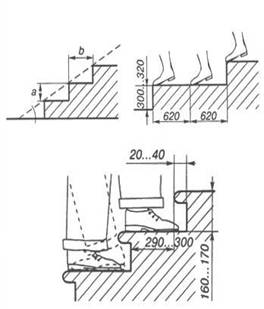 knock 4/5 mm planer under the steps. This is necessary for a good fit of the steps and under the steps to the cusor. Having installed the kosour in place, you can mount the steps into the house, not forgetting the departures of the steps, if they are narrow. knock 4/5 mm planer under the steps. This is necessary for a good fit of the steps and under the steps to the cusor. Having installed the kosour in place, you can mount the steps into the house, not forgetting the departures of the steps, if they are narrow.
Stairs pictures.
Installation of balusters.
Wooden balusters drawings sizes of options, which are very many and mount the handrail last, you can make metal balusters, but that's another topic. How do-it-yourself bolts can be very clearly seen in the second photo of the article, there you can also see the installation pattern of balusters. 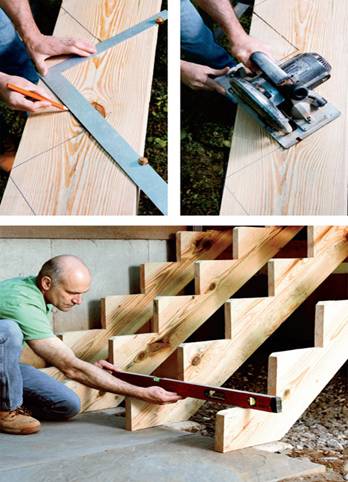 In conclusion, I note that it is necessary to impregnate all wooden parts with impregnation from a woodworm, rotting, treat with a planer and sand the surfaces, impregnate them with linseed oil and open with varnish after installation. A tree under the kosuor, under the steps, handrails - pine. Under stairs and balusters and poles, the best option is an oak board and boards. The volume of our article cannot include various options for wooden stairs in the interior of the photo can be viewed online. In conclusion, I note that it is necessary to impregnate all wooden parts with impregnation from a woodworm, rotting, treat with a planer and sand the surfaces, impregnate them with linseed oil and open with varnish after installation. A tree under the kosuor, under the steps, handrails - pine. Under stairs and balusters and poles, the best option is an oak board and boards. The volume of our article cannot include various options for wooden stairs in the interior of the photo can be viewed online.
Some people believe that the manufacture of stairs is a very complex and time-consuming process and it is better to entrust it to professionals. Perhaps they are right, but in fact, having a bit of free time, desire, a small set of tools, you are able to complete the installation of the stairs yourself. Well, so that you do not get confused and do not get lost when building a staircase in your private house, we have prepared this article. Types of stairs By their design, the stairs are divided into many types and subspecies. Before starting the construction of the stairs to the second floor, it is necessary to determine its type, because their classification is based on many signs: - according to their purpose, they are divided into the main ones that are used regularly in everyday life; auxiliary (these include stairs for the roof, service and spare stairs). Front staircases, landscape gardening and moving stairs (an escalator) are also distinguished;
- depending on location distinguish between internal stairs, street stairs, intra-apartment and intra-house;
- by material used distinguish: wooden (from oak, pine, beech, larch, ash, cedar), concrete (mainly made of stairs in most residential and industrial premises), reinforced concrete, brick, metal, forged, rope, glass and plastic, from natural and artificial stones; there are also various combined options;
- stairs are divided by type of construction: kosour, bowstring, on bolets, cantilever stairs (soaring stairs), modular;
- by the presence of risers distinguish between open, closed and half-closed stairs;
- by the number and configuration of marches staircases are divided into single-march, multi-march, rotary (you can make U-shaped, L-shaped staircases and interfloor spiral stairs);

- depending on the form distinguish between straight, running steps and steps called the "goose step".
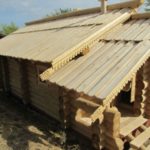
A do-it-yourself staircase can become a home decoration and a source of pride. Its creation is a very exciting process, and determining the type of staircase you want to make is the most initial and very important stage of construction, which will help you to most fully form an idea of \u200b\u200bhow the whole structure should look like. The main components of the stairsThe main details of the staircase will largely depend on what type of structure you have chosen for the construction. A very interesting and quite budget option of a staircase can be a staircase made of logs in the country or in a private house in the village. In this example, we will try to analyze all possible combinations and variants of the necessary elements of the stairs. 
The list of necessary elements:
- ladder frame - a log ladder with your own hands can be howled on a metal frame (not quite a budget option due to the high cost of metal), but this option is rarely used due to the fact that the most harmonious log ladder will look when using wooden stringers, in addition it is also possible version of the construction on bolts using railing racks and steps as a supporting structure;
- steps - for the steps of the stairs themselves and the logs will be used, first they need to be cut in half, it will be more convenient to do this with a circular saw;
- march flights and turning platforms separating them;
- handrail - various options are possible, both wooden, forged, metal, and combined, it all depends on your design decisions;
- balusters - racks for railings;
- riser - using a riser in this version of the stairs is not advisable.

Stair design requirementsWhen building stairs, it is necessary to adhere to the standards developed and specified in GOST and SNiP. Particular attention should be paid to the following indicators: - flight of stairs, if it is not observed, it may turn out to be too steep stairs;

- necessary for comfortable ascent or descent, the most optimal width of the steps (tread) is considered to be a width sufficient to fully accommodate the feet on it;
- (riser) is a very important parameter, observing which, you can reduce the load on many muscle groups and facilitate lifting / lowering;

- also a very important parameter is the size of the opening in the ceiling, because it also depends on how comfortable climbing the stairs will be, especially for tall people. In case of insufficient opening, going up or down the stairs, a person will be forced to bend over so as not to hit his head.

Assembly and installation instructions
Probably the most important thing when installing the stairs with your own hands is a step-by-step instruction, because in order not to miss a single detail, you must have an accurate plan of action. There are many different examples in which people, believing that “it will work out for me” or “should keep it wherever it goes”, of course, they are faced with the fact that the built staircase is simply not suitable for use and in order to correct the mistake, most often you have to redo a lot or even start all over again. After all, your task is not just to make a staircase so that it is, it is necessary to make an integral part of the house, which will serve for a long time, reliably and will become part of the interior, so the speed in these matters is not an assistant. Below we will analyze the main points that you need to pay attention to: - preparatory stage (to determine the materials used, the form and location);
- calculations (the most important stage in the technical plan, failing which, you run the risk of making a lot of mistakes that will lead to the inability to use the stairs in the future);
- installation and installation;
- stage of processing, design, decoration.
How to make a staircase to the second floor of glass
The staircase to the second floor made of glass is probably one of the most unusual and interesting versions of the staircase. Such a staircase looks very easy in the interior, a huge plus is that it can, as it may be completely invisible, be a key element of the interior with proper design and lighting. 
A glass staircase is probably almost the only kind of staircase that is difficult to do yourself without resorting to the help of professionals.
Most of the stairs can still be done independently, depending on the type of design chosen: - on a metal frame;
- on bolets;
- cantilever staircase.
You can find more detailed information about each type of construction on our website. The most difficult and crucial moment is the preparation of glass steps and fences. The thing is that in order for the glass to be strong enough and withstand the necessary load, it must go through the stages of hardening and gluing to ensure maximum resistance to possible loads. In terms of reliability, such a ladder is not inferior to analogues of wood and metal.
The thickness of the steps made of glass may vary depending on the project, but it should not be less than 19 mm. 
At first glance, it may seem that the glass will be slippery and such a ladder can be dangerous, for this step they must undergo a special treatment, the surface is slightly roughened and a special coating is applied to it, which prevents slipping.
It is dangerous to use glass stairs on the street. From moisture or frost, the glass will be very slippery and this can lead to falls and injuries. It is also not recommended to use such a ladder in interior rooms with high humidity. How to make a forged staircase at home
Forging is the most beautiful and elegant material for stairs. Wrought iron staircases quite often attract the eye; a feeling of a truly royal interior is created. 
Wrought iron stairs are used not only in the interior, very often they are installed on the veranda, terrace.
Creating a forged staircase with your own hands in most cases is possible only using the technology of “cold forging”. For hot forging, a special hearth (furnace) will be needed to heat the metal. In financial terms, hot forging is a more expensive method and impractical for small production at home for your own needs. Consider cold forging technology. Although cheaper than hot, it also requires an additional tool. In the simplest version, a vice, a gas key, a hammer are needed, but with such a set of tools it is difficult to create many similar parts for the stairs. To do this, use a specialized tool: - snail - with its help, it is possible to make a spiral from a bar with a diameter of up to 12 mm;

- bend - allows you to bend the bar both in an arc and at a certain angle;

- flashlight - with its help it is possible to make artistic elements, such as lighting lamps and baskets from a bar (up to 16 mm for a square section and up to 30 mm for a round);

- wave - skipping a round or square bar, you can get a sinusoidal element. Dimensions are set individually;
- twister - a bar for equipment can be bent around the axis several times. Outwardly resembles a flashlight, the work is carried out with the same diameter of the workpieces.
After all the elements are given the necessary pattern and bending, a welding machine is required to connect all the elements. At each junction of the elements with each other and with the frame, small point seams must be made so that, if necessary, it is possible to tear off and make changes. After the railing is assembled, it is necessary to thoroughly boil all joints, clean and process. How to make a wooden staircase in the country?
The warmest material for the stairs is wood, it brings additional heat to the cozy atmosphere of the house. Wood is probably the most malleable material with which you can make staircase elements in a variety of forms and styles, from classic rectangular and strict to carved, with various bends and shapes. 
Before proceeding with the manufacture of the stairs, it is necessary to carry out complete calculations of all parameters, the width of the stairs, the height of the steps, the angle of inclination of the stairs and, of course, determine the type of structure. The type of tree to be used for the stairs is also selected.
Making in a house from a log house, you will have to go through the following steps of installing a log ladder: - Rounded logs will act as kosoura in this ladder. First, in logs, it is necessary to prepare semicircular notches of the same diameter as for logs used for steps.
- Steps are possible in two versions. Sawing the log into two identical parts in half, we get two steps. Or you can make a selection in the middle of the log so that the edges of the log remain round, and in the middle it is flat. It is necessary to provide that this flat part is so wide that two people can disperse on the stairs.

- The final step in the installation of any wooden staircase is the processing of wood. Wood is subject to decay, destruction due to the formation of mold or insects is possible, a fire of wood is also a very dangerous moment, to eliminate all of the above points, it is necessary to treat the wood with antiseptics and fire retardants. Please note that some elements must be processed before you fully assemble the stairs, because some parts will then be inaccessible, as they will overlap each other, for example, recesses on the kosoura.
We presented a variant of the simplest single-march log ladder. Depending on the characteristics of the building, the height of the ceilings, the space for the stairs, there are many options for stairs, with rotary platforms, screw. Wooden stairs also do not have to be log or carved. Depending on the design, there are many modern options for wooden stairs, which in their uniqueness can compete with glass stairs. How to build a concrete staircase in a house
If you decide to build, then this design will be the most durable, reliable and will last longer than its counterparts from other materials. Durability and strength are achieved provided that all building standards are observed, both in terms of the dimensions of the stairs (so that flights, sags, without proper strengthening), and in terms of using high-quality materials in the right proportions. 
With a properly built structure (staircase formwork) it is possible to build a wide variety of stairs - from classic straight single-march or corner stairs to round (spiral). It is also possible to build stairs according to an individual design project with the craziest forms.
Consider the step-by-step construction of a staircase in a private house with your own hands: - As we wrote earlier at the initial stage (at the design stage), in order to achieve the required structural strength, it is necessary to perform all the calculations according to the selected type of ladder. The main thing to remember is that any non-standard staircase requires careful attention to calculations.
- At the next stage, it is necessary to prepare the formwork, the design of the formwork must be strong, so special attention should be paid to the materials used. Boards or plywood from 20 mm are best suited, bars for supports of at least 50x100 mm. If there are semicircular elements of the stairs, it is better to use a thin sheet of metal, it is strong enough, will not break under the weight of concrete and is quite elastic to give the steps a rounded shape. The weight of 1 m 3 of concrete is 2-2.5 tons. This must be remembered when selecting materials for formwork. The connection of formwork elements is best done with self-tapping screws.

- An additional reliability is given to the staircase by a reinforced frame, the presence of which is mandatory in order to avoid the appearance of cracks in concrete, the presence of which can lead to the collapse of the entire structure. The metal frame is formed of reinforcement with a diameter of 10-12 mm. It is important at the stage of pouring the floor and floors in the places of docking with the stairs to leave the protruding reinforcement to link it with the metal structure of the stairs.
- Finally, the pouring stage. Concrete quality must be at least B 15 (cement quality at least 400), it is allowed to use special stabilizers and water repellents, which increase the strength of concrete. It is necessary to fill the entire staircase at once. In the presence of a large number of marches, the fill should be divided by spans.
- After pouring, remove all air bubbles from the concrete. To do this, you need a special vibration tool. He plunges into the already poured concrete, under the influence of vibration, air will come to the surface, this increases the strength of concrete, excluding porosity.
- In conclusion, the concrete should harden and become more durable, for this it is necessary to moisten the concrete periodically, in hot weather, the stairs must be covered with a film to slow down the evaporation of moisture. If this is not done, cracks form, due to the fact that the concrete has dried faster than it hardened. After 20-30 days, the concrete will gain the necessary strength, after which you can remove the film and formwork.
Do-it-yourself metal staircase in the cottage
We have already considered one of the types of metal stairs above (forged stairs), in this section we will consider a simpler option for building stairs to the second floor from metal. Of course, from this material it is possible to build not only a simple staircase, but also the most unique one, it all depends on your project and your abilities. We, in turn, will try to describe as clearly as possible all those actions that you will need to perform so that you get exactly the ladder that you have in mind. 
As with the construction of any staircase, at the initial stage you need to make all the calculations according to the chosen staircase option. Depending on the type of construction, dimensions and calculations, you should choose the materials for your future staircase.
In this article, we will tell you about a simple single-march staircase made of metal. - The kosour for the stairs will be made of a channel or a rectangular pipe 80x100 mm. Two channels must be placed on the edge at a distance according to the design width of your staircase.

- If the flight of stairs must be made long, then it is imperative to install retaining posts.
- Next, fillets must be welded to the channel, which can be made from the channel of the same size, fillets must be welded to the channel mirror.
- In the future, steps that can be made of various materials depending on your interior and the place of operation of the stairs will be laid on the filly made earlier.
Painting and decorating stairs
After you have completed the construction of the stairs, you are faced with the task of upgrading the stairs according to the interior of your house. Finishing concrete stairs can begin without any intermediate steps. There are many variations of the design of concrete stairs, the most common options: - Wood staircase - it can be either a laminate or an array of wood. Using a tree to finish a concrete staircase, one can achieve such results that upon completion of work it will be difficult to understand that the staircase was originally concrete.

- Painting stairs - it will be necessary to putty the entire staircase for painting in order to achieve a smooth surface, in this embodiment it is better not to putty the steps themselves, but to immediately paint, because under load when walking the putty will fly off the steps with the paint.

- Cladding stairs - there are many options for tiles: ceramic, porcelain, clinker. The choice of tile largely depends on the location of the stairs and on the environment (should the tile be frost-resistant, anti-slip, etc.).

Do-it-yourself hand-made forged stairs and stairs made of metal must be additionally treated with a primer before starting to paint them, this is due to the fact that the metal is subject to corrosion and it is necessary to prevent the formation of rust and metal destruction.
Wooden staircases and log staircases are most often treated with transparent varnish to preserve the texture of the tree, but no matter what you start painting the wooden staircase, you must also process it to prevent the formation of mold, fungus or insects. The glass staircase requires minimal processing, although a lot depends on the version of such a staircase. If the staircase is made on a metal frame, then it must also be processed, as described previously.
If you have already built a two-story house or are the owner of a two-level apartment, then the topic of building a staircase on the second floor will be interesting for you. In order to acquire a comfortable and high-quality staircase system, you have only three ways: to buy a finished construction in a specialized store, to order the necessary model for a carpenter master, to make a staircase with your own hands.
For those who have chosen the third option and this article is devoted. In it you will learn a lot of useful information about the staircase construction, as well as read the step-by-step detailed instructions for manufacturing the stairs in the photo and video. For owners of a two-level dwelling, the staircase of the second floor is a necessary attribute of the interior What are the stairs - a bit of theoryBefore you begin to build a staircase with your own hands, you need to decide on the type of design that will be most suitable for your home. Types of stairs by design typeWe will choose a system from three types: - Marching.
- Screw.
- Combined.
We will understand a little with each of them. MarchingThis type is the easiest to manufacture and therefore, if you decide to make a staircase with your own hands, then this option will be the most suitable for you.
 Single-march designs, despite their apparent simplicity, can be beautiful and spectacular Single-march designs, despite their apparent simplicity, can be beautiful and spectacular Marching stairs, in turn, are divided into types: - single march;
- two-flight;
- multi-marsh.
 Both the first and second types are considered not difficult to manufacture and are in greatest demand. ScrewSuch stairs are a spiral that goes up to the second floor. This type saves a lot of space, but it is laborious in production.
 The spiral staircase is original and beautiful, but its manufacture is best left to professionals. The spiral staircase is original and beautiful, but its manufacture is best left to professionals. CombinedThese systems combine the two previous types. Their manufacture is the most difficult and therefore not suitable for self-construction.
 Combined systems are more complex in production and it will be quite difficult for a novice to install them Combined systems are more complex in production and it will be quite difficult for a novice to install them Do-it-yourself staircase - manufacturing instructionsFirst, we will determine the material of manufacture and prepare the tool necessary for the job. Material selectionFor the production of staircases, you can choose: - tree;
- a rock;
- concrete;
- metal;
- plastic.
 For the manufacture of stairs, you can use a variety of materials. For the manufacture of stairs, you can use a variety of materials. The most suitable material for self-made stairs is, of course, natural wood. Its advantages are obvious: - environmental friendliness and safety;
- non-toxicity;
- simplicity in processing;
- relatively economical price;
- long service life.
Therefore, for the construction of our stairs, we will choose a natural tree. It is best if it is pine wood - spruce, pine. You can also use ash, beech, maple, oak, birch and other species.
 Natural wood - the best choice for the manufacture of stairs yourself Natural wood - the best choice for the manufacture of stairs yourself So, we decided on the type of construction being constructed - this is a marching staircase. We also chose the simplest and most environmentally friendly material in processing - natural wood. The next point is to prepare the necessary tool. Cooking toolTo make a wooden staircase with our own hands, we need: - Measuring devices - tape measure, ruler, level.
- Manual electric drill.
- Hacksaw for woodwork.
- Screwdriver.
- Hammer.
- Power Planer.
- Sandpaper.
 The optimal set of necessary tools The optimal set of necessary tools Cooking the basic elementsBefore mounting the staircase system, the following parts must be prepared: - Treated boards of the required size (in accordance with the drawing).
- Whetstones for the production of steps.
- Boards for risers.
- Bowstrings or kosour (depending on the type of construction).
- Railings, balusters, handrails - these details can be bought ready-made.
- Fasteners - screws, screws, bolts.
 This figure shows in detail all the components of the structure. This figure shows in detail all the components of the structure. The main stages of installationIn order to make a quality staircase with your own hands, use the following manufacturing instructions in photos and videos. Stage 1. Schematic drawingWe draw a drawing in which we outline the main elements of the future design.
 Stage 2. Perform the necessary calculations.Performing design calculations is probably the most exhausting process, but still it must be completed. You can do this in a few steps: - determine the height of the structure - to calculate it, measure the distance from the floor plane of the first level to the floor of the 2nd floor. This will be the length of the march;
- determine the height of the steps - usually the most optimal height for a person of average height 17 centimeters;
- we calculate how many steps and risers are needed - for this, we divide the height of the stairs, which we have already measured, by the height of the steps (17 cm);
 Before making the stairs, it must be calculated Before making the stairs, it must be calculated - the width of the tread - for convenience when walking, the smallest value of this parameter should be 22 cm, and the largest - 40 cm.
 Stage 3. Making a kosourWe cut the beam prepared for this part to the desired size and cut out the notches of the right size to set the steps.
 Stage 4. Checking the kosourTo do this, we put it to the place where the staircase will be located, if necessary, make adjustments to the details.
 This diagram shows the detailed calculations of the kosour This diagram shows the detailed calculations of the kosour Stage 5. We fasten the kosourWe attach braces and fasten them together to the upper beam using anchor bolts.
 We securely fasten the kosour with anchor bolts We securely fasten the kosour with anchor bolts Stage 6. Installation of stepsAttaching risers to the kosour is carried out using self-tapping screws.
Today, most country houses are built in two or more floors. And in this case, the question arises of moving between levels, or rather, the construction of stairs. For these purposes, you can use a variety of materials, both traditional and modern. But probably, one of the most popular materials for the construction of stairs (and other structures) is wood. It is beautiful, relatively inexpensive, and you can do everything yourself. This article will discuss how to make a wooden staircase with your own hands.
Preparatory stage
Before starting the construction of a wooden staircase in a country house, it is worth considering some details. Firstly, it is worth deciding on the type of design. In private housing construction most often used two types of stairs:
Each of them has its advantages and disadvantages. So, for example, a spiral staircase made of wood will take up much less free space. But at the same time, such designs are complicated in execution. In addition, the stairs themselves turn out to be rather narrow, it can be difficult for a “big” person to walk along it (not to mention the transfer of large furniture or objects).
The most common option for a private home is considered wooden flight of stairs. Such designs can be easily done with your own hands. They are quite spacious and easy to operate. Marching stairs, depending on the height of the second floor, can be with one or two spans. But there is no fundamental difference in the construction of each type.
Secondly worth decide on some more parameters. Namely:
- how much free space you can allocate for the installation of the stairs;
- what is the height between the floors;
- what maximum load the staircase will have to withstand;
- what details the construction will consist of (what type of steps to choose, what their height and width are, what protections to use, etc.).
The appearance can be determined by viewing numerous photos and views from the Internet. Here you can find original solutions, some of which can be fully implemented independently, with your own hands. Also from the video you can learn more about the instructions for the manufacture and installation of wooden stairs.
Once you have decided on the type of wooden staircase and its components, it is worth preparing all the necessary material. But for this you need to do the calculations of the future design and its drawing. initially we calculate all indicators. Namely:
 It is also worth considering the width of the clearance above the stairs. When you climb the stairs, then above your head should be free so that you do not hit. The length of the kosour or bowstring is also calculated.
Preparation of the necessary material and tools
 Knowing all the design parameters, you can prepare the necessary material. Wooden stairs can be made from different species. Many experts recommend the use of oak, beech or larch. But such materials are quite expensive. The most commonly used conifers. They are quite durable, easy to process and are inexpensive. Knowing all the design parameters, you can prepare the necessary material. Wooden stairs can be made from different species. Many experts recommend the use of oak, beech or larch. But such materials are quite expensive. The most commonly used conifers. They are quite durable, easy to process and are inexpensive.
When buying wood, it is important to pay attention to its quality. There should be no rotting places, knots or deformations on the boards. Also ensure that the wood is well dried.
For mounting a wooden staircase in the house you will need:
- bars for kosour, their thickness should be at least 50 mm, and the width in accordance with the dimensions of the steps. The length of the bar should be enough for the entire length of the march, stitching two bars is not allowed;
- tread boards 40 mm thick;
- access boards 30 mm thick;
- balusters, railings and other additions are best purchased in finished form, they will have a more aesthetic appearance;
- galvanized screws, screws and anchor bolts for fastening.
In addition, it is necessary prepare a tool for work. Namely:
- devices for marking and measuring (tape measure, rulers, building corner);
- to make holes you will need a drill (preferably an electric one);
- a hacksaw for wood (for large parts) and a hacksaw for metal (for small parts);
- screwdriver or better screwdriver with a set of nozzles;
- hammer and chisel for making grooves;
- a plane (preferably electric);
- sanding belt.
Well, of course, a detailed design should be at hand.
Building a staircase
Now we will get acquainted with the installation instructions for the most wooden staircase in the house. The drawing is ready, the materials and tools in place, you can proceed. Installation of stairs do it yourself in the following sequence:
 This completes the assembly of the stairs. Remains only cover all surfaces protective layer in the form of varnish. If you wish, you can paint all surfaces with paint.
If you want to build a staircase of wood in a country house with your own hands, then this thing is quite feasible. The main thing is to carefully calculate everything, make a preliminary drawing and pick up good material. And then a little effort and time spent and a beautiful and comfortable wooden staircase, made by yourself, is ready. She will surely decorate your home and bring coziness and comfort into it.
To decorate the house with a beautiful wooden staircase, it is not necessary to spend a lot of money on this. If you like tinkering, you can make it yourself. Next, we will describe in detail how to build a wooden staircase at home.
Before you build a ladder of wood with your own hands, we determine the type of its design.

All existing stairs are divided into two main types:
- Screw - have steps located around the axis;
- Marching - the design consists of smooth steps forming a direct march.

A beginner should not take up the construction of a wooden spiral staircase, since it is difficult to make it. In addition, they look interesting, but very inconvenient to use.
It is more expedient to make a marching construction. Depending on the nuances of the device, it is divided into several subspecies:
- Single march - represent the simplest designs, since they do not have a landing;

- Twin march - the design contains two flights, between which there is a landing or rotary steps.
Two-flight stairs, depending on the location of the Mershes relative to each other, are also divided into several subspecies:
- Straight - both marches are located along a straight line;
- L-shaped - marches are located at right angles;
- U-shaped - the angle between the marches is 180 degrees.

I must say that there are still multi-flight constructions, however, in private construction they are used extremely rarely, since they are not necessary. As for the choice of form, then focus on the size of the room and its features.
In some cases, it is advisable to install the L-shaped structure, placing it along the walls, in others, in order to save space, it is better to place marches at an angle of 180 degrees.
Construction technology
So, we figured out the types of structures, now we build wooden stairs with our own hands.
We divide the whole process into five steps:
- Design;
- Preparation of materials
- Assembly and installation of the structure;
- Finish.

Design
Before you build a wooden staircase to the second floor so that it is not traumatic.
Listed below are all the basic requirements that must be considered when calculating:
- We do all the steps with the same parameters. Since when moving along them, a person has muscle memory, so steps of different depths or heights will make the ladder extremely traumatic;
- The sizes of the steps are selected taking into account the step of the person. Therefore, the main parameters should be within certain limits:
- height - 140-250 mm;
- depth - 250-330;
- Avoid long marches - if the structure contains more than 14-15 steps, it is advisable to split it into two marches;

- Do not save space due to the angle of inclination. A march with an angle of over 45 degrees is inconvenient to use, which means it is traumatic.
Getting to the calculations, measure the parameters of the room, namely, the height of the ceiling and the area reserved for the structure. For example, the height is 2.8 meters. This value is the starting point from which we begin the calculation.
First, find out how many steps are needed, for this we take an arbitrary optimal step height - 18 cm. Now we divide the height of the structure by the step height - 280/18 \u003d 15.55 pcs.

Since the quantity cannot be fractional, we will correct the height - 260/16 \u003d 17.5 cm, i.e. we have 16 steps with a height of 17.5 cm. Please note that there will be no last step, instead we have the floor on the second floor.
We will divide the structure into two marches of 8 steps. In fact, each march will have 7 steps + a landing or a floor.
Now we calculate the depth of the steps according to the formula - 2b + c \u003d a, where:
- a - the step length of a person, which is in the range of 60-64 cm;
- b - height, in our case is 17.5 cm;
- c is the desired depth.
From this formula we find the desired depth 62-35 \u003d 27 cm. This value fully corresponds to the above requirements.
Knowing the depth of the step, we calculate the length of the march, i.e. the projection of each march to the floor is 27x7 \u003d 189 cm. We will make the march 1 m wide so that it is convenient for one person to go down or climb it. As for the landing, it should also have a depth of at least 1 m.

If the design is too large, i.e. It doesn’t fit in the designated area, the basic parameters can be adjusted, i.e. increase the height of the steps and reduce their depth, but within acceptable values.
- a is the length of the march;
- b - march height
- c is the desired length of the beams.
Now that you’ve figured out the calculations, you need to decide on the design and prepare a drawing, according to which the construction of the stairs from the tree will be carried out.
Note! The basis of the march is a beam. It can be flat or with cutouts under the steps. The first is called a bowstring, and the second is called a stringer.

Next, we will consider how to build wooden stairs on two slopes, since they are more durable and, moreover, look more attractive, though they are made somewhat more complicated. In addition to the steps, the staircase will have risers that hide the space between the steps.
Note! If the width of the march exceeds one meter, the number of beams must be increased. So for a two-meter march will need at least three kosour.

As for the landing, this is a simple design on four supports, which is lined with boards on top. Also, the staircase must have a fence. In our case, it will be a handrail mounted on racks (balusters).
Advice! Having decided on the nuances of the design, depict it on paper and indicate the dimensions of all the details.
Preparation of materials
Do-it-yourself wooden staircase construction requires the following lumber:

- "Forty" 300 mm wide for beams;
- 3x30 cm board for steps;
- Boards 2x20 cm for risers;
- Bar 100x100 for racks of the platform;
- Paintwork.
For fencing, if you do not have a lathe, it is advisable to purchase ready-made balusters. The price for them starts from 200 rubles.

The toolbox will need a standard:
- Hacksaw or jigsaw;
- Chisel and hammer, it is desirable to have a milling cutter;
- Electric drill;
- Tape measure and pencil;
- Screwdriver.

Advice! To install the structure you will need a wooden building ladder. If you do not have such a ladder, it is not difficult to make it. To do this, take two beams or two boards, and fasten the lintels between them with nails or screws. As a result, a ladder will learn.
Of course, the construction ladder type is more convenient to use wooden stairs. They are made quite simply - for this you need two ladders, the ends of which in the region of the upper edge are connected by metal axes.

To fix the stepladder, you can make jumpers from wooden planks with hooks. Their task will be to withstand the spacer load, preventing the ladder from “parting”.
Manufacture and installation
So, our goal is strong and beautiful wooden stairs - see below for how to build them:
| Artwork
|
Actions
|
|

|
We start by marking the beam according to the project. We draw lines of steps and risers. The angle between them should be 90 degrees. The lines of steps are drawn at an angle equal to the inclination of the stairs so that after installing the beams, the cutouts are located horizontally.
Note! The length of the cutout under the step should be 5 mm shorter than the depth of the step, which will ensure a small overhang.
|
|

|
We cut the beams according to the markup with a hacksaw or a jigsaw. |
|

|
We cut the steps of the stairs and risers from the boards. |
|

|
Install the racks of the site. To do this, we attach glasses to the floor under the beam with anchors or self-tapping screws, after which we insert supports into them. We connect all racks with jumpers. |
|

|
We mark the location of the beams on the racks. |
|

|
Install the beams of the first march. Fasten to the supports with screws and strengthen with screws. If there is a milling cutter, we make a groove in the rack, and milling a spike in the beam, for a more rigid and reliable joining.
|
|

|
Then install the beams of the second march. We fasten them to the ceiling and racks of the site. We use corners for this, as shown in the photo. Note! Beam cutouts should be in the same horizontal plane.
|
|

|
Now we trim the beams with boards. We fix the steps and risers with screws so that their hats are slightly deepened. First, we must drill holes for the screws. |
Advice! During construction, it is advisable to glue wooden stairs. To do this, you can use ordinary carpentry or, for example, epoxy glue. As a result, the structure will not creak and it will turn out more rigid.
On this, the bulk of the work is completed. Now it remains to install the fence and finish the stairs.
Installation of fencing
Now we will make the fence of the stairs made of wood - the construction of this structure is carried out as follows:
| Artwork
|
Actions
|
|

|
To install balusters, in each step we drill holes along the diameter of the dowels, and glue the dowels into them. All of them should be located on one line so that the fence turns out to be neat.
|
|

|
At the end of the baluster, we drill holes for dowels and also lubricate with glue. |
|

|
String the dowels on the dowels and leave for a while until the glue dries. |
|

|
We cut off the tops of the balusters so that the handrail is parallel to the march. To do this, you can fix a board or bar on them with clamps, as shown in the photo. |
|

|
We fasten the handrail to the balusters in a hidden way. To do this, screw the screws at an angle from below. We pre-drill holes so that balusters or handrails do not crack.
|
Finish
To make beautiful and durable wooden stairs, complete the construction with high-quality finish. It is performed as follows:
| Artwork
|
Actions
|
|

|
We begin the finish with a design inspection. We cover all the flaws, such as cracks or chips, with putty in the color of wood. |
|

|
Then we walk along the surface with a fine sandpaper or grinder. |
|

|
We get rid of dust on the surface of the product, for example, with a vacuum cleaner. |
|

|
We cover the product with varnish using a paint brush. We start work with a fence. Then varnish the march. After the varnish hardens, repeat the work at least once.
|
Note! If you use a water-dispersion varnish, after the first layer has hardened, it must be sanded, since water raises the wood fibers. If this is not done, the surface will be rough.
That's the whole step-by-step instruction for the construction of wooden stairs.
Conclusion
Now you know how to design and assemble a building ladder with your own hands made of wood. The most important thing is to work carefully and carefully, and then making the stairs will not cause you any difficulties, even if you have little experience with wood. The attached video in this article will provide additional information.
|