Website sections
Editor's Choice:
- Laying ceramic tiles on plywood
- The technology of cutting the log house into the bowl - all stages
- Independent manufacture of interior doors
- Rules for grinding cylindrical logs Grinding log ends
- DIY wardrobe
- How to age a tree - the best tips with video How to make artificial aging of wood
- Recommendations for calculating the beam on the house
- Shelves in the bath: height, size and material What should be the shelves in the steam room
- Table transformer do-it-yourself drawings - photos and video
- Making wooden stairs on a metal frame and on concrete marches with your own hands for a private house How to make a staircase with your own hands
Advertising
| The advantages of the technology of manufacturing a log house in the paw. Ways of cutting timber and logs: options for corner joints and their differences How to chop step by step in the paw |
The final result of wood construction looks great. But few people know how many labors it requires, remembering that in the old days log huts were cut without a single nail. Particularly difficult is the cutting of corners, which has several methods and technologies. Firstly, all types of cutting are almost the same technology, with the exception of several. Secondly, to assemble a blockhouse “without a single nail”, cutting down not only the corners, but also the additional coupling - grooves, spikes and other things will be required. So, how to cut a log house in a paw is the most popular cabin.  TechnologyThe cutting process has several solutions., its advantages are as follows:
Stages of preparation and assemblyThe process - cutting the log house into the paw, includes several stages:
They should be slightly larger than the diameter of the circle where they will enter, this is a reliable mount. The design can be strengthened if such stakes are used along the entire length.
ToolThe venerable carpenter, who began to cut log cabins under the supervision of his father or grandfather, does all the work with an ax only. The beginner needs a whole list of cutters:
It is not bad to make a sketch of your work first, and at the same time to calculate how much material will be spent on the process and the marriage. And whether own work is worth such a ruin. Perhaps, having calculated everything, the owner of the construction site will decide to hire a team for work. Masters have all the skills and can suggest a way of cutting corners of the future home, in just one inspection of the beam. Because when buying material it is worth considering it from all sides and understand the degree of quality:
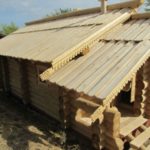
Pre-assemblyUntil the moment when the beam begins to take shape as a designer, a lot of time will pass. We'll have to collect the bar “for live”, that is, to conduct a dress rehearsal. The house or bath is collected, the elements are carefully numbered, then disassembled and dried.It is necessary to carry out such a process in order to avoid the risk of drying out an already assembled log house, and thus protect yourself from unnecessary expenses and work. Also, during this period, it is possible to carry out the processing of each log or timber, so that then you do not lose time on this. After the house is assembled and caulking done, the final result of felling using this technology will become clear only after a year, when the first shrinkage of the house or bathhouse occurs. EstimationBefore asking yourself the question - how to cut down a house in your paw, you need to think about the problems associated with such felling without sufficient qualifications. Firstly, due to the master mismanaging the ax, gaps in the corners are inevitable, that is, on the paw. With shrinkage, this will inevitably affect, and if you do not notice the problem on time, then everything will turn out disastrously - the log house risks falling apart. Such flaws are solved by inserting wedges in dry places and timely caulking. Secondly, the corners when cutting a log house into the paw will require additional insulation either from the outside or with a more dense layer of thermal insulation from the inside. Foam can be used from the street, but then you should not wait for any beauty - this method is good if the house is designed for cladding. In general, chopped houses “in the paw” are very beautiful, especially after decorative processing. It can include varnish, paint, stain and more. Do not expose to chemicals only logs intended for the bath.And the last, if we neglect the additional fasteners along the entire length of the beam, then over time the tree will “lead”, plus the log house will shrink. Needless to say, what will happen then? All of the errors listed are far from the last, therefore, before gathering your courage and deciding for yourself the question - how to cut a log house in your paw, you need to calculate your strength, because not everyone has the courage to start all over again. Felling walls “in the paw” can be simple and complex. In the first case, plug-in spikes are used, in the second case, radical ones (Fig. 1). The technology of cutting walls "in the paw" is different in that the logs do not protrude beyond the corners of the log house. This cutting technology is called cutting without residue, it is more complex and time-consuming compared to cutting in the cloud and requires a more qualified approach. All elements of the log house with this method of installation are adjusted very carefully and any deviations can lead to the fact that the house will be purged, and no seals can help get rid of this drawback. Start felling with the fact that the ends of the logs are carefully marked, starting with a log whose top in the upper cut has the smallest diameter (Fig. 2). Subsequently, this log should become a standard, and the end parts of the remaining logs should be marked according to the size of its “paws”. All deviations in the marking of the “paws” can lead to a violation of the verticality of the corners of the log house and their tightness, therefore, marking, and even more so to the processing of “paws”, should be given maximum attention. One edging, designed for the inner side of the wall, is cut along the entire length of the log. The edging opposite to the inside is trimmed to a length equal to one and a half to two diameters of the log. At the same time, the end of the log, cut from two parallel sides, is called a "blockhead", the planes formed in this case are called "cheeks", and the untreated convex surface is called a "bite". The two remaining edges are trimmed to a length slightly larger than the diameter of the log. It is much simpler and more convenient to mark the “paws” with a special template, which is made according to the procedure indicated in Fig. 3. For this, two identical circles are drawn on a cardboard sheet for patterns No. 1 and No. 2. In this circle, two mutually perpendicular diametrical lines are drawn through its center. Connecting the points of their intersection with the circle, get a square. Then the opposite sides of one square are marked in different proportions 8/8 or 6/8 and 4/8, etc. The resulting templates, if they are made of paper, are glued to the base and cut out. In the places where the vertical line ended, make the notches necessary for the further marking of the ends of the logs. During the marking of the “paws”, the template is applied to the end of the log, combining the notch cuts with the line of vertical diameters drawn earlier on the ends of the logs, and circling it along the contour. After flashing the sides of the logs, all facets of the “paw” are drawn. When making “paws” in logs thinner than 22 cm, the sides of the patterned squares are divided not into 8, but into 12 parts, and then the proportions of division look already like 8/12 to 6/12 and 6/12 to 4/12. “Paws” are prepared on all logs of the future log house, carefully customized, they make the control assembly of the log house next to the foundation and left to dry for several months. After the logs have dried, they are laid on the foundation, final assembly is carried out with a heater laid between them and fixed with insertable spikes. The caulking of the joints is performed during the final assembly and a year after it. The traditional material for the construction of the Russian bath is a whole log. In addition to an affordable price, a sawlog (aka a round log) also attracts another feature: a person with little experience in carpentry can make a log house with his own hands. You will need: the availability of time, the desire to learn and theoretical training, combined with practice. Hence the purpose of our article is to clearly describe how to correctly cut down a log sauna with a steam room. We collect a log bathThe first task that must be solved in advance is the allocation of a site for the construction of the bath. Identify a place near the house, preferably near a pond or pool. The recommended location of the building and the indentation from other objects on a summer cottage or personal plot are shown in the diagram. The next step is the preparation of the layout of the premises taking into account the allocated area. As a rule, 3 rooms are made in a sauna - a washing room, a steam room and a dressing room, which at the same time serves as a relaxation room. You can read more about the correct breakdown of the area. Now that the planning is over, let's take a closer look at how to chop and assemble your log bath. So, the work is divided into the following stages:
Lumber selectionIt is customary to build chopped houses from wood of coniferous species - pine, spruce and larch. The latter is better to lay in the first 2-3 crowns, since it is well resistant to moisture. Freshly cut wood is allowed to mature and dry for 1 month.
To build a reliable and durable felling of the bath with your own hands, select and prepare timber, taking into account our recommendations:
Log diameter decreases from butt to top When choosing logs, consider one important feature: the diameter of the trunk necessarily decreases from the butt to the top. The technical name of the phenomenon is safety, ideally it should not exceed 8 mm per 1 meter of running log.
Tool for workSkilled and quick to work with an ax are skilled craftsmen, but even now they use a power tool that greatly facilitates the work when building log structures. The optimal set of carpenter - builder looks like this:
To mark the trunks, you will also need a special device, shown in the photo, a dash (otherwise - a scriber). For its manufacture, you need to take a thick steel wire, sharpen the ends and bend in the form of a compass. Foundation layingLog houses are heavy structures, and therefore it is better for them to fill in the concrete foundation of the tape type. The exception is a mini-bath with a size of 3 x 3 m, under which you can make brick or block pillars, and then put the first crown on these stands. In other cases, it is necessary to mark the contours of the building on the ground and dig along the perimeter of a trench 40-50 cm wide. You need to go deep to a stable layer of soil, lying 0.5-1.5 m from the surface (depending on the region).
Pouring is done with concrete of grade not lower than M150, prepared from 3 parts of sand and 5 of the same volumes of crushed stone per 1 measure of Portland cement M400. In the process of laying, the concrete mixture is compacted with vibrators, and in their absence - with long steel rods. It will take 4 weeks to harden the base; formwork can be removed after 7-9 days.
Installation of the first crownFirst of all, it is necessary to protect the wood from jamming and subsequent decay. To do this, lay on the foundation a waterproofing of two layers of roofing material, and treat the trunks with an antiseptic composition. It is also possible to make an additional gasket from a beam 50-100 mm thick under the lower tier. Then the fun begins - cutting the crown. There are several ways to dock logs in the corners:
The simplest wheelhouse
Bowl cutting The connection with the rectangular groove shown in the photo is suitable only for the construction of the barn. Due to direct gaps, even if caulked, this angle will turn out to be cold, which is unacceptable for a bath. Docking is more reliable, but is rarely used by modern carpenters because of complexity. For beginners, we propose to master the relatively simple and “warm” option - chopping into the upper bowl with a hidden spike, otherwise - into the oops.
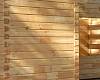
Before collecting a flange, it is necessary to cut a round log along the entire length in order to increase the area of \u200b\u200bcontact with the foundation. The width of the contact spot should be at least 12 cm. To ensure it, lay the log on a concrete tape and mark it with a line resting one end on the foundation surface.
Drawing a line of a stes with a scriber To speed up the work, make cross cuts with a chain saw every 10-15 cm, then cut the wood along and cut the excess with an ax. Make a fine selection with an electric planer, and preferably with a braid.
Now consider how to cut the corner of the flange:
When all 4 corners are cut down, the trunks are laid on a foundation with a layer of moss or jute fiber (it is also stuffed into the joints of lumber) and tightly seated in grooves using a wooden hand rammer. Please note: the connection with the concrete base is not used, the design is rigidly fixed on the groove - spike joints and stands confidently due to a decent weight. WallingThe remaining crowns are mounted on a salary according to the same technology - bowls with spikes that cover the logs of the previous tier are cut at the corners. After a dense nozzle with a moss pad, additional connection with wooden dowels is required, they are also screwed.
Moss - the best interventional heater for a chopped bath A few words about how to collect the second and subsequent crowns of the log house:
So that in the process of shrinkage and further operation, the chopped bath does not squint from the horizontal movement of the elements, they must be fastened together with dowels. These are rods made of dry wood with a diameter of 22-30 mm, driven into vertical holes after laying each crown. The hole pitch is 0.8-1 m, the depth is at least 2 log diameters. In order not to fall into the previous dowels during subsequent drilling and driving, they should be staggered.
Vertical ligament of crowns When you need to grow the log in length, use one of two connection methods - the root spike and the dovetail. In the first case, the vertical groove and spike at the end of the log is rectangular, and in the second - trapezoidal, as shown in the photo. When joining the elements of the outer walls, a clearance of 8 mm is mandatory for sealing packing.
Splicing with molar spike (left) and dovetail (right)
The log walls of the bath are overlapped by a gable roof. It is easier to assemble from bars and boards, which is described in detail. You can make a rafter system from logs, but this process is much more complicated. Okosyachka openingsThere are 2 ways to trim door and window openings:
The first option is more expensive and time-consuming - shortening the logs for sawing the tenon should be foreseen at the stage of construction of the bath. The casing box is made with an internal groove that fits onto the finished flange. Along the perimeter, the pigtail is sealed with the same material that was used for interventional warming (caulking).
The second method is implemented after the construction of the log house by cutting a groove in the ends of the round timber. Then a mortar beam is formed into it, forming the same spike. The further installation procedure of the box is repeated, as shown in the diagram. ConclusionIf in the process of building a log house with your own hands you will observe the above technology and work without haste, then you will surely get a solid and strong bath that will last for more than a dozen years. But do not rush to put the building into operation - the log structure needs to stand for at least 1 year for shrinkage. After that, you can do caulking joints and the internal arrangement of bath rooms.
Design engineer with experience in construction for more than 8 years .. Related entries: 
Choosing between the two classic types of logging angles of wooden log cabins "in the paw" and "in the bowl" should pay attention to their properties. The masters of our company are fluent in both techniques, however, the customer still needs to figure out which of the types of logging corners of the log cabins meets his requirements. In this article, we will conduct a comparative analysis of two classical types of compounds - “into the bowl” and “into the paw”, so that you can decide which one is worth choosing. Felling “in the paw” during the construction of the log house
However, felling “in the paw” has several disadvantages.One of the main disadvantages of cutting “in the paw” is a significant heat consumption. Due to the fact that the spread of cold along wood fibers is much faster than across, and the end face of a log or beam with such a connection is at a fairly close distance from the inside, it is easier for heat to leak out. The heat exchange between cold air outside and warm air inside in a wooden house, cut down “in the paw”, is much more intense than when chopping “into the bowl”. Actually, such cutting requires more skill from the master and is itself more time-consuming. The fact is that inadequate quality of work can lead to the fact that over time the logs “float”. And this will steadily lead to the distortion of the entire building. At the same time, the size of the log house does not play a role, whether it is a large house, a bathhouse or a summer terrace. The construction, chopped “in the paw” is short-lived, the reason for this is a violation of the structure of the tree with this type of logging. This inevitably leads to a decrease in the stability of the house or bath to the natural effects of external factors and weather conditions. So, for example, water falling into a log house with a similar type of connection, during freezing, can seriously damage the building. But to make work on the exterior of such a log house is much simpler. If the owner of the house is generally interested in cashing out the building, it is much more convenient to do it on a house felled “in the paw” than on a house felled “in a bowl”. Chopping in the construction of the log house
Firstly, the heat loss in a wooden house or bathhouse, cut down “into the bowl”, is much less. The size of the building in this case does not matter. Starting from small log cabins, and ending with the most common log cabins among customers - they all have less heat transfer if they are not cut into a “paw”, namely, “into a bowl”. The stability of the house, the log house of which is made in the “bowl”, has become among the masters in the logging of log cabins parables in the tongues. And this is repeatedly confirmed in practice. In addition, the log house “in the bowl” looks more authentic and classic in comparison with the log house “in the paw”. You can see right away - this is a real traditional log house. When felling a log house “into the bowl”, the structure of the log wood is subject to minimal disturbances. This directly affects the longevity of the log house. Its resistance to the natural effects of external factors and weather conditions increases many times. We hope that this material will help you make the right choice. Now you are able to independently figure out which type of log house - “in the bowl” or “in the paw” - is preferable. It remains only to make an order in our company. We will take care of the rest! But also the connection in the paw or, as it is also called, the connection in the dovetail remains very popular. This name comes from the shape of the hewn end of the log, somewhat reminiscent of the straightened tail of a swallow. Let us in this article take a closer look at the technology of chopping in the paw, learn how to correctly mark and cut off logs to connect them into a dovetail.
|
||||||||||||||||||||||||||||||||||||||||||||||||||||||||||||||||||||||||||


 The first thing that can attract the customer in the choice of cutting “in the paw” is the economic component. When cutting corners “in the paw” there is a real opportunity for savings. This type of logging of the corners of the log house does not imply an overspending of the material. And the walls of the log house correspond to the length of the log. As a result, the cost of the total cost of a chopped or timber house, or a bath, is reduced by up to ten percent.
 Cutting a wooden house or a bath “in the bowl” is more expensive than “in the paw”. However, the price difference is not so great. It amounts to about 5 - 10 percent. However, for this money you buy not only the more classic look of a chopped bathhouse or log house, but also a number of pleasant bonuses, which will be discussed below.


|
Paw joint dimensions |
||||
|
Diameter mm |
Sizes, mm |
|||
|
a |
b |
c |
f |
|
It is most convenient to mark the logs for chopping into the paw using special templates that can be cut from thick cardboard and mark the ends of the logs by applying a template to them.
After drawing a circle, and using perpendicular lines drawing a square inside it, you need to divide its sides into 4, 6 and 8 parts, so that by connecting the lines as shown in the figure below, you will get different paw profiles - 8/8, 6/8 and 4 / 8.
How the template for chopping in the paw looks, is shown in the figure below:

Recently, craftsmen have come up with various devices that facilitate the manufacture of paws.
The video below shows a special tool for making paws using an upgraded chainsaw (click on the triangle to view):
Join logs in the paw
The assembly of the log house begins with the thickest logs that form the lower (flange) crown, laid directly on the foundation through a layer of roofing material.
The further construction of the log walls will depend on the correct installation of the logs of the flange.
After assembling the flange, they proceed to the next row of logs. Since the next row (crown) will be stacked on top of a round log, then in the logs from which it will be assembled, you need to choose a longitudinal semicircular groove along the entire length to achieve a snug fit to the round surface of the logs located below.
To do this, lay one log on another and use a carpenter’s dash on the upper log to draw a line parallel to the lower log. After that, the lying log is removed above, turned over and a longitudinal groove is made in it.
You can see how to choose the semicircular longitudinal groove in the log in this article.
After the groove is made, the log is again laid on top and, tapping along the entire length, see if it is snug enough to the bottom. If necessary, remove irregularities and repeat the fitting.
If the groove is made correctly and fits snugly enough to the lower log, then the junction of the logs is laid with tow, jute or moss, and then proceed to the next log.
The logs of the log house arranged by the heater in the assembled state are left for proshushka and shrinkage. Only then do the final caulking of the log house and its grinding is done.
When assembling the log house, it is necessary to constantly monitor the verticality of the walls and the correct geometric dimensions of the log house in plan.
***
As you can see, logging in the paw has its own characteristics that you need to know before you begin construction.
Despite a certain laboriousness, a notch in the paw can be mastered after some practice. Moreover, modern chainsaws can greatly facilitate the work on the formation of paws and longitudinal grooves.
The assembly of the log house in the paw using a chainsaw is shown in the video below:
Popular:
New
- Do-it-yourself highchair - drawings scheme dimensions How to make a children's chair from plywood
- The better to caulk a bath from a bar and how to do it right
- How to make a wooden frame with your own hands: a step-by-step description and recommendations; Production plan for a wooden photo frame
- Ways of cutting timber and logs: options for corner joints and their differences How to chop step by step in the paw
- The construction of the hip roof - how to carry out the correct calculation and installation Installation of the rafter system of the hip roof on the beams
- The hip roof: the installation of the rafter system and installation of the structure The hip roof system complete instructions
- How to pour a do-it-yourself floor slab video Do-it-yourself concrete slab
- How to make a cellar with your own hands in the country: types and proper arrangement
- Making paving stones with your own hands: molds for paving stones and step-by-step installation instructions. What paving stones are made of.
- Painting glass canvas Use fiberglass spider web