Website sections
Editor's Choice:
- Laying ceramic tiles on plywood
- The technology of cutting the log house into the bowl - all stages
- Independent manufacture of interior doors
- Rules for grinding cylindrical logs Grinding log ends
- DIY wardrobe
- How to age a tree - the best tips with video How to make artificial aging of wood
- Recommendations for calculating the beam on the house
- Shelves in the bath: height, size and material What should be the shelves in the steam room
- Table transformer do-it-yourself drawings - photos and video
- Making wooden stairs on a metal frame and on concrete marches with your own hands for a private house How to make a staircase with your own hands
Advertising
| The device of the rafter system of the gable roof of the frame house. Do-it-yourself roof truss system: Manual and Video |
|
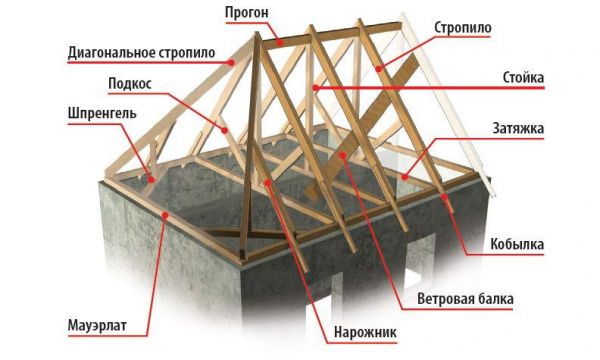
The simplest gable roof is also the most reliable. The availability of do-it-yourself performance does not give rise to self-confidence - before you start working, you need to thoroughly familiarize yourself with the design features in order to make qualified decisions and execute them. Diagram and features of the gable roof deviceA gable is a roof formed by the intersection of two rectangular slopes at a certain angle. Such a device is the most reliable and simple, so even a person with average carpentry skills can mount a gable roof on their own. The base of the roof is the rafter system, which acts as a support for the roofing cake and the finish. The durability of the roof and the comfort of living in the house depend on its strength and reliability. The rafter system, subjected to regular wind and snow loads, must be securely fixed to the building. This problem is solved with the Mauerlat, which is firmly fixed to the upper plane of the walls of the house. Thus, an almost monolithic system is created that reliably protects the interior of the house from any manifestations of the external environment. Photo gallery: how to use the space under the gable roofUnder the gable roof you can arrange a residential attic Gable roof truss systemA roof with two opposite ramps is the most common construction used in individual housing construction. The intersection line forms a ridge, and the lateral openings of the extreme rafter legs serve for the device of gables - vertically located walls, creating a closed under-roof space. To obtain a strong and durable construction, many retaining and reinforcing elements are used, which give additional rigidity to the entire structure. The gable structure is based on a triangle - the most rigid geometric figure. The rafter system consists of the following main elements:
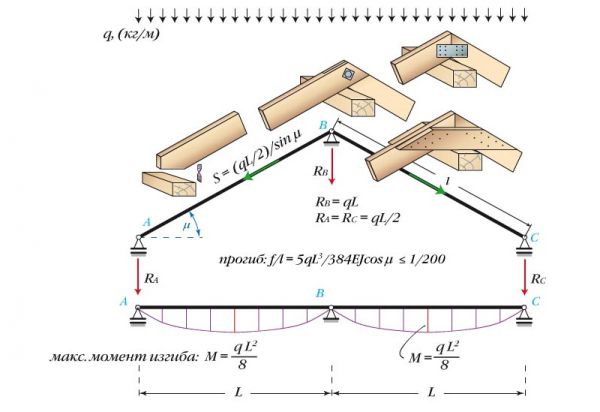
Calculation of the load on the rafter system of the gable roofThe rafter system experiences certain loads, which can be divided into two types.
Obviously, a careful calculation of the loads from snow and wind, taking into account local climatic conditions, is vital when choosing the design and materials of the roof. These loads can be determined from the map compiled on the basis of SNiP 2.01.07–85. Using the map, you can determine the magnitude of the wind and snow load in the construction region The snow and wind load values \u200b\u200bindicated on the maps for each region are called normative. In order to get the estimated snow load, the standard value must be multiplied by a special coefficient that takes into account the angle of the roof. This coefficient is equal to:
The estimated wind load is determined by multiplying the standard value by a coefficient that takes into account the height of the building and the type of terrain in which construction is underway. Table: correction factor for calculating the wind load (taking into account the height of the building and the type of terrain)The specific load of the most popular roofing materials can be taken from the following table. Table: weights of some roof materialsIt is possible to take into account the specific effects of different types of loads only in aggregate, therefore calculations of a similar nature should be entrusted to an experienced specialist. Video: calculation of the rafter systemTypes of rafter systems of a gable roofAccording to the principle of the device, rafter systems are of two types:
Hanging rafters are used for buildings in which the bearing supports are located at a distance of up to 10 meters in the absence of an intermediate wall inside the box of the building. For other cases, it is necessary to use a layered rafter system. Features of the hanging rafter systemSupport for hanging rafters are the outer walls. Since the arch has a connection at the upper point, when exposed to vertical loads on the lower supports, bursting loads are created. To compensate for this, puffs are used - horizontal ligaments between the lower ends of the rafter leg. The result is a rigid force triangle. When installing the attic room, ceiling beams are used as a puff. Various structural solutions of the hanging rafter system are possible:
The crossbar, unlike the lower tightening, works on compression, but not on tension. In addition to the above, other elements are also used to strengthen the roofing skeleton. Very popular are the struts and racks located in the system at the places of the greatest load on the rafters. In the most loaded places, rafters can be strengthened by struts and racks Video: rafter system step by stepRafter type systemsRafter rafters are used for buildings with a width of more than 10 meters. They are characterized by the presence of a supporting wall inside the building, which is an additional support for the rafter system. Popular constructions come in several forms:  In undisturbed layering systems, the main load from the roofing frame is transferred to the Mauerlat Determining the pitch of the gable roof raftersThe task of ensuring sufficient strength of the rafter system is solved by selecting material for the manufacture of its elements and calculating the parameters of their installation. The rafter pitch is one of these elements and is selected depending on the weight of the roofing cake. The distance between the support beams is usually set within 0.6–1.5 m. The actual step between the rafters depends on the geometry of the roof and is calculated as follows:
For example, consider a variant with a roof length of 13 m with a preferred distance between rafters of 750 mm (option for a roof with ceramic tiles).
Thus, on the roof of our choice, the rafters must be installed in increments of 68.4 mm. It should be remembered that the result obtained is the distance between the axes of the rafters. Gantry roof truss unitsThe main types of joints in the nodes of the supporting structure of the roof we have already considered above. But it makes sense to dwell in more detail on auxiliary materials that make the rafter system more reliable and durable. Strengthen the fastening of parts during installation of the rafter system using metal plates and angles of various shapes Such products are made of galvanized steel up to 1.5 mm thick. They have a different configuration and can be installed on any type of connection. Photo gallery: types of joints in nodes of the gable roof truss system
All the connecting nodes of the rafter system have the function of strengthening the rafters due to the redistribution of loads and hardening of the bearing elements. So, in the lower part of the rafters lean on the Mauerlat at a right angle, for which they perform the corresponding inset. To strengthen the rafter system, they try to use joints with maximum load-bearing capacity, for example, inserting the rafters into the Mauerlat at a right angle In addition, for additional reinforcement in the docking nodes, metal mounting plates are used. The same principle is used when installing struts to the rafter. In any case, the mating parts must work "on a stop" and not be displaced during operation. Any parts should be loaded along its axis There are three main types of nodes in the rafter system:
For a stronger connection, the additional elements mentioned above are used. Installation of a gable rafter systemCurrently, the construction market offers services for the manufacture of roof trusses in an individual design for specific buildings. It should be noted that such a service has several advantages:
The only drawback of this method of installing the rafter system is the relatively high cost of the products. For self-construction of a gable roof, you can use ready-made roof trusses ordered from professional manufacturers Assembly of trusses on the groundThe assembly of rafters on the ground is used in cases where directly at the house there is a flat platform of sufficient size for the manufacture of farms. At the same time, not full trusses are mounted, but rigid structures of three to four parts, which can be raised to the installation site by the efforts of two or three people. Lifting is carried out with the help of ropes on the slams. The advantage of this assembly method is the possibility of using a single template, which ensures high precision manufacturing of each structural element. A possible partial installation of trusses below is as follows:
Installation of the rafter system at the installation site is as follows:
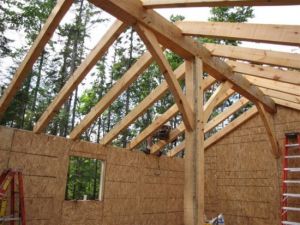
Additional strength to the roof gives the crate, stuffed last. Assembly of rafters directly at the installation siteThe assembly of rafters in place is used on small roofs. At the same time, billets-blanks are fed up, from which the necessary details are cut. Installation is carried out from the bottom up, starting with the installation of rafter legs. The horizontal level of the rafter system is controlled by tensioned cords, and the verticality of the truss assembly - by a construction plumb. The installation procedure is the same: first the pediment farms are mounted, then the rest in any convenient order. The assembly of the rafter system directly on the roof begins with the installation of racks and a ridge run, on which the rafters are laid Exactly fulfilling the requirements of the drawings, you can mount the rafter system yourself. It is almost impossible to do this alone, so the participation of one or two assistants is mandatory. Video: do-it-yourself rafter installationWhen assembling the roof frame for a gable roof, it is important to adhere to certain rules:
Video: gable roof for metalLike any roofing system, a gable roof requires an attentive and responsible attitude. Mistakes in the construction of such roofs are usually expensive. It is important not only a careful selection of materials, but also their competent use. Nevertheless, most of the work can be done independently. I wish you success! The roof frame sets the geometric and operational parameters of the pitched roof. Due to violations in the installation technology, because of flaws in the manufacture of its elements, distortions of the system, traditional leaks, and holes in the coating appear that threaten emergency situations. In order to build a reliable and stable roof structure, you need to clearly know how to saw and install rafters with subsequent fixation to the supporting elements. Rafters, or rafters, are called wooden or metal beams installed on the box of the house at a given angle. They determine the configuration of the roof structure, take over and steadfastly resist the sum of constant and temporary loads acting on the upper enclosing system of the building. The structural simplicity of the rafters is extremely misleading. In fact, these are rather complex elements that require careful marking and careful cutting. Discrepancies in the joints of the rafter legs with the Mauerlat, with each other and with other components of the system lead to a change in the shape of the slopes, a violation of the integrity of the coating and the destruction of the nodes. On the other hand, the proper installation of rafters can correct some errors in the construction of the box at home, and not aggravate the situation by a clear repetition and increased wall height differences. True, in such situations, the elements of the frame are made individually and meticulously customized in fact directly at the facility.  However, before dealing with the specifics of installation, you need to find out what their design differences are, according to which the rafters are divided into two groups, these are:
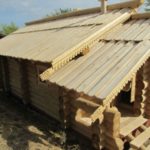
The scope of their application and the installation technology depend on which group the rafters belong. The hanging variety is collected on the ground, and trusses made in the form of peculiar triangles are lifted to the roof and mounted in a form completely prepared for installation.  Plus, the construction of the rafter frame by hanging technology is the safety of the work and the ability to perform the most accurate nodal joints. If the simplest version of the hanging truss with a tightening at the bottom is used in the construction of the roof, you can abandon the Mauerlat device, in the place of which a narrow leveling board is quite suitable. The downsides of hanging technology come with benefits. For example, a farm assembled on the ground is much more difficult to transport to the installation site than planks and timber for lathing rafters. There are restrictions on overlapping spans: the limit is considered to be 14 m, beyond which it is unreasonable to install wooden beams prone to sagging without intermediate supports. The rafters of the layered group, both on top and bottom, are supported by independent structures. The top of them is laid on the run-through structure, which is mounted on the floor beams or on the bed, replacing the Mauerlat on the inner wall. The bottom is either mounted on the Mauerlat, or rests on it, clinging to the beam with a tooth or a support bar sewn instead of a tooth.  The advantage of layered systems is rightfully recognized as the possibility of overlapping virtually any spans in size. Simply, with an increase in the overlapped space, the design becomes more complicated: it is supplemented by struts for a couple with racks, additional runs, along with lounges, contractions. The layered construction is assembled and mounted longer, because they build it not from farms, but from individual elements. However, just this scheme has more opportunities in correcting the defects of the box or the unevenly settled log house. Because rafters of a layered type are stacked individually, it is possible to slightly change the position and dimensions of the assembly, so that as a result a perfectly flattened plane of the ramp is formed.  The specifics of the manufacture and installation of raftersIt is clear that for the erection of the rafter system you will need lumber - long products of woodworking enterprises with clear geometric parameters. You will need a board or timber, on which, of course, there are no mounting gaps and notches for installation. Why do we need cuts and cuts? The fact is that when placing on an edge at the boards and beams, the support area is too small. They come into contact with the Mauerlat only with one Vestma with a thin line, because of which, at the slightest load, they can “move” from the occupied position from above and drag the entire structure behind them. In order to increase the area of \u200b\u200bthe support in the junction of the rafters and the Mauerlat, or it and the additional run, in the beam or board, choose an angular notch, saw out a tooth or sew a support bar. If the top of the rafters is paired with a mirror-opposite counterpart, then for reliable emphasis, a gash will be required, the plane of which should be clearly perpendicular to the horizon.  The basic rule in the construction of rafter frames is that the supporting areas selected in the lumber are strictly horizontal and vertical. At the slightest violations of horizontality with verticality, stability is lost, structural details are displaced under their own weight and load until the system is completely destroyed. Note that the nodes of the rafter systems have the responsibility to ensure the possibility of slight displacement and rotation when the load is exceeded. These movements are necessary so that the structure bends slightly, moves slightly, but does not collapse and remains stable. These subtleties should be known to both the master, who decided to do the manufacturing and installation of rafters with his own hands, and the owner of the house under construction, who does not want to pay for the low-quality labor efforts of the builder team. We will analyze common options to understand the essence of the process.  Hanging roof frame constructionConsider the example of the construction of the rafter system over the log cabin of the bath. The span between the walls is small, it is easier and more reasonable to block it with a hanging structure, the installation of which will be carried out at the bypass of ceiling beams - matrices. Log base - an almost perfect option for installing hanging systems, as it is easiest to squeeze into the horizon, eliminating the need to fit rafters in case of violation of the foot geometry. There is no need for a Mauerlat device. However, the puff will have to be moved up to bypass the upper crown of the log house and form a useful attic space.  Before installing the rafters, phased preparation of the log house is carried out. On both sides of the foot we align the bypasses according to the lace tied to nails hammered into two extreme beams. On top of the crossings, we squeeze the slab so that the edge of each beam ends with a flat horizontal platform. The logs formed after squeezing the upper bulge of the log along the edges of the beams are aligned to the horizon in level. We apply the specified control tool to three or more beams at the same time. If the level is not long enough to carry out such a test, use a long rail or board instead.  After squeezing all the excess, we mark the nests for the rafter tooth. To do this, we again use nails and lace. We note that it is possible to delineate the places of sampling of nests at the crossings both before the construction of hanging farms and after. However, it is much more convenient to make nests before making rafters. They will help to try on with higher accuracy. To facilitate your work, it is advisable to find the center of the log house on the part of future tongs. At these points, it is recommended to nail along the control rail, one of the edges of which will indicate the axis of symmetry. You can do without rails if there is already some experience in the construction of roofs. 
If everything turned out exactly and adjustments are no longer required, the template is ready. We return with him to the earth. We disassemble the workpiece and make cuts along the marked lines. The parts obtained as a result of fitting and fitting will serve as a standard for almost in-line production of rafter trusses in the required quantity.  We will assemble hanging farms on the earth. Their installation, as well as fitting, must be carried out by at least two people. One master simply can not cope with such a job. The performer located above will install the farm, and the second will change its position according to the instructions of the plumb line. The position of each leveled and installed truss should be fixed with temporary struts.  To increase the stability of the system, install racks under the rafters:
To ensure the rigidity of the hanging system, the trusses are connected by wind ties - boards, poles or slats nailed from the inside of the structure. From the outside of the rafter frame, the rigidity will increase due to the construction of the lathing.  The rafters are attached to the matrices with 200 mm nails or corner brackets. In this regard, metal corners and plates with perforations for fasteners significantly lose to traditional methods. To the sides of the rafters we nail fillets made of planks, the width of which is half as much as the material used in the manufacture of rafters. The length of the filly should be 70 - 80 cm longer than the projected width of the overhang. This distance is necessary for their reliable connection with the rafter legs. Mares can be cut in advance, or without preliminary cuts, you can nail the trim of a narrow board to the rafters, and then draw a cornice line. However, the first option is more convenient and economical. In most cases, as in the above example, the filly must be partially buried in the bypass of the matrices, for this:
At the end of the installation of all the fillies in the extreme, we hammer on the nail. Pull the control cord and mark where to cut off the excess.  The device of the pitched roof frameIn the construction of the rafter frame using layered technology there is much in common with the installation of a hanging structure. The fitting is carried out practically in the same sequence, therefore, describing the action twice does not make sense. The main difference is in the methods of forming the upper node, because the tops of the lay rafters have a support - a ridge run. If at the top the lathing rafters are corny based on a ridge run, they are laid either with a spacing, i.e. parallel to each other, or with a strictly vertical joint, similar to the joining of hanging legs. However, in most cases, they try to fix the upper part with a notch or a vertical gash with a tight fit to the ridge beam. There are schemes according to which layered rafters do not rely on the ridge, but on the side run. In such situations, the top is formed according to the hanging principle, and the point of support on the runner beam is formed by an angular notch. We will analyze the most popular variant in the construction of private rafters with a support on the lower corner cut and on the ridge run through a vertical gash. Note that the maximum depth of the cutting should not exceed 1/3 of the width of the board.  Variant of marking with a construction square:
At the end, we draw on the board the outline of the eaves overhang, cut it along the outlined lines and use the do-it-yourself rafter blank to saw the rest of the roof elements.  It is possible to apply the described method without a building square and marking the parameters of the roof on it. It is enough to represent the process in order to postpone the necessary distances with a conventional drawing tool. However, without experience, you can get confused in the calculations of angles and segments. To help novice builders, a template with options for the formation of corner cuts has been developed. It will help to orient in the manufacture of rafter legs from the most common lumber in this area.  In cases of laying rafters with cuts in the upper and lower parts, it should be remembered that the depth of both recesses should be the same so that the roof slope does not change during construction work. Usually, for the device of two equal cuts, an auxiliary bar is used, the thickness of which is not more than 1/3 of the thickness of the board. Harvesting rafters is then installed edge on the Mauerlat and on the run. The bar is applied laterally in the area of \u200b\u200bthe lower and upper nodes to outline the notch. If the cut is needed only in the lower part of the rafters, and the top will rest on the run with a saw cut, the board is installed at the bottom on the Mauerlat, and at the top on the run and block, so that the angle of inclination of the ramp does not change as a result of cutting. Below, a second block of the same size is applied to the future node and the outline of the future cut is outlined with its help.  To form gaps with a tooth, the same methods are used. The difference is only in the form washed down. Installation of layered rafters begins with the installation of two extreme trusses. The elements are mounted one at a time, carefully checking their position using a level with a plumb line. Most often, farms are arranged from twin boards, because they are distributed more load. They are fixed with temporary struts, then connected with a lace or rail to indicate the plane of the ramp. Ordinary rafters located between the extreme bearing trusses, install shoelaces according to the instructions. If necessary, adjust the position of the legs in accordance with the actual situation.  Video about installing raftersInstallation of rafters with fastening with metal corners: How to make rafters with gaps for landing on Mauerlat: The device of the rafter frame under the roof of the garage: We have given and described only a part of the methods for constructing roof frames. In reality, the manufacturing and installation methods are much larger. However, the analysis of the basic options allows you to perfectly understand how to properly make rafters and roof trusses for the roof, how to saw them before installation. Each roof is based on a large number of beams, rafters, racks and girders, which are collectively called the rafter system. Over the centuries-old history of the types and methods of its organization, a lot has accumulated, and each has its own characteristics in the construction of nodes and cuttings. We will talk in more detail about what a rafter system of a gable roof can be and how rafters should be attached and other elements of the system in more detail. Gable roof truss systemIn the context of a gable roof is a triangle. It consists of two rectangular inclined planes. These two planes are connected at the highest point into a single system with a ridge beam (run). Now about the components of the system and their purpose:
Filly may still be present in the system. These are boards that extend the rafters to form an overhang. The fact is that to protect the walls and foundation of the house from rainfall, it is desirable that the roof ends as far away from the walls as possible. To do this, you can take long rafter legs. But the standard length of lumber of 6 meters is often not enough for this. Ordering a custom is very expensive. Therefore, the rafters simply grow up, and the boards that do this are called "filly". Structures of rafter systems are quite a lot. First of all, they are divided into two groups - with open and hanging rafters.
With hanging raftersThese are systems in which the rafters rest only on the outer walls without intermediate supports (load-bearing walls). For gable roofs, the maximum span is 9 meters. When installing a vertical support and strut system, it can be increased up to 14 meters. The hanging type of the gable roof truss system is good in that in most cases there is no need to put the Mauerlat, and this makes installing the rafter legs easier: no need to make cuts, just cut the boards. To connect the walls and rafters, a lining is used - a wide board, which is mounted on studs, nails, bolts, crossbars. With this structure, most of the bursting loads are compensated, the impact on the walls is directed vertically down.
Types of rafter systems with hanging rafters for different spans between the bearing walls Roof system for small housesThere is a cheap version of the rafter system when it is a triangle (photo below). Such a structure is possible if the distance between the outer walls is not more than 6 meters. For such a rafter system, you can not do the calculation according to the angle of inclination: the skate should be raised above the tightening to a height of at least 1/6 of the span. But with such a construction, the rafters experience significant bending loads. To compensate for them, they either take rafters of a larger cross section or cut the ridge part so that they are partially neutralized. To give greater rigidity, wooden or metal plates are nailed to the upper part on both sides, which securely fasten the top of the triangle (also see not in the picture). The photo also shows how to grow rafters to create a roof overhang. A notch is made, which should go beyond the line drawn from the inner wall up. This is necessary to move the incision and reduce the likelihood of a rafter breaking.
Skate assembly and fastening of rafter legs to the underlay with a simple version of the system For attic roofsOption with installation of a crossbar - is used at. In this case, it is the basis for the hemming of the ceiling located below the room. For reliable operation of this type of system, the cross-section of the crossbar must be hinged (rigid). The best option is half-baked (see the figure below). Otherwise, the roof will become unstable to stress.
Please note that Mauerlat is present in this scheme, and rafter legs should extend beyond the walls to increase the stability of the structure. To fix and dock with the Mauerlat, a notch in the form of a triangle is made. In this case, with an uneven load on the slopes, the roof will be more stable. With this scheme, almost the entire load falls on the rafters, so they need to be taken in a larger section. Sometimes a raised puff is reinforced with a suspension. This is necessary to prevent its deflection if it serves as a support for the materials of the ceiling lining. If the puff is short, it can be secured in the center on both sides by boards nailed to the nails. With a significant load and the length of such insurance may be several. In this case, there are also enough boards and nails. For large housesWith a significant distance between the two outer walls, a headstock and struts are installed. This design has high rigidity, since the load is balanced.
With such a long span (up to 14 meters) it is difficult and expensive to tighten the whole, therefore it is made of two beams. It is connected by a direct or oblique cut (figure below).
For a reliable connection, the joint is reinforced with a steel plate mounted on bolts. Its dimensions should be larger than the size of the cutting - the extreme bolts are screwed into solid wood at a distance of at least 5 cm from the edge of the cutting. In order for the circuit to work properly, it is necessary to correctly make struts. They transmit and distribute part of the load from the rafters to the puff and provide structural rigidity. Metal reinforcements are used to strengthen the joints.
When assembling a gable roof with hanging rafters, the cross-section of lumber is always greater than in systems with layered rafters: there are fewer load transfer points, therefore, each element has a large load. With layered raftersIn gable roofs with layered rafters, the ends they rest on the walls, and in the middle part they rely on load-bearing walls or columns. Some schemes are bursting walls, some not. In any case, the presence of Mauerlat is mandatory.
Non-supported circuits and nodes nodesHouses made of logs or timber do not respond well to spacer loads. For them, they are critical: the wall can fall apart. For wooden houses, the rafter system of the gable roof should be undivided. We will talk more about the types of such systems. The simplest undivided scheme of the rafter system is shown in the photo below. In it, the rafter's foot rests on the Mauerlat. In this version, it works on bending without bursting the wall.
Pay attention to the options for attaching rafters to the Mauerlat. In the first, the support platform is usually mowed, its length being no more than the beam section. The depth of the notch is not more than 0.25 of its height. The top of the rafters is laid on the ridge beam, not fastening it to the opposite rafter. Two single-pitched roofs are obtained by the structure, which in the upper part adjoin (but do not connect) one with the other. It is much easier to assemble an option with rafters fastened in the ridge part. They almost never give way to walls.
For this circuit to work, the rafters below are attached using a movable joint. To fix the rafter leg to the Mauerlat, one nail is hammered on top or a flexible steel plate is placed on the bottom. For options for attaching rafter legs to the ridge run, see the photo. If the roofing material is planned to be used heavy, it is necessary to increase the bearing capacity. This is achieved by increasing the cross section of the elements of the rafter system and strengthening the ridge node. It is shown in the photo below.
Reinforcement of the ridge knot under heavy roofing material or with significant snow loads All of the above gable roof schemes are stable in the presence of uniform loads. But in practice this practically does not happen. There are two ways to prevent the roof from sliding towards a higher load: by setting the scrum at a height of about 2 meters or by struts. Options rafter systems with contractionsThe installation of contractions increases the reliability of the structure. In order for it to work normally, in places of its intersection with drains, you need to attach nails to them. The cross section of the beam for the scrum is the same as for the rafters.
They are attached to the rafters with bots or nails. They can be installed on one or two sides. The attachment point of the scrum to the rafters and the ridge run, see the figure below.
In order for the system to be rigid and not “crawl” even under emergency loads, it is sufficient in this case to provide rigid fastening of the ridge beam. In the absence of the possibility of horizontal displacement, the roof will withstand even significant loads. Beam truss systemsIn these options, for added rigidity, the rafters, which are also called braces, are added. They are installed at an angle of 45 ° relative to the horizon. Their installation allows you to increase the span (up to 14 meters) or reduce the cross-section of beams (rafters). The strut is simply substituted at the required angle to the beams and nailed from the sides and from the bottom. An important requirement: the strut must be cut precisely and fit snugly on the uprights and rafter leg, eliminating the possibility of its deflection.
Systems with truss legs. Above is a spacer system, from below - indispensable. The correct cutting units for each are located nearby. Below - possible brace attachment schemes But not in all houses, the average load-bearing wall is located in the middle. In this case, it is possible to establish struts with an angle of inclination relative to the horizon of 45-53 °.
Systems with struts are necessary if significant uneven shrinkage of the foundation or walls is possible. Walls can sit in different ways on wooden houses, and foundations on layered or heaving soils. In all these cases, consider installing this type of rafter system. System for houses with two internal load-bearing wallsIf the house has two load-bearing walls, install two roof beams, which are located above each of the walls. On the intermediate load-bearing walls, pits are laid, the load from the sub-rafter beams is transmitted to the piles through the racks.
In these systems, the ridge run is not set: it gives spacer forces. The rafters in the upper part are connected to each other (they are cut and joined without gaps), the joints are reinforced with steel or wooden plates, which are nailed. In the upper pressure-free system, the tensile force neutralizes the puff. Note that a puff is placed under the run. Then it works efficiently (the upper diagram in the figure). Stability can be provided by uprights, or flanges - beams installed obliquely. In the spacer system (in the picture below), the crossbar is a crossbar. It is set over the run. There is a version of the system with racks, but without rafters. Then, a stand is nailed to each rafter leg, which rests on the intermediate end with a second end.
Fastening of a rack and tightening in a rafter system without a truss run For fastening the racks, nails for 150 mm and bolts 12 mm are used. Dimensions and distances shown in millimeters. The arrangement of the roof is the last stage of construction, if we consider the standard options, then the outbuildings are built with a single-pitched construction, and houses with a gable roof. Construction technology has a long history, the sequence of operations is practically unchanged, despite the fact that modern roofing materials are used today. Advantages of the gable structure
Roof variationsSymmetrical. This choice is justified: a reliable design is formed by symmetrical slopes, the load is distributed evenly. If necessary, increase the load install the rafter system.
Asymmetric. The slope of the slopes is made at different angles, on one of the sides the owner will be able to equip the room. In this case, the load is distributed unequally, it will be necessary to carefully calculate the load capacity of the foundation with load-bearing walls, correctly select roofing materials, calculate their amount, change the method of insulation, exterior decoration and waterproofing.
Asymmetrical. The design is characterized by the presence of an internal or external fracture, as in the photo of a gable roof.
Preparatory phase prior to the erection of the roofThe correct gable roof is first created in the drawing, in most cases, the shape of the structure is chosen according to the design of the house.
It is important to consider many factors: the size of the house, the material from which the supporting walls are built, as well as the geographical location of the land. It is necessary to accurately calculate what load the gable roof will withstand during operation.
If the ramp has an inclination angle of 400 or more, the possibilities to equip a full attic in the attic are very limited.
When the angle of inclination is 100 or more, the load on the roof from precipitation and wind increases. Owners who wish to equip the attic in the attic are advised to choose an asymmetrical roof.
How is the gable roof area calculated?Performing calculations, follow the axiom - the less roofing materials by weight, the less load on the foundation and walls of the building. If you build a roof from wood, you need to select the appropriate species of wood to make wooden elements more durable, you will need to increase their cross section.
The long walls of the building must withstand the main load of the roof structure: the rafter system is created to redistribute the load evenly.
If the house is no longer than 6 m in length, it is not necessary to install supports, a system of hanging rafters is suitable. When it is planned to erect a large out-of-town building, layered rafters are used, which have a more complex configuration.
The gable roof drawing should indicate the location of all the necessary nodes and elements:
A self-made sloping roof is erected when the project provides for the construction of a full-fledged attic in the attic space.
Installation workMauerlat is designed to support the weight of the roof, it provides an even distribution of the load on the foundation with walls, the width of the beam for its manufacture is equal to the width of the wall. Fastening is carried out using steel wire, brackets, studs, metal plates, anchors or wooden timbers.
Beam ceilings are created from 200x100 mm wooden beams, the crate is placed on the longitudinal beams in increments of 50 or 60 cm, they are attached to the Mauerlat using long nails (200 mm). The rafter system is made of beams with a cross section of 100x50 mm, the height of each rack is equal to the distance between the floor and the upper part of the Mauerlat.
Experienced builders who know how to build a gable roof are sure to sew up the pediment, for this purpose you can use siding, profiled sheets or lining. For ventilation and lighting of the internal space of the attic, a window opening is left in the pediment.
A curtain rail and a plastic drainage system are installed around the perimeter. Roof installation requires steam, hydro and thermal insulation; roof tiles, ondulin and others are used as roofing materials.
Photos of gable roofs
Rafter system - powerful roof frame for holding roofing and other elements. How well is the roof frame depends on the strength of the roof as a whole. Otherwise, its functionality, ability to protect the building from external influences and provide heat in the house may deteriorate. Therefore, you need to correctly approach the choice of rafter systems and correctly draw up a rafter plan. And how to calculate the rafter system you can read. Depending on the purpose of the room, the size of the gable roof, the device of the rafter system is classified as follows: a hanging system and a layered one. Hanging systemSuspension rafter system of a gable roof relies only on the supporting external walls of the building. Depending on the span, roof project, the device of hanging systems has features. For small housesIt is advisable to erect a hanging structure for buildings where the distance from one wall to the opposite does not exceed 6 meters. The frame has the form of a triangle. To strengthen the bearing capacity of the faces of the frame triangle, several methods are used:
Using these methods, it is possible to distribute the load throughout the structure.
Strengthening the frame triangle For attic roofsWhen arranging the frame under, you should pay attention to some points:
CAUTION! Particular attention should be paid to the fastening of the elements, as the attic is under pressure from inside and out. In addition, the rafter system of a gable roof with an attic is equipped with heaters, which increases the load.
Roof frame for attic roofs For large housesWith a span of more than 6.5 meters, it is required to install more fastening elements to install the suspension system in order to prevent the sag of the tightening, which causes its own weight. Points to consider:
When installing a suspension system, sometimes it can do without installing a Mauerlat and limit itself to installing boards on the film. In addition, the suspension system is characterized by the absence of complex nodes, which facilitates the work on the arrangement of the roof frame.
Hanging system SystemThe difference between the design of the layered type and the hanging one is that the structure has additional support points indoors. A prerequisite for installing a layered system is the installation of a Mauerlat. The design of the system provides for the installation of both a spacer frame and a non-support frame. Support frameThe non-supporting frame should be installed in houses with log walls. When installing rafters, their bases must be attached to the Mauerlat. Options for attaching the base of the system to the Mauerlat:
When attaching rafter legs without connecting them in the ridge part particular attention should be paid to the accuracy of calculations. Even with slight differences in the scheme, spacer pressure will act on the walls of the building, which can lead to the destruction of walls.
Support frame With fightsTo strengthen the structure and give it stability, Struggles are mounted to construction racks. A beam of the same cross section as for rafters should be used. To increase the strength, the contractions are nailed on both sides of the timber. The same mounting option is effective when the ridge element is firmly fixed, which prevents the displacement of the roof in the horizontal direction.
Scrum frame With bracesBraces increase the bearing capacity of the wooden frame and provide strength to the rafters. An important requirement when installing the strut is a correctly measured cutting angle, which makes it possible to tightly fit the strut to the connected elements. ATTENTION! If the support part is in the center of the base of the frame with the layered system, then the strut is attached at an angle of 45 ° to the horizontal line, if the support is closer to one of the supporting walls, then the mounting angle may be different: from 45 ° to 53 °. It is advisable to erect a frame with struts in places where there is a chance of planting a foundation, or in wooden buildings where slight shrinkage of walls is permissible.
Brace Frame With two supports indoorsWhen there are two pillars in the form of internal walls, then when arranging the rafter legs, beams are laid under them. If the beams are not installed, then a rack resting on the internal support is nailed to the base of the rafters. Sub-rafter beams are installed on bearing supports. On the supports inside the premises, lodges are installed, on which the load from the rafters from the racks falls. The rafters are trimmed so that they fit snugly against each other, and are fixed. With this design, the ridge run is not installed. To ensure the non-propensity of the structure, tighten the puffs. The stability of the structure is ensured by racks, which are installed horizontally from the inner base to the rafter leg, and the bridging, - wooden beams that connect the base of the uprights obliquely. If the structure is spacer, then a beam connecting the frame legs is attached above the girder - the crossbar.
System
Types of rafter systems The device of the rafters for the attic roof |
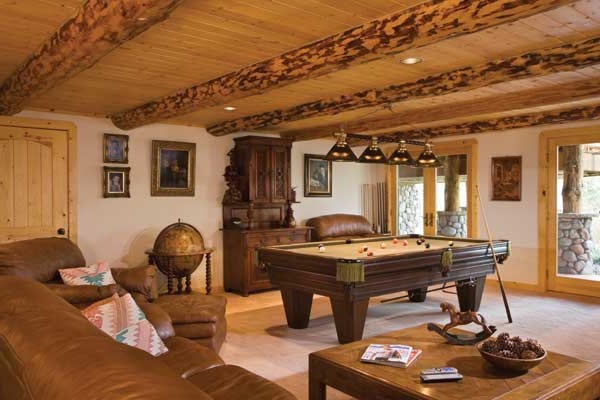
 A gable roof with a Danish semi-hip ennobles the exterior of the building and allows you to increase the size of the attic
  The attic above the garage can be used to store spare parts, create a relaxation room or to equip a warehouse of household equipment
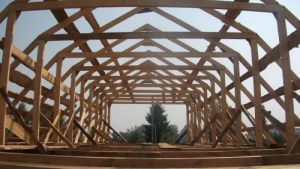
  The attic area under the gable roof depends on the height of the ridge and the angle of inclination of the ramps
 In the ridge, the rafters are usually joined by flat bolted plates
  To strengthen the design of the rafter system, it is necessary to select metal plates that correspond to the configuration of the mounting unit
  Sliding junctions unload the rafter structure
  Adjoining nodes in the rafter system can be additionally reinforced with metal inserts
  Depending on the type of rafter system used, there are different ways to mount the ridge assembly
  On flat joints operating under high loads, it is convenient to use nail plates


Popular:
New
- Do-it-yourself highchair - drawings scheme dimensions How to make a children's chair from plywood
- The better to caulk a bath from a bar and how to do it right
- How to make a wooden frame with your own hands: a step-by-step description and recommendations; Production plan for a wooden photo frame
- Ways of cutting timber and logs: options for corner joints and their differences How to chop step by step in the paw
- The construction of the hip roof - how to carry out the correct calculation and installation Installation of the rafter system of the hip roof on the beams
- The hip roof: the installation of the rafter system and installation of the structure The hip roof system complete instructions
- How to pour a do-it-yourself floor slab video Do-it-yourself concrete slab
- How to make a cellar with your own hands in the country: types and proper arrangement
- Making paving stones with your own hands: molds for paving stones and step-by-step installation instructions. What paving stones are made of.
- Painting glass canvas Use fiberglass spider web