Website sections
Editor's Choice:
- Ideas for decorating a room with paper butterflies
- Features, types, methods of applying decorative Venetian plaster
- Features, types, methods of applying decorative Venetian plaster
- Liquid rubber waterproofing for wooden floors
- How to repair a bathroom in Khrushchev
- Which linoleum is better for home: on what basis is linoleum better Which linoleum to lay at home
- Fashionable bathroom tiles
- Protecting a wooden wall from the heat of a stove
- Insulation for the exterior walls of the house: which one to choose Insulation for walls outside
- How to glue liquid wallpaper with your own hands
Advertising
| Plasterboard ceiling in the hallway. DIY plasterboard ceiling in the hall |
|
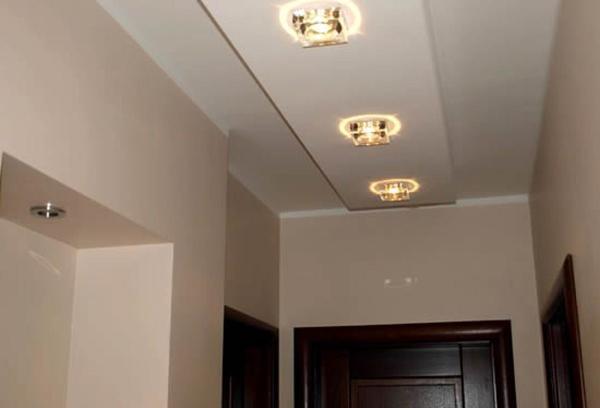
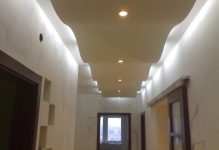
The ceilings in the hallway and corridor are the most difficult part of the repair of the apartment. In most houses, and especially in those that were built a long time ago, they do not differ in the presence of space, and the surface is often not quite even. In order to mask such defects, it is necessary to apply a competent surface finish. Drywall ceilings in the hallway in this case are the best solution. Hallway Ceiling DesignFirst you need to choose the most suitable design of drywall ceilings - the entrance hall must have the correct design. Often they make it one-level. The main reason for this is the small amount of space. Do not think that a single-level design means an ordinary flat plane. Thanks to a special installation technique, the ceiling of the drywall in the hallway can be beautiful, in addition, it allows you to visually increase the height of the room. But, as it turns out, there are design options that allow you to create a multi-level plasterboard ceiling in the hallway. In this case, it is important to correctly distribute the ceiling levels and the radius of the structure. If the room is smallIn a narrow room, the gypsum plasterboard hallway ceilings must be light. For small hallways, drywall constructions are the best solution. If you choose the right design option, the ceiling expands the space. To create such an effect, you can use practical tips: Ceilings in a large roomIn a spacious room, it’s realistic to realize almost everything. In this case, both single-level and multi-level structures look great.
As can be understood from all of the above, the original ceiling is not only the prerogative of spacious hallways. It is quite possible to create a unique and interesting design of a plasterboard ceiling in the hallway. Properly choosing colors, installing lights and using the right accents in the design, you can completely transform even the most ordinary entrance hall.
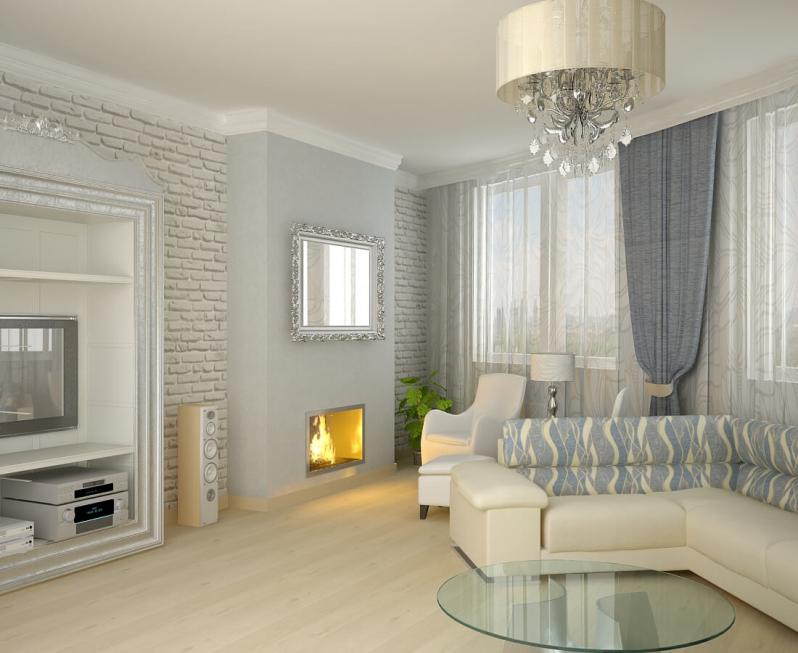
Drywall Ceiling Lighting OptionsRoom lighting can be made traditional. That is, hang a chandelier in the middle of the room. But this approach is considered a bit outdated. Based on this, it is much better to use modern fixtures that are easily integrated into the ceiling structure. With the help of such point sources of light, you can create the right one, give the room a larger volume and additional attractiveness. In addition, such lamps can work in several colors. Depending on the color of the glow and the placement, the appearance of the ceiling structure changes.
The arrangement of lighting should be approached especially carefully. To do this, before installing drywall sheets, it is necessary to conduct electrical wiring. If you do not have the skills to work with electricity, it is better not to take risks and entrust this part of the work to professionals. Such forethought will help to avoid short circuit and fire. When installing two-level ceilings in a large room, you can resort to a different lighting method. It's about LED backlighting. It will not only decorate the interior, but also visually increase the height of the ceilings. LED strip mounted in a special niche. This lighting method is also great for small hallways, as it visually increases the space. Drywall is a unique material. It allows you to equip the ceilings of a very different configuration. And the exterior finish of such a surface is very diverse and simple. You just need to choose the right surface design that will most emphasize the sophistication of your hallway. The whole problem is that the ceilings in the hallways are usually low, and I really would not want them to become noticeably lower. Nobody wants the already small height to be “eaten up” by the ceiling structure, because what is often called the “entrance hall” proudly turns out to be just a corridor and quite small. But the ceilings in the hallway from drywall, as practice and many years of building experience of many thousands of people show, is one of the most rational options for finishing ceilings in this situation. Not in all rooms, whether it be a house or an apartment, perfectly flat ceilings. And, probably, the cherished dream of every homeowner is to correct this omission, and, if possible, cheaply.
The curvature of the ceilings in the hallway is the most common thing for most apartments, because the "hallway" is an integral part of any apartment.
What gives drywall:
Thus, drywall can successfully fulfill its task of inexpensive alignment of the ceiling. Plasterboard suspended ceilings in the entryway: a very common optionDrywall in the halls "captures" more and more square meters nationwide.
The corridor in the apartment, as a rule, is done last, although, if you rephrase Stanislavsky, the apartment still starts with a hanger. However, this principle is far from always respected for a number of reasons. After the repair in the apartment is almost done, the repair in the hallway, as usual, is relegated to the background.
Causes:
In order to get out of this situation, you need to gather strength, and still finish the job. As for the suspended ceiling from drywall, this option will take very little time, it will not take so much effort, due to the fact that the work is not difficult and is not included in the category of expensive. By the way, it can be fulfilled relying solely on one's own strength. Advantages of suspended plasterboard ceilings for anteroom: they are obviousSomeone may object, they say, what is the difference, and why is the suspended ceiling of drywall for the entrance more priority?
Even a small entrance hall (in the world - a corridor) can become optically taller and wider - it all depends on a competent ceiling device, and a plasterboard ceiling is a vivid example of this.
Benefits:
As you can see, the advantages that plasterboard ceilings have in comparison with many other types of ceilings are more than enough. Plasterboard suspended ceilings: do it yourselfFalse ceiling allows you to radically change the design of your apartment.
The suspended ceiling does not have a complicated structure, but, nevertheless, not knowing for sure how to properly arrange the suspended ceiling from drywall, you should not undertake its installation without first familiarizing yourself with the relevant materials that cover this topic in detail. So, step by step:
Drywall sheets are best used with a thickness of 9.5 mm, which do not sag with the small width of the hallway. Reviews of suspended plasterboard ceilings for anteroom: opinion is almost the sameNumerous homeowner reviews indicate the correct choice of a plasterboard suspended ceiling in the hallway.
The simple design of the suspended ceiling is an excellent choice for the hallway, as evidenced by consumer reviews. Reviews:
It is clear from what has been said that the hallway with the ceiling of their drywall suits the majority. There are a lot of reviews, only a few are given here, in order to be more clearly visible, the benefit of such a finish. Installation of a suspended ceiling made of drywall (video)And finally, a few words about the suspended ceilings in the hallway. Having arranged such a ceiling design in your entrance hall, you save yourself for many years from all kinds of cleanings, putties and other routine and ungrateful work. You, in addition, forget about all the irregularities of the ceiling, which have been an eyesore for you for many years, or even decades. To make such a ceiling, as you already understood, is not at all difficult even with your own hands. And, of course, it is very important that such a ceiling system will take away not only not enough space, which is called the ceiling height, but also very little money. Good luck to you! Drywall ceilings (photo)
Living in the house, we do not pay attention to the hallway, running through it in a hurry. But what has become invisible to us, it is the object of the first acquaintance with the house for the guests and it is from him that they make up the first impression. There is no universal answer than to finish the ceilings. It all depends on the financial condition and personal preferences. But now this type of finish is popular as suspended plasterboard ceilings. What are their advantages and how to install them step by step on their own, we will consider in the article. Suspended structures completely hide the ceiling. Many use this property in order to close all the flaws. If you have an uneven ceiling with holes and cracks, then you can not be tormented and not bring it to perfect condition, but just close it. You do not have to spend money on additional preparation of the ceiling. It is not necessary to plaster and putty. But it is better to treat the ceiling with an antifungal primer. The presence of mold will be imperceptible, but it can spread to the structure and permanently spoil the ceiling. Drywall is not afraid of heating. In this, it differs significantly from stretch fabric or plastic. For lighting, you can use any lighting devices. But still, do not place open light close to the material. False plasterboard ceilings for the entrance hall will cost inexpensively. They do not apply to budget types of finishes, but they are cheaper than tension or wooden structures. You can install the ceilings yourself, so that you can save on the masters. But if your plans include a construction of several levels, then you should still invite specialists. Beginners will cope with such work practically beyond the power.
Drywall does not support combustion and is not afraid of weak mechanical stresses. Shocks of small force are not afraid of him. Some imagine plasterboard ceilings as something boring and monotonous. In fact, the design of such structures provides wide scope for imagination. You can do one level, but you can do several. There are options with a simple flat ceiling or curly ceiling, frame, etc. A variety of colors and decorative elements will decorate any interior.
If you liked these ceilings, then you should know about their disadvantages. Drywall can not withstand long-term operation in a humid room. He loves dryness. It cannot be cleaned often; wet cleaning will certainly deform it. In addition, despite the fact that such ceilings can last more than 10 years, you still have to periodically update them: paint or varnish.
Another drawback that applies to all pendant-type construction is that they take centimeters from the ceiling. It will be lower by 5, or even 10 centimeters. Other types cope with this due to mirror surfaces, but drywall can not offer this. Therefore, before installing it in a small corridor, you should carefully weigh everything. Ceiling preparation before installationSurface preparation is an important step before finishing, do not neglect it. Even considering that the drywall construction hides it, since you have already begun to make repairs, why not put it in order completely. First clean the surface of the old coating. Nothing should stay. Primer the surface. The soil composition must be used waterproof with anti-fungal properties. This is done so that mold does not form on the ceiling. It is necessary to make a primer. Then fill the holes with putty and smooth the surface with plaster. These works are not required when installing suspended structures. Remove all lighting fixtures. If you plan to change their location, then the wires are adjusted to the place of future location at this stage.
GKL sheets are attached to the frame, which is installed on the walls. Therefore, before installing the sheets, you need to mark the place of attachment of the frame. On paper, draw a drawing of the future design. This will help you not to get confused in the future. Put on the paper the location of the suspensions and lighting fixtures. Marking is done using the level. If you have a laser, then use it, it is more accurate and more convenient to work with. Since the ceilings in apartments are often uneven, measure all angles. You need to draw a line from the lowest angle. Marking can be done with a pencil or with a rope. After the layout is ready, calculate the area of \u200b\u200bthe room. This is necessary for the purchase of material. To calculate the length of the profile, add the length of all the walls, this will be the length of the profile. And buy sheets based on the entire ceiling area. Do not buy back to back, it is better to buy 1-2 extra sheets, this will save time if you damage one in the process. After the preparatory work is completed, you need to prepare the necessary tools.
Necessary tools and materialsNo specific tools are needed for installation, so everything you need may be at your place. What you need:
Do-it-yourself ceiling installation of plasterboard in the hallwayAccording to the marking, holes for the profile are first drilled. They need to be drilled at a distance of 40 cm. Then attach the suspensions 60 cm from each other. Now it’s the turn of the carrier profile. The distance between them depends on the size of the sheets. Install them so that they are located at the junction between the sheets. Suspension ears need to be bent. The frame is ready. Installation of sheets starts from the corner. They are mounted on dowels, nails and screws. If you have more sheets than wireframe cells, you need to trim them. This can be done with a hacksaw. Place all the sheets to begin with on the floor. In the necessary holes, make holes for the chandelier or lamps. The seams between the sheets are closed with putty.
Reading time ≈ 3 minutes Before we go into the room, we will definitely go through the hallway. And, of course, the first impression depends on this small part of your home. In conditions of limited space, I want to visually expand it. The ideal option in this case is a plasterboard ceiling in the hallway, provided that it will be decorated with spotlights. Benefits of Drywall CeilingDrywall is a versatile material that allows you to produce smooth surfaces, as well as apply concave, convex and curved shapes. Manufacturing do-it-yourself plasterboard ceiling as in the video, you need to take into account its general appearance. For example, a multi-level ceiling is used for a narrow and long hallway, while various graphic lines look especially attractive, making the room more voluminous. A rectangle located in the center of the ceiling provides a visual extension of its borders. With a very small entrance hall, a single-layer ceiling will be enough. Video editingBefore the start of installation, you need to decide how high the ceiling should be from drywall. If the height of the base is small, it is best to place the suspended ceiling as close to the main as possible. As a reference section, you need to take the lowest point located on the main ceiling, after which a mark is placed at any angle, which is placed 25 mm lower than this point. This mark is transferred to all corners and corners of the hallway. Drywall is mounted on the thickness of the gypsum board below the marks made.
Before starting the installation of the frame, you need to consider what kind of lighting is planned in the hallway. If these are spotlights, then the ceiling level should be more than 100 mm, if a chandelier, then from 50 mm is enough. The next stage is marking the level of the frame according to the labels. At the zero level of the entire perimeter of the hallway, it is necessary to fix the guide profile with dowels, the distance between which is 500 mm. Next, a ceiling profile is attached, places for which are marked on the guide (600 mm between adjacent ones).
Ceiling profiles are attached using direct suspensions placed on the wall every 400 mm, they are screwed with screws. It is necessary to check the level of the ceiling profile, for example, using a stretched cord. The final strength of the entire structure is given by transverse jumpers cut from the profile. They are attached using crabs at a distance of 600 mm. The next step is the fastening of drywall sheets. In this case, the sheets are pre-cut with the required dimensions. To do this, an incision is made with a knife at 50% thickness on one side and breaks. After which cardboard is cut from the other side. The planer handles the resulting burrs. Installation of sheets is carried out in a checkerboard pattern, for mismatches between the seams. To do this, you need to start with a whole sheet, then half, etc. Fastening takes place on self-tapping screws twisted flush. After attaching all parts of drywall, the joints are putty. What can be a plasterboard ceiling in the hallway (the photo gallery in our article will inspire interesting ideas) of a modern house, apartment or even office? Is it possible to use creative drywall sheets and frames to create creative designs that can set the tone for the entire interior? What techniques do designers use when designing spacious, narrow, standard corridors? About all this below. Plasterboard ceiling for the hallway - what makes the choiceThe modern plasterboard ceiling in the hallway pays off in every way. Affordable and easy to install, the material demonstrates a number of advantages, including:
It is pleasant and convenient to work with drywall sheets. Without unnecessary efforts and, what is important, skills and experience, a spectacular impeccable ceiling can be made in a room in a day. Among a number of positive aspects, it is worth noting some nuances that you need to know about when planning a ceiling in a drywall corridor in a simple or complex interpretation. Despite the flexibility, the material is quite fragile and requires careful handling. In addition, structures, especially on the basis of several levels, “steal” the height of the ceiling of the room.
Plasterboard constructions: possible variationsTo install suspended ceilings from drywall in the hallway, depending on the design idea and the characteristics of the room, you can have several options. These can be constructions:
The latter option is used extremely rarely and only in spacious hallways with high ceilings. In residential buildings and apartments, simple single-level structures are most often mounted, trying to maintain the height of the ceilings practically unchanged. Two-level constructions, provided the geometry is correct, the combination of colors and lighting can become a decoration of the room, set the right accents, visually change the parameters for the better. Small Hallway - Designer TricksMost often, the corridor is inferior in parameters to other rooms in the apartment or house. Taking into account its features, planning the installation of the ceiling, you need to try to visually increase the space with it. Properly designed plasterboard ceilings in the corridor solve several problems at once:
It is allowed to install a two-level ceiling in a narrow corridor, subject to simple recommendations. To achieve the correct effect, you must:
In addition, when planning a functional design of ceilings, it is necessary to consider the location and combination of fixtures, with their help smoothing out the imperfections of the room and focusing on the merits.
Spacious corridor - unlimited field of activityFor large rooms, drywall ceilings are more diverse. The more space, the easier it is to think through, place and mount the structure. That is why in spacious corridors you can often find interesting designer multi-level ceilings with built-in lighting and stretch sheets. Designers recommend even in spacious corridors to try to use the space as rationally and competently as possible. It is important to think through the design to the smallest detail, plan the lighting in advance, using, for example, a reception with height differences and an LED strip. In spacious hallways, you can afford to use large geometric decor elements of restrained colors, experiment with combinations of bright colors to decorate different levels of construction. A large corridor should not be a call for creating a complex and overloaded construction details. Not always beautiful ceilings - multi-level with many decorative elements. You can make the right accents and complement the interior with a minimalist design with a perfectly even and smooth surface without excess details and light.
Design Secrets - Discovering Secrets of MastersIn order to make a beautiful and practical ceiling in the corridor with your own hands, you can use the general tips of designers that have been repeatedly tested in practice.
Plasterboard constructions in the corridor can be combined with mirror surfaces to create an infinity effect, which can be enhanced by correctly positioned spotlights and a colored LED strip. All these techniques will allow you to focus on the ceiling and visually adjust the parameters of the room, if you adhere to the main rule - the design of the structure should be planned taking into account the characteristics and dimensions of the corridor.
Narrow hallways - how to properly arrange the ceilingThe long and narrow corridor with the help of a drywall construction can be quite simply visually expanded. For this, several effective techniques are used. One of them is the division of the surface into geometric regular shapes, each of which is additionally framed by a high baseboard. An important point is thoughtful lighting. With it, you can make even the narrowest corridor visually spacious and comfortable. Spotlights placed along several lines, starting from the center and ending with the sides of the structure, are suitable. The closer to the edge, the smaller the lamps should be.
The color scheme also matters. Narrow corridor and dark ceilings are incompatible. In such rooms, only light and cold tones will become appropriate, finishing with a reflective effect is allowed.
|


Popular:
New
- How to remove old vinyl wallpapers from walls correctly and quickly How to remove old vinyl wallpapers from walls
- How to make a roof slope from a sandwich panel?
- How to cover up wiring strobes?
- How to make a steam locomotive and other ground transportation do it yourself
- Do-it-yourself drinking bowls for ducks: manufacturing features
- Layout of apartments in a series of cube 2
- Do it yourself from unnecessary things: yard, garden, kitchen garden
- Construction of a welded aluminum motor boat "magic" Construction of an aluminum boat
- Home gas station
- Drywall Carrier: Simple and Convenient