Website sections
Editor's Choice:
- Ideas for decorating a room with paper butterflies
- Features, types, methods of applying decorative Venetian plaster
- Features, types, methods of applying decorative Venetian plaster
- Liquid rubber waterproofing for wooden floors
- How to repair a bathroom in Khrushchev
- Which linoleum is better for home: on what basis is linoleum better Which linoleum to lay at home
- Fashionable bathroom tiles
- Protecting a wooden wall from the heat of a stove
- Insulation for the exterior walls of the house: which one to choose Insulation for walls outside
- How to glue liquid wallpaper with your own hands
Advertising
| Make a beach lounger with your own hands. How to make a deck chair with your own hands: manufacturing instructions and tips on where to place a rest place on the site (105 photos) |
|
What is outdoor recreation and what in this section means a deck chair, there is no need to repeat. But for a person who knows how to craft a little, it may be easier to design a deck chair with his own hands than to buy a ready-made one. And it's not just about money. In affordable retail outlets, you may simply not find one in which you just want to lie down and relax. Yes, there is, of course, e-commerce. But what comes to you in ergonomics may not be exactly what it looked in the picture. In general, furniture and leisure items (not to mention medical ones) should not be bought in absentia. Unless the seller guarantees a refund of 100% payment without any explanation on the part of the buyer. Okay, science fiction to write fiction, and we are closer to the point. Products similar to those in the photo below will not be considered. For one simple reason - their manufacture requires production conditions. And at home it will cost hardly less than buying a ready-made one. Even if you are a skilled craftsman and own all the necessary tools. But a deck chair made per day (maximum for a weekend) from improvised materials on the balcony or in the garage can be just as comfortable, look no worse, and will cost no more than a third of the price of such a purchase. That's what we will do. Including steam rooms and children.
Soft or hard?The first question that needs to be addressed is whether, so to speak, the seating surface of the deck chair is hard or soft. On the one hand, this is determined by the purpose and nature of the use of the product; on the other hand, the choice of soft / hard determines the design choice of the deck chair. Its bed / seat can be either soft cloth or hard typeset of wooden planks. The soft bed, if done correctly, absorbs, removes and, like a wick, evaporates grease; a soft chaise longue is cheaper, it is easier to make (especially folding), it takes up less storage space. But - it’s unlikely that you can fully relax in a soft deck chair for more than 2-3 hours; why - see below. On the whole, in terms of the totality of qualities, soft is an optimal chaise lounge for a summer residence (you still don’t fall asleep there anyway) and like a carry, for example. for fishing, also see below. It is more difficult to make a hard deck chair, materials for it will cost more, for its storage in the winter you will need a rather extensive room. But on the other hand, a hard deck chair can be extremely ergonomic: it is possible to lie on it all day or to rest quickly and well after hard work. Provided that it is covered with a terry sheet or a cover made of upholstery fabrics for cabinet furniture - flock, microfiber, etc. Otherwise, you will have to get up on a hot day, tearing your sweaty back off a sticky tree, which is not very pleasant.
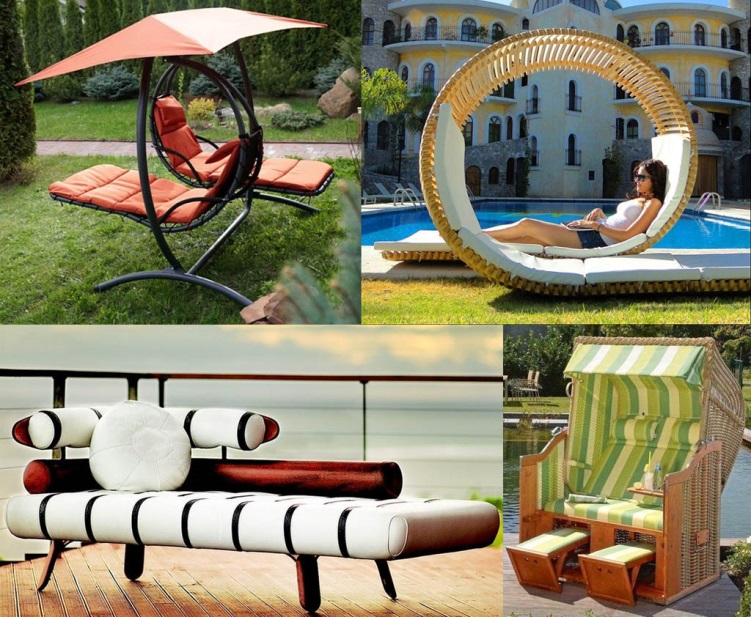
VarietiesRoughly speaking, a chaise longue is either a trestle bed with an adjustable headrest, or a chair with an adjustable camber of the seat and backrest (with one exception, see below). The chaise longue-bed is executed preim. tough; chaise lounge chair - soft. The main types of design of sun loungers are shown in the figure:
A simple chaise longue-bed (pos. 1) is extremely economical: for its production, you may need only 2-3 hours of time and materials for 100-200 rubles. (depending on what you already have at your fingertips), see e.g. video: Video: homemade deck chair lounger for 100 rublesFor a simple chaise lounge-bed, for the convenience of use and transportation, armrests, steps, shelves, poses are often added. 2. This significantly increases the cost and complicates its manufacture, but does not improve ergonomics at all: you lie down for such an hour and a half, you need to get up - and you’ll cool, your lower back will break. However, there is a very simple trick that can greatly improve the ergonomics of a simple chaise longue-couch, see below. The anatomical chaise longue-bed (pos. 3) allows you to quickly, within half an hour or an hour, restore strength after hard work or take a sunbathing all day without being ossified. But structurally it is the most complex, material and laborious. A chaise lounge of the “anatomical type” with a broken, rather than a smoothly profiled bed (pos. 4) is structurally not much simpler, but in terms of ergonomics it is worse than even a simple straight line; especially angular failure under the "fifth point".
Of the soft sun loungers, the most common is universal (garden), pos. 5. In fact, a universal soft beach lounger, pos. 6, but to make it more difficult: you need not only to increase the maximum camber of the back and seat, but also add steps for its adjustment, see. on right. A deck chair for fishing is made almost exclusively soft (item 7 in the previous figure), bearing in mind its weight and ease of transportation. At a fishing chaise lounge, firstly, the seat depth is less, and the height of the back is greater. Secondly, their collapse and inclinations, especially if a home-made deck chair, are set for themselves once and for all. The reason is that it doesn’t bite, it doesn’t bite, suddenly it’s off! And, it seems, the chub (or bream) leads, which you need to hook very skillfully and carefully. And from a garden or beach lounger, having relaxed yourself, you will not rise quickly, smoothly and silently. Chaise lounge or chair?
Very ergonomic and at the same time structurally simple garden chairs so called. Adirondack type, or just an adirondack chair (see figure on the right); they were invented by the inhabitants of the Adirondack Mountains of North America. You can sit in the adirondack chair for a day while admiring the scenery (the ones there are worth it, look at least Rockwell Kent’s Adirondack Autumn picture) and get out of it fresh, vigorous.
MaterialsNext, we will look at how a deck chair is made of wood. Metal-based deckchairs are much more labor intensive. The frame (frame) of a deck chair made of ordinary steel under normal operating conditions quickly corrodes in spite of any painting, and profiles made of corrosion-resistant metals will cost more than very high-quality wooden blanks, see below. The only exception is a deck chair for fishing (weight and size!); it is best done on a frame made of aluminum pipes, see e.g. video: Video: homemade deck chair for fishing< But the choice of material for a wooden deck chair is also not easy. And immediately the question arises: solid or glued plywood? The first is more solid, but it’s more difficult for him to choose the material. A deck chair made of glued plywood is more laborious, but more technologically advanced, especially in the case of an anatomical deck chair; material for it will cost less than high-quality wood. ArrayAn ordinary timber line for a deck chair is not very suitable - it is not resistant to regular alternating loads (after all, houses and sheds do not drag from place to place, do not fold and hide for the winter). In terms of mechanical and chemical resistance, a larch would be suitable for a deck chair, but its wood, like other conifers, quickly fades and turns gray from solar ultraviolet radiation. Of domestic hardwoods, oak and beech are suitable, provided that they are 2-3 times saturated with water-polymer emulsion (VPE). The last name is not entirely clear, but the first is a bit long, so now VPE is on sale under the name "Eco-soil". This is one and the same substance, suitable for impregnating everything at least a little porous - from concrete to soft wood.
HeveaTropical species like teak would not have to be talked about because of their high cost and the fact that in the Russian Federation they are delivered almost exclusively in products. Recently, however, hevea wood has appeared in sufficient quantities on the wood market. This Brazilian tree is known as the best rubber, but the Sieringero suicide armies have long been sent to the wilds of the Amazon for the “wild” latex. Hevea is grown on plantations in the humid tropics around the world, and when the trees are depleted from regular cutting, they are cut down and sold as industrial wood; partially dismissed into semi-finished workpieces.
The advantages of hevea as an ornamental tree are undeniable:  There is only one lack of hevea wood: its trees on plantations are depleted by young ones, aged 5-10 years. Therefore, hevea does not enter the market with long construction billets. But for the manufacture of a deck chair, this is not essential.
PlywoodHere, too, the choice arises: birch bakelized moisture-proof (aviation)? It is very expensive, bends badly and often bends on a bend. Construction pine? It burns out and turns gray in the light, like any coniferous tree, and is also not very cheap. Waste wood packaging (alder, aspen, poplar)? Cheap, bends, figuratively speaking, at least knit. Unstable, unstable to mechanics, chemistry, pests? After some additional processing, quite feasible at home (see below) for a deck chair will be quite suitable. Especially for the anatomical one, in the design of which there are curved parts, and the concentrated loads are much smaller in size than in the soft one. Impregnation and sawingThe fact that packaging plywood for hardening and moisture resistance must be impregnated is obvious. It is easy to guess that the best impregnation in this case is the same Eco-soil (VPE): cheap, safe (you can work in a living room with children), effective enough for a sun lounger. They are impregnated with a plaster brush-mowler 2-3 times on each side with an interval of 15-30 minutes and dried for a day (at temperatures above 25 degrees and humidity up to 60% you can dry overnight). And here is the first secret - you need to impregnate a whole sheet or part of it, intended for a deck chair. Yes, before sawing into blanks. Why? Anyone who has ever worked with a jigsaw knows how much sawdust he gives and how they fly apart + the pungent smell of a burning tree. Impregnated plywood dusts and stinks a lot less when sawing. It is easier with a circular, but not everyone has it, doesn’t make a curved cut, and all the same, the fewer the sawdust, the better. About jigsawIf you only plan to purchase a jigsaw (which is useful in so many cases), then taking it in your hands, do not saw immediately clean, practice on scraps and waste. The jigsaw is whimsical no less than manual. The first cuts can generally go sideways, then go slightly wavy. There is no sense in the laser marker - it literally gets off at the first centimeters of the cut, even if you have a “cool” Bosch or Makita. But, beat your hand under your own, exactly your own instrument - and your friends will not believe that this is done by hand, and not on a cutting machine. PlywoodThe full moisture resistance of the plywood parts will be gained by complete drying of the impregnation, after 2-3 days. But for the necessary strength they need to be glued from strips of plywood. The best glue, again in this case is mounting PVA. It is sold in construction stores under the names "Structural", "Reinforced", "PVA D2". Its important dignity is comparative, for example. with liquid nails and other glues on a nitro base - not dried PVA is completely washed off with water. Got on clothes - stretch under the tap; on the carpet - wipe it several times with a wet swab or walk with a washing vacuum cleaner. Mounting PVA has a somewhat gelatinous consistency and dries to full strength for a long time, the same 2-3 days. According to the usual technology, the parts to be glued are held up until the adhesive sticks (this is about 20 minutes), and then for at least 24 hours under pressure. If we take into account that for gluing, for example, 24 mm thick beams, 4 strips of plywood 6 mm thick will be needed, and there are no heaps of clamps and heavy loads for the home master, then the manufacture of a deck chair can drag on for a while, when you need to think about insulation, boxes / screens for radiators, etc. Not just nailsAll the details for the plywood deck chair can be re-glued in a day, and the next product can be assembled if metal fasteners are used for fastening with compression of the parts to be glued. But the heads of the usual screws will either stick out in plain sight, or they will need to be puttied and painted over. Over time, they will rust, but most importantly - a large number of thick ribbed fasteners will inevitably weaken the details. These problems will not arise if you use the so-called. finish nails. They are also sold in hardware stores, and if you cut off “No!” or look in surprise, explain: “Yes, these are the ones that beat platbands to MDF doors!” Nails for platbands! "
"Cash" nails are made of bronze (these are more expensive) or high-quality stainless steel; their heads and necks are molded somewhat differently than conventional construction ones. Therefore, finishing nails are very rarely bent and do not prick the material, even if the hammer is in the hands of a “full teapot”. And yet - the finish nails are anodized in different colors, so that you can pick up inconspicuous on your material (see. Fig.). Finishing nails of various sizes are available; the most popular from 12x0.6 to 25x1, which is just suitable for assembling plywood parts by plywood. GluingPlywood of plywood parts from strips with the use of finishing nails is re-made. way (see also fig.):
And if the curve?Bent glued parts are also assembled from plywood in a similar way, but it is impossible to dry them after impregnation: for 1-2 days the plywood impregnated with VPE remains plastic enough, but then it becomes more rigid and brittle than “raw”. The manufacturing technology of the bent parts of the deck chair flooring depends on how this flooring is assembled: frame transverse or longitudinal in place, see below. Longitudinal flooring is quickly assembled directly on the finished frame of the product; cross-frame is much more time consuming.Strips of longitudinal flooring are nailed one after another directly to the supporting beams of the frame with the same finishing nails. The finished product is dried for a day, sanded, varnished or painted - and done. To assemble parts (lamellas) of the transverse flooring, it is necessary to prepare a plasma wooden shield of a suitable size. Then:
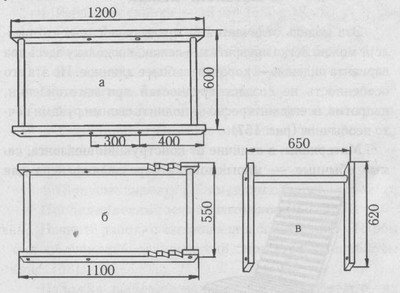
We make a soft chaise loungeThe easiest way to do for a summer residence, fishing and, possibly, a free beach nearby is a soft deck chair. Its fabric bed is sewn of tarpaulin or other durable resistant cotton fabric. Linen canvas is of little use - it is resistant, but rather rough, but at the same time slippery, which can result in scuffs on the body. Furniture flock and microfiber are perfect, but quite expensive. Typical dimensions of a universal (see above) soft deck chair are given in the figure:
But the design shown there is a highlight: the lack of need for locksmithing and simplified carpentry. The details of the backrest – camber adjuster (highlighted in bluish-gray on the right in the figure) are wooden because the oak (or beechen) locking rod does not rest on the holes at the points, as usual, but on the rails along the entire length; the rest of the metal fasteners are ready-made (M6 bolts with press-washers and nuts for them). By positioning the controller rails in a different way or simply by stuffing them a little more, you can achieve any limit for adjusting the camber and the number of its steps from the above. Most of the structural details are made of 40x25 timber, except for the head restraint and popliteal couplers - they are fastened with pairs of furniture confirm screws and therefore are made of 60x30 or 80x40 boards (in section). HeadrestAchilles heel of soft sun loungers - head restraints and popliteal support ties. If the patella is not particularly interfering, then the headrest is very felt neck or neck. Therefore, the head restraint of a soft chaise lounge is almost certainly made double (which, by the way, increases the lateral rigidity of the structure) and is wrapped with fabric of the bed, see fig. For more convenience, you can put a mattress made of sintepon or furniture foam in the back of the bed, but you will have to sweat it change at least every season.
No adjustmentA soft garden and summer lounger for one person or several of similar growth, corpulence and complexion can quickly be made unregulated from improvised materials. An example of this kind of construction is shown in the video: Video: homemade chaise lounge for a summer residenceOne of the commentators on this video claims that this deck chair is prone to transverse parallelogram folding. Why he called the horizontal transverse axis the z axis, he knows better. But in the described construction, there are enough transverse stiffness bonds and at least 3 virtual boxes can be distinguished, which impede parallelogram folding. Who has not learned building mechanics, just look at any panel or monolithic house. Where are the slanting / diagonal plates, beams, columns? But it’s worth it. And if it collapses from excessive exposure from the side, then it is not parallelogram. We pass to anatomicalMaking a hard anatomical deck chair is much more difficult than a soft one, and you cannot carry / carry it with you, but rest in it will be much more pleasant and full. First, decide on the purpose of the product. To relax after hard work and / or elderly people, you need a deck chair with a low back and a deep dip under the pelvic area, pos. And in fig. For the beach and relaxation in general, a deck chair with a raised back and a small smooth ledge under the lower back is more suitable. In the first case, it is necessary to ensure the outflow of blood from loaded (possibly sick) legs; in the second - to prevent her rush to her feet. Of course, a transformable deck chair will be the best, allowing you to implement one or another anatomical scheme.
TopchanLet's start with a simple, without any physiological and anatomical subtleties. It’s quite decent to rest on an ordinary beach couch, but is it possible to somehow improve it without complicating and not raising the price? Drawings of a simple beach chaise longue-bed with an adjustable headboard are given on the left in the figure, and on the right there - with the same improvement, making the bed more ergonomic. Specifically - with slightly profiled sidewalls-drawbridge. In the case of czars, it is better to put on a regular drill board, 2-3 times saturated with eco-soil; flooring - from slats 30x30 or 40x40. This deck chair will either be painted or varnished with acrylic varnish for outdoor work in 3-4 layers; in this case, the wood will not fade in 4-6 years.
Frame or beams?Frame in Russian frame without any Hi-Tech. Framed structures are now called structures with a supporting frame and idle casing; again in Russian frame. Frame support circuits (see, for example, on the left in the figure) are widely used in furniture production, including anatomical chaise lounges of the house-keeper and the middle price segment, thanks to the minimum expense of material; their complexity in automated production is also low. Flooring on a frame frame (claims for a tautology - to the authors of the term) can be laid out from longitudinal or transverse lamellas. But for an amateur working in a garage or on a balcony, the frame design is clearly complicated.
If you look closely at the photos of expensive / elite anatomical deck chairs, it turns out that most of them are made according to the beam scheme with a working longitudinal sheathing of the flooring (on the right in the figure); transverse beams are laid on the legs without tie-ins and are attached to them with screws. The point here is not only and not so much in the “steepness of the headstock” - rest on a deck chair with longitudinal decking is much more complete, because the ribs of the lamellas are not felt by the body through a single-layer terry coverlet. In addition, the lamellas can be made of one layer of 6 mm plywood and mounted with plastic immediately after impregnation without plaza directly in place, see above. But the flooring of the bed of the beam deck chair can only be longitudinal, because its skin is working.
Video: anatomical lounge chair
Construction ExamplesFurniture masters, both amateurs and professionals, rarely use canons meticulously and scrupulously. Any product of human hands requires a creative approach, and in the practical designs of chaise lounges, the basic principles of their construction are applied with various combinations and modifications. For example, a deck chair, the drawings of which are given in Fig., Can be attributed to partially transformable. The profile of his tsar (on the right in the figure) is selected so that, depending on the inclination of the bed, this deck chair is suitable for deep relaxation and thoughtless relaxation. The combined power circuit: a small number of transverse beams (not supporting) works in conjunction with the flooring of the bed from thin boards (better - plywood slats). As a result, the design turns out to be technologically simple and low material intensive.
On the trail. fig. - An example of a different approach to the same problem: a rocking chair (side of the cage drawing section 100 mm; flooring from rails 30x40). Here, the “transformation mechanism" is the resting person: leaning back or leaning forward, he chooses for himself (possibly unconsciously) the most comfortable position. Swinging, you can combine both types of relaxation. If a deck chair is under a tree, then psychological relaxation from the contemplation of trembling foliage against the sky will strengthen and complement the physiological.
For the elderly and / or people very tired of physical labor, a deck chair is a more suitable bed rest - a rocking chair with a canopy (see. Fig.). If the body aches, legs are poured with lead, and, especially, the romantic illusions of youth behind, flickering before the eyes and bright light in them only annoy, but when the fatigue subsides, the canopy can be rolled up “in the mood”. Drawings of a mobile double deck chair with a folding canopy Massive design that can be rolled into a secluded corner, a durable elastic bed, woven from a rope (better - a propylene cross lay); in such a sun lounger, relaxing together can be very, very active. And its natural result over time will appeal to the children's anatomical deck chair (sidewall profile in the figure below; cell 10x10 cm, dimensions also in cm).
Well, sooner or later everything passes, and the information revolution generously presents us with new opportunities. Now anyone can find a manual on the Internet on how to make a deck chair with your own hands. However, such plans are often difficult to implement, especially for a novice. They require the use of a large number of expensive tools, and therefore for many remain unfeasible. This workshop is a pleasant exception to the rule. The chaise lounge presented by the author has a simple design and an understandable system for folding and adjusting the backrest. If you approach the issue of choosing materials correctly, you will need a very modest arsenal of power tools and, in extreme cases, you could borrow any of them from friends and acquaintances. In addition, given the fact that the deck chair is made of natural wood, it can easily be used also at home, instead of a couch or chair in the living room. It quickly develops and unfolds, has a completely finished appearance. A beautiful textile mattress will complement the image, and a chaise lounge will fit perfectly into the interior of your home. In order to make a deck chair with your own hands, you will need: Materials: Pine board with a thickness of 20 - 30 mm; Tools: Miter saw, circular or hacksaw for wood; Step one: create a sketch and layout of a deck chair The model of the product is simply necessary if it itself consists of a large number of parts. It will not allow you to get confused in their countless list and significantly speed up the whole process of work. In addition, you will see the entire list of parts and their exact size. Well, how without this? But everything is preceded by a sketch. This sketch on a piece of paper by hand gives birth to an idea and lays down the basic outlines of the image of a future product. And it should start with it. In your case, the computer model of the chaise lounge is already ready and you can safely take as a basis all the dimensions indicated in this master class. But first write on paper the entire list of parts that you have to make. Indicate their sizes opposite and only after that start work.
Step Two: Parts Manufacturing The detail you have collected should be transferred to the material in the form of marking. Use a pencil to do this to easily correct creeping errors. Use also a construction square. Especially if you plan to resort to using a hand saw to saw the boards. It will allow you to mark angles at 45 and 90 °, and accuracy is never superfluous. So, mark the parts and proceed to their manufacture. Saw the boards into blanks of the length indicated on your list. You will need: Two longitudinal frame parts with a length of 1850 mm; All indicated dimensions should be clarified, since the author indicated them in inches. They also depend on the thickness of the boards you use. To find out the sizes in your case, always start with the general values \u200b\u200band gradually move on to the smaller details.
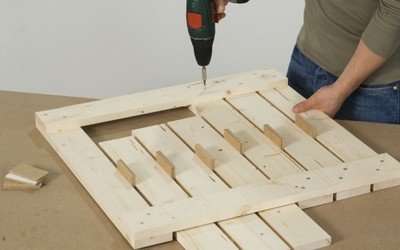
Step Three: Assembling a Lounger Start by assembling the deck chair frame. Remember that it is customary to assemble any frame with the help of screws. This ensures the relative strength of the entire structure. However, it often happens that screws alone are not enough. Then glue is also used. Such combined connections serve very well and do not require repair for a long time. Assemble the deck chair frame with glue and screws and fix the legs. Fasten the base parts to the frame with small studs. In parallel, fabricate the back panel. Inside the hole for the backrest, screw on the two support rails on the sides, on which the back rests in the folded state and on which the pieces of the rail (teeth) are attached to adjust the inclination of the back. Lock the teeth themselves. Connect the back to the frame using a pair of integral metal loops. Also make a U-shaped part for the back and fasten it in place with loops, which is smaller. Check backrest adjustment.
Step Four: Wood Protection Any furniture will sooner or later be subject to wet cleaning. Untreated wood hardly tolerates such processing, and the result is often zero. Therefore, the tree must be treated with suitable paints and varnishes. The author decided to leave the wood unpainted so that it could be seen that it was made of natural wood. In this case, the most reasonable option is to varnish the chaise lounge with a matte or semi-gloss transparent varnish. Since furniture is usually used very intensively, you should choose a varnish that will give the most durable and wear-resistant coating. For example, profile furniture varnish. Apply it on the surface of the tree in several layers and let each one dry thoroughly. Do-it-yourself chaise lounge (drawings with dimensions will be provided in the article below), quite simple to manufacture. But before buying the material, it is better to calculate the amount of wood in advance, and the fabric is selected more tightly. Previously, in scarce periods, they used ordinary tarpaulin and an untreated dry board for home-made furniture of this format. It was possible to meet a comfortable and thoughtful sunbed (also a deck chair) only in places for rest. Now everything is simpler, and it’s almost free to create a comfortable garden sliding furniture for yourself and your family. Views
The difference is always in the environment, and if at home you can put a compact sliding chair like a deck chair, then at sea or by the pool there is always such furniture, resistant to moisture (salt). But to make it simple, convenient and inexpensive, we will consider just the simple form of a chaise lounge on two frames, with a crossbeam and a fabric back. This is a portable type of furniture for relaxation, so everyone can assemble the same sliding chairs for the whole family. Do it yourselfWhere to begin? Well, of course, with the size. What will be the production, the deckchairs will only get stronger. Drawings and DimensionsAnd you will need to assemble two frames of this format on one deck chair:
What will result in a straightforward design:
For simplicity, we give dimensions for the drawings.
Materials and ToolsTo make a solid, proper seat, look at the following drawing:
You need to fold the cut out piece of dense fabric and sew the indents. But you can make a two-layer coating without saving. To do this, we fold in the measured segment with the front sides, stitch along the sides. But in the center (similar to a pillowcase) we leave space for carefully turning the seat on the front side. Then you can simply fasten the longitudinal seams with another stitch. But the needs of loops or pockets to connect all into one. So, in advance, we measure already on the wooden frame the necessary size of the pockets, then we tuck our rag and stitch it. It is important to measure so that there is an average state between excessively stretched and sagging.
Carefully with fasteners. Since iron or steel is susceptible to moisture, it is necessary to protect them with paint necessarily. It also recommends using quick-drying adhesives in those joints where there will be backlash. But in no case do we apply adhesive to the thread, because then disassembling the structure will be problematic. How to use and careIn order not to complicate the work, you can do this:
Then the frame can be made monolithic, and the bright fabric of the seat is easy to wash in the machine. Another plus: you can make several pockets for different weight and height. A universal design will come out that even a schoolboy can set up. DecorThere is plenty of room for imagination. Here's what happens without rushing, saving, or hacking:
And if you take four more bars and movable fasteners (clamps, bolts and others), then a sun canopy will come out. What is always the place in good weather:
Replacing the fabric on the board, we get the simplest bench-bench in terms of labor costs. The idea is not new, but affordable:
When there is no time for cutting and sewing, you can again make a lattice base, and buy litter from IKEA into this space: The collapsible design, although it does not look so expensive, but has a significant advantage - this is mobility. And you can fully relax if you add portable footboards to the frame. And for this it is not necessary to invent something:
Prefabricated or stationary chaise lounges are the simplest type of country furniture. There was never anything complicated in their design. But in working on furniture for relaxation, as in any business, you need to adhere to an independent or deducted plan. How to make a chaise lounge for the garden with your own hands, see the instructions in the following video:
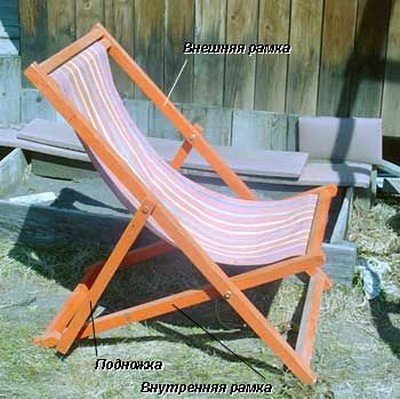
The word "deck chair" is immediately associated with a comfortable outdoor recreation. In addition, a comfortable portable chair will emphasize the style and personality of the cottage or garden plot. A shop lounger can be quite expensive, but you can easily assemble it yourself from improvised materials. Chaise lounge - the general principle of design, varietiesAny deck chair is a folding chair on the frame, often with an adjustable back position. The word "deck chair" comes from the French expression Chaise-longue - "loafer." Varieties by destinationDepending on the purpose, the sun loungers have a different configuration.
Design VarietiesBy design, sun loungers can be sedentary and recumbent.
Photo gallery: the variety of sun loungers has no limits
The choice of design and material for constructionYou need to clearly understand what you would like to receive and what opportunities you have. If you need a solid structure, and weight does not matter much, then you need to focus on a metal or wooden deck chair with a wooden seat. The easiest way to make such a seat is from pallets - there is already ready-made assembly of boards on the frame, but the boards themselves are of poor quality and will require long processing after assembly - sanding, painting. Making a deck chair out of bent steel pipes requires handling skills for the welding machine. The finished design will turn out to be very durable, but heavy. If, on the contrary, you need an extremely lightweight construction that takes up little space, then think about a deck chair from the frame of an old folding bed. But the easiest to manufacture option is a familiar wooden deck chair with a fabric seat. Future beach chair - drawing and descriptionWe settled on a simple wooden structure: bars connected by bolts to nuts and washers. Three racks in the back give a fortress to such a deck chair, they also allow the chair to transform. The seat made of durable awning is fixed on two round bars. Tools and materialsWe will need tools:
Metal fittings and other trifles:
Compounds for preparing the tree:
Table: necessary details for a chaise lounge
Preparation for workAll bars must be sanded, starting with a coarse-grained skin, ending with the smallest. It is advisable to impregnate them with special impregnation from decay or water-repellent impregnation, after which it is primed and painted or coated with stain. Then the deck chair will serve you for many years in any conditions. Sun lounger assembly
Here is another exemplary drawing of a slightly different design - here all parts, dimensions and connections are perfectly visible. Further careIf you carefully approached the preparation of wooden parts, then special care is not required. But over time, all actions for sanding, impregnating, priming and painting should be repeated by removing the fabric seat. The removable seat can be cleaned during rain and is easy to wash when dirty. You can also make it from washable fabric. For the winter, the deck chair is better to clean the room. The simple process of making a deck chair with your own hands will delight any master with a wonderful end result. A variety of materials and fabrics will allow you to be creative and create an original thing. And with proper care, a deck chair will last you for many years. It is so pleasant to retire in the garden after a hard day's work or sit on the lawn by the pond in order to relax, rest and enjoy the sounds of nature. And what kind of garden furniture do most associate with a comfortable rest? Yes, a garden deck chair! A convenient portable elongated chair, in addition to direct functional value, will act as a spectacular exterior element that emphasizes the style of a summer cottage. There is nothing difficult in making a garden deck chair with your own hands. We have selected for you several options simple in the manufacture of sun loungers. Among them, it will not be difficult to choose a suitable model, which anyone can build. Such a chaise lounge can be safely used instead of a bed: a flat surface, an adjustable backrest. What else do you need for an afternoon break ?! The only drawback of this design is that it is very problematic to move it around the site itself. Sun loungers of this design are very popular among vacationers on the sea coast, and among the owners of suburban areas But there is a way! We suggest you consider the option of a deck chair equipped with rollers. To make a deck chair you need to prepare:
Plates of the required size can be purchased at a carpentry workshop or at the construction market. When choosing plates, it is better to give preference to products from coniferous species, since they are more resistant to atmospheric precipitation. The size of the deck chair depends on the desire of its owner. In most cases, the structure is made 60x190 cm in size. Having decided on the dimensions of the deck chair, we make two long and two short sidewalls from wooden blocks. From them we assemble the frame of the structure, fixing together with the help of fixing corners. The outer side of the frame is planked with boards.
On long planks at a distance of 5-8 cm from the corner, we fix the legs of a chaise lounge, the material for the manufacture of which were bars 5-10 cm long We fix the legs to the boards using 60 mm screws.
We mount the wheels: in the center of the short legs of the deck chair we install the rollers, fixing them with screws 30 mm long, equipped with a semicircular head with a diameter of 4 mm To make a wooden lattice using a jigsaw, we cut boards of 60x8 cm in size from the plates.
We attach the planks to the plank bed on the screws, leaving a gap of 1-2 cm. To maintain the clearance, it is most convenient to use special struts When planning to make a chaise lounge with an adjustable backrest, the lattice should be divided into two parts: a sunbed and a headboard. We put both parts on the connecting boards and fasten together using a door hinge.
To equip the mounting plate between the long bars of the deck chair frame, we fix the transverse rail. On the mounting plate we fix the support rack, fixing it on both sides with screws The finished deck chair can only be processed by walking with a grinder and opened with varnish or paint. We offer you to watch a video that shows how such a model of a chaise lounge is assembled:
Option # 2 - fabric chaise lounge on the frameAnother no less popular model of a deck chair, which can be folded, giving an almost flat shape.
It is convenient to move a light chair around the site, choosing open sunny glades for relaxation, or, on the contrary, corners shaded and hidden from prying eyes in the garden To make a folding deck chair you need to prepare:
Reiki is best made from hardwood species, which include birch, beech or oak. For the manufacture of a chaise lounge, it is better to use fabrics that are characterized by increased strength and resistance to abrasion. For example: canvas, tarpaulin, jeans, mattress teak, camouflage. We cut the slats of the required length. Using sandpaper, carefully grind the surface.
According to the scheme, where A and B denote the main frames, B represents the stop-regulator, we assemble the main structural elements In the long rails of the main frames at a distance of 40 and 70 cm from the corners of the structure, drill holes with a diameter of 8 mm, and then grind them using a round file. In order to change the position of the back in the deck chair, in frame B we make 3-4 cutouts at a distance of 7-10 cm. To equip the seat, we drill holes with a diameter of 2 cm, departing from the two ends of the rails. We install cross-members in the holes - round slats, the ends of which were pre-lubricated with PVA glue.
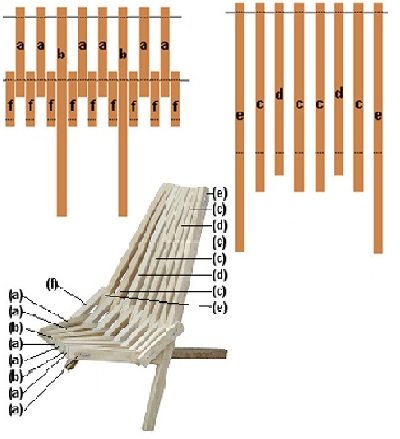
We proceed to the assembly of the deck chair: we connect parts A and B with the screws inserted through the upper holes. By the same principle, we connect parts A and B, only through the lower holes The frame is assembled. It remains only to carve and sew a seat. Cut length is determined by the possibility of folding. Too short a cut will not allow the deck chair to fold, and an excessively long cut will sag in the disassembled position. To determine the optimal length, you need to fold the deck chair and measure the fabric: it should be slightly stretched, but without effort. A piece of fabric with machined edges is nailed to the round slats located on parts A and B. To do this, wrap the cross-pieces around the edge of the cut, and then fix them with small cloves with thick hats. A variant is possible in which "loops" are made at the edges of the cut and put them on the crossbars. Option # 3 - Kentucky folding chairThe original chair is assembled entirely from bars. If necessary, the chair can always be folded and put into storage.
The advantage of such a garden chair is that when disassembled, it does not take up much space, while the design is designed so that you can completely relax the muscles To make a chair we need:
For the manufacture of the chair, bars of 50x33 mm in size can also be quite suitable, which can be obtained by sawing a 50x100 mm board into three equal parts. The total length of the bars should be 13 meters. Instead of galvanized wire and brackets, you can use galvanized studs, the edges of which are secured with eight nuts and washers.
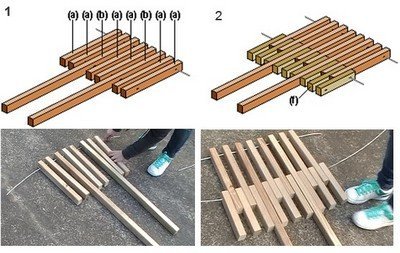
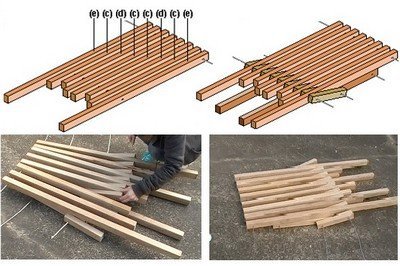
To determine the required number and length of wooden blocks, it is convenient to use a summary table. According to the drawing, we make through holes The diameter of the holes should be 1.5-2 mm larger than the thickness of the wire used. Having prepared the required number of bars, it is necessary to carefully process all the faces, sanding the surface with the help of fine-grained sandpaper. We proceed to the assembly of the structure.
For clarity, we use the assembly scheme of the seat with dividers, as well as the back of the chair. Dotted lines indicate the locations of the through holes with a wire threaded through them.
On a flat surface according to the scheme, lay out the bars for arranging the seat. Through holes for wire passes
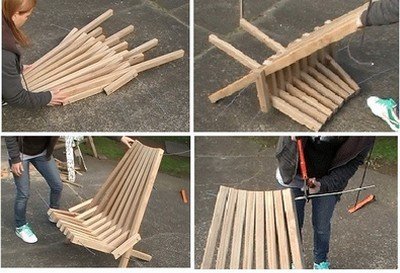
Using the same principle, we assemble seats with dividers, connecting wooden blocks with pieces of galvanized wire The main structural elements are assembled. We take up the ends of the wire, holding the sides of the structure, and carefully raise the chair.
It remains only to cut off the excess wire with wire cutters, and then bend and fasten the ends with galvanized staples Chaise lounge for a summer residence: 8 do-it-yourself models
Garden chair ready. If desired, it can be coated with semi-matt varnish for woodwork. This will significantly extend the life of such a popular element of garden furniture. |


 For the simplest reclining chair made of wood, aluminum or plastic, there are the following types or types:
 Let's start like this:
 In working with fabric and wood, we need to take:


 Products made of eco-friendly material are popular among summer residents
  A deck chair with a plastic seat in a classic crate is suitable for the beach
  The chaise lounge can be a type of upholstered furniture
  The chaise lounge "Leonardo" is equipped with a mattress
  The fabric for the seat must be strong and dense, not subject to stretching
  The simplest folding garden chaise lounge "Valdai" - the most budget option
  Non-folding chaise lounges are better for stationary use.
  Chaise lounge Cosatto - minimalistic plastic and metal
  The chaise longue is made of thick plywood
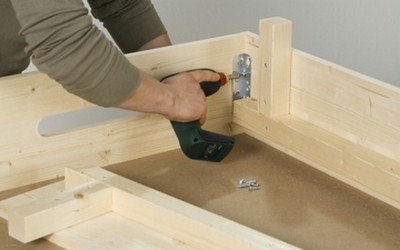


Popular:
New
- How to remove old vinyl wallpapers from walls correctly and quickly How to remove old vinyl wallpapers from walls
- How to make a roof slope from a sandwich panel?
- How to cover up wiring strobes?
- How to make a steam locomotive and other ground transportation do it yourself
- Do-it-yourself drinking bowls for ducks: manufacturing features
- Layout of apartments in a series of cube 2
- Do it yourself from unnecessary things: yard, garden, kitchen garden
- Construction of a welded aluminum motor boat "magic" Construction of an aluminum boat
- Home gas station
- Drywall Carrier: Simple and Convenient