Sections of the site
Editor's Choice:
- Frejka pillow sizes by age
- Sports knee brace
- Water programs in X-Fit: training according to the unique SMART SWIM method
- Anti-varicose compression hosiery
- XVIII World Class Games: results
- Oleg Vasiliev: every step in my life is against the movement
- Son of Elena Sanzharovskaya: cause of death, what happened
- Orenburg bibliographic encyclopedia
- SketchUp - a program for modeling simple 3D objects
- Pole Dance (Paul Dance, Pole Dance)
Advertising
| How to repair an iron with your own hands. Disassembly and repair secrets |
|
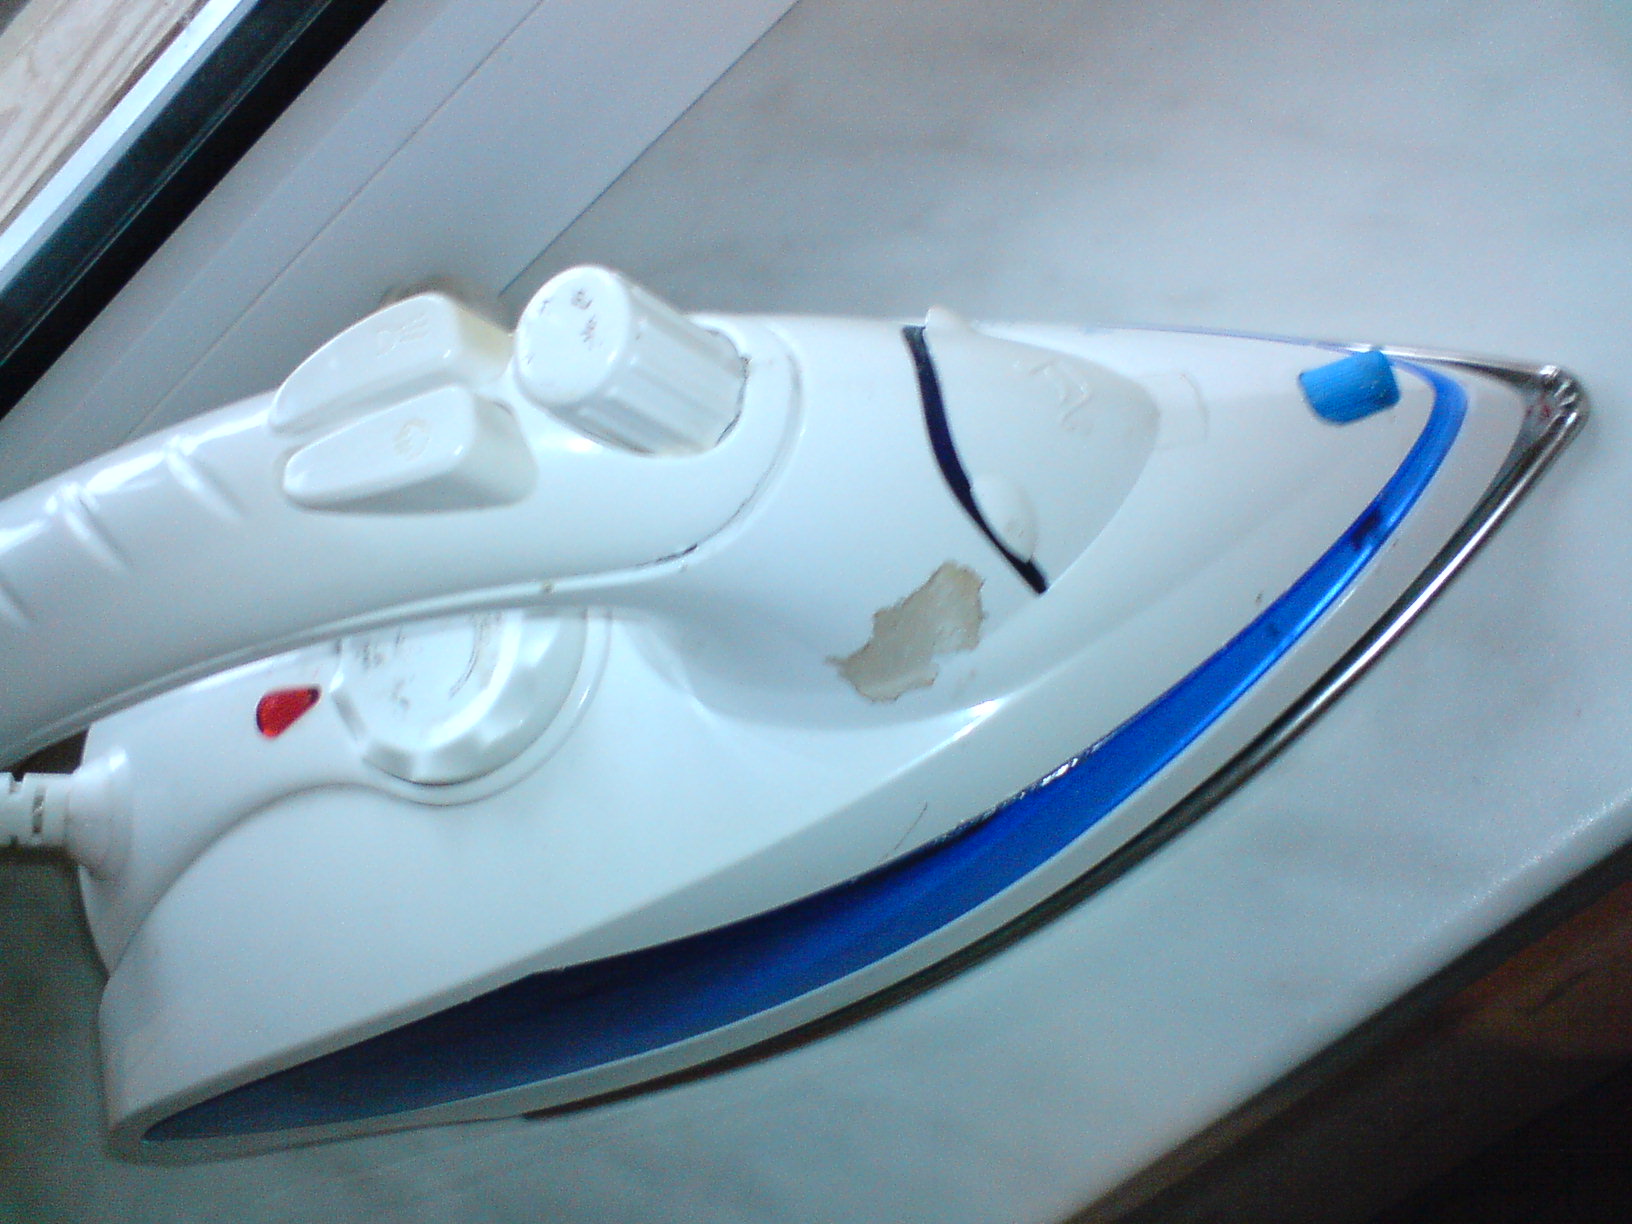
You started your "favorite" business - ironing, and the iron refuses to heat up. What kind of demonstration of protest? Want to go on vacation? Let's figure out together why the iron does not want to work, and how to fix it. After all, fixing an iron at home is not so difficult. One has only to arm yourself with the knowledge that we will give you in our master class. Electric circuit and device of conventional and steam ironsElectric irons are different. In addition to conventional heating devices, there are those that have a steaming function, as well as steam stations. Accordingly, in order to carry out the repair of the iron at home with our own hands, we need the electrical circuit of the iron of our version of the unit. Let's see what the diagrams of various types of electric irons are. Regular ironThe simplest version, no frills. Smoothes creases by applying pressure from a hot sole. You have seen these in films, when housewives, to make the fabric more pliable, took water in their mouths and snorted at the fabric. This iron is inexpensive, its device is very simple. Now you will find such small size irons. It is convenient to take them with you on a business trip in order to iron the linen crumpled in the suitcase. The wiring diagram for this version looks like this:
With steamerThis is the most common iron model today. Has in its arsenal a spray nozzle to dampen folds, and holes for steam out. The liquid is poured into a special reservoir located on the front of the device. The scheme is a little more complicated than that of the first option, but the principle of operation remains the same:
Steam stationsit latest development in ironing technology. The body of the iron itself is connected to a free-standing steam generator by two wires assembled in a common binding: an electric cord and a steam line. Water boils in a boiler, and then steam is supplied to the iron. Thanks to a capacious tank, into which 1-1.2 liters of water can be poured, such devices are capable of releasing steam under a pressure of 4-5 atmospheres. Creases are smoothed out with no effort on your part. The hand does not get tired, because the iron weighs less than a simpler appliance. But steam stations are suitable only for home: they have heavy weight and size. Here is a rough diagram of the structure of a steam station:
Did you recognize your type among those represented? Then let's move on. So, we see that the wiring diagrams of the irons different types are approximately the same and contain 4 basic elements, without which no iron will work:
All other indicators and regulators are only additional "chips" of one or another manufacturer. For this reason, we will consider how malfunctions are repaired, using the example of an iron with a steamer. Almost everyone has this, doesn't it?
How to disassembleThe case disassembly scheme for each model will have its own characteristics (screws in different places), but in general you will need to follow the sequence of steps.
In our work, we need, in addition to a screwdriver, sandpaper for stripping wires and contacts and an electronic device for measuring the resistance in the circuit - a multimeter.
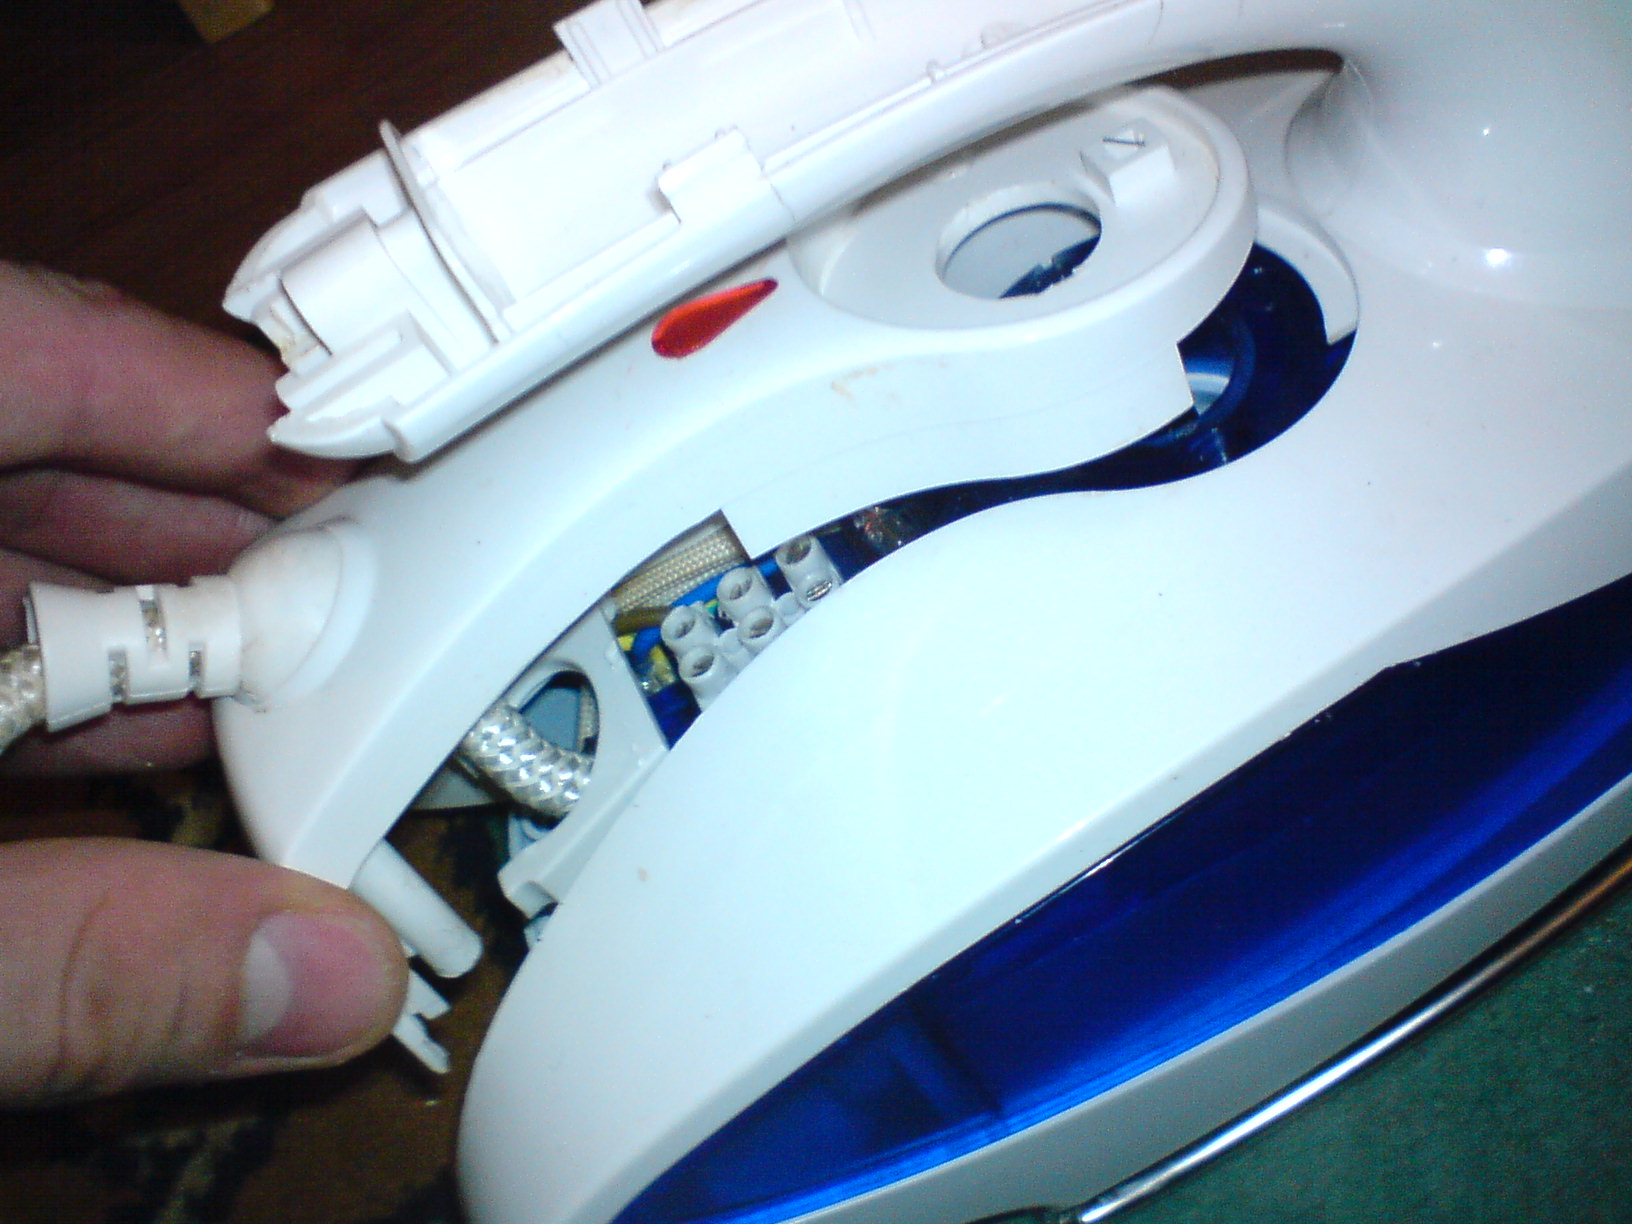
Iron malfunctions and how to fix themChecking the cord for continuity - replacing the cordYou need to fix the iron with your own hands from the beginning, that is, from the power cable. Perhaps the cause of the breakdown is in it. First of all, we check the wire for flaws. Most often, the electrical cable breaks in the area of \u200b\u200b\\ u200b \\ u200bconnection with the plug and with the body. Look closely at these places to find broken wires. If you notice that the mains indicator light blinks during ironing, it is possible that the malfunction is related precisely to the integrity of the supply cable. Check the cable connection to the terminals. If you see signs of oxidation on them, we disconnect the wiring, clean the terminals with sandpaper and return the wires to their place, watering the attachment point with sealant for reliability. If the cord is frayed to such an extent that a short circuit occurs during ironing, then there will be only one way out: change the cord in the iron. it the best way... But if the replacement of the cable is not yet included in your plans, and you need to iron the clothes here and now, then you need to repair the wire. To do this, you need to find where the wiring was rubbed. Sometimes broken wires are hidden by insulation or winding.
To locate the break, turn on the iron and look at the signal light. In the meantime, we bend the wire, moving from one end to the other. If at some point the indicator starts blinking, it means that you have found the place of breakdown. Then we remove the winding in this area, cut each wire separately, remove 1-1.5 cm of insulation from each end and twist / solder them. We wrap the joints with electrical tape. Then we fasten the wires to one another with electrical tape so that they do not dangle. Now we check our cable for serviceability: we turn on the iron to the network and bend the wire in different places, looking at the light indicator. If it turns on and does not blink anymore, then everything is in order; if the light comes on and goes out, then the repair has failed, and you will have to repeat it again. In any case, such a fix is \u200b\u200ba temporary measure. Better to change the wire out of harm's way. So, you replaced the wire, and the device still does not want to function? In this case, the problem may be lurking further. Replacing the heating element (TEN) - cleaning contacts + checking with a multimeterThe heating element in modern devices is an extremely reliable device that can break only in the most extreme cases (for example, the sole of the iron somehow cracked). If this does happen, it will be easier to buy a new iron than to replace the sole. Moreover, its cost is not much less than the price of a new device; and not the fact that you will be able to find exactly the one that fits your model. To understand if the time has come to buy a new unit, let's make sure that the matter is in the thermal heater. All models have a standard heating element arrangement: on the bottom of the device. Its contacts are soldered to the contacts of the iron, and a light bulb is responsible for the indication. If it lights up, and the sole does not heat up, then the problem is in the heating element. The main reason for the breakdown of the heating element is the rupture of the filament coil.
If, for some reason, the spiral breaks, then you will have to buy a new iron. But take your time. Take a closer look at the contacts of the heating element. There may be traces of oxidation or caked dust. It may well be that we can still repair the device. We clean the contacts from dust and oxides that prevent the current from passing to the coil... Next, we take a multimeter and connect the terminals to the wiring in order to measure the resistance of the iron (see the picture for how to do this). If the numbers appear on the scoreboard, then everything is fine: we will postpone the purchase of a new iron until later, and we will revive this one. In general, you need to go through all the nodes of the iron with a multimeter and check if there is life in the contacts. ThermostatIt is likely that the iron is not working because the thermostat is out of order. The device of the thermostat is simple (see the description of the simplest iron at the very beginning of the article):
To check it for serviceability, first of all we inspect the thermostat contacts for oxides and contamination. If there are any, then we clean and check the device for serviceability. It works - great, we assemble the iron! If not, we look further. The principle of operation of the thermostat is based on the bending of a bimetallic plate when it is heated. Reaching the set temperature, it rises so much that it reaches the contact plate and moves it, thereby breaking the circuit. A power cut occurs and the soleplate cools down. This is how the platform overheating protection works. Cooling down, the plate takes on its original shape, and the process is repeated anew. Using an arrow tester (adjusting the dialing mode), we check the health of the module. To do this, set the wheel to some mode, and bring the device probes to the contacts of the wires that go to the heating element. Heard the sound - great, let's take the next step. Turn the thermostat wheel until it stops and listen to the multimeter. We need silence, which means the contacts are open. If there is sound, then the thermostat needs to be changed, because disassembling it is a dreary business and only professionals can do it. We buy a new part in the store (or remove it from an old iron) and put it in place of the faulty one. We assemble the unit, trying not to lose spare parts. Overheating protection does not workBut what if all the nodes we checked are in order, but heating does not occur? Modern irons are equipped with one spare part, which, in theory, should save from overheating and power surges. In fact, she, besides this, saves you from extra money. I'm talking about a fuse made of fusible metal. If our device heats up to 2400C, an auto shutdown occurs: the fuse overheats and opens the circuit. The iron turns off and does not turn on again. The trouble is that if you don't know that the fuse has blown, you will go for a new iron. And this is a hasty step. The solution to the problem is simple - replacing the thermal fuse in the iron. Better yet, throw it away as an unnecessary element, and close the circuit by soldering the wires.
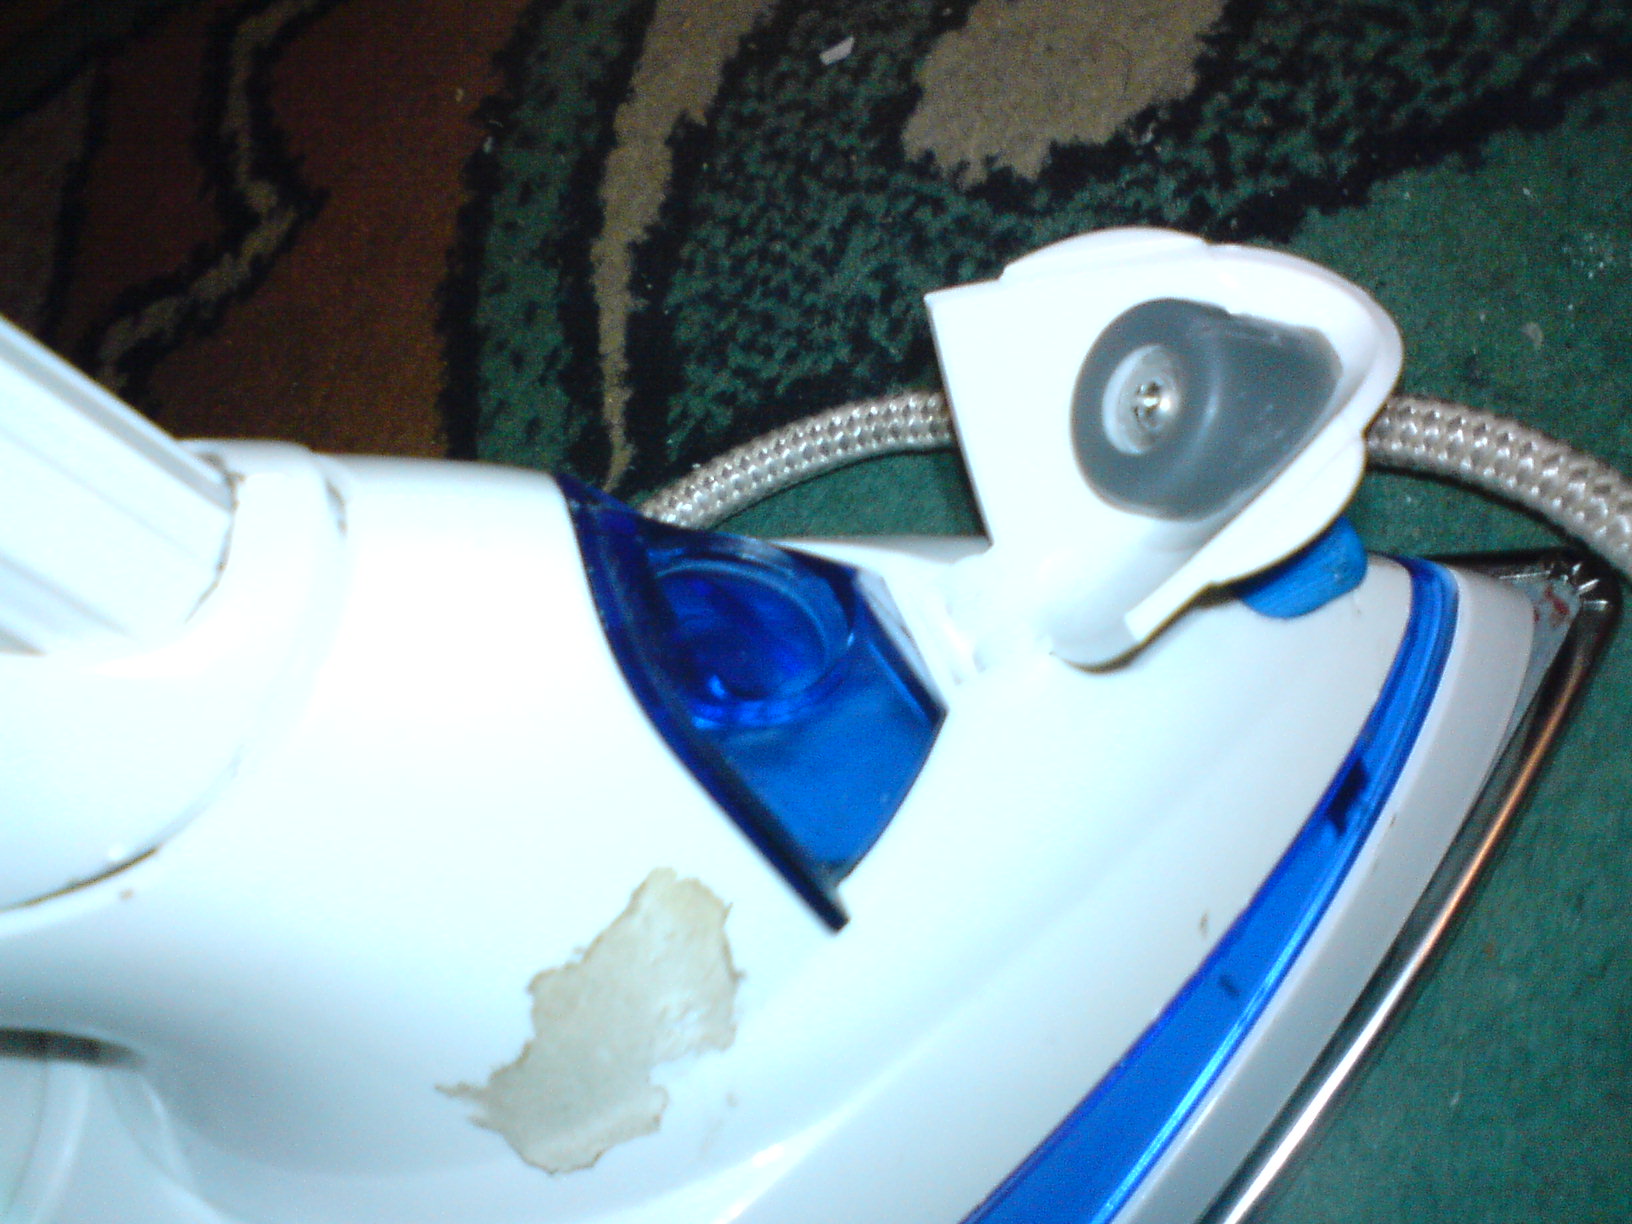
No steam escaping - cleaning the soleplate holesIt so happens that the iron seems to work, but for some reason the steam does not come. The steam cannot find a way out, usually due to the fact that scale has accumulated on the holes ( limescale). To clean the sole, take a baking sheet and pour into it a solution of vinegar (1 tbsp. Per 1 l of water) or citric acid (1 tbsp. L. Per 1 tbsp. Water), and place the iron. Position it so that the spout is below the back edge. Pour water to a height of 1-1.5 cm. Now you need to adjust the steam supply to the maximum, and put the baking sheet on fire. Bring to a boil and let cool. We repeat the process 2-3 times. To avoid limescale build-up, use purified water to extend the life of your iron. Sprinkler breakageIf no water is coming out of the spray tip, the cause is most likely a loose water pipe. We disassemble the panel on which the tip is located and attach the tube in place. At the same time, we check the serviceability of the contacts, as described above. So we figured out how to fix problems with the iron. I hope this workshop has saved your money. Good luck to all!
I love puzzles ... especially unexpected ones. Here is such an unexpected puzzle "fell on my head" today. More precisely, it fell not on my head but on my shirt, and did not fall - but fell off. An iron fell apart in my hands, while ironing a shirt…. just like that, the sole took and fell off (it remained hanging on the wires). The case turned out to be one screw that had been unscrewed (the flimsy fastening of the iron soleplate aroused my suspicions from the very beginning), which fastened the sole to the "nose" of the iron. To screw this screw into place, it was necessary to disassemble the entire iron, which was a puzzle. A quick "google" did not bring a solution and had to "storm" the iron ... So I decided to combine the solution of the puzzle with a photo session. Maybe someone will be useful, although the model of the iron is not known…. but still.. This is how my iron looked at the very beginning, a fallen off potash and an assembled top of the iron:
The heel of the sole is fastened without screws, with some kind of anchor grips)) Ie. the reliability of the design rests on the very screw on the iron spout.
Note that I took the photographs after disassembling the iron ... so there will be a "reconstruction of events" further. So welcome - the iron itself:
Disassembly should begin with a dastardly hidden screw under the lid of the water tank:
But you need to remove the cover from the closed state, hook it with a screwdriver and lift it up.
Unscrew the first screw:
We take out the "horned bullshit" from the end of the handle and take out the rotary control. To do this, unscrew it counterclockwise until it stops, and then pull it up.
We screw this screw, this is the second hidden screw. I found it only when I was assembling the iron ... I broke it or it was broken before me (the iron is not mine) will remain a mystery !!! In my case, there is an option to buy super-glue or find dichloroethane and glue the plastic:
The next 2 screws are hidden under the cover of the temperature controller. It will have to be brutally ripped out with a screwdriver. (in my case it was easier, I pushed her out with insidesince the sole has not yet been screwed on)
Unscrew the screws here and near the heel of the sole... There will be 4 more screws: two large and two smaller ...
We remove the part:
Mesh filters at the bottom of the cylinders ... You also need to watch out and not rip (as I did) the tube leading to the spray on the iron spout:
EVERYTHING, I finally got access to the ill-fated screw on the toe. It can be screwed on and iron assembled. But I recommend checking the integrity and tightness of all contacts. And in general, to carry out maintenance of the iron, the races have already been dismantled .... When assembling, do not forget to put in place various little things so that there are no "extra parts" left after the repair:
two crap I almost forgot to put on. These are some kind of gaskets ... Everything, I tighten the ill-fated screw:
And I start assembling ... in the reverse order to disassembly .... The only thing I will note is that in order to properly assemble the temperature regulator, I unscrewed it all the way clockwise and accordingly knew in which position it was necessary to put on the regulator cover itself ... this was the position of the maximum temperature:
Look like that's it…. do not forget about the screws and do not get nervous during assembly and disassembly)))) This entry was posted on October 5, 2008 at 13:47 and is filed under with tags. You can follow any responses to this entry through the feed. You can, or from your own site. November 26 2005 yearIgor Davidovsky What does such a necessary device in everyday life as an iron consist of? According to the principle of operation, a modern iron has remained the same as it was in the days of our mothers. So, the iron consists of: a massive sole into which an electric heating element (TEN) is embedded, a bimetallic temperature controller, a thermal fuse, a water tank used in the steaming system, a handle, indicator lamps for operating modes and buttons (knobs) for controlling the operation of the steaming system. Next, we will take a closer look at the purpose of the components of the irons and find out what you should look for when buying a new appliance. Sole. She is the most important element of the iron. It is on her that your success in the "ironing" field mainly depends. First you need to decide which outsole quality plays a major role for you - durability or ease of sliding. If the first, then the sole should be based on stainless steel, which has held the lead for several decades, being still the most common material for making an iron sole, but it does not differ in ease of sliding. True, in order to eliminate this disadvantage, devices from many manufacturers (Braun, Siemens, Bosh, Tefal, etc.) form a special air cushion between the sole and the fabric when steam is generated, making it easier to slide the iron. But still, it will not replace the soles, which already contain materials that provide a high slip coefficient. Most often, this is an ordinary enamel coating, which, although it has such an irreplaceable property, is nevertheless a delicate and vulnerable material, and if you handle it carelessly, scratches and chips may appear on such a sole. The same applies to teflon coatings. Today, every self-respecting company has patented soles made of special compounds (compounds of various materials). Alas, apart from the mysterious beautiful names, we can get little specific information and, accordingly, we cannot blindly trust the manufacturer who claims the unique durability of its outsole. In my opinion, the ideal option is a polished (mirror) steel sole. Temperature regulators used mainly of the bimetallic type, this is a completely reliable iron unit that does not cause much trouble. Irons with electronic regulators are less common, and their price is very different from ordinary bimetallic regulators. The electrical circuit of the irons, in principle, has not undergone any changes. The only thing that has been added is a thermal fuse that turns off the heating element if the main regulator does not work and the sole temperature exceeds the temperature of the thermal fuse. There are two schemes for connecting the heating element to the network.
Thermal fuses are of two types: disposable and reusable. Reusable thermal fuses are made on the bimetal principle (like the main iron regulator). When the set temperature is exceeded, the contact breaks and the power supply circuit of the heating element is interrupted. After the iron has cooled down, the bimetallic contact again closes the power circuit of the heating element. Thus, a reusable thermal fuse prevents the iron from overheating (if the main thermostat has not worked) and burn out completely.
A disposable thermal fuse can perform its function only once. When the set temperature is exceeded, it breaks the power supply circuit of the heating element, thus protecting the iron from overheating and burnout of the heating element. Unfortunately, after the one-time thermal fuse has triggered, further operation of the iron without repair is impossible. It is disposable and disposable in Africa.
The steaming system control buttons are used to adjust the water supply for steaming. Usually there are two buttons and a knob. One of the buttons serves for a one-time supply of a portion of water into the steam generation chamber (the so-called steam boost), the other for wetting clothes from a sprinkler installed in the front of the iron. The knob is used to adjust the water supply for constant steam generation (remember to close the water supply when the iron is not working, as this can lead to a large puddle under the iron). The operation of the iron is indicated by light bulbs. Usually there is one red light, it indicates that the heating process is taking place to the set temperature. However, there are models with two bulbs - one red and one green. The red light has the same function as in the first case, and the green light indicates that the iron is plugged into the mains (socket). Repairs.Nothing is eternal under the Moon. One fine day or not, plugging the iron into an outlet and waiting 5-10 minutes, you realize that it does not work. So beautiful, comfortable, familiar and still doesn't work. The way out is to throw it out and buy a new one is not the best option. It means that repair is needed. In 80% of cases, the iron can be returned to working condition. The heating element burns out in 20% and in this case it is really cheaper to throw it out and please yourself with a new purchase. For repairs, you will need the following tools:
Before starting the repair, it is necessary to assess the external manifestations of the malfunction. 99% of irons have light signals. This is, as a rule, a red light, signaling the heating process of the heating element (thermoelectric heating element). There are options with two light bulbs - green and red, in this case the green light signals that the iron is plugged into the outlet and has a voltage of 220 V, and the red one indicates the process of turning the heating element on and off. If not one of the bulbs does not light up in all positions of the thermostat, then the first suspicion falls on the serviceability of the cord. The biggest difficulty in repairing modern irons is disassembling them. Designers dictate their own rules and therefore all screws holding the structure are hidden, and it is rather difficult to find them. It is impossible to describe all the designs, there are a great many of them, but there are several general principles:
Electrical Cord RepairFirst of all, you need to remove the back cover that covers the place from where the electrical cord exits. Finding the back cover screws is usually straightforward. By removing the back cover, you can check the integrity of the electrical cord, 20% of faults are associated with a broken wire at the point where the cord exits the iron or plug.
To check the integrity of the cord, you need a tester or an ordinary dial tone (battery, light bulb and a piece of wire). One end coming from the light bulb by connecting to the pins of the plug, and the other, coming from the battery, alternately to the wires coming out of the power cord. It is not necessary to check the wire in yellow-green insulation, this is the so-called protective neutral wire. If the light is on, then the wire is in order and you need to look for the malfunction further. If the light is off, then you can be congratulated on finding the problem. To eliminate this malfunction, it is usually enough to shorten the cord by 10-15 centimeters and reconnect it to the place where these wires were screwed (having previously checked its integrity, if the dial light does not light, then the wire is damaged near the plug and must be replaced) , that the electric cord of irons is special, its wires have rubberized insulation that can withstand high temperatures. Therefore, any wire will not work here, it is needed in rubberized insulation. If the wire is normal, then you will have to disassemble the iron further. Before further disassembly, you need to sketch a wiring diagram, then this drawing will greatly facilitate your assembly. Temperature regulator repair.Having disconnected all the wires, you must try to remove the plastic case in order to get to the temperature regulator and heating element. First, remove the handle of the temperature regulator, for this we push a flat metal plate (you can use a knife) under the handle of the regulator and try to lift it up, making little effort. If it doesn't work, we leave everything as it is and look for the screws that secure the iron body to its base. There are no difficulties with the back of the case, but in front the screw is usually hidden either by a special plug or by a lid (covering the opening for pouring water into the steamer). Be that as it may, after a thorough inspection, you will still find, think of, get to this screw or screws.
By unscrewing all the screws, you can remove the case and get to the parts of the interior of your iron. Now you can continue troubleshooting further.
First, let's check if the temperature regulator is working, to do this, twist the regulator rod from one extreme position to another. It happens that the regulator is very difficult to scroll, in this case it is necessary to resort to the help of pliers and try to develop a rotation unit by turning the regulator rod several times from one extreme position to another. Having achieved ease of rotation, rub the thread of this node with a simple soft pencil. Graphite is not afraid of high temperatures and has good lubricating properties. Turn the adjuster stem from one extreme position to the other.
In one of the positions, the contact group should work (with a characteristic click). Check the continuity of the electrical circuit with the contacts closed using a continuity test. To do this, we connect one end of the dial to one contact, the other to the other and, turning the axis of the regulator, we observe the lighting and extinction of the light bulb. If the light does not light up, you need to carefully clean the contacts using a strip of sandpaper or a nail file (from a manicure set). Thermal fuse repair.Next, you should check the integrity of the thermal fuse by connecting the continuity wires to it on both sides. If the light is off, then the culprit of the malfunction and the hour of your wasted time is He. This happens in 50-60% of cases. The simplest way out of this situation is to throw out this thermal fuse, and short-circuit the electrical circuit in this place. If the main temperature regulator is in good working order, the absence of a thermal fuse at work and the safety of the iron will not be affected at all. In order to short-circuit an electrical circuit, you do not need a lot of imagination. There can be many options. This is soldering with high-temperature solder, and crimping the conductors with a copper tube (from the ballpoint pen rod), using a spring from a lighter, switching 220 V supply wires. The main thing is to achieve reliable contact of the connection points.
Iron soleplate with heating element, thermostat, steam chamber and thermal fuse (disposable) Heating element repair.If the thermal fuse, temperature regulator and power cord are in good working order, we are left with the only and most unpleasant option - the heating element burns out. In most cases, the heating element is rolled into the soleplate of the iron and its replacement is a technically rather complicated procedure and, accordingly, economically inexpedient.
However, there are designs in which the current supply conductors are not welded to the contacts of the heating element, but are connected using ferrules. Rarely, but there is such a strong oxidation of the contact points of the tips and the heating element that the electrical circuit is broken. In this case, it is necessary to ensure the reliability of the contact in this connection, which is achieved by thorough cleaning of the joints with sandpaper, a file, a nail file, etc. If, nevertheless, the heating element burns out, and you decide to throw away the once so useful and beloved iron, keep the cord from it. You may need it when repairing a new favorite iron or other electrical appliance. In the end, it can serve as a weighty argument in the difficult task of educating the younger generation. Repair of the steaming systemThe system for steaming irons has several nuances:
Repairing the steam system usually involves removing scale from your pet's internal steam cavities. During normal use of a home iron, after about half a year, there is a need to clean the steaming system. When using distilled water, this period increases several times. Cleaning your iron at home is easy enough. To do this, we need a container for water, in which we need to place it so that the water covers the metal sole by 1-1.5 cm. This container can be an ordinary large frying pan. Do not forget to set the steam regulator to maximum or to clean.
The iron should stand on metal spacers, the role of which ordinary coins can successfully perform. It is enough to lift only the back of the iron. In our case, no spacers were required, since the back of the iron rests on the edge of the pan and water can freely penetrate into the steam generation chamber. Never plug the heating iron into an outlet !!! Add table vinegar to the water at the rate of 1 cup of vinegar per 1 liter of water. after these preparations, we put our entire structure on the stove and bring to a boil, after which we turn off the stove and let the water cool down a little. We carry out this procedure 2-4 times. Instead of vinegar, you can use citric acid or descaling agents for kettles. I have tried a variety of branded iron descaling products, but none of them have achieved the same result as the method you are suggesting.
And I would rather not say anything about the price of these funds. After descaling, rinse the iron in cold water and leave it for a couple of hours to dry. That's all, now your assistant will not throw away scale flakes and leave stains on your snow-white underwear. Before starting the ironing process itself, you need to prepare workplace and an iron. The surface of the sole must be perfectly clean as lint and dust can stick to the fabric. Do not rub the soleplate while it is still hot. It is advisable to iron woolen items and dark fabrics through a special ironing cloth, otherwise it will begin to shine. It is not recommended to put on clothes immediately after ironing, because a still warm fabric tends to wrinkle quickly: hang it on a hanger for half an hour, and it will retain its shape longer. Today there are many types of different fabrics, both natural and synthetic, so before ironing a thing, look at the label, which indicates the optimal temperature regime for this type of fabric. If there are no recommendations on this matter, then first try to iron a small piece of fabric from the wrong side and, depending on this, increase or decrease the heating of the iron. Start ironing with delicate fabrics (silk, acetate) that require a minimum temperature regime, gradually move to fabrics that can be ironed at high temperatures. Start by ironing mixed fiber fabrics, look at the composition and set the iron for the fiber that requires the lowest temperature. Then proceed with silk and synthetics (by the way, artificial silk can be ironed even at medium temperature), and do not forget that it is undesirable to use the steaming function on such fabrics - the fabric may shrink and lose its appearance. Natural silk can be wetted first and ironed immediately. It is recommended to iron woolen items at moderate temperature conditions, without using steam. Fabrics such as crepe de Chine shrink quite a bit after washing, so first soak it in warm water and then iron it at about 100 ° C The easiest way is to iron cotton and linen products: they can be ironed at the highest temperature, feel free to use the steam supply. The only "but": it is also advisable to iron linen and colored cotton from the wrong side, otherwise there is a possibility of shine on the fabric. Faux fur, suede and leather should not be ironed using steam (the fibers can simply melt). Shiny fabrics can be steam ironed from the right side, while matte fabrics can be ironed from the wrong side to avoid unnecessary shine. Fabrics with pile should be ironed from the back and in the direction of the pile, and for greater efficiency, you can put a fleecy cloth under it, then the pile will not wrinkle (you can also use a terry towel for this purpose). Save timeTo make the ironing process as efficient and quick as possible, we can give you some useful tips: start ironing shirts and blouses with ruffles (if there are any), then iron one sleeve (preferably on a specially designed oversleeve), then the collar and top of the back, the back itself, and last of all - the darts. iron the pleated fabric as follows: the folds in the upper part of the skirt, at the waist, are the most difficult to iron, so just steam the fabric without pressing the iron hard against the fabric, and then hang the skirt on a hanger and let the fabric cool. iron dresses from wool from the wrong side, and pockets and trimmings from the front, but through a slightly dampened fabric. The ironing scheme is the same as for shirts: first the details, then along the entire length. to keep the arrows on your trousers for a long time, run dry soap over them from the inside out, and then iron them from the right side through a damp ironing cloth. Always carefully monitor your appearance, take care of your hair, clothes and shoes. Everyone knows that the main thing in a person is the mind, but they are still greeted by their clothes ... ConclusionNaturally, there are more sophisticated irons with an electronic temperature controller, with water supply for the pressure steaming system, cordless with a heating stand, etc. However, all the above causes of malfunctions and methods of their elimination are suitable for their repair. If the repair was not successful, we go to the store and choose a new assistant. Now let's talk about buying such a necessary household thing as an iron. Before buying, first of all decide what exactly you need an iron for. If, in addition to your own person, numerous relatives also live in your apartment, and your wardrobe is full of clothes, an iron with a maximum power (2000-2400 W) and steam supply will be indispensable. But keep in mind that such a purchase will lighten your wallet by about $ 70-80 You can even purchase a steam station that will reduce ironing time to a minimum. But, firstly, it takes up more space than a regular iron, and secondly, such devices are quite expensive, in the range of $ 120-170, which is available only to wealthy people. If you are a lonely person, then a medium-power iron is enough for you. (~ 1500 W). The weight category of the iron is no less important. It was at the time of coal and cast iron irons that linen was ironed mainly due to the heavy weight of the device. Today, there is no need for this, so the lighter the iron, the easier it will be for you to cope with it, although some people also like heavier irons. A separate item is the water tank. In this case, the larger the container, the better. The most common models are with a 250 ml capacity. The largest tank to date is 350 ml (one of the achievements of Siemens). Next, pay attention to the variety of steam functions. You should not buy an iron that does not have a constant steam supply and steam boost, which are necessary to smooth out deep creases: even if the crease has disappeared from the surface of the fabric even without steam, you cannot be sure that it will forever. Most likely, in 1-2 hours it will appear again. Be sure to ask the seller to show the detailed characteristics of the steam functions, they are also of great importance: if the maximum steam supply reaches 15 g / min, you can hardly iron thick fabric with it. It is also necessary to have an adjustment of the steam supply, since for different types fabrics require different intensities. Some firms do not specify such parameters at all. Well, in this case, one can only hope for the manufacturers' honesty. If you want the iron to serve for a long time, then it must be equipped with protective functions (anti-lime rod, self-cleaning function, etc.). Each company has different protective functions, so ask the seller what the model you like is equipped with and how these functions work. It is difficult to advise anything specific here, as they say, for taste and color ... Although I do not recommend that you buy an iron with a replaceable cartridge, because it will not be so easy to buy a spare one, it is highly likely that you will have to go around more than one store before than you will find it. So, you have already figured out for yourself which device will suit you completely. There are little things left: choose the design you like and estimate the amount that you are ready to pay for the purchase. The main thing to consider when doing this is the iron brand. Philips, Siemens, Braun, Tefal, Rowenta, Bosh are leaders in the production of household appliances. Their quality is more reliable, and the devices themselves are more expensive, $ 60-80. If you expect $ 20-30 when buying, then you should pay attention to Scarlett, Unit, Binatone, Clatronic, Vitek, Vigod irons, etc. Remember that if the iron meets all your requirements, ironing will cease to be torture, and while working with it you will get, if not pleasure, then at least complete satisfaction. I hope that reading this article will help you choose, properly operate and extend the life of such a necessary device as an iron. Igor Davidovsky 2005. All the best, write to © 2006 Imagine a situation when your favorite iron, produced by a Russian company, stopped working. The question immediately arises of how to disassemble the Vitek iron in order to repair it. If you have necessary tool, then in most cases you can restore the device's performance with your own hands. Reliable home appliances manufactured under the Vitek brand are deservedly popular among Russians. However, any device can fail. Therefore, the topic of disassembling and repairing various household appliances, including irons, is quite relevant. How the iron worksIn order to disassemble and repair an electric iron, you need to know how it works and how it works. Without this knowledge, it is useless to start repair work. Almost all steam irons different manufacturers - Philips, Braun, Tefal, Vitek and others - have the same device and principle of operation. Differences can only be in the technical performance of individual parts.
The main part in any electric iron is a sole with a tubular electric heater built into it (hereinafter also referred to as a heating element). The power of the heating element in modern Vitek irons is usually 2000W, 2200W or 2400W. The devices are produced with soles made of different materials – of stainless steel, aluminum, teflon, ceramics and others. The soles have holes through which steam is released to ensure the desired ironing quality. The heating temperature of the metal base is regulated by a built-in thermostat.
In devices with a vaporization function, a reservoir is provided into which water is poured. The liquid must be cleaned and softened - only in this case it is possible to prevent the formation of scale inside the sole. Water enters from the reservoir onto a heated soleplate, is converted into steam and exits through the holes. The intensity of vaporization is also adjustable. Most modern models have the function of forced exit of a vapor cloud with maximum intensity - steam blow. As a rule, electric irons have nozzles to spray water. The electrical connection is provided by an electrical cord that can move freely relative to the housing. Inside the case, the cord is attached to the terminal block. Thus, the construction of modern steam irons is not complicated. Even those who are far from technology can understand it. Common breakdownsDue to the simplicity of the device and operation, the list of common faults in different models Vitek irons - VT-1201, VT-1209, VT-1244 and others - the same. This statement is also true for devices of other brands, since they have no fundamental design differences. A description of the main failures is given in the table below.
This video introduces readers to typical malfunctions irons, the procedure for their diagnosis and elimination:
Preparatory stageIn order to disassemble, diagnose, repair and assemble the Vitek iron, you must have the appropriate tool. As the readers have already guessed, diagnostics are performed using a multimeter. Without this device, it is rarely possible to find and localize a breakdown. Moreover, for renovation works a soldering iron may be needed. In order to disassemble the iron, you should know that the back cover can be tightened with a screw with an original head that has a star-shaped slot with three beams (see figure). These are the screws used in many Vitek models.
With a certain skill, it can, of course, be unscrewed. If it doesn't work, you can make a snap - take a flat screwdriver of a suitable size and cut a small depression in the middle.
In general, the following tools and materials may be needed for disassembly and repair:
See also if you have such materials:
They can also come in handy when repairing your iron. Disassembly processThe work must be done in stages, adhering to a certain sequence. The following describes the disassembly procedure for the Vitek VT-1259.
For other models of electric irons of the Russian manufacturer, disassembly is carried out in a similar way. There may be differences, but they are not fundamental. Description of actions is given in the table.
In conclusion, you can add only one thing: most users can handle the disassembly of a Vitek iron of any model on their own. But repairs may require certain qualifications. VideoTo learn more about the procedure for disassembling Vitek irons, models VT-1207, VT-1229, VT-12125, see the video:
Electronic engineer with many years of experience. For several years he has been organizing the repair of household appliances, including washing machines. Loves sport fishing, boating and travel. Found a bug? Highlight it and press the buttons: Ctrl + Enter4.6176470588235 Rating 4.6 (17 votes) The principle of operation and the internal structure of the iron, at first glance, do not raise any special questions: the electric current leads to the heating of the nichrome spiral, which, in turn, transfers heat to a massive metal plate - the sole. But how do you adjust the heating temperature, steam or spray water? Modern iron models can be equipped with a variety of scale prevention systems, electronic components and regulators, the presence of which significantly complicates the design. It is not easy to understand the device of a modern iron on your own, but possession of such information can help in eliminating minor faults. Given the high complexity of the iron design, for major repairs (replacement of the coil or electronic components, cleaning the water supply pumps, restoration electrical wire) recommend contacting specialized workshops, since the device's performance after unauthorized intervention is not guaranteed. Such a common household appliance as an iron is a rather complicated device from a technical point of view. The iron circuit includes several dozen elements, the main ones of which are a heating element, a thermostat, an overheating protection system, as well as a variety of regulators, indicators and other electronic components, without which it is impossible to imagine the normal operation of a modern iron. How does a modern iron work, many models of which can be seen on store shelves today? First of all, the following components should be distinguished in its structure:
Considering each of the elements separately, special attention should be paid to the internal structure and the principle of operation of parts, since such information makes it possible to determine the cause of breakdowns and ways to eliminate them. Electrical wireAlthough at first glance, a wire for an iron is no different from a similar element of other household appliances, in its appearance and the internal structure, some peculiarities can be traced: first of all, the wire has a fabric braid, which prevents chafing of the polymer sheath during ironing. It is difficult to imagine any other device that is subjected to the same heavy loads as an iron, because when using it, you have to twist the cable several times in different directions, stretch it, bend it at inconceivable angles, and even inadvertently fold it into a knot.
The secret lies precisely in the fabric braid: it several times reduces the coefficient of friction between different sections of the cable, and also increases its rigidity. As an additional element that gives maximum reliability to the system, a plastic stopper is used, which is located near the base of the iron and is designed to prevent possible kinks of the wire.
The inner part of the wire for the iron is represented by three cores, one of which is used as a ground. This safety measure makes it possible to reduce the risk of electric shock in the event of a short circuit and to extend the life of the device. Steam supply systemMost modern models of irons are equipped with two buttons located in the front of the device: one of them is responsible for supplying steam, and the other makes it possible, if necessary, to moisten the fabric by spraying water through a special hole located on the iron spout. The transformation of water into steam takes place in a separate chamber, which is equipped with powerful heating elements. After pressing the button, the liquid under pressure enters the chamber, where it is instantly heated, and is distributed through the perforations on the sole of the iron. The use of untreated tap water often leads to excessive formation of carbonate deposits on the surface of the heaters, which naturally entails a decrease in heating efficiency, and the failure of heating elements. The appearance of traces of rust, dirt or scale chips on the fabric during ironing is an alarm signal that it is time to pay extra attention to cleaning the iron.
Outsole and heater systemNot only the quality of ironing, but also the general level of comfort when using the device largely depends on the sole, as the main component of the iron. Manufacturers of modern irons equip them with Teflon, ceramic or even sapphire soles - this technical solution allows to reduce the coefficient of friction between the sole and the fabric, thereby making ironing easier. Inexpensive models of irons are equipped with an aluminum sole, the main disadvantage of which is considered to be the excessive pliability of the metal, which often leads to noticeable scratches.
Inside the sole there is a heating element - a nichrome spiral, complemented by ceramic rings that evenly distribute heat and help keep it for a long time. The heating temperature is set by a separate thermostat, the main function of which is to timely turn off the power supply in accordance with the set mode. Thermostat and heating shutdown systemUsing the iron on various types of fabrics requires careful selection of the appropriate temperature regime.
Heating is adjusted by setting the iron rotary wheel to the required position, corresponding to the permissible ironing parameters. When the temperature reaches its maximum value, the contact opens, as a result of which the voltage supply is interrupted. How is the regulator disabled? Electric circuits of irons assume the presence of a special element - a bimetallic plate, which consists of two parts made of metals with different coefficients of thermal expansion. When heated, the metal deforms, and the differences in properties component parts the plates lead to slight deformation, as a result of which the plate is pulled up and stops contacting the electrical circuit. A similar principle of operation is used not only in irons, but also in kettles, relays for disconnecting boilers and other heating elements.
How an iron with a steam generator worksThere are two types of iron with a steam generator, at least significant. The first is a device with a built-in reservoir and a steam generation system. The second is models with a free-standing tank. It contains not only a container with liquid, but also heaters and a steam flow control system. The reservoir is connected to the iron with steam pipes. Steam generator designThe steam generator is a rather dangerous device. The risk of emergencies is unacceptable for a household appliance. Therefore, the generator design uses a whole a range of safety devices... The unit, built-in or housed in a free-standing tank, consists of the following parts:
In inexpensive models, everything works quite simply. In order to ensure an even supply of steam with constant energy consumption by the heaters, the steam generator unit is equipped with a dispenser. It works in tandem with a thermostat, supplying water as its volume depletes during evaporation and stopping this process when the temperature drops. In expensive irons with a steam generator, an emergency stop system in the form of a safety valve supplemented with manometers... In this version, the unit not only supplies steam with a constant flow more stable, but also provides greater safety. Varieties of generators based on the principle of using liquidThere are two types of steam stations. Simple option - gravity... Here the liquid is fed directly into the heating zone. When it evaporates intensively, steam is formed, which is ejected through the holes in the sole. Advanced Design - Generators pump-action type. They heat the liquid in a separate tank, where it is supplied by a dispenser. The vapor formed during evaporation is discharged by a pump. This not only ensures a stable flow, but also a controlled high jet pressure. Depending on the design, steam irons are designed for different purposes. Gravity models are not able to provide a high, controlled quality of the final ironing result. But their price tag and general characteristics are attractive to housewives dealing with a small amount of laundry. When you need an ideal, consistently good ironing result for large volumes of things, you simply cannot do without a more expensive pump model.
Professional iron with pump-type steam generator General procedure for getting started with the ironThe specific algorithm for handling the steam generator is always described in the instructions for the model. It is worth remembering that there is a danger of using this device, which operates at the same time with high temperature and pressure. Therefore, the manufacturer's recommendations should not be ignored. The general algorithm of actions looks like this:
Operating pressure in the steam supply system is about 0.35 atm (value for conventional steam generators). During heating and operation of the device, the safety structure is constantly in place. It is represented by several components. There is an integrated overheating protection in each heating element... In the event of a heater breakdown or short circuit, an electrical fuse is triggered.
Boiler safety systems A bimetallic thermostat is responsible for the temperature regime... Its contact plate changes configuration when heated, making and breaking the circuit. If none of the above measures works, steam is released through the safety valve in the cover. This is a potentially hazardous phenomenon, but it helps prevent another high risk in the form of pressure rupture of the housing and the release of huge amounts of superheated fluid over a large area. Iron function operationAll irons have a basic set of functions. This is not to say that all devices are the same. Some models can perform more operations, others are limited only to the basic list. Automatic shutdownAn iron with a steam generator has heaters and a water treatment zone, a pressure vessel. Therefore, in order to ensure fire safety all models have a built-in automatic shutdown system. It is built on the simplest gyroscope. The iron switches off:
The iron will turn itself off when idle on a horizontal surface The thermostat performs two functions at once. This is one of the parts of the iron's overall safety system, and at the same time the main function. The thermostat sets the heating level of the sole... The unit works simply: upon reaching the set temperature, it breaks the voltage supply circuit to the heating elements, and when it decreases, it closes again. Liquid and steam supplyThe simplest irons can only supply steam. More complex functions have two. At the push of one button, a stream of steam is delivered. On the second - the iron starts spray hot water through the spout for handling heavily wrinkled fabric. More complex models have steam boost. This is an extremely intense jet. At this time, the device quickly consumes water from the heating zone. Depending on the capacity of the latter and the power of the heaters, the duration of operation in the steam boost mode may be more or less.
Steam and water spray buttons Anti-drip systemIt should be understood that during pauses in the supply of steam, the liquid remains inside the nozzles on the sole. While the iron is in use, the amount is low. But if you turn it off, the whole liquid condenses... And on the next ironing, drops of water can fly out when steam is supplied. The anti-drip system serves two purposes:
The models with the anti-drip system use a shortened steam path from the generation zone to the holes in the sole. All with one goal: to minimize water build-up when not heated.
Anti-drip system helps prevent water leaking from the holes in the sole Vertical steamingVertical steaming irons have distinctive features constructions. This is the position of the heating elements, and the location of the heating zone, and the length of the steam path before ejection from the sole. The flow is less than in impact mode. But more intense than normal work. With vertical steaming comfortable to iron delicate fabric... Indeed, in this mode, the iron may not touch its surface. You can also iron things that cannot or are difficult to remove. For example, blackout curtains. Typical iron malfunctions and solutionsIron breakdowns are mainly associated with improper operation, sudden voltage drops or insufficient tightness of the water compartment, from which moisture seeps onto the electronic components of the device. It can be difficult to determine the cause of a malfunction, given the significant complexity of the design of modern irons, but there are a number of typical signs that reduce the search circle:  How to extend the life of your iron?In order for the iron to serve you as long as possible and not cause problems with its work, you should follow a few simple tips:  The main principle of operation of irons is uniform heating of the metal sole and the distribution of water vapor in the thickness of the fabric. By observing simple precautions, you can not only significantly extend the life of the equipment, but also avoid most common breakdowns.
|


| Read: |
|---|

New
- “What is the scene in a dream?
- If a child catches a parent having sex
- Dream interpretation to be in an unfamiliar city
- Collect roses in a dream. Why do roses dream. Dream interpretation of Martin Zadeki
- Whole oven baked tuna: recipes with cheese and vegetables
- Straight talk: how to conduct it
- Carl Jung's dream theory
- Monkey fold: causes, symptoms, diagnosis, treatment, correction and advice from doctors
- How to cook white beans properly
- Seeing yourself rich in a dream


