Sections of the site
Editor's Choice:
- How to tie a hijab - a traditional Islamic woman's headscarf
- Vasily Lanovoy: trial by war and death of his son
- Ksenia the meaning of name, character and fate for girls
- New life of old things: Renewing an old coat
- Types of bangs and how to cut them
- “What is the scene in a dream?
- If a child catches a parent having sex
- Dream interpretation to be in an unfamiliar city
- Collect roses in a dream. Why do roses dream. Dream interpretation of Martin Zadeki
- Whole oven baked tuna: recipes with cheese and vegetables
Advertising
| How to properly disassemble a Philips azur household iron. How to repair an iron: disassemble, consider typical malfunctions, fix them Is it possible to repair an iron |
|
Greetings colleagues! This time we will look at the insides of a home iron, we will learn how to repair the iron even when the nearest store does not have the necessary spare parts, armed only with ingenuity and a firm mindset for a successful outcome of our bold enterprise! The other day, my beloved mother-in-law handed me her next home device for repairs ”! The iron did not work at all, the cord was rewound in many places with electrical tape, worn out, tortured and unhappy. It was rubbed before copper wire, on the bends (cheap cord) because the mother-in-law decided to try herself as an electrician, then armed with electrical tape. But to be honest, it looked depressing. Disassembling a modern iron is difficult. In many places, latches, screws, etc., you disassemble and solve like a puzzle! Having disassembled the first, I was surprised at first and raised my eyebrows upward and found a lot of dust! I cleaned and washed the sole of the iron. The case was also washed with soap from stubborn dirt. The cord was immediately replaced with another, more elastic, removed from another faulty iron. When checking, I found a blown thermal fuse screwed to the sole of the iron. I did not bother looking for a new one, because in this case I thought that it was superfluous here and rather serves the interests of the manufacturer, burnout scares and frightens users, forcing them to blindly run to stores and buy new irons. Well that is as is customary today to deceive naive buyers, all over the world. 🙂 But we are not them - you will not take us unceremoniously! Take your quick wit into your hands and come out of trouble intact! 🙂 I rang the heating element (tubular electric heater) with an ohmmeter, it turned out to be serviceable, which added optimism. Since, as usual, if the heating element burns out, then you can consider the iron to be thrown away (the heating element is pressed into the sole!) Or, as in our repair business, send it to stock. Then I discovered a burnt thermostat (that which regulates the temperature in the iron), or rather its burnt, swollen, oxidized contacts (oxides do not allow electric current to flow!) And its elastic plate. There was an obvious problem on the face, since the thermostat is a rather delicate thing in setting and repairing it is fraught with many troubles and ingratitude. And there was no point in simply cleaning the contacts, since the plate on which these contacts were established was burnt, blackened, behaved and clearly faulty! After running around the shops, erasing, as they say, legs to knees, I did not find the necessary thermostat. Fortunately, I have enough time at work, raised my hand and sharply lowered it at my leisure and decided to take a desperate step - to disassemble the spare faulty iron, remove the thermostat from there (which turned out to be suitable in terms of electrical parameters!) And disassemble it to a screw, remove the plate and contacts I needed ! This is certainly not an easy matter, but for something interesting and unique! Normal masters would probably twist with a grin at their temples seeing such a repair! But this is not about me! A conventional thermostat is assembled from ceramic, washers-tablets "fastened by a tube and expanded on one side. In order to disassemble, I drilled out the flaring, removed the parts. Then he also disassembled his thermostat and inserted parts from the spare thermostat into it, carefully assembled it, having previously glued the tablets with good glue B-7000, so that it would not crumble in the hands and did not lead the parts to the sides. I did not flare (the glue successfully held the assembled structure), I managed with my own tube, because the long screw holding the thermostat is quite powerful and coped with this task quite well! I installed the thermostat in place, put on the wires, plugged it in. The thermostat fulfilled its function as cute! I used the iron while ironing the clothes, otherwise it is difficult to understand and calculate how he would behave in a real battle. " Worked well! This was the end of the repair. You saw the work processes and the results of the repair in the photo. Let's summarize. , Gol is cunning for invention "! The city takes courage"! This is how my repair came out. Good luck with creative renovations !!! How to repair an iron with your own hands. Disassembly and repair secrets. Nothing is eternal under the Moon. One fine day or not, plugging the iron into an outlet and waiting 5-10 minutes, you realize that it does not work. So beautiful, comfortable, familiar and still doesn't work. The way out is to throw it out and buy a new one, not the most the best way... It means that repair is needed. In 80% of cases, the iron can be returned to working condition. The heating element burns out in 20% and in this case it is really cheaper to throw it out and please yourself with a new purchase. For the repair, you will need the following tool: a set of screwdrivers, a tester or a battery with a light bulb. Before starting the repair, it is necessary to assess the external manifestations of the malfunction. 99% of irons have light signals. This is, as a rule, a red light, signaling the heating process of the heating element (thermoelectric heating element ). There are options with two lights - green and red, in this case the green light signals that the iron is plugged into the outlet and is supplied with voltage of 220 V, and the red one indicates the process of turning the heating element on and off. If not one of the bulbs does not light up in all positions of the thermostat, then the first suspicion falls on the serviceability of the cord. The biggest difficulty in repairing modern irons is disassembling them. Designers dictate their own rules and therefore all screws holding the structure are hidden, and it is rather difficult to find them. It is impossible to describe all the designs, there are a great many of them, but there are some general principles: The plastic body of the iron is always fastened to the soleplate with screws (I have not come across a single iron in which only plastic clips were used for fastening) The screws are usually hidden under decorative plugs, light filters for light bulbs, a water tank for the steaming system. You should always try to disassemble the iron so that after assembly it is not a shame to look at your work. Be careful not to break the plastic clips on the parts First, remove the back cover that covers where the power cord comes out. Finding the back cover screws is usually straightforward. By removing the back cover, you can check the integrity of the electrical cord, 20% of faults are associated with a broken wire at the point where the cord exits the iron or plug. To check the integrity of the cord, you need a tester or an ordinary dial tone (battery, light bulb and a piece of wire). One end coming from the light bulb by connecting to the pins of the plug, and the other, coming from the battery, alternately to the wires coming out of the power cord. It is not necessary to check the wire in yellow-green insulation, this is the so-called protective neutral wire. If the light is on, then the wire is in order and you need to look for the malfunction further. If the light is off, then you can be congratulated on finding the problem. To eliminate this malfunction, it is usually enough to shorten the cord by 10-15 centimeters and reconnect it to the place where these wires were screwed (having previously checked its integrity, if the dial light is off, then the wire is damaged near the plug and must be replaced) , that the electric cord of irons is special, its wires have rubberized insulation that can withstand high temperatures. Therefore, any wire will not work here, it is needed in rubberized insulation. If the wire is normal, then you will have to disassemble the iron further. Before further disassembly, you need to sketch a wiring diagram, then this drawing will greatly facilitate your assembly. Philips, Siemens, Braun, Tefal, Rowenta, Bosh are leaders in the production of household appliances. Their quality is more reliable, and the devices themselves are more expensive, $ 60-80. If you expect an amount of $ 20-30 when buying, then you should pay attention to Scarlett, Unit, Binatone, Clatronic, Vitek, Vigod irons, etc. The iron is one of the most essential electrical appliances in the house, however, malfunctions occur in it, as in any household appliance. For example, you plugged in the appliance, waited for a while and realized that the iron was still cold. You can cope with this problem yourself, without resorting to the help of the service center specialists. Below we will consider the most common reasons why your favorite iron does not heat up, and give advice on how to fix this breakdown. In some situations, you can understand what the problem of lack of heating is without even disassembling the unit. If you are convinced that the iron is plugged in, there are no power outages in the house, and the light indicator on the iron body is on, it means that damaged heating element iron (in other words, "ten"). Unfortunately, in this case, the forecasts are unfavorable.
The fact is that the heating element is connected directly to the sole of the iron. If the fasteners are one-piece, then most likely you will have to contact a specialist and replace the entire sole, or buy a new iron. If the heating element is attached with lugs, then theoretically it can be detached from the sole and then sand the damaged contacts with sandpaper.
However, this is far from the only version according to which the iron does not heat. Let's try to diagnose other malfunctions:
How to disassemble the iron yourselfIf you have never disassembled electrical appliances in your life, then this can be a big puzzle. In current models, not a single attachment, screw or connector is visible from the outside. What to do in this case and how to disassemble the structure? Indeed, in the Soviet, grandmother's irons, everything was arranged much easier and more understandable.
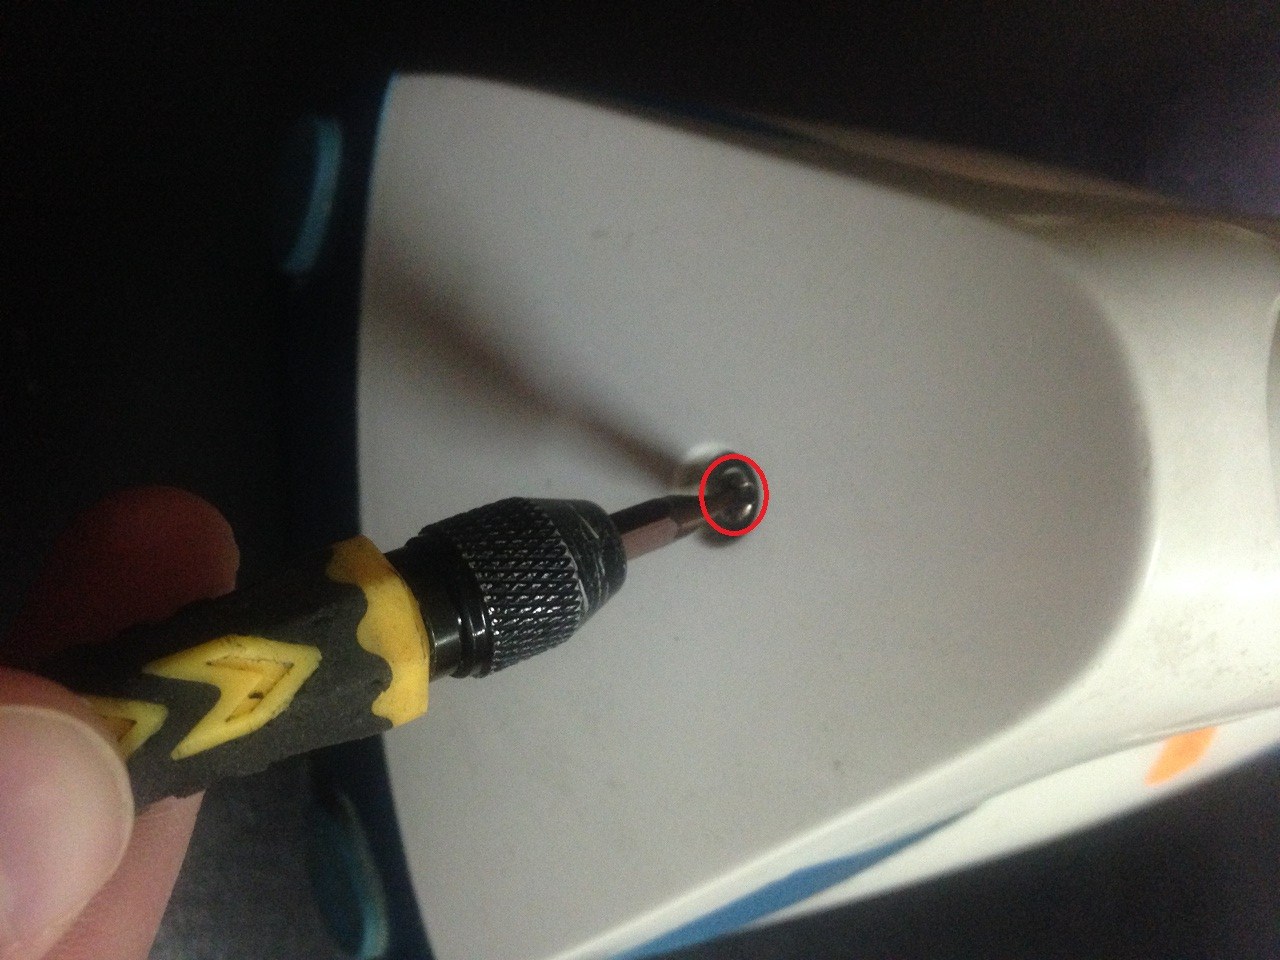
Take a close look at the body of your electric assistant. Today, the design of electrical appliances is arranged in such a way that all elements, parts are connected to each other. hidden latches... Find a flathead screwdriver and gently pry the latches. Next, you will find the same screws that hold the main parts of the iron together.
Some popular manufacturers of household appliances, such as Tefal, Philips, Brown, often use screws with branded, not quite standard heads. Here you will have to suffer a lot and pick up the right screwdriver, or even contact service center manufacturer. In order to prevent malfunctioning of the iron, it is best to take care of careful care in advance.
ConclusionSo, we found out the main reasons why your iron does not turn on or does not heat up, and gave ways to fix this problem. Whatever perfect technologies the manufacturers come up with (touch control, automatic steam supply, water supply, lack of wires), the causes of the malfunction are universal for almost all irons. This may be a poor contact of the power cord, a malfunctioning heating element, a broken fuse, or banal dusting of the contacts. If you were unable to diagnose yourself, seek qualified help, but do not forget that repairs are an expensive process, and in some serious cases it will be more economical to purchase a new electrical appliance. An iron is a fairly simple household device, consisting of a heating element, a light bulb showing the operation of the modes, a water container used for steaming, a control button and a handle. It is a basic necessity, it cannot be replaced by something else. Therefore, its breakdown is so unpleasant. If you have the iron stopped working, do not repair it yourself, because it is not entirely safe. In addition, it is important to correctly define causes of iron breakage... If determined incorrectly, there is a high probability of damage to the rest of the device. Consider the frequently encountered causes of iron breakage:  So, the iron has broken. What to do?
Our specialists carry out repairs of irons of the most varied complexity, regardless of what they were causes of iron breakageand offer services to repair any damage. Today we will figure out the very unpleasant situation when the iron stopped heating up. The iron has become an integral part of everyone. Using the vitek vt 1259 iron as an example, I will tell you how to find out why the iron does not heat up. For disassembly, we need a screwdriver, a metal spatula, and then everything will depend on why the iron does not heat up, the reasons. First, we see one bolt on the back of the iron; you can unscrew it using a flat screwdriver with a hole in the middle. Now we are looking for the rest of the bolts to disassemble the iron. We remove the buttons on the iron handle, for this you need to pry with a spatula, but carefully so as not to break the fasteners. There is a bolt under the buttons, we unscrew it using a Phillips screwdriver. You can already remove the upper part of the iron handle, pry it along the seam with a spatula and snap off the latches. We also unscrew all the bolts that we see. In the back of the vitek vt 1259 iron, we unscrew all the bolts, except for those that hold the power cord, these two do not need to be unscrewed. Otherwise, the cord will hang and simply interfere with our further actions. In the front part, near the spout, we also see the bolts, unscrew them. We unscrewed all the bolts along the body, you can raise the body. We will soon find out why the iron stopped heating up. When we raised the body, we found three more bolts, we also unscrew them. We remove the upper part, only the sole remains. So how do you know why the iron is not heating? The sole has a thermostat and a thermal fuse. The thermal fuse is in a white case, you need to get to it, you can't move the case to one side, so you can just cut it in half and push it apart. When we got to the thermal fuse, we put the tester in the dial mode and check if it should ring. The thermal fuse does not ring for us, which means that it is not working properly and needs to be replaced with the same one. We found out why the iron stopped heating. We install a new thermal fuse and turn on the iron, it immediately began to heat up. Good luck to everyone in the repairs. |


| Read: |
|---|
Popular:
Delicious fluffy omelet in the oven
|
New
- Nutrition for stomach ulcers during an exacerbation
- How to be confident in yourself: advice from a psychologist, practical recommendations
- Harbingers (first signs) of stomach cancer
- What determines the gender of the child
- What is periphrase examples
- Which food contains calcium?
- Determining the number of children by date of birth
- Work horoscope for April Gemini
- When is the best time to conceive a child?
- Greedy man psychology


