Sections of the site
Editor's Choice:
- Pain in the liver: why do they occur and what to do to eliminate them?
- How to publish your book in Russia - printed or electronic?
- Nutrition for stomach ulcers during an exacerbation
- How to be confident in yourself: advice from a psychologist, practical recommendations
- Harbingers (first signs) of stomach cancer
- What determines the gender of the child
- What is periphrase examples
- Which food contains calcium?
- Determining the number of children by date of birth
- Work horoscope for April Gemini
Advertising
| The timer for watering electronic verve instruction. Do-it-yourself timer for watering: tips from a wizard for making a device |
|
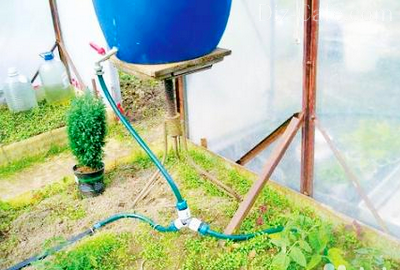
Drip irrigation for your garden
What is drip irrigation? It is an efficient and economical watering method. This irrigation method gives over 90% efficiency of the water used. Unlike sprinkler irrigation methods, which are only 65-75% efficient, drip irrigation reduces leakage and evaporation. Drip irrigation delivers water very slowly to the root of the plant, just where it is needed. Drip irrigation is used in greenhouses, nurseries and agricultural firms. Be that as it may, regular home owners can take advantage of the use and benefits of drip irrigation. As a homeowner, you can use drip irrigation for your vegetable and year-round gardens, trees, flower beds, and flowers. The benefits of drip irrigation Tubes with a lot of droppers, called drip lines, are placed above the ground along the plant beds. Droppers slowly let water into the soil into the root zone. As the moisture level is kept at an optimal level, the plant's growth productivity and quality are improved. Plus, drip irrigation: Prevents disease by minimizing water contact with leaves, stems and fruits of plants. Allows the beds between plants to be dry, improves access and reduces weed growth. Saves time, money and water thanks to its highly efficient system. Reduces labor costs. Increases efficiency even on uneven surfaces. Reduces water leakage and fertilization below the root zone. Drip irrigation system assembly and components. The main components of a drip system are a faucet or automatic controller, a filter, a main line, auxiliary lines, connectors and fittings, drip lines and plugs. The main line is connected to a water source - to an external tap - and then, through an auxiliary line, to drip lines. Basically, construction lines are used if you have many watering zones. The total length of the main line and auxiliary lines should be no more than 120m. The tap regulates the water supply to the system and can be operated either manually or automatically (if an electrical controller is connected). A pressure regulator is required if the pressure can exceed 2 bar. Filters prevent droppers from clogging up with substances undissolved in water during a long time of use. It is best if the filter has a filter mesh of at least 120 MESH or higher. Adapters and filters are used to connect drip lines to the remainder of the system. This is important as it is the correct size to prevent leakage when pressurized water supply. Drip lines and drippers The drip line is a polyethylene tube with built-in drippers to be located near the plants. Drip lines and drippers come in different types and diameters depending on your needs. The length of each drip line 16 mm / 33 cm / 2.1 l / h should not exceed 50 m from the point where the water enters the tube so that the emission uniformity is 95%. You will need to reinforce the line to prevent it from moving. Typical mistakes The following points are provided to introduce you to some common mistakes that occur when designing and installing a drip irrigation system. Drip line too long or too many droppers: The Tandem drip line contains drippers that are pre-installed at the factory every 33 cm and each dripper consumes 2.1 l / h (at 1 bar pressure) The maximum recommended length is about 50 meters on a flat surface in order to have an equal flow with 95% uniformity or a maximum of 80 meters for 90% flow uniformity, which already means that an emission difference of up to 15% is possible between the first and last dropper in the line ... Since the Tandem drip line has 4 outlets per drip chamber, this contributes to better flow and better stability against clogging.
Filtration:
... Incorrect zoning: "Zoning" is a grouping of a large drip line in common "zones". Zones are usually grouped by plant type. The trees are separated from the flower beds. Plants resistant to dry climates are separated from moisture-loving plants, etc. if you have different types soils, you can also separate them into separate zones. The main thing you should remember is the ability to water each plant according to its needs with the system turned on? If you place a large tree on the same line as a small flower bed, one of them will be either too dry or too wet. ... The drip irrigation system can be connected via an automatic regulator. Since a small amount of water is delivered slowly, drip irrigation is designed to function throughout the day, excluding rainy days. The question of how long to use drip irrigation depends on how much water your plants require per day and how much flow the drip outlets have. Water is served once or twice a day. The best time to water is early in the morning, as evaporation is lowest during this time. ... Water Demand: You should know the water demand according to the evapotranspiration factor (Evaporation rate in the area you are in and plant transpiration). If, say, the total evaporation is 5 mm per day in the hottest month, we calculate this data based on the size of the zone we wish to water, i.e. 100m2: 100m2x 0.005m \u003d 0.5m3 per day is the water demand every day. This is an accurate calculation of the amount of water you need to apply every day through the drip system. You can water every two days, doubling the amount of irrigation water, or even every 3 days, tripling the amount of water. You also need to adjust the system in months that are not so hot The usual way to do this is through trial and error. Adjust system usage times and daily schedule for the entire season. The main thing is the need to observe the plants and pay attention to their needs. You need to do more than just install the drip system and go into the house. You should check your system periodically to make sure it works fine. Beginning of work If this is your first time installing a drip system, we recommend trying one of the kits. Each kit contains everything you need to install a working drip system. All parts can be purchased separately for later addition to the system. Place insulating tape around the threaded connection of the Greentimer controller Wrap insulating foil around the filter thread Connect the coupling
Unscrew the 16mm tube and cut when it reaches ground level Connect the elbow to the other end of the 16mm tubing and then to the drip line Connect the Tandem drip line to the knee. Install a Tandem drip line along your plant line Use a T-joint to follow the contour of your plants Close the end of the drip line by bending the tubing and installing the double clamp Planning your system
Start by making a sketch of the area you want to water. Make sure to include locations for trees, bushes, vegetables, and natural shelter. Prepare a list of your plants by category, i.e. natural shelters, bushes and trees. Based on plant size, category and density, you will be able to determine the required drip flow rate. Show on paper the location of the site's water resources, obstructing walls and paved areas. This will require measuring the area you wish to water.
Each type of soil will require a separate layout. On sandy soil, water tends to seep down, so we recommend using closely spaced or large volume drippers. In loam, the water will move slowly and spread evenly, so you can use fewer drippers with more distance between them. The relationship between soil and water
EXAMPLE OF GOOD IRRIGATION UNIFORM  WASTE WATER
Field moisture capacity is a method of measuring the volume of water retained in the soil despite the action of gravity. If the soil is saturated with rain or watering and then dries freely within 24 hours, the soil is usually at the field water capacity. For most plants, soil moisture content at the field moisture capacity is the ideal moisture level for vegetative growth because there is a good balance between soil moisture saturation and weathering. The soil will lose a small amount of water after it dries out to field capacity if there are no plants on it. Plants will remove water through transpiration and reduce moisture in the soil. On hot days, plants can use water faster than the soil can supply the roots, or faster than the roots can supply water to the rest of the plants, and the plant will wither. Usually, with sufficient moisture in the soil (which you can maintain with your irrigation system), the plant will recover overnight. Calculation of the total volume of consumption
SteleCables ★ ★ ★ ★ ★ Drip irrigation and watering timers: what is it and where and why to use it?Drip irrigation - this is the most perfect way of watering plants in the beds in small doses, while:
What is drip irrigation and its automation in simple words
and that's it! You just have to add water to the barrel ( better pump) and weed. Where did drip irrigation come from and the scope of its use: The essence of the simple operation of drip irrigation is described above, but it is important to understand that its application is so universal that it is suitable for the entire garden: from watering strawberries to open ground to greenhouse plantings. Optionally: ★ All from one barrel. Price and types of irrigation systemsBy water supply source:
Assembly diagram of drip irrigation "Beetle" (below)
 Drip irrigation kits pricesPlease note that for starters, the price depends on the length of the main hose and the number of bends with droppers: from 10 to 18 m (for 30 or 60 plants). Such sets cost from 1000 to 2000 rubles. There are also additional kits to expand the standard configuration, for example, "AquaDusya +12". Drip irrigation set Beetle for 30 plants per container set for drip irrigation "Greenhouse" for 30 plants (1 bed of 6 meters) in a box. Buy 1 130 Expansion kit AquaDusya for drip irrigation systems +12designed to expand standard irrigation kits Buy AquaDusya drip irrigation set + 60everything you need to organize non-automatic irrigation of 60 plants Buy 1 800 And when and how does the automatic irrigation switch on and the options for its application?Yes, what matters is WHEN to start watering. It's not for you to walk with a watering can or a hose for irrigation, but just after a few days of absence from the country, come and see that all plants and trees are watered. First you need to solve a few simple calculations:
For example, in accordance with GOST, the watering rate is 3-6 liters, depending on the soil, and on a hot day - 10 liters per 1 sq. DETAILS
IT'S IMPORTANT TO KNOW : The difference is that the timers simply "set the cycle", most often they set the watering interval by day for a week (eg 2 days in hours) and with the duration of watering (eg 60 minutes). AND programmers (controllers) are able to set both interval and duration up to date and time. What are the watering timer
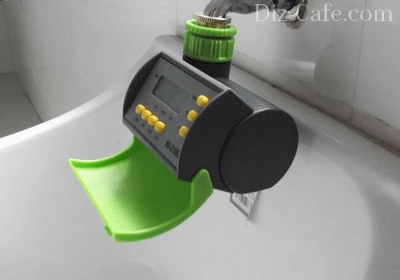
Green Helper Automatic Drip Irrigation Set GA-010 Watering frequency from 1 time per month to 10 times per day. Watering time from 1 to 99 seconds Buy Many owners spend a huge amount of time watering, while using more water than the plants need. It is especially problematic to irrigate regularly far from home and fields. It was for such purposes that a special timer watering, which we will talk about in this article. Let's figure out how the device works, what it is used for, whether the price really matches the benefit. What is it and how does it work?Let's start with what the automatic watering timer is. The design can be of different shapes, but most often it resembles a water meter that everyone has in a private house or apartment. The device is intended both for supplying water for irrigation for a certain time, which is set by a timer, and for programming irrigation for each day of the week. At the same time, the program is not limited by anything, and if you understand the action system, then you can program a separate watering option for each day, while setting a different time and duration. Important! The set programs are retained when the batteries are changed. The timer works as a shut-off valve, which is connected on one side to the pipe to which water is supplied, and on the other side a regular irrigation hose is attached. The design provides for a nozzle for the garden hose, so you don't need to buy anything extra. At the moment when it is necessary to produce, the device opens a valve, like a ball valve, and water is supplied to irrigate the site. It is worth noting that not all watering timers have software that will allow you to program actions, so be sure to check the capabilities of the device when purchasing. Also note that the watering timer, although it has a similar shape, does not function as a water meter. Device typesMechanicalA mechanical timer has a clock device that was used in the first microwave ovens or mechanical watches. The watch device works on a spring and can provide continuous watering for up to one day. In this case, any adjustments are made manually. Such devices lack a dial or screen, as well as the ability to program actions. Did you know? The first prototype of a timer and stopwatch was invented back in 1720. The device could record time intervals with an accuracy of 1/16 of a second. ElectronicThe electronic version, as you might guess, has an additional programming function that allows you to spend more time doing other things than watering the vegetation. These options are best suited for areas far from home. Since some crops require daily watering, the purchase of such a timer will pay off almost instantly, given the cost of gasoline and the time required. The electronic watering timer allows you to set actions for one week, while the maximum watering duration is 2 hours. All tasks are set in advance by a person, after which the system works according to a given scenario. Such devices have an average price and fairly good functionality that allows remote irrigation. The most advanced version, which has up to 16 programs. Any watering action is set. You can also irrigate different plants from one timer, while setting a specific watering time for each. To make it easier to understand what the difference is, let's compare the cheapest microwave and microwave oven with all possible "bells and whistles." Yes, each of them can reheat or cook food, but the more expensive option gives you more choice that allows you to cook absolutely any dish using only a microwave oven, which will replace the oven, grill, gas oven and even. So it is with electronic timers with software control. They allow you to irrigate all crops at once, using at the same time for each of them its own time and its own volume of water. Such a system works without any human intervention. Did you know? The first electronic watch appeared in 1971. They were equipped with digital LED indication. Selection rulesTo begin with, it is worth deciding what exactly you need, since the functionality of the device and, of course, its price will depend on this. If you are reading this article, it means that you are interested in this device, or there is a need for such a sensor. Therefore, it is worth considering all the options, as well as explaining their usefulness in one case or another.
Important! If the device runs on batteries, then, on average, they will be enough for 1500 on / off switching. It makes no sense to use the most advanced option in open fields, since the entire functionality of the device will not be revealed. And given the cost of the device, its loss or breakdown can hit your pocket hard. After all, it is worth understanding that the more electronic filling in a device, the more vulnerable it is to external factors. Now it's worth talking about which device to take for the plumbing system, and which watering timer to choose for gravity systems. To begin with, these timers differ in the mechanism for opening and closing the water supply. In one case a solenoid valve is used and in the other a ball valve is used. The solenoid valve opens only at a pressure of at least 0.2 atmospheres. Used for centralized water supply, as it can withstand high pressure. Also, a similar valve protects against air supply during the time when the water is turned off. It is used for gravity systems, that is, for irrigation from any container (barrel). This option is better suited for watering greenhouses and greenhouses, since a fixed amount of water is used. Ideal for drip irrigation systems. Works at pressures from 0 to 6 atmospheres. Number of valves. Above, we wrote that advanced timers allow you to set the watering scenario for different crops. In order to do this, you need to purchase a device with multiple valves. At the same time, a separate time and duration of watering for each plant is programmatically set. It is useful to use multiple valves in a greenhouse, as it is important to maintain a constant microclimate in order to get a good harvest. Additional features. A rain sensor, an additional filter and a mini pump can be connected to the electronic versions. The rain sensor, as you already understood, is used so that our timer does not flood the area at the moment when it's raining... An additional filter is used only for drip irrigation to avoid blockages in the system. A mini-pump is needed when water is supplied from a tank, and the pressure is 0 atmospheres. How to connect and use the deviceAfter connecting, we begin to understand the principle of operation. The simplest timers are enough to "wind" like a clock, after which the water supply will begin. Complex options have multitasking, which requires a complete study of the instructions. Assembling the deviceAfter opening the original packaging, read the instructions carefully. Also pay attention to which way the water supply arrows point. If you ignore this aspect, then you will mount the device in reverse. After you have picked up everything you need, you need to connect the pipe to the inlet. To do this, remove the protective ring, put the pipe on the "nose" and twist the ring, which should fix it. Next, we look at the outlet diameter. Most often, there is a special nozzle on the timers, which is used to connect the watering hoses. If the diameter fits, then we simply put the hose on, if not, we buy the nozzle of the required diameter. After connecting the hose to the outlet, the installation of the simple timer is complete. To mount advanced drip irrigation devices, additional steps are required, which can also be described in the instructions. Additional adapters, bushings or tees may be required depending on the irrigation system you are using. Timer settingAfter connecting the device to the system, you need to insert the batteries or connect to the network (some timers only support connecting to the mains). Next, the dial will light up, under which the buttons are located. Most devices have two buttons that allow you to increase or decrease a numerical value, a button that sets the day or month, as well as on / off buttons for the device. There is a "Start" button that launches an algorithm of actions. Depending on the configuration and manufacturer, the number of buttons and the actions for which they are responsible may differ, so we have provided general data. To set the timer, you need to enable it. Next, set the current correct time by which the device will navigate. Next, you need to create a script for each day. To do this, select the day, after which we set the watering time first, and then its duration. After that, we switch to other days. If you have an advanced version, then it gives you the opportunity to create a script for a whole year. This opportunity is perfect for. After complete configuration, you need to press the "Enable" or "Start" button, and the unit will start sequentially executing the script. Important! Electronic timers have no initial settings, so everything is manually programmed for personal needs. Features of operationNow let's talk about how to properly operate the device so that it lasts longer. To begin with, you should only use high quality batteries if you have an electronic device. In this case, the batteries must be 1.5 v, or a different voltage, if described in the instructions. Today, to facilitate the care of plants, various irrigation systems are used, they make it possible to control the amount of water for each type of plant, apply drip irrigation or sprinklers. Water is saved, the most favorable conditions for development are created for plants. The only drawback of such systems is the need for constant monitoring, switching on / off is done manually. This is a rather unpleasant activity, the duration of watering, depending on the type of plants, climatic conditions and the specific system, can be up to two hours. In order to solve this problem, you should install a watering timer for gravity systems. First, you need to explain the concept of "gravity systems", otherwise in some sources you can find funny explanations of the principles of their operation and a complete lack of understanding of hydrodynamics.
Automatic systems for watering the garden - diagram There are experts who claim that irrigation timers for gravity systems are so good that they can work with water pressures from 0 to 6 atmospheres. They will work at zero pressure, only nothing will be watered. Gravity is not a physical concept, but a purely everyday one. And it means not the absence of pressure, but the absence of constantly operating water pumps. In gravity systems, the pump supplies water only to the storage tank, which is located at some distance from the ground. Due to the height difference between the upper level of the water and the place of its exit, pressure is created, it is this pressure that makes the water flow move. Why are timers used in most cases for gravity systems? Because they cannot work at high pressures, their closing valves are too fragile and their drive mechanism is weak. For most devices, the maximum water pressure cannot exceed 0.5 atm., For such a pressure, a container with water should be at a distance of five meters from the earth's surface. The vast majority of irrigation systems have storage tanks located much lower.
Timer typesThree types of timers are currently available for purchase:
Mechanical timers are rarely used, most often irrigation systems are controlled by one of the types of electronic devices. The water supply is regulated by a solenoid (electromagnetic) valve or a ball valve.
Timer for watering on 2 lines, mechanical "Expert Garden"
Mechanical electronic timers (tumbler type)Very easy to operate, reliable and durable devices. To select the operating modes of the irrigation system, you must perform the following steps:
Manufacturers complete with a timer implement a complete set of fittings for connecting plastic pipes or flexible hoses of various diameters. The timer is powered by two AAA 1.5 V AA batteries.
Watering timer - photo
Electronic timers with software controlMore modern devices have significantly advanced functions. The delivery set includes adapters for connecting pipelines and flexible hoses of various diameters. Setting up software control runs like this:
A fairly large capacitor is installed inside the device. It is designed to signal a critical discharge of batteries and switch the timer to autonomous power mode. When the battery power is low, a warning signal will appear on the display. From the time of its appearance, the batteries can still work for 2-3 days, depending on the frequency and duration of the irrigation system. In fully autonomous mode, the condenser can provide a timer for 3-4 days. If the batteries are not replaced during this time, the timer will be canceled. After that, all previously set watering modes will be erased from memory, you will have to repeat the installation steps from the very beginning. In standby mode, the timer consumes no more than 1.2 mA, during operation, the current consumption increases to 350 mA. These are very small values, allowing the device to operate on batteries alone for at least a season. Manufacturers deliberately left this time, during the period of the annual routine inspection of the irrigation system before starting it is recommended to install new batteries.
There are models of timers designed to work on large and complex irrigation systems. They have several valves, which allows you to control the irrigation modes of several separate zones, for each of them its own parameters are set. Multi-valve devices can be connected to a voltage of 220 V or have up to eight AAA 1.5 V batteries. What data should be taken into account when configuring sensorsThe conditions for growing plants largely depend on the correct setting of the timer program. What should be considered? Breakdown of the irrigation area into separate zones, taking into account the types of crops. Each of them has its own requirements, in some cases you will have to buy multi-valve timers. Hydraulic calculation based on maximum water consumption. Timers should take into account the total storage capacity. If there is no automatic pumping, then you need to independently control the presence of water and, if necessary, fill the containers. Analysis of the trace of the laying of irrigation systems. Large differences in the height of individual irrigation lines can have a significant impact on their productivity. When setting up, you should keep in mind not only the watering time, but also the amount of water that is supplied to the plants during this time. After completing the installation of the timer, it is recommended to check the system performance. For this, the minimum activation periods are set, the correct operation of the valve drives is checked. If the timer is in normal mode, you can start specific programming and put the system into automatic mode of operation. The process of installing the timer program will be much easier if you purchase additional sensors with it.
Additional timer featuresElectronic timers for sensor-assisted irrigation can perform several additional functions, making it even easier to grow crops in greenhouses or outdoors.
Additional monitoring and control devices can be purchased together with the watering timer or separately.
Video - Watering Timers for Gravity Systems
One of the conditions for the full growth and development of plants is timely watering. But not always, due to the employment of the owners and the remoteness of the site from the city, it is possible to provide it. Setting a timer will help to solve the problem of creating optimal conditions in compliance with the humidity regime. This device will not only simplify the care of green "pets", but also have a beneficial effect on the quality of the crop. The device you need on the farm can be purchased at a gardening store, or you can make a watering timer yourself. How to choose the best option models or make a simple device on our own we will consider in the article. The Water Timer is a single or multi-channel shut-off mechanism that controls the water pump. It opens at regular intervals, allowing water to flow into the irrigation system.
Drip irrigation systems provide an opportunity for several days or even weeks not to appear on the site, without worrying about your seedlings The automatic watering timer in one fell swoop solves a lot of tasks:
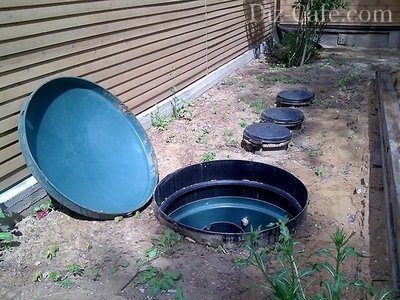
For ease of maintenance, water supply timers are placed together with other equipment in plastic boxes installed underground.
In order to be able to quickly access devices, such boxes are equipped with a removable hatch or a tightly closing lid. According to the counting principle, timers are divided into single-action devices (with a single actuation) and multiple (when they are triggered several times with pre-set shutter speeds). Depending on the type of mechanism used, the timer is:
Both devices are multi-channel designs. The mechanical irrigation timer is simple in design and lacks power supply wires. This significantly reduces the cost of the device.
A mechanical timer, in comparison with an electronic analogue, has a more limited duration of a given cycle In the mechanical timer, it is enough to set the watering cycle by selecting the interval. With an electronic model, it is somewhat more complicated: first you need to set the date and time, and only after that choose the program that is optimal for the grown crop. Many have noticed that in the water supply systems of suburban settlements in the daytime, due to intensive water intake, the pressure decreases. By setting the automatic watering timer, you can schedule evening and night time irrigation. Depending on the modification of the device, the timers can have an internal or external "normal" pipe thread, and are also equipped with quick-release hose connectors or quick-connect connectors with an irrigation system.
The most expensive models have additional functions, for example, moisture determination, depending on the indicator of which irrigation is automatically reduced or extended. Water Timer Manufacturing OptionsWhen planning to equip an automatic irrigation system on the site, it is convenient to use water timers to control taps. With their help, the water supply system can be made absolutely non-volatile, avoiding the use of any electronics. Construction # 1 - timer with drip-wickThe fibers of the wick, being saturated with moisture, lift it up to a certain height, preventing the water from quickly evaporating. If you throw the wick over the side of the container, then the absorbed water will simply drip from the free end.
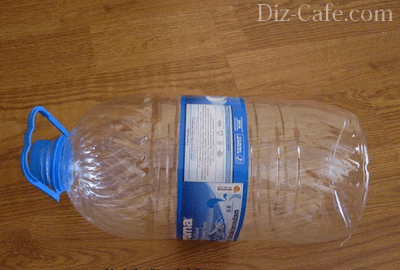
This method is based on physical laws that create a capillary effect. It occurs when a fabric wick is lowered into a container of water The moisture throughput can be adjusted by adjusting the thickness of the wick, the tightness of the twist of the threads and pinching them with a wire loop. To equip the timer in a container with low sides, the height of which does not exceed 5-8 cm, set five or ten-liter plastic bottle... One of the key conditions for the operation of the system is to maintain the liquid level in the tank at a constant height. The optimal ratio of capacities is easiest to determine experimentally.
The determining factor in his work is the water column. Therefore, the height of the bottle and the depth of the wide container are interrelated things. A small hole is made in the bottom of the bottle for water to flow out. The bottle is filled with water, temporarily covering the drain hole, and sealed with a lid. The filled bottle is placed in a trough. Water seeping through the bottom will gradually flow out, stopping at a level when the hole does not hide under the thickness. As the water is consumed, the water flowing out of the bottle will replace the losses.
The wick itself is easiest to make from a rope of suitable thickness or a bundle twisted from a piece of fabric. It is placed in a container, correctly distributing the ends The main advantage of such a timer is that due to the same water level in a wide container in case of rain, the replenishment of moisture loss from the bottle will be suspended. Craftsmen who have already tested such a device in practice claim that a five-liter bottle with a flow rate of 1 drop / 2 seconds is enough for 20 hours of uninterrupted operation. By choosing optimal size bottle that acts as a water column, and by adjusting the intensity of the droplet, you can achieve the effect of many-day delays.
Construction # 2 - Ball Valve Regulating DeviceIn the water timer, the response time is driven by the drop. The water flowing out of the ballast tank reduces the weight of the structure. At a certain moment, the weight of the container is no longer enough to hold the handle of the shut-off valve, and the water supply starts. To equip a water timer you will need:
For the smooth functioning of the system, it is advisable to modify the ball valve by attaching a small pulley - rocker arm to the handle fixed by means of a screw. This will allow the valve to be moved from closed to open by changing the angle of the handle. The pulley is constructed from two identical plywood circles, gluing them together with planes with construction glue, or metal, connecting them with bolts. A strong cord is wound on the pulley, making several turns around it for reliability. When constructing a lever, the cord pieces are firmly fixed at its edges. A weight-ballast and a container with water that compensates for its weight are tied to the free ends of the cord from opposite sides. The weight of the load must be such that, under its weight, the crane comes into a lever state.
It is convenient to use five-liter plastic bottles as cargo ballast and a container with water that compensates for its weight. The easiest way to adjust the weight of containers is by pouring sand into one of them and pouring water into the other. The role of a weighting agent can also be played by metal chips or lead shot. The container with water will serve as a timer. To do this, a tiny hole is made in its bottom with a thin needle, through which water will seep out drop by drop. The flow time will depend on the volume of the bottle itself and the size of the hole. It can range from a few hours to three to four days. To power the device, the irrigation container is placed on a flat surface and filled with water. The bottles, suspended by the ends of the cord from the pulley, are also filled: one with sand, the other with water. If the weight of the filled bottles is equal, the tap is closed.
As the water is scooped up, the container loses weight. At a certain moment, the ballast weight, outweighing the partially emptied bottle, turns the tap to the "open" position, thereby starting watering There are situations when it is necessary to get the full opening of the tap, bypassing intermediate positions - the so-called toggle switch effect. In these cases, a little trick will help: in the closed position of the crane, the edge of the thread is attached to the weight, which will act as a safety device, and its free end is fixed to the crane. When the mechanism is closed, the thread will not experience any stress. As the container with water is emptied, the load will outweigh, but the safety thread will take on the excess weight, not allowing the ballast to move the valve to the "open" position. The thread will break only with a significant overweight of the load, instantly switching the tap and providing free passage of water. To bring the system to its original state, it is enough to simply remove the load or fix it in a suspended state by removing the tension on the cord. The system is ready for operation, it remains only to fill the watering barrel and timer with water before leaving and hang the ballast, securing it with a thin thread. Such a device is easy to manufacture and easy to maintain. Its only drawback can be considered a single actuation. Other ideas for creating mechanical timers can be found in the thematic forms. For example, some craftsmen use a cylindrical plunger with polyethylene granules in oil as a working body of a timer. The device is adjusted so that when the temperature drops at night, the displacer is retracted, and the weakened spring opens the valve. A diaphragm is used to limit the flow of water. In the daytime, the polyethylene granules warmed up by the sun's rays increase in size, pushing the plunger back to its original position and thereby shutting off the water supply. Construction # 3 - electronic timerCraftsmen with basic knowledge of electronics can build a simple model of an electronic timer. The manufacturing guide for the device is presented in the video clip:
|


 Drip irrigation in the modern world is considered an invention of Israeli farmers who still manage to supply vegetables and fruits from their arid greenhouses around the world (including Russia). Although, the type of watering appeared much earlier, just a sample


| Read: |
|---|

New
- Vladimir Mayakovsky - Left March: Verse
- What is happiness in Ivan Ivanovich's opinion
- My words are dry leaves. "Lilichka!": The Story of Vladimir Mayakovsky's Most Passionate Poem. Echoes of Furious Love
- "He breathed life with nature alone ...": a literary portrait of M
- What is the work of gooseberry
- Read the short story first love turgenev
- "A wonderful city will sometimes merge ..." E
- Cospect and presentation of a lesson in chemistry on the topic "Carbohydrates
- Who are aliens - secrets of UFOs First appearance of UFOs
- Princess Olga's legendary trip to constantinople took place


